Pages

Friday 30 April 2021

Sweet Duck

  DT Claudia here,  happy Friday  crafty friends! I couldn't resist and I created another card with this fantastic stamp Lucky Ducks!!!


 For this card I created a night background with many stars with the Distress


I wanted to use this beautiful sentiment so I put a four-leaf clover in my friend's hand.

I like this set because it has many useful elements to build our scenes !!!

I hope you like my card, and I wish you a good creative ween end !!

Don't forget to use the code T4TCLAUDIA10 to get a FANTASTIC 10% discount!!!

Paper Hugs Enclosed


Happy Friday, DT Annalisa here sharing a shadowbox card featuring some older Time For Tea Designs products, as well as the new Brighter Days 6x6' Paper Pad. This is such a beautiful paper pad with so many terrific patterns.

To start, I used my Brother Scan N Cut SDX125e to cut a card base design from Lori Whitlock's SVG Shop (shadowbox card front flap hedgehog), which I adapted to create my card. I used several Time For Tea products for the inside of the card, including Up, Up & Away, Treat Yourself, Windmill Add On die, Happy Mail Critters, Mum & Dad Coordinating Die set.


I stamped, coloured (with Copics) and die cut the critters and other elements. For the fence and pots, I used some grey paper (fence), patterned paper (from the new release) and Distress Oxide in Mowed Lawn (green bush top). I assembled the inside of the card first, starting with adding the fence, grass (which I stamped the sentiment on) and pot, which I adhered to the card using liquid glue. Next, I added the hot air balloon bunnies, followed by the mouse, worm, flowers and die-cut heart. To finish off the inside, I added the clouds, the bee and the butterflies.
 

I cut out the beautiful pink bee patterned paper with the A2 Nesting dies and placed it on top of the blue card base for the front of my project. I stamped and coloured the bunny in the hot air balloon (with some masking to remove the second bunny) from the Up, Up & Away Clear Stamp Set. I cut it out and glued it to the patterned paper as well as some white puffy clouds. I also used the other bee from the All Occasion Critters Clear Stamp Set. 


I die cut the Paper Hugs Sentiment Die from some white card stock and used liquid glue to adhere the 'paper' sentiment to the patterned paper. To complete the front of the card, I stamped and die cut the 'Hugs enclosed' sentiment using the Be Kind Be You Clear Stamp Set and the coordinating dies.

Use code T4TANNALISA10 when you visit the shop to get a 10% discount on your entire order.


Thursday 29 April 2021

Hoppy Friends

Afternoon crafy friends. It's Thursday which means it's time for my usual DT post. I know we are all loving the new release products so I had to share another of my creations using the new bunnies..


For this card I used the Blossoming Bunnies Stamp Set. I coloured each of the images with copics and cut them out. I used the Scene It Stencil to create the clouds along with a little pink ink. I created the hills with the Landscape Edge Dies and somelightly blended green ink. I added the stamped and die cut sentiment which is from the same bunny set, it coordinates perfectly. To finish I added some Clear Drops.

As always, please feel free to use my discount code T4TKITTY10 to get 10% off your order. Thank you for coming by today to check out my card, I will be back next week another card for you.

Kitty xx

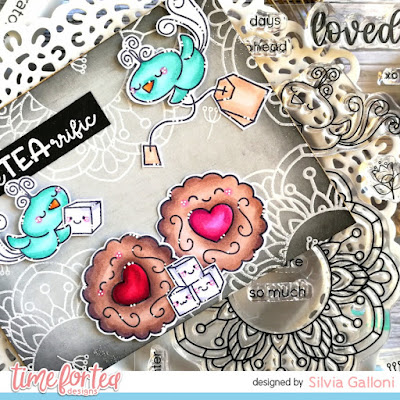
You are TEArrific

 Hello Time for Tea Designs friends! Silvia's here today sharing with you a card made mixing together two of the new stamp sets from the Brighter Days collection.


I started cutting a 5" x 3,75" from gray cardstock and I created my pattern on it heat embossing the "mandala" from the "Brighter Days" stamp set in white. I also darkened edges a bit with black soot Distress ink.

I then stamped images  from the "Brighter Days" and "Tearrific Pals" stamp sets with black ink, I colored them with alcohol markers and I cut them out with coordinating dies (here and here).


I heat embossed a sentiment from the "Tearrific Pals" stemp set in white on black cardstock and I put everything together using a mix of liquid glue and foam tape.


And that's my card, I hope you'll enjoy it.


Thank you so much for stopping by today and remember that you can got 10% off of your Time for Tea Designs order using my code, T4TSILVIA10.

I wish you an amazing day! Hugs, Silvia.


Tuesday 27 April 2021

Duck Sweet Duck

 DT Claudia here to show you my card silhouette created with this adorable set

Lucky Ducks!!!

To make it, I first created the background using different shades of Distress and I created the moon with the masking technique


I then stamped the images and colored the ducks with black watercolor


Finally I used the white gel penalty to give the accents.... 

Why these colors? Anyone who knows me knows that they are my favorites, and that I love to draw the moon and stars !!!

Don't forget to use the code T4TCLAUDIA10 to get a FANTASTIC 10% discount!!!

Super Cute and Easy Shaker Card | Video Tutorial with Tasha

 Hey Crafty People!

It's Tasha here, and I am so excited to be sharing my first post as a member of the Time For Tea Designs Video Design Team.

I needed a new baby card, so I decided to make this super cute shaker, which is perfect for the older sister who I'm sure will end up with it anyway! (If she is anything like my children anyway!)


I used the 6x6 Paper pack for the background and the top panel too; these new Inverted Scallop Frame dies are PERFECT for a super easy & quick shaker!
I cut the frame from one of the patterned papers and added acetate, then filled it with a bunch of fun sequins and shaker bits before using the Rainbow stripe paper as a background.

Then I created the cute little Bunny from the Builder Bunny die set and added him to the front of the shaker panel!


You can check out how I did it by watching my YT Video!


Copic Colours Used
Carrot - YG41, YG11, YR15, Y516, YR68
Bunny - R00. R20, Y00, Y11, Y02

Thank you so much for spending this time with me today, I really hope that you like my first DT project and I can't wait to share even more projects with you soon!

Head over to Instagram to see more Time For Tea Designs inspiration from me!

Have a lovely, happy, safe, wonderful week!

Stay crafty!
Byeee!


HandmadeByTasha

Instagram | Youtube | Blog | Facebook


Inverted Scallop Frame dies
Shop at:
T4TD
Brighter Days 6x6 Paper Pad
Shop at:
T4TD
Large Scallop Celebrate Dies
Shop at:
T4TD
Bunny Builder die set
Shop at:
T4TD

Monday 26 April 2021

I blooming love you

Happy Monday crafty friends! 

DT Natalia here today with a card I made using the Blooming Bunnies stamp set from the April Brighter Days New Release!


I used the slimline scalloped trio circle nesting dies set to make my background and shaker card. The distress oxide colours I used to create the rainbow blended background are: kitsch flamingo, squeezed lemonade, broken china and wilted violet. I also used Perfect Pearls water to give it a subtle shimmer, which I love! 

I then stamped the solid little flowers stamps from the set randomly on my circles panel with Memento Dew drop - angel pink. 


The Spectrum Noir alcohol markers colours I used for the bunnies are: 

  • Browns: MB4, MB3, MB2, MB1 (I think this is my fav comb for browns lately!)
  • Greys: IG5, IG4, IG2, IG1
  • Brown greys: BG4, BG3, BG2, BG1
To assemble my shaker panel, I used the large foam roll, which since I discovered, I can't put away! The fact that it is so thin makes making shaker cards so much easier! 

For the shaker sequins, I chose this happy mix called 'Cottage Garden' from Little Things from Lucy's cards - how adorable are those happy smiley faces? 😍


This new release is full of amazing products, including the cutest stamps, standalone dies and stencils! Make sure to check it out on the Time for
Tea Designs shop! I can't wait to share more cards using these new products with you in the coming weeks, but for now, I hope you like this first one. 

Sending hugs,
Natalia

Sunday 25 April 2021

Pop Up Ducks

Good afternoon everyone and happy Sunday.

Lyndsey here and I'm so excited to be on the blog sharing this card with you today. You may remember quite a while ago on one of the lives Jo had asked what us Teatimers would like to see in upcoming releases, one of my answers back then was ducks. So I can't tell you how happy I was when I actually saw them feature in this months release.

For my card today I decided to make a box card, which I have seen all over social media lately and just love the design, and obviously I used the adorable Lucky Ducks stamp and die set .

I don't have the die sets to create this with so I came up with my own measurements and have created a little photo tutorial for you.

1. I took a simple arch die nesting set and used it to cut 2 arches from white card.
2. I trimed each arch down to size as I didn't want them to be too tall.

3. I cut 3 pieces of white card to 12cm wide x (different heights as shown in the pic) and scored at 1cm & 11cm. I used the Landscape Border Dies to cut the grass shape from the top of the 2 larger pieces. I then cut 2 pieces of card to 7cm wide x 6cm tall and trimmed in a diagonal to 3.5xm at the RH side,  scoring in at 1cm from the LH edge.

4. I Attached both the side pieces to the back of the largest arch panel ( you will need a good strong tape or adhesive).

5. I used the Scene it 6x6 Stencil to add clouds to the smaller arch panel using salty ocean distress ink, and coloured the grass using twisted citron distress ink.


 6. The cloud panel is stuck to the back of the card (covering the joins from the side pieces) and the front piece and the 2 grass pieces are stuck to the LH side of the box, spacing out the grass pieces to suit your design.


7. An easy way to get everything lined up when on the final assembly is to lay the card flat (with the tabs up as shown) remove the tape and then fold the RH side piece over to stick the card together.


8. And wholia you have your finished box card.


To create my little scene I stamped and cut out the cute Lucky Ducks and then added more details using the the tree, clouds and fence from the Windmill add on die set.  I coloured the tree in with my SN markers and finally added one of the bees from the Buzzing for you  stamp set.

The colours for the images are listed below in order of lightest to darkest.

Ducks & Bee - CT1, CT2, CT4, GB5 
Beaks - OR1, OR2, OR3 
Grass - CG3, CG2, DG4
Flowers- HB2, LV2, LV3 & PP2, PP5
Bullrushes - TN5, TN7,  TN9 
Butterflies - PP4 & LV1 

I finally finished off by adding patterned paper from the Rainbow Brights 6x6 pad to the outside of the box and stamping the sentiment onto a scalloped rectangle which was then added to the front of the box.

I hope you made it to the end of this very long post! Thank you for joining me here on the blog today.

You can get 10% off your order in store by using my code T4TLYNDSEY10.

Enjoy the rest of your weekend.

Lyndsey x

Saturday 24 April 2021

You are Tearrific!


 Well the new release is finally in the shop! What do you think it’s another super cute one right, perfect for spring cards. I choose to use the for my first card I liked the idea of combining it with the Sunburst cover plate die I thought it gave the impression of having a morning brew watching the sun was coming up ❤️ 

I started by cutting out the Sunburst cover plate die out of white 360gsm card-stock and then again out of white fun foam so I could add some depth to my card. Then added some warm yellow underneath just slightly larger that the sunray and popped it onto my card-base. 

I then stamped out my images from the new Tearrific Pals stamp and die set and white heat embossed my sentiment onto some black card-stock. I love that biscuit stamp I just had to colour it up like a Jammy Dodger I used a range of e30’s to colour the biscuit part and added some dots in the darker one to add some texture. Also adding some rosy cheeks with R11 and adding some white dots using a Gelly roll pen. 

I love the spots on the kitty it’s my favourite way to colour them up. I used E99, E97 and E95 for the spots and then some light warm greys to give the white fur some depth. I coloured up my tea cup and tea bag and added a tiny heart on the teabag label. Popping everything onto my card-base and that was my card finished. As you can see it was a quick and easy to card to make. I hope you like it and don’t forget you can get 10% off in the shop using code T4TNATALIE10 

Hope you have a great weekend and I’ll see you next week ❤️


Friday 23 April 2021

Lucky Ducks

 Hello dear friends, DT Claudia here, to show you my first card for this fabulous release!! I am so happy because I have always loved ducks.

 For this card I used this fantastic set Lucky Ducks


The set has many elements to decorate our scene, and with the help of the 
Splish splash stencil I created the pond


With such a pigmented sky I used white embossing powder for the sentiment. 


                                         I hope you like it, I already love this set!!!

Don't forget to use the code T4TCLAUDIA10 to get a FANTASTIC 10% discount!!!


Rainbow of Cookies


Hello everyone and happy Friday, DT Annalisa here. The brand new Time For Tea Designs release dropped today - yippee! - and I am sharing a rainbow of Jammy Dodgers using the Tearrific Pals stamp set. My mum knows this is one of my favourite treats and often makes them for me, thanks, mum! Be sure to check out the rest of the new release over on the T4T website.

I stamped six cookies and coloured them with my Copics. I cut them out, including the heart in the center and set them aside. 


I used the two larger dies in the Slimline Scalloped Trio Circle Nesting Dies to die-cut some blue-coloured cardstock as well as some rainbow patterned paper by Lawn Fawn. I adhered these together using liquid glue.

Next, I stamped the 'I miss your face' sentiment from the Be Kind Be You Clear Stamp Set and cut it out using the coordinating die set. I used the same die set to cut the word 'hello' from the same blue cardstock that I used for the base of the card.

I stuck the cookies in rainbow order to the card and then adhered the sentiments as well. To finish the card I added some Stardust Stickles.

I hope you like this card and would love it if you could use T4TANNALISA10 for 10% off your order the next time you purchase anything from Time For Tea Designs.


Its New Release Day!!

 Hi lovely Tea Timers!!

I am so happy to say the Bright Days New Release is now available in the Time For Tea Designs store!


If you missed any of our Live Reveal Shows On Facebook you can watch the replays on our YouTube Channel.

DAY ONE


DAY TWO


During the Live Shows I made a few projects too.


Lucky Duck Stamps & Coord Dies | Celebrate Large Scallop Frame Dies | Brighter Days 6x6 Paper Pad | Dancing Dandelions Stencil | Landscape Edge Dies


Bunny Builder Dies | Mini Slimline Scalloped Dies | Tree of Love Die | Brighter Days Paper Pad | Brighter Days Stamp & Coord Dies | Brighter Days Sentiment Cards | New Beautiful Blender Brush - pack of 2, Extra Large & Large

Over the next few days you will see a ton of inspiration from the team using the new products. I know you are going to love all the new stamps, dies, stencils and papers and I can't wait to see which are your favourites. Let us know in the comments which will be making it to your wish list :)

Happy Crafting
Jo
XOXO


Thursday 22 April 2021

Hang In There Sloths

Hello, Kitty here and welcome to my usual weekly post for Time For Tea Designs. This week I got to play with one of my favourite stamp sets - Sloths!!! I love creating with these cuties, I just love their little sleepy faces...


I kept the design on this one very simple as I wanted the images to be the focal point. I used the Be Slothy Stamp Set. I coloured in each of them with Copics and cut them out. I created an tunnel style panel using two circle dies, kraft and white card. I and added some patterned paper behind it. I added the sloths so they were peeking out from behind the circle. I added the stamped sentiment which is from the Up, Up & Away Stamp Set and some Clear Drops to finish.

Don't forget you can use my discount code T4TKITTY10 to receive 10% off anything on the Time For Tea Website. There is also a new release coming so do check out all the sneak peaks over the next couple of days.


Kitty xx

Thank you fairy much

 Hello crafty friends! Silvia's back today with a magical thank you card.

I started cutting a 4,25" x 5,5" rectangle and two grassy borders (using the "Landscape Edge" dieset) from white cardstock.  I then ink blended borders with twisted citron, mowed lawn and rustic wilderness Distress Oxide inks and I added some texture on them splattering with clean water, the same ink colors and a bit of Indian gold Nuvo mousse (all loosened with water). 

To create the sky I used tumbled glass Distress spray stain and broken china Distress Oxide spray

I stamped images from the "Fairy Garden" and "Bears Picnic" stamp sets, I colored them with Spectrum Noir Triblend Brush alcohol markers and I cut them out with coordinating dies (you can find them here and here).

Next I die cut some puffy clouds and two fence (that I glued together to make a longer one) from the "Windmill Add On" die set in white and I put everything together, using a mix of liquid glue and foam tape.

I stamped my sentiment in the middle of the sky and that's my card. I hope you'll enjoy it.

Thank you so much for passing by today and don't forget that you can get a 10% discount  off your Time for Tea order using my code, T4TSILVIA10.

Have a wonderful day. Hugs, Silvia.


Other Posts You Might Like