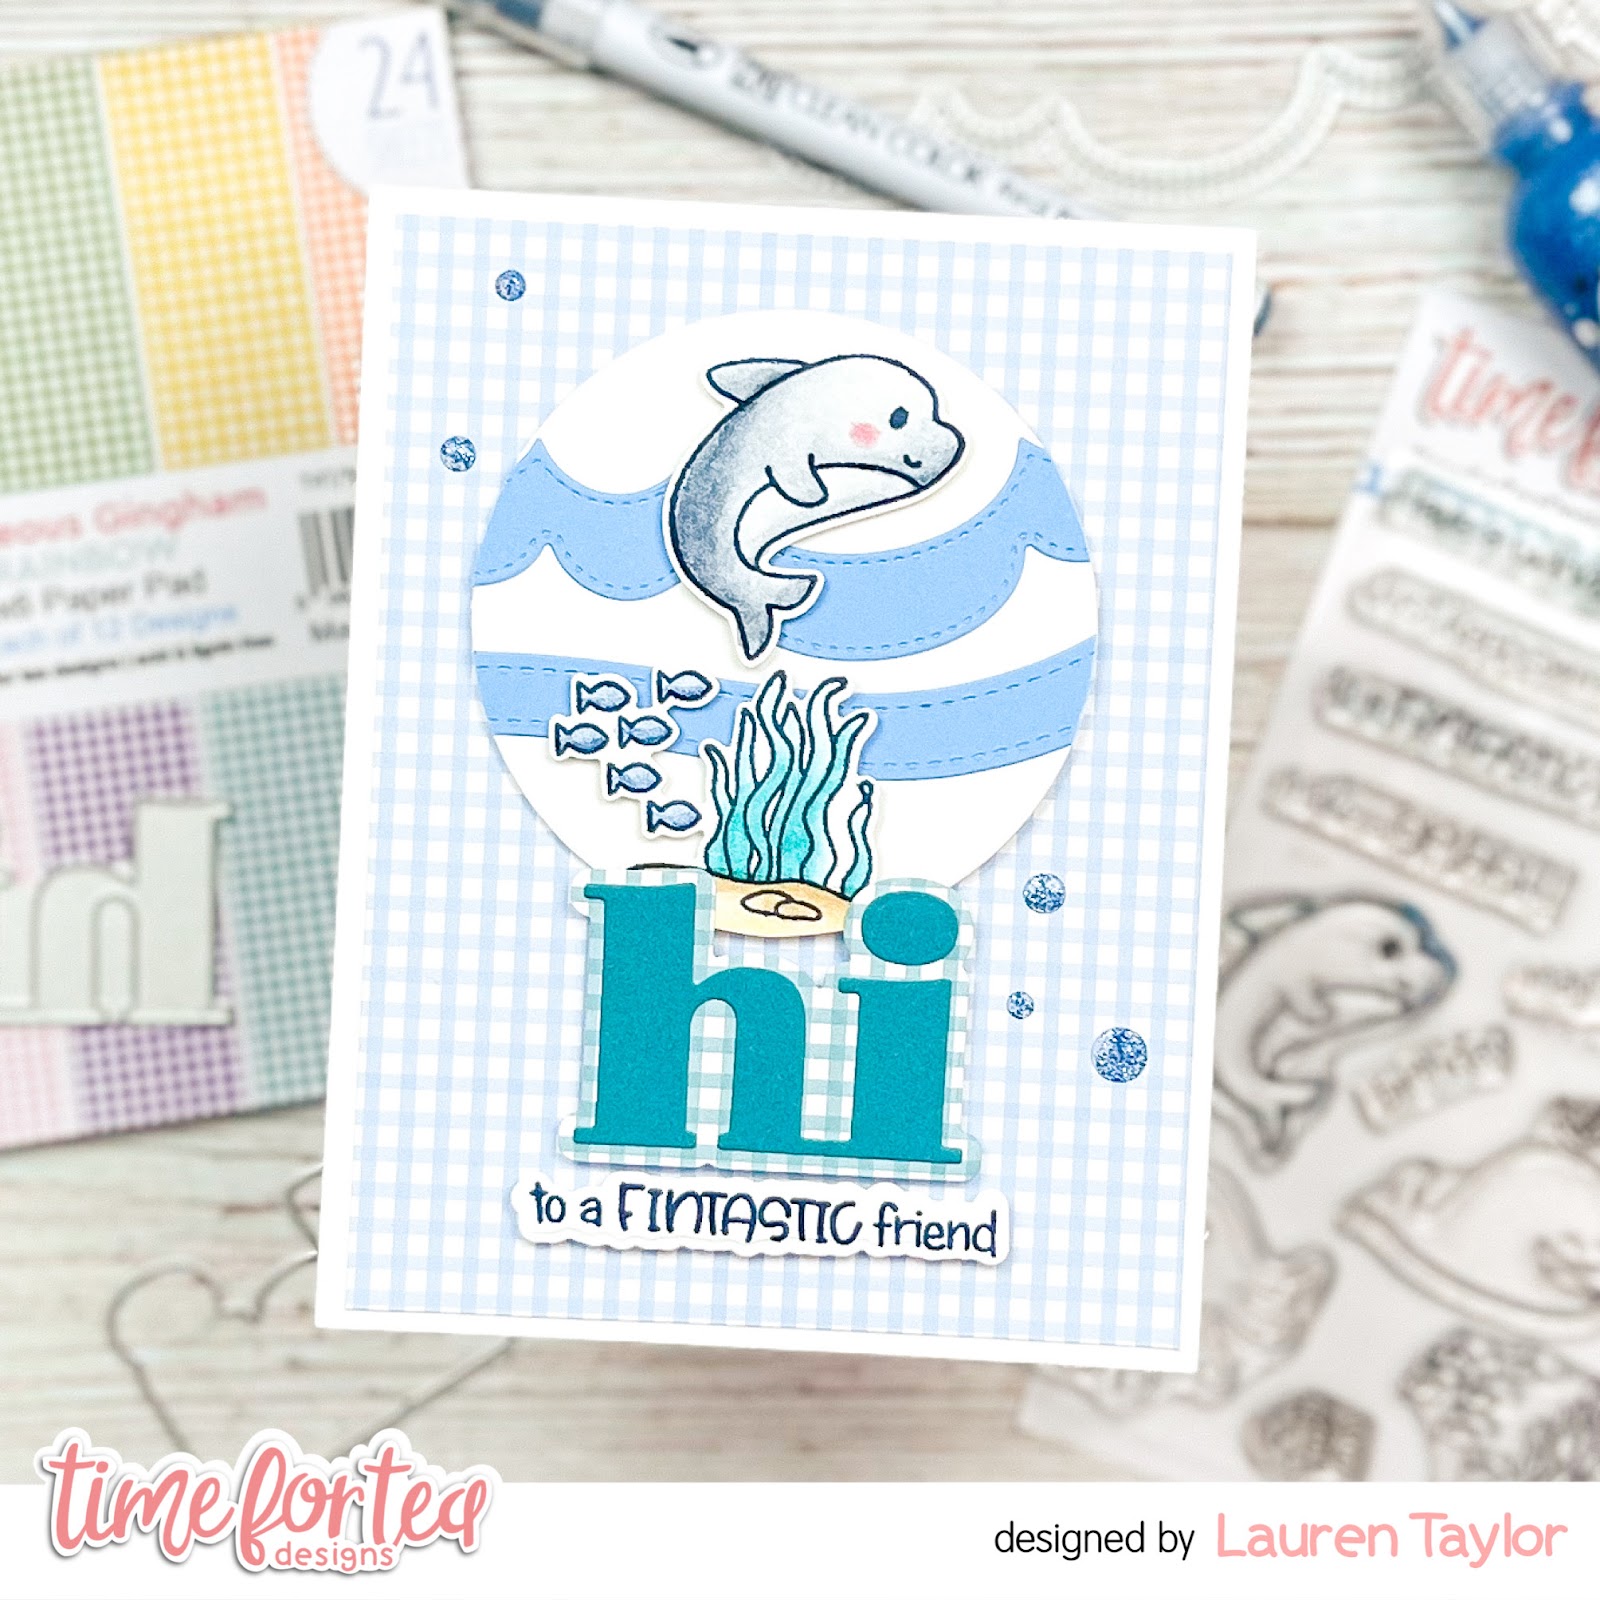
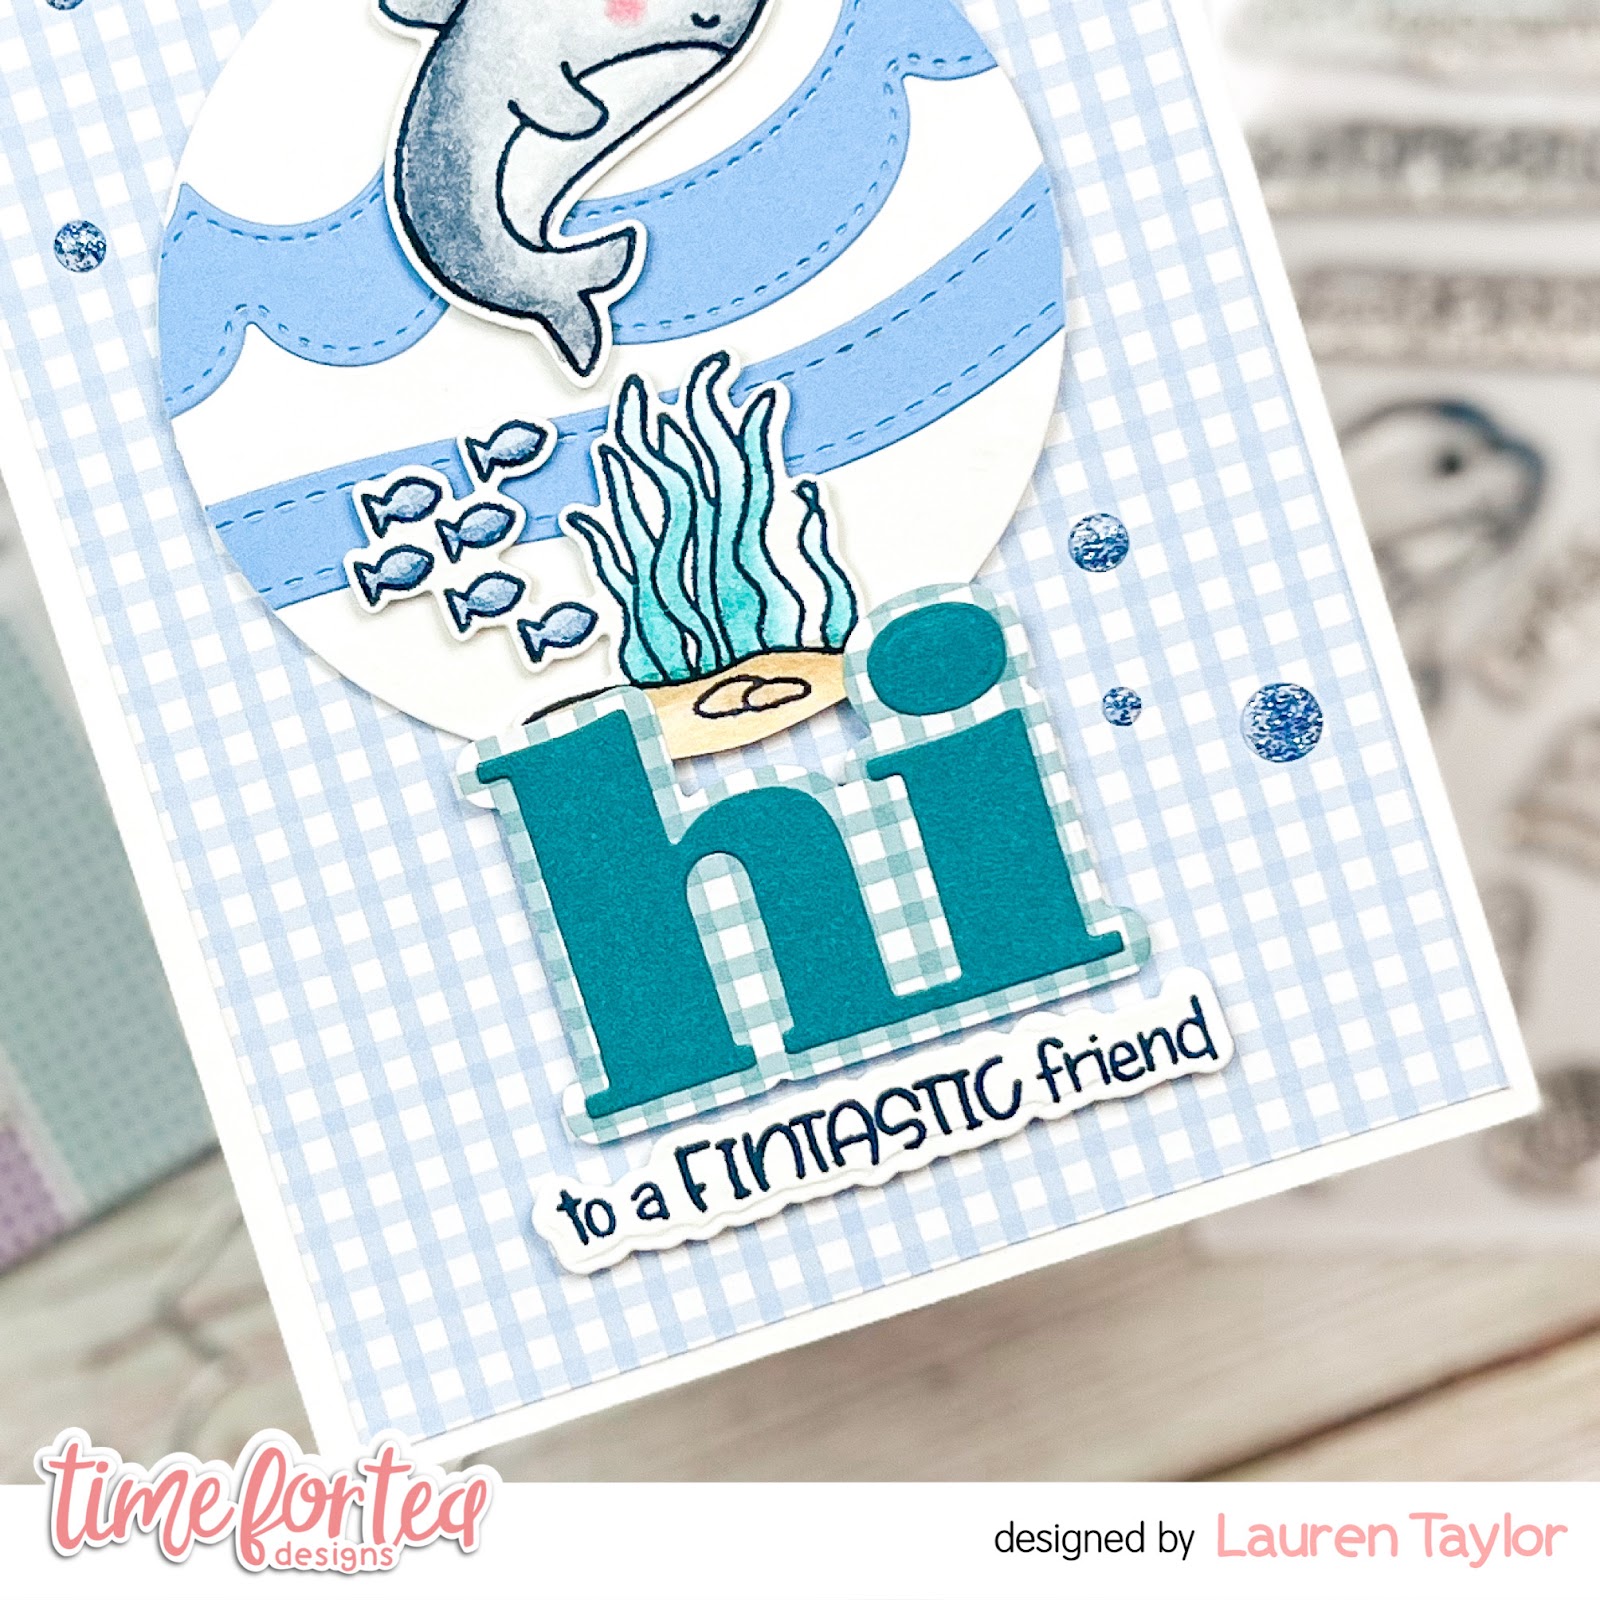
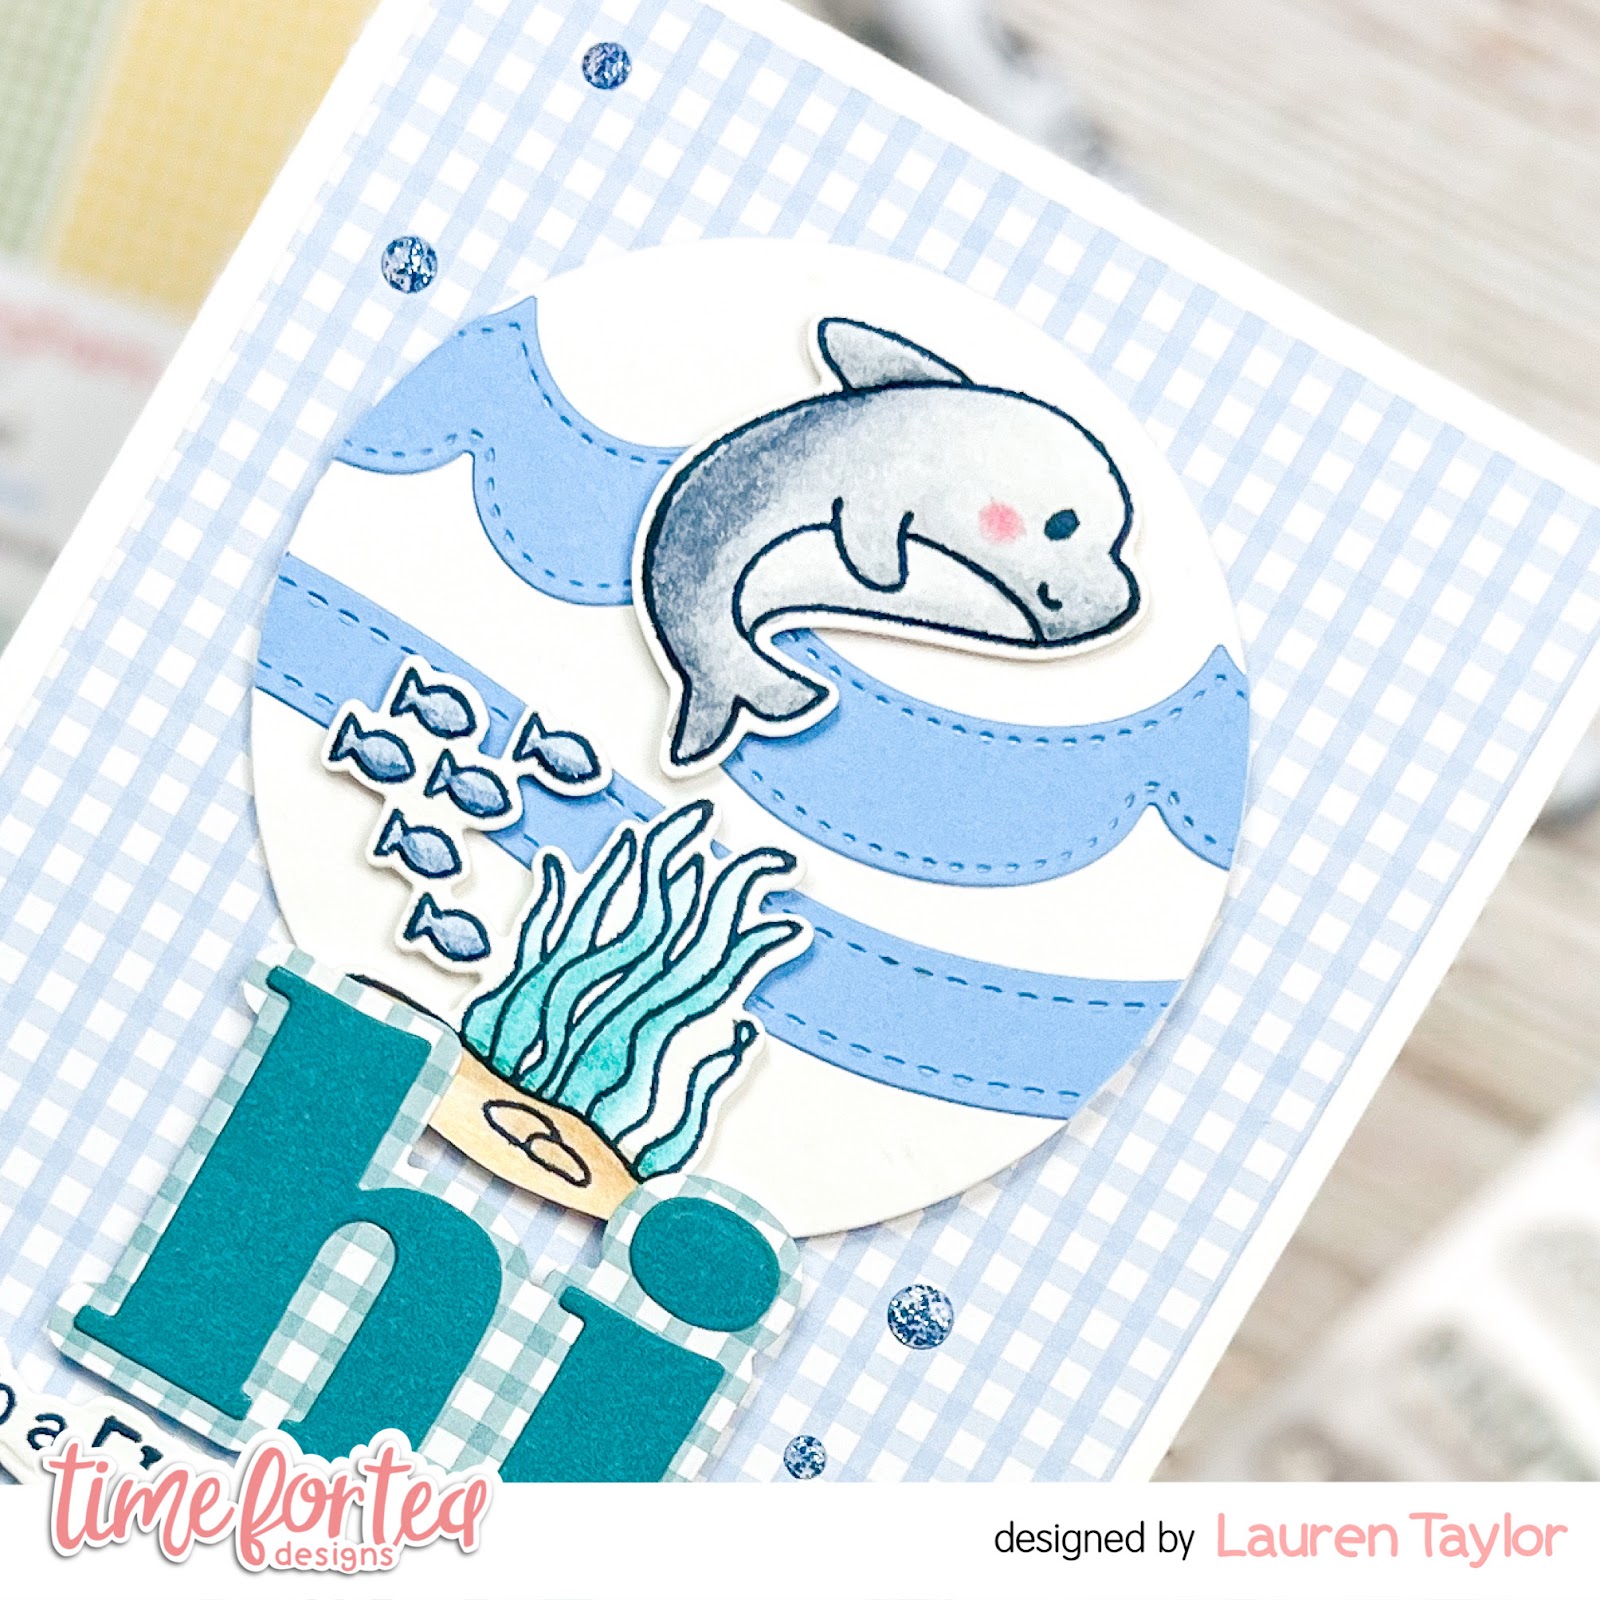
Pages

Wednesday 31 August 2022

Llama tell you....

 Hey Tea-timers...

DT Ashlee here with some new Time for tea designs inspiration for you using products from the latest release...


For this card I used these T4T products...

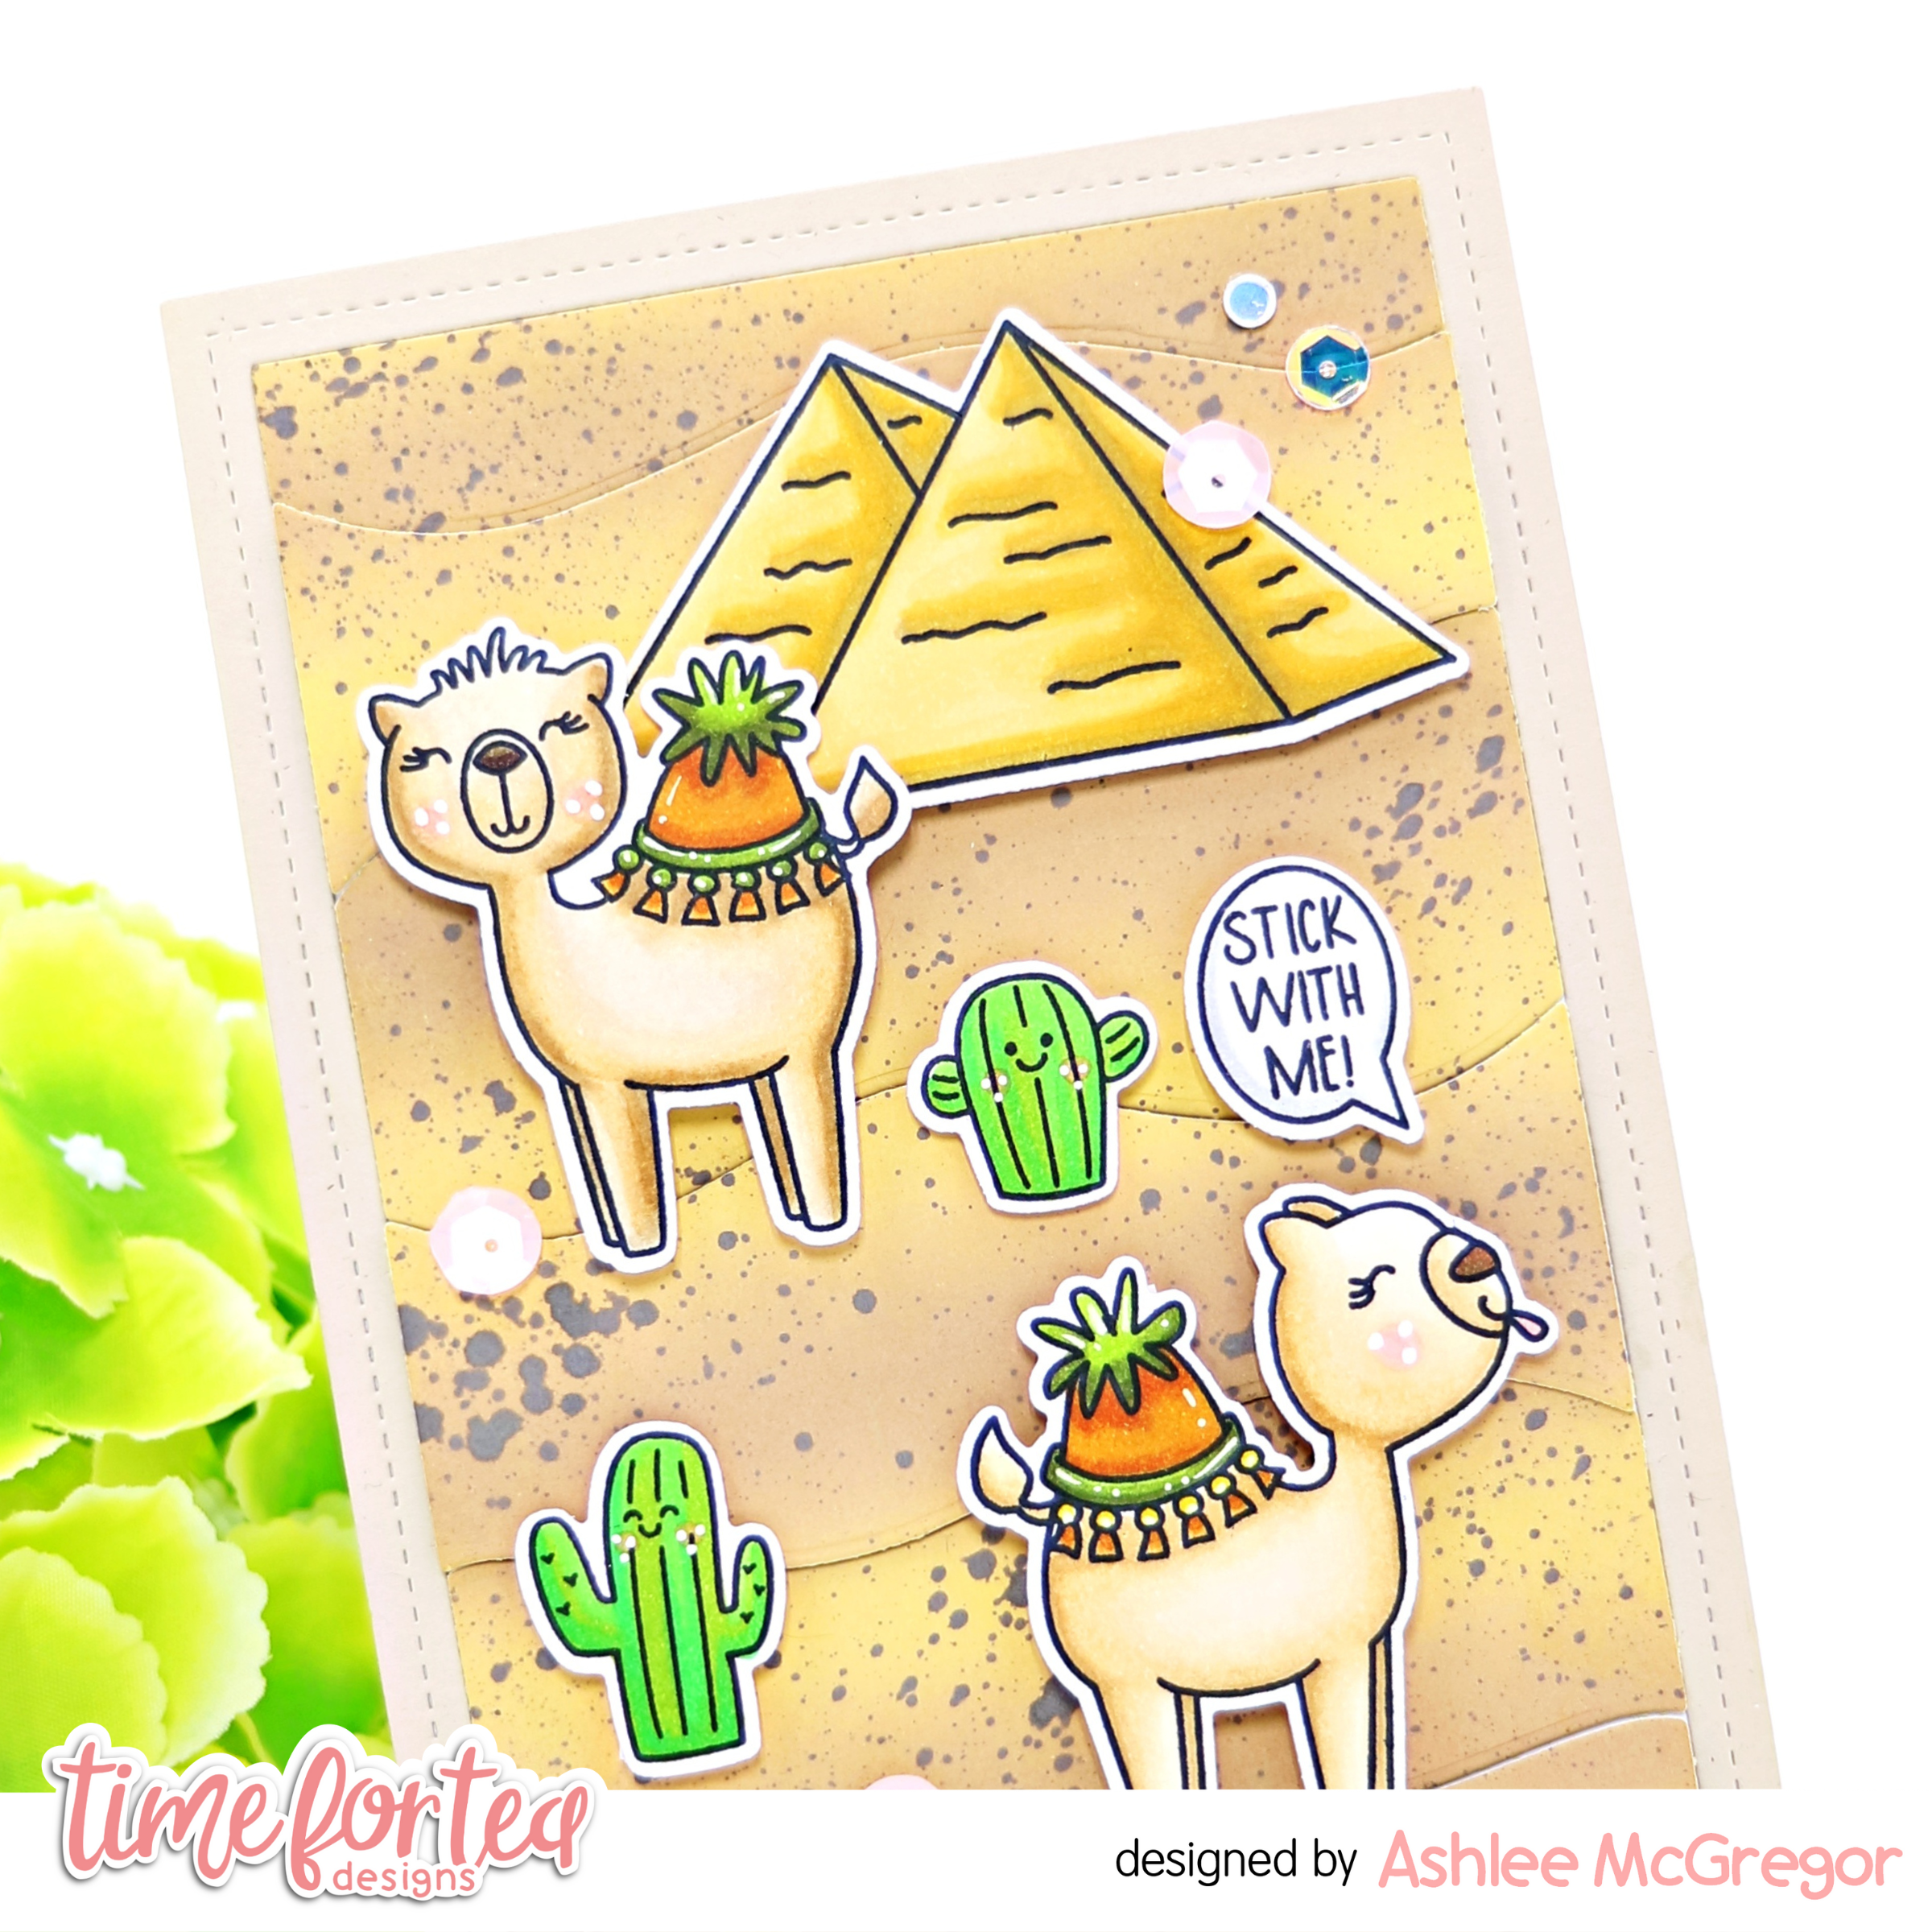
To create my card I started by die cutting the waves cover die twice. Once from a piece of green cardstock and then once from a piece of cardstock I had inked blended/splattered using distress oxide inks.

I adhered the green frame to a piece of card before then laying in the wave pieces using different levels of foam tape to give it fun dimension. This completed the card base....


Now that the base was complete it was time to add some llamas...

I stamped, coloured and die cut three llamas along with a mountain and some sentiments. These were all adhered to the card using foam tape. To finish it all off in true Ashlee style there was of course some sequins for a touch of bling!!

What do you think of this llama mountain scene? I hope you like it...
Thanks for stopping by today, happy crafting hugs Ashlee. 


(Want to do some shopping at the T4T store? You can use my discount code T4TASHLEE10 for 10% off your order)

Monday 29 August 2022

DIY Circle Gift Tags

Hi Tea Timers and welcome back to the blog. Today, I have a DIY on how to create circle tags that can be used on gift bags and presents. I created a total of three tags but there are endless possibilities!


Sets Used:

All my tags use the 2 3/4 inch circle die from the Nest Die set.


For my first tag, I stamped the underwater seaweed scene directly onto the tag. I used a 0.3 fineliner to extend the sand  image. I then stamped out the turtle and fish from the Fintastic Friends and Beach Buds set. I used the following colors to color the images:

  • Seaweed: YG21, YG23, YG25
  • Fish: BG11, BG13, Y11. Y13
  • Turtle: G00, G02, G03, G05, G07, G09
  • Water: B000, B00, B01, B02, B04
  • Sand: E00, E01, E11, E13


I stamped the sentiment directly onto the tag and fussy cut the turtle and fish. I used foam tape to adhere the turtle and fish. 


For my next tag, I stamped the beach scene directly onto the tag as well and used the 0.3 fineliner to extend the scene to the edge of the tag. I stamped and fussy cut the otter, shovel and pail. I then used the following colors to color the images:
  • Umbrella: YG21, YG23, RV21. RV23
  • Otter: W05, W06, W07, W08, W09
  • Sky: B000, B00, B01, B02, Y000, Y00, Y02
  • Sand: E00, E01, E11, E13, E15
  • Pail and Shovel: V01, V04, V06


I then stamped the sentiment directly onto the blue cardstock and used the matching banner die to cut it out. I used foam tape to adhere the sentiment and the liquid adhesive to adhere the images.


For my last tag, I wanted to show the whale jumping out and into the water. I took 2 circle die cuts and for one, I used the wavy die from the Landscape Edge set to cut out the water part. I used Uncharted Mariner and Peacock Feathers to blend the water portion. On the second circle, I blended Seedless Preserves, Picked Raspberry, and Kitsch Flamingo. I then used white watercolor to splatter over the sky. 


I stamped out the whale and used T5, T6, T7, T8 and T9 to color the image. I used the coordinating die to cut out the whale. I heat embossed the sentiment onto the water portion with white embossing powder. I used foam tape to adhere the water portion and liquid adhesive for the whale. 

To complete the tags, I used a hole punch to punch a hole at the top of each of my tags. I then tied twine onto each tag.

I hope you enjoyed this tutorial and will create some fun tags as well. You can put the To and From on the back of each tag. If you liked any of the supplies that I used in this post, don't forget to use the code T4TRANDY10 at check out. Have crafty week!


Friday 26 August 2022

Make A Splash


Hello and happy Friday! DT Annalisa here sharing a beach scene I created for my husband's birthday using distress ink and Time For Tea Designs stamps and dies.

I used a stitched rectangle die in my stash to die-cut a panel of Distress Watercolor Cardstock. I smushed down Peacock Feathers Distress Ink onto my glass matt and added a drop of re-inker for good measure! I sprayed some water and then plonked my watercolour paper on top of it. By sheer luck, what you see on the top of my stitched panel is what I got. I noticed it looked like where the ocean meets the sand and loved it, so I stopped adding more ink. For the sand area, I ink blended on some Scattered Straw Distress Ink with a Beautiful Blender Brush. I added Rusty Hinge Distress Ink splatter with a paintbrush.

 I stamped, then die-cut the critters and ocean-themed elements from Fintastic Friends (and the coordinating die set) and Beach Buds (and the coordinating die set). I coloured everything with Copic Markers and added white accents with a Gelly Roll Pen.


I cut the sand portion under the umbrella and tucked it under a stitched die-cut area. I used liquid glue and foam tape to adhere the various elements to the panel. For the sentiments, I stamped and then die-cut them with each coordinating die. I die-cut two more of each sentiment die from white card stock. I used liquid glue to adhere to the three layers to add dimension to both sentiments.

I added the completed panel to a white A2 card base to complete the card.

Thank you so much for reading my blog post. Don't forget to use my discount code T4TANNALISA10 when you visit the Time For Tea Designs shop to get 10% off your order.


Thursday 25 August 2022

Fintastic Friends

Happy Thursday, Tea Timers!  It's Amanda here to share another card I made using the New Release!  This card features the Fintastic Friends stamp set.

To create this card, I started with my background.  I used some Maker Forte inks and Catherine Pooler inks to create an ink blended ocean and sky scene.  I added some water splotches and white paint flecks to the entire background.  


Then, I stamped my images from the Fintastic Friends stamp set and colored them in with Copic markers.  I cut them out with the coordinating die set.  I added some white gel pen marks as well.
 

I added on a Smile Inverted Scallop Frame Die and then adhered my stamped images to my card using 3D foam squares.


Thank you so much for stopping by the Time for Tea Blog today!  I hope you enjoyed making this card with me!  Enjoy the rest of your day!  Xx, Amanda


Wednesday 24 August 2022

Rainbow waves

 Hey there Tea-timers...

I hope you are all having fun getting crafty.

I've got some new T4T inspiration for you and this one is complete with rainbow goodness!!


I love a good rainbow so for this one I've done a blended rainbow Distress oxide ink background using the awesome Waves cover die....

I layered the waves pieces with different levels of foam so that it wasn't just one flat piece and I love the way it turned out!!


I then die cut three of the Fishtail banners and added sentiments to each one...

The sentiments were from the set Simple sentiments. To stamp them I placed the stamp and the die cut piece into my Misti so that I could slightly bend the stamp so that it went along the curves of the banners!!

The banners were all folded along their fold lines and then adhered to the card base. 


It was all completed with a touch of sequins for a bit of bling of course.... 

Thanks for stopping by the blog today and checking out my latest creation for the new release products.  If you would like to see this card some more pop on over to the YouTube and you will spot it in one of Jo's latest lives!!

Happy crafting, hugs Ashlee


(Use code T4TASHLEE10 for discount off your order at the T4T store)

Tuesday 23 August 2022

Birthday CAS card

Hi tea timers!

Welcome back to the blog! It's Miki here from the Design Team and I'm so excited to share with you today's card using the new release. Today I have a CAS card to share with you using the Llama tell you stamp & die collection. I also filmed a reel which will be available on my instagram.


To start with I stamped and die cut one of the llamas in the Llama tell you stamp set. I coloured it in using some pencils and alcohol markers.

I then took a white card panel slightly smaller than an A2 card size. I added it to my misti and I used the mountain stamp. I first masked off the cacti bit and only stamped the mountains towards the right side of the panel. I then repositioned the stamp and masked off the right part of the mountains. This doesn't have to be perfect as the llama will go on top where they meet. I chose to do some masking and off set stamping to make my scene a bit bigger.

Next, I stamped the It's your birthday sentiment from the same set just below the scene. I then used alcohol markers to colour in the scene. I went with some light greens for the grass and a light blue for the sky. Once I was happy with my colouring I added the Llama on top using foam tape and added one of the party hats to its head. I then glued the panel to an A2 card base made out of kraft paper.

I added some gems all around for extra details and that was it. I hope you like this CAS card, it was super easy to put together.

Hugs,
Miki

Monday 22 August 2022

Have a WHALE of a time with the Porthole Lift the Flap Dies

Hi Tea Timers, welcome back to the blog. This is DT Randy and today I am showcasing the new Porthole Lift the Flap Dies. This fun die set will allow you to create super easy and cute surprise cards. I decided to create a fun night and day ocean/beach scene.


For the front of the card, I wanted the whale to look like it was jumping out of the ocean at night, have a WHALE of a time. When you lift the flap, I wanted it to be a sweet beach scene during the day.


Sets used:

I first cut out the 2 panels using the largest die from the Autumn Scene Cover Plate set. For the first panel I wanted to create a night scene. I took masking tape to mask off the bottom quarter of the car panel. For the top portion, I cut out a circle from the Circle of Love Nesting Dies set and taped it on to the panel. I then blended Chipped Sapphire, Seedless Preserves and Picked Raspberry. I then removed the bottom mask and blended Salty Ocean and Mermaid Lagoon. I splattered white water color over the panel to give it a starry night look. 


I then took the large Porthole Lift the Flap Die and taped it onto the card panel and ran it through my die-cutting machine. I turned the panel over and blended Mustard Seed, Squeezed Lemonade and Dried Marigold. 

I decided to stamp my sentiments directly onto both sides of the flaps. 


I then stamped out all the images, diecut them out with the coordinating dies and used the following Copic Colors for my images:

  • Whale: B91, B93, B95, B97, B99
  • Otter: E00, E11, E13, E15
  • Palm Tree and Coconut: G05, G07, E11, E13
  • Turtles: YG21, YG23, YG25
  • Pail and Shovel: RV21, RV23, Y11, Y13


I then placed the second panel underneath to see where I wanted to place the sand and wave pieces. I had some wave dies in my stash but you can use the Ocean Waves set as well. Once I knew where I wanted them to go, I used liquid adhesive to adhere the pieces along with the images.


I then glued my top panel with the Porthole directly onto the second panel. To complete my card, I added the whale image and glued on the word "Love" that was cut from the Nesting Die set from gold cardstock.

I hope you enjoyed my post today and if you enjoyed any of the sets that I used today, use the code T4TRANDY10 at check out for extra savings. I hope you have a crafty day!

Saturday 20 August 2022

Get Whale Soon!


Happy Saturday Teatimer's I'm back with another cute cards using the new Get Whale Soon Stamp Set from Time for Tea Designs. 
I love a good pun so had to cut up the Get Well Soon Large Sentiment Die to create this fun punny get well soon card. I used the Smile Inverted Scallop Frame Die for my base layer and used the dotted wave embossing die from the Ocean Waves Die Set to create embossed waves. 
I ink blended over this with blue and pink oxides so the pink tied in with the sentiment and added some spritzes of water and splatters of the same colours. 
The whales and their fun accessories are coloured up with copic markers I just love the Get whale Soon pun they create adding them to the middle of the sentiment. To finish everything up I added some stars and bubbles using a white gelly roll pen. 
I love how this one turned between the rich colours and the pop of pink to that punny sentiment it's just a super fun card. You can find all the supplies in the Time for Tea Shop and get 10% off any orders using code T4TNATALIE10 
Have a great weekend and don't forget to come back soon for more inspiration and cute cards!


Friday 19 August 2022

Seas The Day


Happy Friday, DT Annalisa  here sharing a sea-themed shaker card I created using stamps, dies and a stencil from Time For Tea Designs. I love how you can use the alpha dies to spell out part of a stamped sentiment to draw attention to it.

To start, I used a panel of watercolour paper and the Simple Stripes 6 x6" Stencil. I sprayed Dusty Concord Oxide Spray and Salvaged Patina Distress Spray Stain over top of it. I gently removed the stencil and set the panel aside to dry. I used a stitched rectangle die to trim it down once it was dry.

I cut out the letters 'SEAS' three times, using Anthony's Alpha Dies. Once from metallic card paper (top layer) and twice from white card stock, I then glued these all together with liquid glue.

I stamped the fish (from Fintastic Friends), gull and shell (from Beach Buds), coloured them with my copics and die-cut them out with the coordinating dies. I then stamped 'Seas the day!' onto white cardstock die-cut it out, and trimmed off the word 'Seas'. 


I used the Slimline Porthole Dies to die-cut some silver metallic paper (the same as the one I used for the letters 'SEAS') porthole. I die-cut the frame for the porthole die from white cardstock and glued them together. I used tape on the back to connect the striped panel to the porthole cover.

I created an A2 card base from white card stock and ink blended the edges with Prize Ribbon. In the centre portion where the porthole opening is, I ink blended Salvaged Patina Ink using my teal Beautiful Blender Brush. I used the bubbles section of the Making Waves stencil and ink blended on some white pigment ink. I glued down the two fish to this area and then added some sequins on top of them (for the shaker element). I added double-sided foam tape (doubled up) to the back of the striped panel and stuck this down to the card base.

I used liquid glue to stick down the sentiment, letters, shell and foam tape for the gull. I then added clear gems. to complete the card.

Thank you so much for reading my blog post, you can use my discount code T4TANNALISA10 when you visit the Time For Tea Designs shop to get 10% off your order.


Thursday 18 August 2022

Slimline Beach Scene

Happy Thursday, Tea Timers!  It's Amanda sharing this beautiful and bright card using the New Release!  Are these little critters too cute or what?!

To create this card, I started my creating my background.  I die cut a slimline scalloped frame and used Catherine Pooler inks to create a blended background.  I placed this background onto my slimline card base.  

Next, I cut my Slimline Porthole Dies and placed them on my background with 3D foam squares.  I ink blended the inner circles with blues and greens and then glued them down.

I stamped my critters from the Beach Buds Stamp Set, colored them with Copic markers, and then die cut them out with the coordinating dies.

Aren't they just the cutest little beach buddies you ever did see?!
I'll be back next week with another card showcasing this adorable new release!
Xx, Amanda


Wednesday 17 August 2022

Stick with me....!!

Hey Tea-timers...

It's DT Ashlee here, I hope you are all well and getting in some crafty time!!

I've got a new card to share today using these new T4T products...

- Happy hump day stamp and co-ordinating die

- Waves cover die 


To create this card I started by making an ink blended panel of cardstock with Distress oxide inks so that I could die cut the waves cover die. (I also die cut it from a natural coloured card to use for the outside frame piece)

The ink colours I used to do this are :
Scattered straw, Tea dye, Gathered twigs and Ground espresso.

I adhered the wave pieces to a card base with different layers of foam tape to create dimension in the desert sand ready to add a scene too!!


Using the Happy hump day set I stamped, coloured and die cut a bunch of images. 
(These were all coloured with Spectrum noir tri-blend markers)

I adhered all the images using foam tape because I love lots of dimension in my cards. Once I was happy with the scene I added a touch of sequins for a little bit of bling and finished it off with a sentiment bubble!!

I'm so happy with how this card came out, do you like it?
Also I hope this inspires you to use the Waves cover die for other scenes other than water...

Happy crafting, hugs Ashlee. 


If you would like to do some shopping for your own T4T goodies you can use this code for a discount off your order - T4TASHLEE10

Video: Fintastic Friend Mini Underwater Scene Card

Hi, Friends! Lauren here and I'm back with a new video tutorial on YouTube! This month I am featuring the adorable Finstastic Friends stamp set on my card. I wanted to create a mini scene to be the focal point on the card and used edger dies to create border strips of waves. The colors I used were inspired by the rainbow colors from the Gorgeous Gingham paper pack.

To color in my images, I stamped with a watercolor friendly ink and used my Zig Clean Color Brushes. I love the softness you can create with these colors and the Blender. You can watch today's video to see how I colored and assembled my card!

Click the image below to start the video and make sure to leave a comment if you have any questions!


Here is a quick list of the Time For Tea Designs supplies I used and make sure to enter my code T4TLAUREN10 at checkout for 10% off your order!

Thanks for joining me today and for spending time with me these past six months!

XO. Lauren

Find me on my social media here!

Tuesday 16 August 2022

Desert sunset birthday card

Hi tea timers!

It's Miki here from the Design Team and I'm so excited to share with you today's card using the new release. For today's card I used the Happy Hump Day stamp set - this might be one of my forever favourite T4T designs!!

To start with I ink blended a summer sunset background on white cardstock. I used the following distress oxides:

  • Fossilized Amber
  • Ripe Persimmon
  • Candied Apple
I started with the yellow in the center and faded it out into the oranges and reds on the outside. I then added some splatters using a mix of water and perfect pearls and picked up the excess with some tissue. I then used the Sun Ray Cover Die to cut the panel. I used the die once more on white cardstock and glued the white rays behind the ink blended ones for extra dimension. I then glued all the pieces on a card base. 

Next I stamped the two camels, the pyramids and the cacti from the Happy Hump Day stamp set. I coloured them in and die cut them with the matching dies. I added them to my card base with foam tape.

I also stamped and embossed the It's your birthday sentiment in white embossing powder on black cardstock and cut it using the matching dies. I glued it with foam tape at the top of the card.

I love this scene, it makes me think of a summer sunset in the desert and the critters are so adorable! I hope you like it too!

Until next time,
Miki 

Monday 15 August 2022

Beach Bud Memories

Hello Tea Timers and welcome back to the blog. I hope you had a crafty weekend! With Summer coming to an end soon, I wanted to highlight the Beach Buds set with "photo shots" of some fun beach memories. I really wanted to make this card look like it was a page from a photo album and it was really easy to create.


Sets Used:
I first too the large die from the Autumn Scene Cover Plate set and cut out a panel I blended it with Mustard Seed, Spiced Marmalade and Abandoned Coral. I then splattered it with white watercolor to give it a fun effect.


I then stamped out thee images and die cut them out using the coordinating dies. I used the following Copic markers to color the images:

  • Otter: W00, W01, W02, W03, W04
  • Bird: BG11, BG13, BG15, Y11, Y13
  • Crab: R22, RV24, ERV27
  • Umbrella: RV21, RV23, RV25, YG21, YG23, YG25
  • Palm Tree: E11, E13, E15, G24, G28
  • Coconut; E23, E25
  • Shovel and pail: RV11, RV13


I then took a polaroid die I had in my stash and cut it out twice. You can create your own frame if you have rectangle and a square die. I stamped my sentiments directly onto each frame using black ink. To assemble my card, I used liquid adhesive to combine all the elements for each polaroid.

I hope you enjoyed this post to today and will create fun memories with the Beach Bud set as well. If you like this set, don't forget to use the code T4TRANDY10 at checkout for extra savings. Have a crafty day!


Saturday 13 August 2022

Congratulations, Well Done!


Happy Saturday Teatimer's I've got a fun whale card today for you using the new Time for Tea release. 
As you probably know I love to make scene cards and the Stitched Slimline Slopes Die is perfect for this. 
I used an ombre technique with Distress Oxides to create darker water at the bottom and then lighter towards the top where it hits the sky. Then for the sky I blended the sky and then stencilled some sun rays over the top. I finished it up with some spritzes of water and splatters of the same colours and coloured up some fish using an orange gelly roll pen. I also drew in some birds in the sky too to add some extra interest.
The whales and narwhal are from the new Get Whale Soon Stamp and Die set  I coloured them up in a range of colours for more contrast and a pop of colour. Then all that was left to do was the sentiments which I white heat embossed onto black using the Simple Sentiments Clear Stamp Set.
That's my card finished up I hope you like it you can fund all the products in the Time for Tea Shop and you can get 10% off your purchases using code T4TNATALIE10
Have a great weekend and be sure to keep checking back for more inspiration. 
 

Other Posts You Might Like