Pages

Showing posts with label Copic Colouring. Show all posts

Tuesday, 4 April 2023

Skating By Penguins


Hi friends and welcome back to the blog. 

DT Miriam here and I am delighted to be here for my first design team post for Time For Tea Designs. Where better to start my design team journey than with a Christmas card, it's never too early to make Christmas cards, right? Today it's all about penguins and snow ball fights, so lets get started.....


I started the card by creating a card base from hot pink cardstock to measure 4.25 x 5.5 inches. I then trimmed a piece of white card to be slightly smaller than the card base. 

On the white panel I stamped out three images from the Skating By Penguins stamp set  - the ice skating penguin, the penguin throwing the snowballs and the penguin furthest to the right. Now for once of my favourite crafting things to do - masking!! I made masks for these three images, popped them into place and moved on to stamping the rest of the images. I removed the masks and everything was ready to colour.


To colour the images I chose to use Copic markers. Today I have used the following colours:

Yellows - Y000, Y00

Teals - BG49, BG45, BG01

Reds - R30, R85, R83, R81

Blues - B60, B0000, B000

Oranges - YR07, YR04, YR02

Purples - BV29, BV25, BV23

Greys - C3, C2, C1


Once the colouring was finished I drew in a few snow drifts and moved onto the background. I ink blended Distress Oxide inks - Tumbled Glass, Faded Jeans and Chipped Sapphire. I then used the grey Copic markers to create trees and branches over the ink blending. I drew lots of vertical lines and flicking lines off on angles. This does not need to be perfect at all, as the next step with cover an errors!

I mixed some white gouache with a tiny amount of water and flicked it all over the panel to create a snow effect. Once it was dry, I applied another layer of flicking, then filled in any gaps with white gel pen.


I then glued the panel to the card base. I stamped a sentiment onto hot pink cardstock with white pigment ink. Added white embossing powder and heat set until melted. I trimmed the sentiment and popped into place on the card with foam tape.

That completes the card for today. I hope you love the card as much as I do and that you may be inspired the get started on your Christmas cards. Don't forget to visit the Time For Tea Designs shop and use my code T4TMIRI10 for 10% discount.

Thanks again for visiting today x


Friday, 14 October 2022

New Video & How to Colour Pumpkins!

 We have a fun new video on our YouTube Channel today showing how I made this adorable Autumn themed card.


DT Annalisa suggested using some Pumpkin colouring tips from @sandyallnock. These were amazing! Watch the video to find out how I got on.


You can find more tips from Sandy on her social media pages and on YouTube.


I also added some autumn leaves after the Live ended so look out for a reel later on Facebook & Instagram showing you the final process.


You can watch the Live replay below.


Also, if you're a Time For Tea Designs newsletter subscriber, check your inbox a little later for a VIP exclusive!

Happy Crafting
Hugs Jo xx


Saturday, 23 July 2022

Have a Beary Good Day!


Happy Saturday Teatimer’s it’s DT member Natalie here on the blog with this super sweet bear card. I haven’t been well the past few weeks so needed a quick card for my post for today. Luckily when I colour up my stamps I always stamp and colour about three out of each image and then I have some left for another project later on. 

These sweet bears are from the Bears Picnic Clear Stamp Set. It’s such a sweet set with four bears a picnic basket some little ants and picnic food. I’ve used it many times and still love it so much! 

As you can see I added two of the same stamp but just coloured them up in different ways. As I wanted it to look like two friends having a Frappuccino in the park and then flying their kites way up in the sky. 

The background was pretty simple to make too the Stitched Slimline Slope Dies make for quick easy backgrounds. I just inked up the inside with different Distress Oxides to give the impression of grass and sky. Great for when your in a rush! I did layer the frame twice to add some depth and dimension. 


 For the sentiment I heat embossed white onto black card. I love this technique as it makes the sentiment really pop. Then to finish off my card I added some details with my gelly roll pens just adding some dots of colour in the sky and grass and then little dots on the cheeks and some shiny black noses. 

I hope you like my card for today and if you want to pick up any of the products you can get 10% off in the Time for Tea shop using code T4TNATALIE10 ❤️

Saturday, 2 July 2022

You're a reel star!


Happy Saturday Teatimer's I have a fun 3-D cinema card for you today. It was super easy to make and great for kids birthday cards or your movie loving friends. 
I cut out and coloured up the Movie Night Stamp using copic markers. Adding some finishing touches with a black gelly roll pen on the nose and some cute white dots on their cheeks. Once everything was cut out I could cut out the base. I used the Box Clever Die Set for this and cut it out of black card. This way I could figure out the height in which the seats needed to be. Adding the back one a little higher like it would be in the cinema.
It was at this point I realised I needed a pop of colour so added a lot of movie tickets in the background. Then at the sides I added some white panels which I stencilled the Popping Popcorn 6 x 6 Stencil using yellow and orange distress oxides, as you can see below.


To finish off the front I used the Purrfect Day Scene Builder Dies for the curtains and coloured them up with copic markers adding some little gold bands with a gold marker. Then for the sentiment I cut out another black strip and heat embossed my sentiment I didn't have any yellow embossing powder so coloured over my white with the same yellow copic marker over the top. I don't know whether this is good for your copics though so I wouldn't do it often and I scribbled off some ink on some scrap paper just in case. Then that was my card finished up. You can find all the products in the shop and get 10% off your order using code T4TNATALIE10. 


Tuesday, 7 June 2022

How To Create A Cute Scene For Cards

Hi DT Vic here today and I’m sharing a video Tutorial. I often get asked how I create my scenes for my cards and I thought it would be fun to show you.


Products Used: 

I knew I wanted to create a sweet scene using the Purrfect Day Stamp & Dies the cats in this set are so sweet. I also really love the little plants so I popped them at the bottom of my card to make it look like the cats are laying in a big window. 

I used my copics to colour in the images and using the coordinating dies I die cut them out. 


I then used some black card and white embossing powder for my sentiment. I show you in my video how this was all out together.


I hope you find the video tutorial helpful and it will hopefully help you out if your stuck creating a scene for your card. Don’t forget you can also save 10% off your order using the code: T4TVICKI10 at the checkout this includes the brand new release!

Thank you so much for popping by!
Vic x


Saturday, 14 May 2022

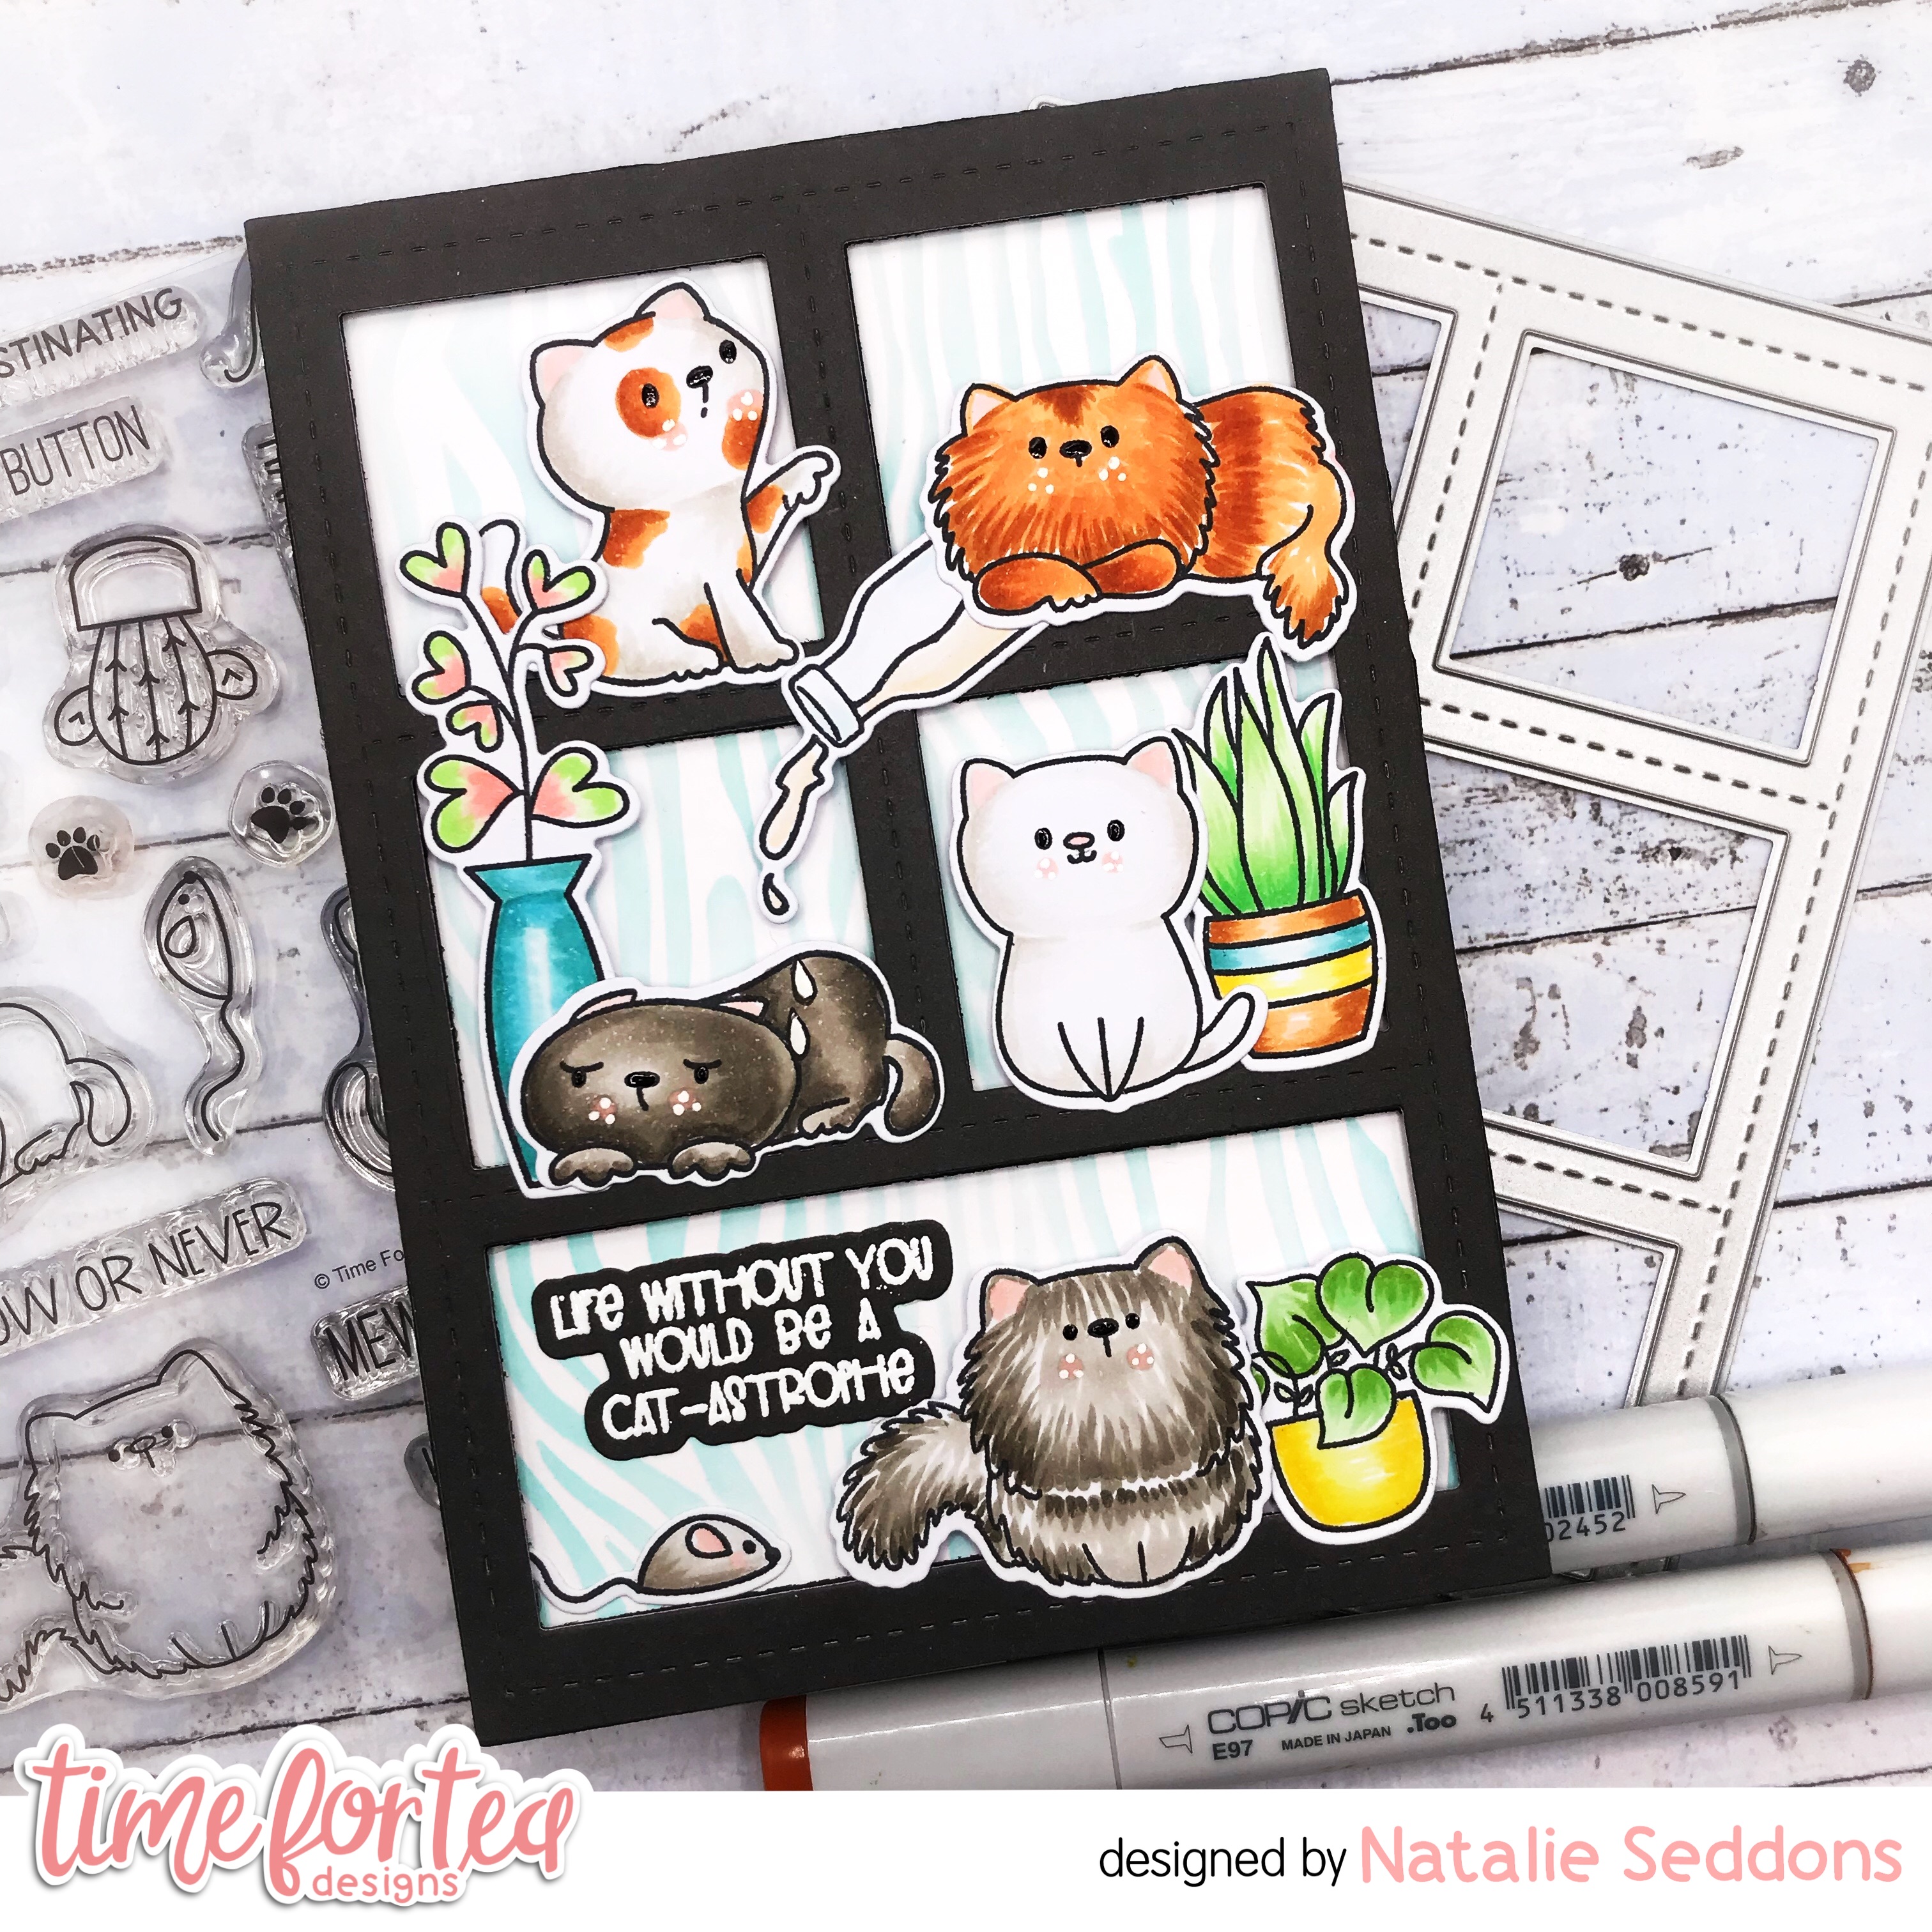
Life without you would be a Cat-astrophe!


 Happy Saturday Teatimer's the new release is finally in the Time for Tea Shop and wow what a release not only in size but in also in cuteness! The cheeky kitties have to be my favourite, so needless to say they were the first ones I coloured up. 

I used the Stitched Window Die to create a shelving unit and added the kitties from the both the Kitty Capers and Purrfect Day stamp and Die sets. I love how the furry ginger kitty is like it wasn't me whilst the other kitty is watching whilst there's milk spilling the milk over that poor grumpy kitty underneath. 
The two stamp sets work so well together but you still have so many images in each set alone to create a super fun scene. Underneath the images I used the new Tiger Stripes stencil to create a subtle wood effect behind. It just gives a little more detail so the background is not so plain but subtle enough to take over the card. 
I hope you like my card for today don't forget to check out the Time for Tea Shop for more inspiration and see the full release and if anything catches your eye you can get 10% off using code T4TNATALIE10. Have a great weekend and happy crafting!


Thursday, 24 March 2022

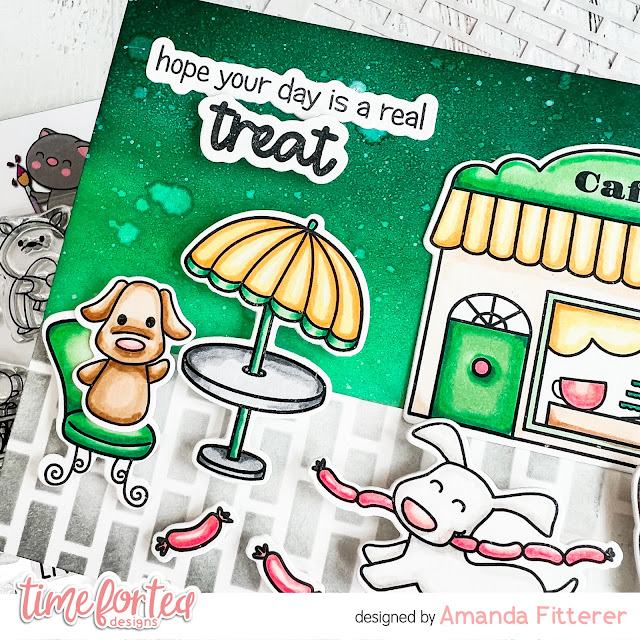
Cafe Critters are a REAL TREAT!


 Hello crafty friends!!  It's Amanda and I'm hoping you're having a GREAT day!!  If not, I hope this card cheers you up a little!

I have created this lovely scene using the Enjoy the Little Things and Cafe Critters stamp sets.  I stamped my cute little images from these sets using alcohol marker friendly black ink.  Then, I colored them with Copic markers and cut them out using the coordinating dies.  I also stamped my sentiment on a piece of white cardstock.

For my background, I ink blended Catherine Pooler's Flirty Fuschia and Dress Blues and then splattered white paint and water onto the background.


Once dry, I used 3D foam squares and liquid glue to adhere everything to my card front.  


I just love this color combination.. don't you!?  Thanks for stopping by the Time for Tea Designs blog today!

Don't forget, you can use code T4TAMANDA10 to get 10% off your purchase! 

I hope you enjoyed this post!!  Get crafty! Xx, Amanda

Saturday, 5 March 2022

Stop Beavering Away!

 Happy Saturday Teatimer's its Natalie here with a sweet Beaver card for you today. I finally got a chance to use the new Stitched Slimline Slopes Dies it's a great die for creating scenes with.  

I started out by cutting out the die and inking up the inside panels. Adding clouds in the top one with the slimline scene builder stencil some green distress oxides for the grass and a combo of blues for the water. Finishing off with some texture by adding splatters using the same colours I used to blend. 

The beavers and accessories and trees are from the Beavering Away Stamp Set which I coloured up using copic markers. Then I added the bulrushes from the Lucky Duck Stamp Set alongside the dragon fly and fly. 

After everything was cut and coloured I layered it all together on to my card base and finished it up with my sentiment which I stamped out and heat embossed onto black card. That was my card finished off it was a really quick and easy card to make but looks super fun. I hope you like my card for today you can find all the products in the Time for Tea shop and get 10% off your orders using code T4TNATALIE10. 
Have a great weekend and Happy Crafting!

Cute Sloth Video Tutorial

 Hi DT Vic here today and I have a fun Resist Embossing video. 


I absolutely adore the Be Slothy Stamp set and I just had to use them for my video today. I also made the background using the smaller images in the stamp set. In the video you will see how I created this background.


I used some Distress Ink ( Scattered Straw, Worn Lipstick and Tumbled Glass) along with my Beautiful Blending Brushes for the colours on my background. I started by using Versamark ink and sprinkling WOW Bright White Embossing Powder over the top. I heat set this and added the inks.


I then stamped and coloured my images using the following Copics: E23, E25, E27, E53, E55, E74, E79, YG91, YG93. I added these onto my card and die cut the sentiment using the Big Birthday Wishes Sentiment Die.


I loved how this turned out in the end. I hope you enjoy the Video and don't forget you can save 10% off your orders using the code: T4TVICKI10 at the checkout to receive 10% off your orders. 

Have a lovely weekend!

Vic x

Thursday, 3 March 2022

Hope your day is a real treat!


Hey friends!
It's Amanda here sharing my very first post as a proud Time for Tea Designs design team member!  I am so excited to share my creations with you!  I hope you get some inspiration from my cards and learn something new with every blog post!

Are these Enjoy the Little Things and Cafe Critters stamp sets just the CUTEST!?  Eek!  They look so good mix and matched, too!

For this card, I blended a background using Catherine Pooler's Minted, In the Park, and Deck the Halls inks.  I spritzed it with water and also flicked a bit of white paint on it.


While waiting for that to dry, I cut a panel of white cardstock for the ground.  I used the Tiled Wall Stencil and Twilight ink to create little pavestones.

Next, I stamped my images from the Enjoy the Little Things and Cafe Critters stamp sets, colored them with Copic markers, and then cut them out using the coordinating dies.


Finally, I assembled my card using liquid glue and 3D foam squares.


That's it for me today, crafty buddies!  Thank you so much for stopping by the Time for Tea blog today!  

Use code T4TAMANDA10 to get 10% off your purchase! 
See you next week!
Xx, Amanda

Saturday, 19 February 2022

Happy Mail, Hugs Enclosed!


Happy Saturday Teatimer’s, have you had a good week? You might have seen this cute card during the blog hop last week, so I thought I’d share with you all how I made it. 

I finally got to use the Happy Mail Gift Card Holder Die Set. I didn’t use it as a gift cardholder though, I just used it to create a fun shaped card base. I wanted some texture on my card so cut out the Dotty Hearts Cover Plate Die and ink blended Abandoned Coral, Picked Raspberry, Kitsch Flamingo and Spun Sugar Distress Oxides over the top to give and ombré look. Finishing off with a few splatters of water to give some texture and some splatters of gold water colour paint.

 Setting that aside to dry I stamped cut out and coloured up the skunks from the Stinkin’ Cute Stamp Set. I coloured them up with COPIC markers and added some finishing touches with white gelly roll pen. The letters are from the Happy Mail Critters Stamp Set and the Be Kind Be You Stamp Set which also contains the hugs enclosed sentiment (which I stamped and heat embossed in gold) then the balloons are from the Smitten Kitten stamp set. I really do love to mix and match my sets! Once all the colouring was done I could began adhering my card together.

I cut out the biggest of the two mail box dies the larger rectangle and the letter box die out of hot pink card. Then taking the Dotty Hearts panel I cut the smaller mail box out of that and to save my card being bulky and time I cut out the smaller rectangle in the middle. Then layered everything on top of each other as you can see the larger pink rectangle covered the hole.

Before adding my critters I needed to make the rest of my sentiments I used the Happy Mail die from the Happy Mail Gift Card Holder Add on Die Set which cut out in gold and white and layered on top of each other to create a shadow and used the same hot pink for the happy bigger shadow. 

Then I just adhered everything together using foam tape on the critters to give some added depth and dimension. To make the card base I just cut out the bigger of the two mail box dies from white 360gsm card twice and scored one of across the top about 2cm down and added double sided tape above the line and attached my card together. Then all was left to do was adhere the top and that's my card finished up. I hope you like my card for today it's super fun and great for just sending happy mail to a friend. You can find all the products in the Time for Tea Shop and get 10% off any orders using code T4TNATALIE10. Have a great weekend and I will see you all next week. 

Saturday, 22 January 2022

You’re a real cutie pie!


 Happy Saturday Teatimer’s are you loving the new release? It’s another super cute one isn’t it! You may have peeked this card yesterday on the blog/insta hop so I thought I’d share with you how I made it. 
All the products are from the new release I started by cutting out the A2 Hearts Stitched Cover Dies and did an ombré effect on it with Candied Apple, Picked Raspberry, Kitsch Flamingo and Spun Sugar Distress Oxide inks. Finishing it by spritzing water and then added splatters with the same colours and some gold watercolours. Setting this aside to dry I worked on the rest of the card. 
I wanted some depth with the Love Intertwined Die so cut it out 3 times with white 360 gsm card stock and layered them on top of each other. Then for the last layer I used some hot pink paper. I adhered this to the card panel I set aside so I could then layer in some glittery white paper. 
The sentiment and little cutie pie are from the new We Go Together Stamp Set. It’s filled with adorable images and I love how it has extra little faces you can add to the images that don’t have them so you can customise them yourself. Again with the coordinating dies they cut out the sentiments which is something I love about Time for Tea. It’s gives you a different option than the usual sentiment strip or just stamping straight onto the card. Once my pie was coloured and the sentiment heat embossed (the you I masked and stamped from the yourself sentiment in the Bold Sentiments Stamp Set) and cut out it adhered them to the card adding some depth with foam tape. I adhered my card to a black card base and that was it finished up. I hope you like it and if you would like to purchase any of the items in the shop you can get 10% off your order using code T4TNATALIE10 . Have a great weekend and happy crafting! 

Saturday, 25 December 2021

Merry Christmas!


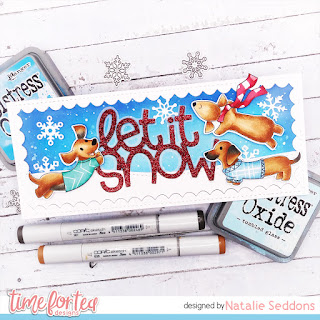
Merry Christmas everyone it's DT member Natalie here with a super cute Christmas card for you today. I just had to sneak in a last minute Christmas card with the Dachshunds. 
It was a pretty quick card to make I already had the Dachshunds coloured up. I love having pre coloured images ready it makes my life so much easier especially when time is short around this time of year. These cuties are new in the shop and are called Stop Dachshund Around. I also used the Sweet Summer and Brighter Days Paper Pads to paper piece there cute jumpers. 
To make the background I used the 
Falalala Die set to make the base which is one of my favourites at the minute it also includes gorgeous snowflake dies. 
I cut the die out of white card stock and ink blended a combination of blue distress oxides on the inner panel. I finished it off with a spritz of water and added some splatters of white acrylic paint. This just gives some added texture. 
Whilst this was drying I cut out another one of the falalala die again in white card stock and used the Slimline Hillside Border Dies to create the snow bank. With the off cuts I also cut out my snowflakes. 
Then all what was left to make was the sentiment. I love big sentiment dies and the Let it Snow one is so much fun. I cut out the sentiment in red glitter card and used some velum to cut out the back piece. I like the added interest of the velum but that you can still see the background behind. 
Then all was left to do was stick everything together I only glued the velum behind the sentiment so that you couldn’t see the glue and I added some foam dots to the dogs to give them some dimension and that was my card finished up. 
I hope you have a wonderful Christmas and a Happy New Year. Also don’t forget if you want to treat yourself in the shop you can get 10% off any orders using code T4TNATALIE10 ❤️ 

Saturday, 11 December 2021

Christmas Joy!


Happy Saturday Teatimer's how you doing with your Christmas cards? I'm so far behind with mine Christmas has really crept up fast.  Today I have a tutorial for a snowy wreath shaker card you can find all the details below. 


Materials 
• Acetate 
• Wow Gold Embossing Powder and Embossing ink
• Copic Markers 
• Red and White Cardstock 
• Copic Paper 
• Plaid Bow
• Iridescent Fake Glitter Snow 
• White Fun Foam
• Wood Print Paper 


How to Create 


1) Cut out the A2 Nesting Frame Dies twice out of fun foam then once each from the white and red card stock.
2) Adhere the largest red frame on top of the largest white frame then adhere these on top of the acetate using cosmic shimmer glue and cut the acetate to size. Layer the two fun foam frames underneath. Flip over and fill with the iridescent Fake glitter Snow and adhere the wood print paper to the back. 
3) Stamp out the wreath onto the Copic paper, colour in using Copic markers and cut out using the coordinating dies. Cut out the fun foam using the coordinating wreath die and adhere the wreath stamp on top using Cosmic Shimmer Glue. 
4) Adhere the wreath straight onto the acetate and add the little plaid bow on top.
5) Heat Emboss the Joy stamp onto red card stock using Gold Embossing Powder and cut out with the coordinating dies. Adhere onto the card and then adhere the shaker frame onto a card base.
I hope you liked today's tutorial let me know if you prefer this style or the usual one and don't forget if you would like to pick any of the products up in the shop you can get 10% off your order using code T4TNATALIE10 💗
 Have a great weekend and I will see you all next week!

Saturday, 13 November 2021

Cosy Winter!

 Happy Saturday Teatimer’s it’s DT member Natalie here with another super cute card to share with you all. I combined a mix of old and new for this snowy winter scene. I love how versatile the new City Break stamp set is from winter to summer it can be used all year round with just a change of characters and colours. 

I mixed the City Break stamp set with the bunnies  from the Cosy Winter Stamp set and the lamppost comes from the Carolling Critters Stamp Set. The Time for Tea Stamps just mix and match so well with each other, which is great if you love building scenes like I do! 

For the black frame I used the Zig Zag Frame and Tag dies it almost give it a comic feel to the card like the final scene in the book with the happy ever after 🥰 

Snowy Scenes are one of my all time favourites to create so I love how this card turned out and I hope you do too!  If you would like to create your own version and want to purchase any of the items I used in the Time for Tea shop or any other goodies you can get 10% off your order using code T4TNATALIE10 ❤️ 

Have a great weekend and I’ll catch you next week!

Saturday, 23 October 2021

Happy Winter Birthday!


Happy weekend Teatimer's it's DT member Natalie here with a winter birthday card. I just love the Winter Wreath set it's such a beautiful design and works so well on it's own or combined with the critters. To get started here's a list of materials I used.
 

· Winter wreath stamps and dies

· Salvaged Patina and Evergreen Bough Distress Oxide Inks

· Distress Oxide

· Autumn Scene Cover Plate Die

· White Fun Foam

· White and Red Cardstock

· Copic Paper

· Copic Markers

· Ink - Blending Brushes

· White Wow Embossing Powder and Embossing Ink

· Cosmic Shimmer Glue

How to Create

1) Cut out the Rectangle Die from the Autumn Scene Cover Plate Die from the white cardstock. Blend the Salvaged Patina all over the card stock and add Evergreen Bough Distress Oxides on the edges. Spritz water on top and dab off with tissue paper. Dab some of the oxides onto a paint palette and add water to add some splatters of colour. Leave to dry.

2) Stamp out the Winter Wreath stamp twice, three of the acorn leaves, two acorns, the trio of toadstools, one flower and the leafy branch onto Copic Paper. Colour with the Copics and Die cut out with the coordinating dies. Snip off the top of one of the wreaths halfway up at each side.

3) Using the wreath as a guide stamp and heat emboss the Happy Winter Birthday sentiment onto the ink blended card stock.

4) Stick on the full wreath around the sentiment with the cosmic shimmer glue. Cut out the fun foam using the coordinating die for the wreath and stick to the back of the half wreath using the cosmic shimmer glue and cut off the excess. Then stick this on top of the wreath using the glue. Sticking the trio of toadstools underneath.

5) Adhere the leaves onto the edges and the big acorn and acorn leaf onto the wreath. Then pop up the acorn at the bottom and the flower at the top of the wreath using some of the fun foam.

6) Pop the finished up piece onto the red card stock around 120cm x 150cm and adhere straight onto your card base.

I hope you like my tutorial for today I thought I'd try a different method so let me know which style you prefer. If you want to recreate my card or get anything in the Time for Tea shop you can get 10% off your Time for Tea order using code T4TNATALIE10 . Happy shopping and I'll catch you same time next week!

Friday, 8 October 2021

Halloween Shaker Card Video Tutorial

 Hello DT Vic here with you today and I have made a fun video tutorial that’s perfect for Halloween. I love creating Halloween cards they are always so fun to make. 


In my video I show you the steps on how to create a fun slimline shaker card. 


I went for traditional colours using black, purple, green and orange. You can of course use whatever colours you want for your card. The products I used are:

Slimline Postage Frames Die

Slimline Scalloped Nesting Dies

Starry Sky 6x6 Stencil

Spooky Circle Tags Clear Stamp Set

Spooktacular Clear Stamp Set

Beautiful Blending Brushes


For the shaker background I done some emboss resist this is fun technique to try and I also show you how to create different compartments for your sequins so you can add different colours of sequins to each heart. I used my copics to colour my images and the greeting is a SVG cut file that says Happy Halloween. 


I hope you enjoy the video tutorial and have fun creating some Halloween shaker cards. 

You can also save 10% off your order using the code: T4TVICKI10 at the checkout including the new release too!

Have a lovely day!

Vic


Tuesday, 5 October 2021

Follow Your Dreams with Unicorns in Training

 Hi crafty friends!  Its Elaine here today with my final Guest Designer card.  I absolutely adore anything and everything unicorns so I had to use this Unicorns in Training set.  

I stamped lots of images from the Unicorns in Training stamp set on to copic friendly cardstock.  I used some fun pink and purple copic markers to colour the mains and tails of the unicorns and for the body I used some light cool greys to give the image depth.  Here are the copic colours I used:

RV19, RV17, RV10, B66, B63, B60, V15, V12, V01, RV10, RV00, Y15, Y13, Y11, C3, C1, C00

I used the Unicorns in Training co-ordinating dies to cut out all the images and set them aside to work on the background.


Taking a piece of heavyweight white cardstock measuring 3.25" x 8.25" I began blending on Distress Ink in the shades Picked Raspberry, Blueprint Sketch and Dusty Concord in sections on the card.  I used the Time for Tea Designs Blending brushes to apply the ink and a very light hand to ensure a smooth blend.  To give the background a distressed look I splattered on some clean water with a smooth paint brush and dabbed the card with paper towel to leave some white spots.  I also added some ink splatters in the same Distress Ink colours over the co-ordinating areas to look like stars in a unicorn utopia!

I ran the distressed panel through my die cutting machine with the Slimline Scalloped Trio Circle Nesting Dies to created the three scalloped windows  I also second largest nesting rectangle to trim down the panel.  To create the panels behind the windows I blended on Distress Inks in Picked Raspberry, Blueprint Sketch and Dusty Concord on to small pieces of card slightly larger than the window openings.  I concentrated more colour at the top of the panel to give a gradient effect.

I used the largest rectangle die in the Slimline Scalloped Trio Circle Nesting Dies to cut a base from white card and adhered the two panels together.  I made my cardbase by cutting a piece of white heavyweight card to 7" x  by 8.5" and scored at 3.5 on the 7" edge.  Before applying the scalloped aperture panel to the card base I adhered the gradient panels behind the windows then secured the whole piece to the front of the cardbase.  I used liquid adhesive to adhere all my stamped images

For the sentiment I white heat embossed the word 'Dreams' and 'Follow your' on to white card stock.  I gently applied some Dusty Concord Distress Ink on the heat embossed sentiments to help everything co-ordinate.  The first part of the sentiment was cut into a thin strip and secured behind the die cut 'Dreams' to help it all blend together.

Finally, I went over (nearly all!) of the images with some Wink of Stella clear sparkle pen.  There can never be too much shimmer on a unicorn card!

That finishes up this card! Thank you so much for joining me today and I hope you have enjoyed all of my creations for Time for Tea Designs.  Take care everyone and have a great week! xxx Elaine xxx

.


Saturday, 18 September 2021

Snappy Before Coffee!

  Happy Saturday Teatimer’s this weekend has rolled around fast. Have you had a good week? Lots of crafting? That's hopefully my plan, it will be so nice to have a chilled out day. 

I know you all love coffee cards so I have a fun one to share with you today I just love a good pun don't you?!
The shape of my card didn't start out like it ended so I had originally cut out a stitched rectangle but I changed my mind after stencilling the sky and cutting out the grass. There was so much empty space so I used the new Square Label Dies to cut it out instead I like how the stitched detail stayed at the top and bottom though. Then I darkened up the sky edges with some chipped sapphire distress oxide to draw your eye in to the image. The sentiment is also stamped with the same ink. 
The crocodiles are from the new Snappy Before Coffee Stamp Set . They are super fun to colour I used the same yellow for their spikes and belly but darker greens on one and added some little spots and rosy cheeks. I coloured up the coffee cups and die cut everything out and adhered everything together. 
The it was time to make my card base I followed some kraft cardstock in half and took out one of the larger Square Label Dies. I popped the die onto the fold of the card making sure the part of the die that's on the fold is just hanging over the edge so it doesn't cut that part. Once it was made I added some splashes of coffee using the Coffee Stain 6x6 Stencil and adhered the rest if the card on top with some foam tape to give it some depth and that was my card finished up. I hope you like it it's a really quick one to make so great for any last minute needed cards. Hope you have a great weekend and don't forget you can get 10% off in the shop using code T4TNATALIE10 💖


Other Posts You Might Like