Well hey there, crafty friend! I hope you're doing well today!
Today's card that I get to share with you uses the Hooray Hamster stamp set!
Are these little guys just the cutest or what?!
To make this card, I ink blended a background using Melon Ice and Lime Rickey. I colored and die cut my images from the Hooray Hamster set. I placed a circle of vellum behind my hamster wheel to make it look more realistic!
I assembled the card using liquid glue and 3D foam squares.
For a finishing touch, I used some of my leftover hearts from this post.
Such a fun and happy card! Thank you so much for stopping by the Time for Tea blog today! See you again soon!
Use code T4TAMANDA10 to get 10% off your purchase!
It's Miki here and today I have a CAS card to share with you.
I started off by working on my background. I used masking tape to mask 3 sides of an A2 white panel. This will create a border around the card. I then used the Cracked Pistachio distress oxide and faded it out towards the top of my card. To add some details and a bit of sparkle I sprayed the background with a mix of water and perfect pearls and used a paper towel to pick up some of the droplets.
Next, I stamped and die cut the images from the You Got Mail set. I coloured them in using my Spectrum Noir Illustrator markers and added some white highlights for extra details. I then embossed the sentiments in white on black cardstock and used the matching dies to cut them out.
I added the images and sentiments on the panel using foam tape and glued it on an A2 card base.
Today's card is super simple, but it was a lot of fun making it. You can use my code T4TMIKI10 for 10% off the whole site.
It's Mothers Day here in the UK today and so I thought I'd share the card I made for my lovely mom. I decided to use these sweet little bunnies from the Blooming Bunnies Stamp Set, they are just perfect for a spring themed card.
To start I stamped and coloured my images using my new Ohuhu Markers (still trying to figure out blends but oh how I love those brush tips!)
Bunnies - WG050, WG01, WG3, WG4
Wheelbarrow - Y230, Y11, Y8
Red - R1, R3, R8
Pink - RV260, RV270, R12
Blue - B120, B250
Yellow - Y3, Y2
Green - CG070, NG06, NG09
For my background I die cut the Stitched Slopes Slimline Die from white card, keeping the the segments in place I masked off the bottom of the card and used the Slimline Scene Builder Stencil with Salty Ocean distress ink to create a sky. Masking off the top of the card I added distress ink in Twisted Citron to the bottom of the card, using the stencil again and Mowed Lawn distress ink added in the grass shape.
I die cut the Tree and Fence from the Windmill Add On Die Set from white card and added colour to the tree using my markers. I added these to the 3rd segment of the card.
At this point I decided I wanted to make my frame stand out so I die cut another of the Slimline die once more and added this to the tip of the panel.
I added the bunnies in the bottom half of the card underneath the fence and tree. I then used the MUM die to cut out the letters 3x from red card and the shadow from white card. This was added to the top of the card and the 'Happy Mothers Day' sentiment stamped underneath.
To finish off the card I added a few randomly placed Enamel Dots around the images.
Thank you for joining me here on the blog today, don't forget you can use my code T4TLYNDSEY10 for 10% off your order in store.
I then heat embossed the sentiment using some white embossing and adhered this to my card. I stamped out a few more coffee beans and coloured them in before adding these onto my card.
You can also save 10% off your order using the code: T4TVICKI10 at checkout.
Hello and happy Friday! Annalisa here today, have you seen the amazing sale going on over at Time For Tea Designs!? The SPRING CLEAN SALE is on until Monday, March 28th with 70% OFF selected items. Use SPRINGCLEAN22 at checkout, and your discount will be applied. I used several die sets, including Spring Blooms (part of the sale), to create this spring card.
To start, I used the Spring Blooms dies to cut out several flowers from coloured card stock. Next, I die-cut the letters 'Spring' using Anthony's Alpha Dies from some blue card stock. I added some Mermaid Lagoon Distress Oxide using my Beautiful Blender Brush to the bottom of the letters. I also cut the bunny elements using the Bunny Builder Dies using pink, black and white card stock and assembled the bunny using liquid glue.
I had a fence cut from white card stock in my stash (you could use the one in the Windmill Add On) and ink blended on some Weathered Wood Distress Oxide.
I used the Mini Slimline Scallop Dies to die-cut the scalloped frame and the outer panel. I added Dusty Concord Distress Oxide to the outer panel using my Beautiful Rainbow Blender Brush and then adhered it to a 6.5 by 3.5-inch card base.
I cut down a piece of yellow patterned paper from the Sweet Summer 6x6' Paper Pad and added some Wild Honey Distress Oxide to the edges. I glued the fence to this paper and then both of these to the purple panel.
I added foam tape to the back of the scalloped frame and adhered it to the purple panel. Next, I added the flowers using liquid glue. I stuck the bunny down using a combination of foam tape and liquid glue. For the letters, I added tiny pieces of foam tape to the back of each letter and added them to the panel in an off-kilter fashion - this was SUPER hard for my logical brain!
To complete the card, I used my white gel pen to add dashed lines to the purple panel and some white accents to various elements on the card.
Thank you so much for reading my blog, you can use my discount code T4TANNALISA10 when you visit the Time For Tea Designs shop to get 10% off your order.
Hello crafty friends!! It's Amanda and I'm hoping you're having a GREAT day!! If not, I hope this card cheers you up a little!
I have created this lovely scene using the Enjoy the Little Things and Cafe Critters stamp sets. I stamped my cute little images from these sets using alcohol marker friendly black ink. Then, I colored them with Copic markers and cut them out using the coordinating dies. I also stamped my sentiment on a piece of white cardstock.
For my background, I ink blended Catherine Pooler's Flirty Fuschia and Dress Blues and then splattered white paint and water onto the background.
Once dry, I used 3D foam squares and liquid glue to adhere everything to my card front.
I just love this color combination.. don't you!? Thanks for stopping by the Time for Tea Designs blog today!
Don't forget, you can use code T4TAMANDA10 to get 10% off your purchase!
I hope you enjoyed this post!! Get crafty! Xx, Amanda
It's Tasha and I'm here today sharing three background techniques using Distress Oxide inks, including the brand new colour; Saltwater Taffy.
Then once we have our backgrounds I'm going to make an Infinity, or full panel, shaker card using products that you will already have lying round your craft room! ;)
I really hope that you enjoy the video! Here are more, close up images of the three cards that I created in today's video tutorial!
I'll also have all of the products I used linked below, if you're interested in anything that I've used today.
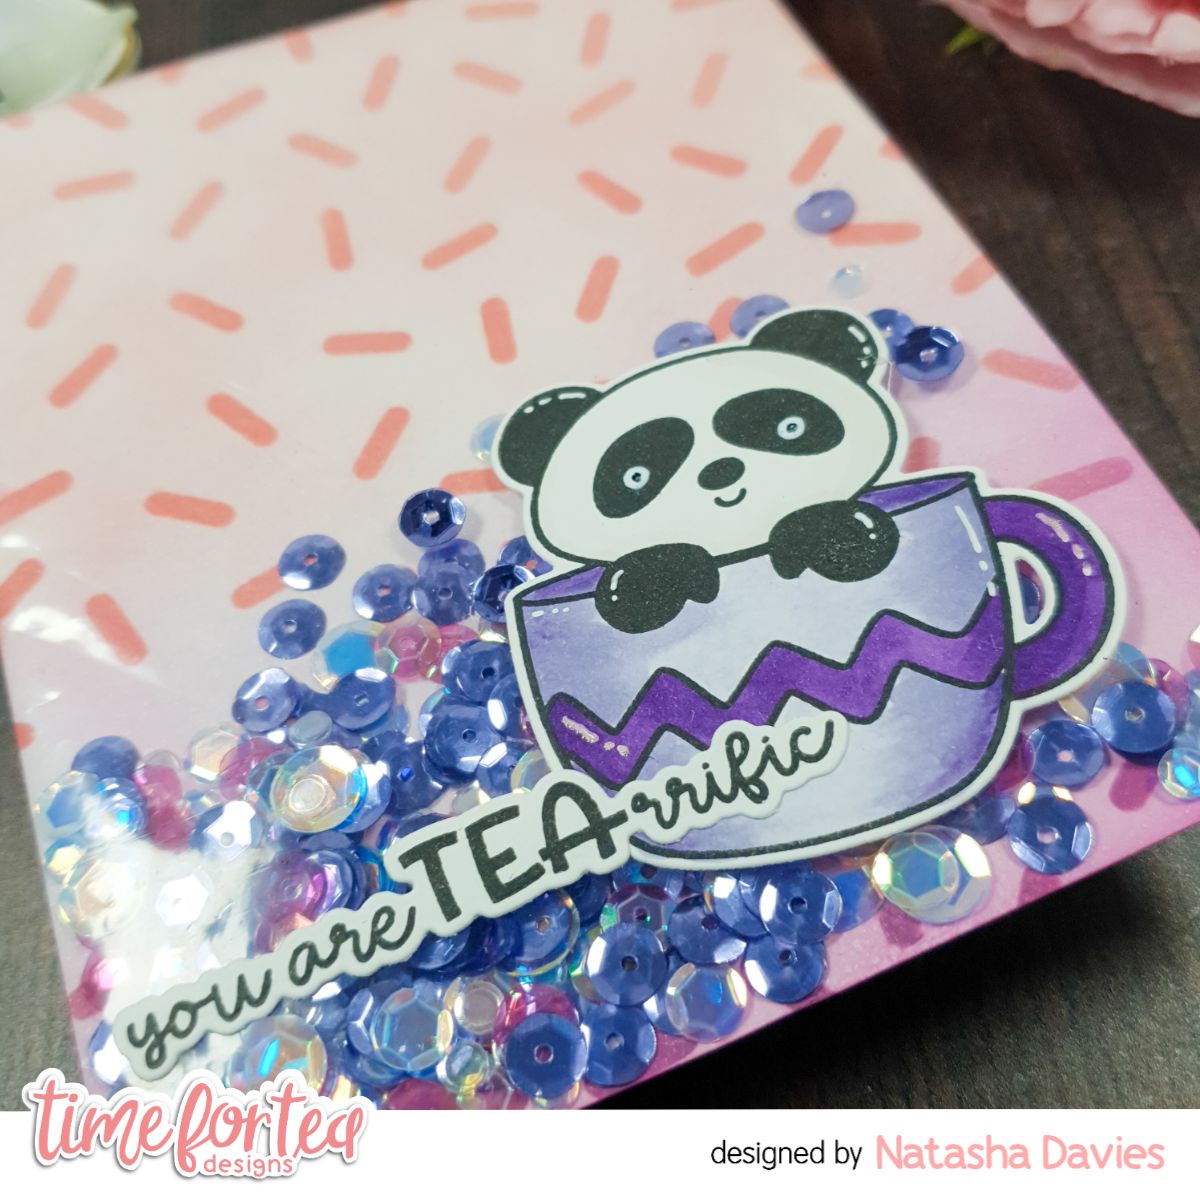
Card 1
For this card, I created a background with a stencil for a quick & fun look that can be customised in literally millions of ways!
Check out the stencils we have in the store, choose your favourite ink colours and get creative!!!
I finished this with this adorable Panda from the Tea-riffic Pals stamp & coordinating dies.
Card 2
This background is just straight ombre blend, I absolutely love making these backgrounds as I find ink blending therapeutic but I know that it isn't for everyone.
To add a little texture, I spritzed some water over the finished panel.
This one is finished so simply, with a vellum panel cut using the Love Heart Cover Panel die set and then the Big Birthday Wishes die. I stacked a white die cut on top of a holographic, slightly offsetting it to form a drop shadow. I really love how fun that looks!
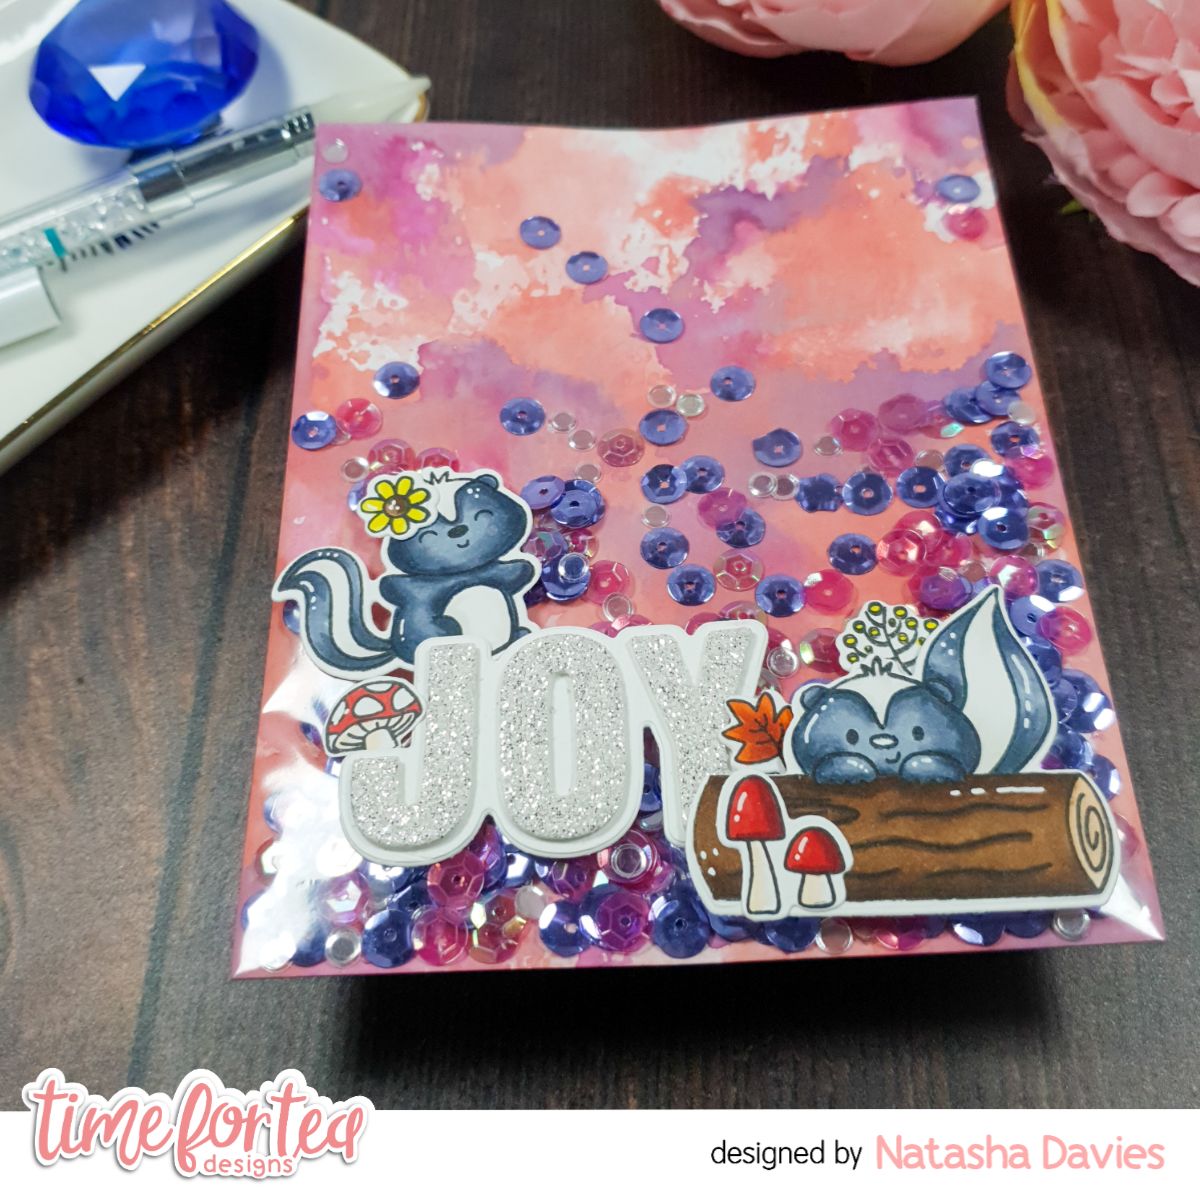
Card 3
I must admit, this is my favourite of the bunch!!! The ink smooshing background is so vibrant and fun!!!
I finished it with the Stitched Joy word die and some cuties from the Stinkin' Cute stamp & die set. I stamped them in Copic friendly ink and then coloured them in really simply.
I hope that you found some inspiration in today's tutorial and we'd love to see if you create anything inspired by this!
It's Miki here and today I'm back with a shaker card, yay! I know shakers are scary for some people, but they're so easy to make.
I started off by stamping the images. I used the kitty in the mug and the sugar cubes from the Tearrific Pals stamp set. I coloured them in using my Spectrum Noir Illustrator markers, cut them with the matching dies and added some white highlights. I then embossed the sentiment in white and used the matching die to cut it out.
Now, for the shaker I used the Wide Stitched Frame die and cut the largest one from white cardstock. I cut a piece of acetate roughly the same size of the frame and glued it at the back of it. I then added foam tape all around the frame. Make sure there are no gaps, this will ensure your sequins won't fall out! Next, you're going to add many, many sequins to your frame. When you're happy with the amount, remove the release paper from the foam tape and glue down your background.
Next, I made a card base and attached my shaker to it. To finish off the card I added my images and sentiment on top of the shaker with foam tape.
Shakers are so much fun and so easy to make, I hope you give this technique a try! You can use my code T4TMIKI10 for 10% on the shop.
Happy Saturday Teatimer's anyone else longing for warm summer days again?! It's been so wet and miserable recently that I decided to create my own summer's day instead, I just love that cheeky little skunk with their two fab ice lollies. It does look a tad warm in front of that hot sun though.
To make my card I used the Skies the Limit Slimline Dies which I cut out twice from white 360gsm card making sure to keep all of the cut out pieces. I then adhered the two die cuts together and layered on top of another piece of white card.
Taking the die cut pieces I ink blended Squeezed Lemonade and Dried Marigold for the sun and Tumbled Glass and Faded Jeans for the sky. Adding splatters on top using the same colours. Once dried I adhered the pieces back together.
For the grass I took some white card the same length and used the Slimline Hillside Scene Dies to cut out the grass. I ink blended this with Twisted Citron and Rustic Wilderness Distress oxide again adding splatters with the same colours.
The last thing to do for my card was colour up those cute critters from the Cool Critters Stamp Set. I used Copic markers to colour them up using a small range of colours so they all coordinate. I finished them up by adding some extra details to their cheeks and the skunks ice creams with white gelly roll and some pastel coloured Signo Uniball pens. Once they were all coloured I cut them out using the coordinating dies and adhered them to my card using foam tape to add some depth.
The last thing to do was add some dots and stars using the pastel pens and a gold gelly roll pen to add a little texture and some more details and that was my card finished up. I hope it brought some sunshine to your day! You can find all the products in the Time for Tea shop and get 10% off your order using code T4TNATALIE10.
Hello, DT Annalisa here today. We welcome Spring 2022 on Sunday so I am sharing a pretty tree in full bloom that I created using the Tree of Love Cover Plate Die. I can't wait to see the apple blossoms flowering in my neighbourhood, they bring me so much joy to look at and photograph on my daily walks.
I die-cut the tree from some Neenah Solar White 80 lb card stock and coloured it with my Copics. I loved colouring in the leaves with pinks, purples and reds rather than greens. I added some white gel pen accents and set this aside.
Next, I used Distress Oxides in the colours Tumbled Glass, Salvaged Patina (sky), Twisted Citron and Lucky Clover (grass) on some white cardstock using my Beautiful Rainbow Blender Brushes. I added some white and water splatter to the panel and set it aside to dry.
I stamped and coloured the ducks from Lucky Ducks and then die-cut them out. I then stamped the sentiment from You’ve Got Mail and die cut them out with the coordinating dies.
To assemble the card, I added the sky and grass coloured panel to a card base with some liquid glue. I then glued the tree to this and added the sentiment and ducks on top with some foam tape.
Thank you so much for reading my blog post, you can use my discount
code T4TANNALISA10
when you visit the Time For Tea Designs
shop to get 10% off your order.
Hey friends! It's Amanda back here again with another card to share with you!
Today's card is a fun Enjoy the Little Things and Cafe Critters card. I stamped my images with black Copic-friendly ink and then colored them with Copic markers. I also grabbed the hat and sign from the Hooray Hamster stamp set. Once I had them all colored in, I used the coordinating dies to quickly cut them out!
To create my faux brick background, I used the Tiled Wall Stencil and Rockin' Red ink from Catherine Pooler. I masked off the bottom third of my card panel and used the stencil on the top portion. Then, I flipped my mask to cover my newly created bricks and used Twilight ink to create a concrete ground.
For my sentiments, I've trimmed out a few of the sentiments from the Brighter Days Sentiment Cards. For a finishing touch, I added some of the hearts I had created on my last blog post.
And that is it for me today! I hope you've enjoyed this post and feel inspired to make something fun!
Don't forget that you can use the code T4TAMANDA10 to get 10% off your purchase!
Hi, Friends! My name is Lauren and I'm so excited to be a part of the Time for Tea Designs Video Team! I have my first video today and I thought I would I would share a tutorial of a typical card I love to create - a scene with lots of perspective and layering.
For this card I grabbed my Blooming Bunnies stamp set and dies, then went through my die sets to help me create a floral, Spring scene.
In the video I share which dies I use and how I add depth to die cut pieces of colored cardstock. Then I will walk through how I create each layer of the card using foam squares to create more dimension and perspective on the card.
Click the image below to start the video and make sure to leave a comment if you have any questions that I can help with in creating a scene!
Here is a quick list of the Time For Tea Designs supplies I used and make sure to enter my code T4TLAUREN10 at checkout for 10% off your order!