Pages

Showing posts with label Christmas Card. Show all posts

Friday, 26 December 2025

Christmas Wonder


Happy Friday, DT Annalisa here! I saved my favourite Christmas card that I made this year for last. I absolutely love this whimsical nighttime Christmas scene, created using the Santa’s Nice List and Sweet Christmas stamp sets.

For the background, I pulled out a moon masking stencil from my stash. I started by securing the negative (moon) portion of the stencil onto a 6" × 4 1/4" card base using double-sided removable tape. I then ink-blended Salvaged Patina, Tumbled Glass, Salty Ocean, Prize Ribbon, and Black Soot Distress Oxide inks to create a deep, moody night sky.

Next, I removed the negative piece and positioned the positive part of the stencil so that only the moon area was exposed. I ink-blended Squeezed Lemonade, Fossilized Amber, and Tumbled Glass to add soft colour and dimension to the moon.


To give the background a star-filled sky, I used a paintbrush to splatter both water and white paint across the panel.

For the ground section, I ink blended Hickory Smoke Distress Ink and Manatee Lawn Fawn Ink over a cobblestone stencil to create subtle texture.

I then stamped several images from the Santa’s Nice List and Sweet Christmas stamp sets, coloured them with Copics, and cut them out using my Brother ScanNCut SDX125e. I added white gel pen details with a Gelly Roll pen, and finished off some of the images with sparkle using a Quickie Glue Pen and Lawn Fawn Prisma Glitter.


The images were attached to the card base using liquid glue and double-sided foam tape for extra dimension.

To finish the card, I added a sentiment from the Sentiment Cards - Winter Wonderland | Black set: “It’s the Most Wonderful Time of the Year.”

Thank you so much for reading my blog post! Don’t forget to use my discount code T4TANNALISA10 when you shop at Time For Tea Designs to receive 10% off your order.

Friday, 19 December 2025

Colourful Penguin Christmas


Happy Friday before Christmas! DT Annalisa here today sharing a sweet and colourful penguin scene I created using the It's Penguin-ing to Look A Lot Like Christmas stamp set from Time For Tea Designs.


To make the background panel, I used watercolour paper and Distress Watercolour Pencils in Cracked Pistachio, Salvaged Patina, Peacock Feathers, Shaded Lilac, Picked Raspberry, and Spun Sugar. I followed a technique from one of Jenn Shurkus’s Get Cracking on Christmas tutorials on YouTube. She has so many fantastic tutorials, a wonderful blog, and terrific classes. I highly recommend checking her out if you want to learn more about using Distress Watercolour Pencils.


Once the A2 panel was dry, I used a palette knife to spread White Embossing Paste by Wendy Vecchi over a snow stencil from my stash. After letting it dry for about an hour, I attached the panel to a card base using double-sided tape.

For the card images, I stamped elements from several sets: Skating By Penguins (ice), Merry Cheesemas (round Christmas ornament), and It's Penguin-ing to Look A Lot Like Christmas (penguins and igloo). I coloured everything with Copic markers and cut the pieces out using the coordinating dies. I added white gel-pen accents with a Gelly Roll Pen and added a touch of sparkle to some images using a Quickie Glue Pen and Lawn Fawn Prisma Glitter.


I adhered the images to the card base using either liquid glue or foam tape for added dimension.

Thank you so much for reading my blog post! Don’t forget to use my discount code T4TANNALISA10 when you shop at Time For Tea Designs to receive 10% off your order.


Friday, 5 December 2025

Cheesy Christmas


Happy Friday, DT Annalisa here! Today I’m sharing a cheesy Christmas card featuring the Merry Cheesemas stamp set and the Say Cheese Cover Plate Die. I love that I was able to use a non-traditional Christmas colour for the background of this project!

I began with watercolour paper and a mix of Squeezed Lemonade, Scattered Straw, and Rusty Hinge Distress Inks, along with Fossilized Amber Distress Oxide. I pressed the inks onto my glass mat, spritzed them with water, and then swiped and pressed the paper into the colour. I heat-set the panel between layers to build depth and texture.


Once the panel was dry, I die-cut it with the Say Cheese Cover Plate Die. I adhered the panel to a card base with double-sided foam tape and used liquid glue to secure the small cheese-hole pieces in place.

Next, I stamped several images from the Merry Cheesemas stamp set, coloured them with Copics, and cut them out using my Brother ScanNCut SDX125e. I added highlights with a white Gelly Roll pen. The mistletoe image is from It's Penguin-ing to Look A Lot Like Christmas, the heart is from Seasons Tweetings, and the red stocking is from Santa’s Nice List.

I added sparkle to some of the images using a Quickie Glue Pen and Lawn Fawn Prisma Glitter, then adhered everything to the card with liquid glue.

Thank you so much for reading my blog post! Don’t forget to use my discount code T4TANNALISA10 when you shop at Time For Tea Designs to receive 10% off your order.


Friday, 28 November 2025

Candy Cane Christmas


Happy Friday, DT Annalisa! Today I’m sharing my first Christmas card of the season, featuring the adorable Sweet Christmas stamp set from Time For Tea Designs.

To create the background, I started with watercolour paper and Distress Watercolour Pencils in Prize Ribbon, Peacock Feathers, Evergreen Bough, Uncharted Mariner, Mermaid Lagoon, and Iced Spruce. I layered the colours one at a time, heat-setting between sprays to build depth and texture. For a final touch of interest, I added splatters of Picket Fence Distress Spray Stain.


I die-cut a frame from white cardstock using the Stitched Window Cover Die and adhered it to the blue panel with liquid glue. I then used liquid glue to adhere them both to a white card base. 

Next, I stamped several images from the Sweet Christmas stamp set, coloured them with Copics, and cut them out using my Brother ScanNCut SDX125e. I added highlights with a white Gelly Roll pen.

The “Happy Christmas” sentiment is from the Simple Sentiments set. I stamped it with VersaMark ink, sprinkled on Ultra Fine Embossing Powder, and heat-set it until smooth and melted. I then used a die from the A6 Simple Nesting Dies to cut it out.

I adhered the images to the card base with liquid glue and foam tape to add dimension.


Thank you so much for reading my blog post! Don’t forget to use my discount code T4TANNALISA10 when you shop at Time For Tea Designs to receive 10% off your order.


Friday, 27 December 2024

Penguin Christmas Shaker


Happy Friday! DT Annalisa here sharing my last Christmas card of the year, a colourful shaker featuring the It's Penguin-ing to Look A Lot Like Christmas stamp set from Time For Tea Designs.

I started with watercolour paper and die-cut using the Stars Stitched Cover Die. Then, I sprayed the die-cut panel with Mermaid Lagoon and Uncharted Mariner Distress Spray Stain and used my Heat It craft tool by Ranger to dry it. After that, I added some shimmer by spraying the panel with Cocktail Party Mica and Merry Mint Mica.

I used White Silver Neenah cardstock to cover the entire surface of the card base. Next, using double-sided tape, I adhered acetate to the back of the inked star panel. I placed 3mm double-sided tape on the back of the panel and attached it to the card base. Before securing the star panel, I sprinkled Candy Christmas sequins mix from Pawsome Stamps in the appropriate areas.

I stamped and coloured several images from the It's Penguin-ing to Look A Lot Like Christmas set using Copics, then cut them out with their coordinating dies. I added white gel pen accents with a Gelly Roll Pen. The Christmas tree and candies are from Gingerbread Family - Our House to Yours.

To add some sparkle, I applied small dots of glue to select areas on the stamped images using my Quickie Glue Pen by Sakura and dipped them into Lawn Fawn Prisma Glitter. I then secured all the stamped elements to the card using liquid glue.

For the sentiment, I stamped "Happy Christmas" from the Simple Sentiments set onto black cardstock with VersaMark ink. I sprinkled Alabaster ultra-fine embossing powder by Brutus Monroe (in white) over the stamped sentiment and heat-set it. I used a small rectangle die to cut it out.

To finish the card, I added some clear dots from Pretty Pink Posh for an extra touch.

Thank you so much for reading my blog post! Don’t forget to use my discount code T4TANNALISA10 when you shop at Time For Tea Designs to receive 10% off your order.


Friday, 13 December 2024

Have A Sweet Christmas


Happy Friday, DT Annalisa here today
! I used the new Sweet Christmas stamp set from Time For Tea Designs to create a pastel pink Christmas card. I really enjoyed incorporating non-traditional Christmas colours into this project.

To begin, I die-cut Distress White Heavy cardstock by Ranger using the Wonky Window Cover Die. I then ran it through my Big Shot a second time with the Snow Flurry Cover Die, which creates a lovely stitched pattern that I love!

Next, I ink-blended the panel with Saltwater Taffy Distress Oxide and my Beautiful Blender Brushes. After that, I sprayed Sugary Gumdrop Distress Mica Stain onto the panel to add a beautiful shimmer.

I trimmed paper from the Joyful Winter Paper Pad to fit a card base measuring 5 3/4 inches by 4 1/8 inches and adhered it using double-sided tape.

For the pink panel, I applied 1 mm double-sided foam tape to the back before attaching it to the card base.

I stamped and coloured several images from the Sweet Christmas set using Copics and cut them out with the Brother Scan N Cut SDX125e. To add some detail, I used a white gel pen for accents with a Gelly Roll Pen.


I placed the stamped images in the openings of the card using 1 mm double-sided foam tape. I also added sparkles to some images using a Quickie Glue Pen and Lawn Fawn Prisma Glitter.

Finally, I stamped the sentiments, cut them out with the A6 Simple Nesting Dies, and adhered them to the card with liquid glue.


Thank you so much for reading my blog post. Remember to use my discount code T4TANNALISA10 when you visit the Time For Tea Designs shop to get 10% off your order.

Sunday, 8 December 2024

Sweet Christmas

 Hi Friends!
I’m Patricia and today I share you a new Christmas card with  Sweet Christmas stamp set


I've created a Slim Card with some characters of set, I've colored with Copic Markers.

For the background I've used Distress Oxide ink Spun Sugar color and liquid inks for splash on.


The sentiment in the center of the card, I've created with Joy Stitched Sentiment die and Joyful Winter 6x6 paper pad. 


Thank you so much for reading my blog post. Remember to use my discount code T4TPATRICIA10 when you visit the Time For Tea Designs shop to get 10% off your order. Happy Crafting! 

Sunday, 1 December 2024

Have a mice & gouda Cheesemas!!

 Hi Friends!
I’m Patricia and today I share you a new Christmas card with new release Merry Cheesemas stamp set.


I've used the Stitched Circle dies to background and center of my card and put all elements of the set over creating a christmas scene with the mouses.


The background circle I've used Distress oxide inks (Fossilized Amber, Wild Honey & Vintage Photo colors) and ink splashes. Also I've decorated with enamel dots and sequins. All stamps are colored with Copic Markers.


Thank you so much for reading my blog post. Remember to use my discount code T4TPATRICIA10 when you visit the Time For Tea Designs shop to get 10% off your order. Happy Crafting! 

Friday, 15 December 2023

Sweet Gingerbread Christmas


Happy Friday! DT Annalisa here sharing a sweet mini slimline Christmas card featuring the Gingerbread Family - Our House to Yours stamp set from Time For Tea Designs. This is an adorable stamp set that is perfect for Christmas cards.

I die-cut dark blue cardstock using the rectangle in the Mini Slimline Scallop Die set. I sprayed the blue cardstock with Distress Mica Stain in Snow flurries. It is hard to see in photos, but I love the shimmer and shine that Mica sprays add to projects. 


I used liquid glue to stick the blue panel to a wide card base (6 1/2 by 3 5/8 inches). Next, I die-cut white cardstock using the same die set to create a mini scalloped frame and used liquid glue to adhere it to the card. I added 'snow' to the sky using a white metallic marker.

I stamped and coloured (with Copics) several images (and the 'have a sweet Christmas sentiment) from Gingerbread Family - Our House to Yours and cut them out with their coordinating dies. I added white gel pen accents with a Gelly Roll Pen. The little bird is from Love Is In the Air and it was cut out with the coordinating dies.


I stuck the images to the card base using a combination of liquid glue and double-sided foam tape for dimension.

Thank you so much for reading my blog post. Remember to use my discount code T4TANNALISA10 when you visit the Time For Tea Designs shop to get 10% off your order.


Friday, 1 December 2023

Slimline Christmas Houses


Happy December, DT 
Annalisa here and I am kicking this month off with a CAS (clean and simple) slimline Christmas card that I created using three dies and no stamps. I rarely do this, but I really enjoyed making this card. 

I used the Simple Slimline Nesting Dies to die-cut a white panel and some blue cardstock. I sprayed the blue cardstock with Distress Mica Stain in Shiny Bauble to add shimmer. I love the shimmer and shine that Mica sprays add to projects. 

Slimline Christmas Houses card

I used liquid glue to adhere the blue panel to the white panel and a slimline card base. I used the Slimline Mini Village Die to cut white cardstock that I then glued to the card. 

I ink-blended lumberjack plaid Distress Oxide onto white cardstock and then used Anthony's Alpha Dies to cut out the letters to create the word 'Christmas.' I added sparkles to the bottom of each letter with a Quickie Glue Pen and Lawn Fawn Prisma Glitter.


I used liquid glue to stick the letters to the card base. Next, I added Designer Enamel Dots Clear Bubbles to complete the card. 

Thank you so much for visiting my blog. Remember to use my discount code T4TANNALISA10 when you visit the Time For Tea Designs shop to get 10% off your order.

Saturday, 12 November 2022

You mean a Latte to me!


So the new Time for Tea release is finally here and what a cute one it is. Like everyone else I think I was instantly in love with the cute Gingerbread Family Stamp Set, so keep looking back for more inspiration for them. I have so many ideas I want to create with them!
For today's card though I wanted to create a cosy Christmas coffee scene combining them with the Pumpkin Spice Stamp Set. We all know how much coffee is a well loved theme for us Crafter's so this is another super fun set. 
Using red and green as my theme I began colouring up my images, adding a pop of yellow with the pumpkins. As usual I used my trusted copic markers to colour up my images and added some extra details with my white gelly roll pen. 
The base of my card I used the Wide Stitched Frame Dies which I'm absolutely loving at the minute. I used a rich red for the frame and a nice Christmas green for the inside which helps adds some contrast to the card. I mounted these onto my card base and used some foam tape to give the red frame some height so I could layer the images at different heights too to add some extra interest. After everything was adhered I realised I didn't quite place the images right on the left hand side so added in some steam from my mug to add a little interest. Then added some dots of red, gold and white using gelly roll for some background detail and white heat embossed my sentiment which came from the Perfect Blend Stamp set and that was my card finished up. 
I hope you like it and be sure to check back for more inspiration. You can find all the products in the Time for Tea Shop and get 10% off your orders using code T4TNATALIE10. Have a great weekend and I'll see you all next week!


Monday, 13 December 2021

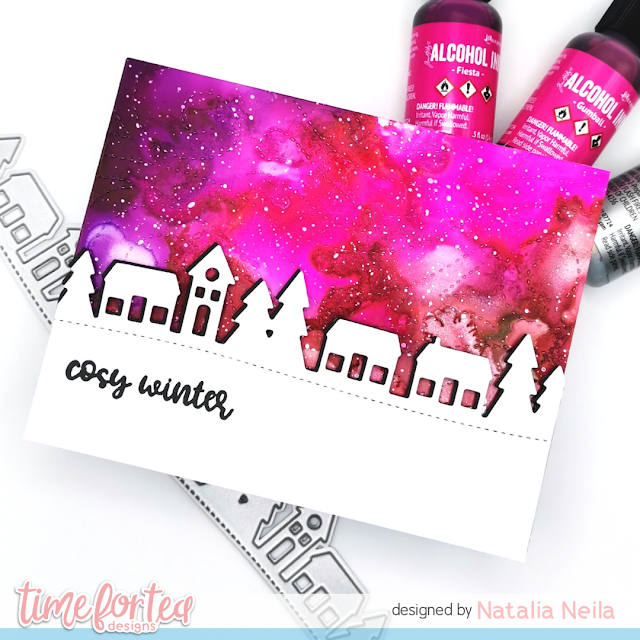
Cosy winter & alcohol inks

Hello, Tea Timers! 

Natalia here with you today. I have a quick card to share with you today.

To start with, I made my background panel with alcohol inks. I used Fiesta, Gumball, Boysenberry and Sterling Alloy. I also added some splatters with white gouache.

Once that was dry and ready, I used the Snow Flurry Cover die to give it some texture. I really like this die - it is so beautiful!


The next step was to die cut the Slimline Mini Village die twice, once from black cardstock and once from white cardstock. I stamped the sentiment 'cosy winter' from the A5 Cosy Winter Stamp set twice with Onyx Black Versafine ink onto the front panel.

I glued the black die cut houses behind my white panel to give it some shadow and extra depth - I learned this technique from my lovely friend Raquel who is a master with die cuts! 

I used double sided foam tape to stick the houses onto my alcohol ink background panel, and that's it! That completes this card. 

Do you use alcohol inks often? I certainly want to use mine more!

If you are looking to buy some goodies from the shop, either for you or for a crafty friend, use code T4TNEILA10 for a 10% off your shop!

Sending hugs,

Natalia


Friday, 10 December 2021

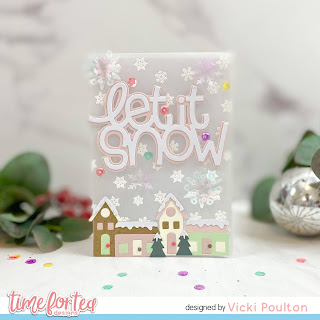
Vellum Christmas Card Video Tutorial

 Hello! DT Vic here today and I am sharing a fun video tutorial. I have made a video on how to create a card using vellum as your base. I love using vellum as a card base and it also looks really lovely too.


In my video I will take you through each step on how I made this Christmas card. Plus there is no colouring or stamping used so if your a fan of die cutting this is perfect for you, however if you want to add any stamped images then this will also look great.


To make the card you will need the following products: 

Stop Dachshund Around Stamp Set

Home For Christmas Dies 

Let It Snow Sentiment Die

Falalala Scalloped Slimline Dies

Vellum 

Sequins

PVA Glue

Coloured Cardstock

White Embossing Powder


I loved how this card turned out and I hope you have as much fun as me using vellum. Don't forget you can save 10% off your order using the code: T4TVICKI10 at the checkout this includes the new release products too. 

Thank you so much for popping over today!

Vic 

Saturday, 4 December 2021

Festive Christmas Cheer!


Hi Teatimer's it's DT member Natalie here with some Christmas inspiration. I love how Jo has created some festive elements to add to the Open the Door Die set the new set is called Open the Door Holiday Add on Set and comes with lights, a wreath some fun trees and other bits and pieces. It also has a fun element too as it can open, on this occasion though I decided to keep it closed so the wreath and the other details were the main focus along with the mouse (from the Baked with More Love Stamp set) and their huge stack of presents.
It was such a fun card to make and not a lot of colouring involved so nice and easy to make. I did a stencilled background with the new Tiled Wall 6 x 6 Stencil but decided to keep a white on white look and just add texture using an embossing paste. I think this keeps your eye on the main feature but adds a little interest to the background. 
I just love how it all turned out it's such a cute fun Christmas card to make and I can't wait to see your versions. It could be quite simple like mine or you could really bling it up and add more glitter, snow and baubles. Don't forget to share with us when you do and if you want to get any of the products used in my card or anything else in the shop you can get 10% off your orders using code T4TNATALIE10
Have a great weekend and Happy Crafting!


Monday, 22 November 2021

Cosy winter & embossing powders with stencils!

Hello, Tea Timers!

Did you see the WOW! embossing and T4TD collaboration blog hop? So much inspiration and sparkle! Make sure to check it out for a chance to win a giveaway voucher!

For my card, I used an the Line Em Up stencil with three gorgeous WOW! embossing powder colours: Blue Glitz, Cummerbund and Halo (soooo shinny!!).
I made a reel showing how I made it which you can see here.

I then used the A5 Cosy Winter Stamp set and coordinating dies, which is an awesome set with lots of lovely critters and accessories. I coloured them with my Ohuhu alcohol markers and added some highlights with a white gel pen. Of course I had to add some glitter to their scarves too! It is a Christmas card after all :)


I hope you like it and don't forget to use the code T4TNEILA10 for a 10% off your shop!

Sending hugs,
Natalia

Wednesday, 23 December 2020

Have A Treemendous Christmas!

Happy Wednesday!

It's DT Shabneez and as there are just a couple of sleeps left before Christmas I thought I'd share a Christmas scene.


In my head I had an outdoor Christmas tree with the bunny stuck in it trying to sort the lights out.  Above him was his friend holding a banner out of the window.  

I began with the background for which I cut a scalloped base with the Scalloped Slimline Die.  I placed the Brickwall Stencil over it to create a background with blended Distress Oxide inks.  I then cut out the window frame with grey card and placed some blue card in the background.


Using the Christmas Surprise Clear Stamp Set I stamped and die cut the images with the co-ordinating dies, colouring in the critters with my Chameleon pens.  I die the tree again with green card and paper pieced it.  I used Nuvo drops on the baubles to add texture and shine.

I stuck the tree at the bottom of my card and then another critter peeking out the window holding the Christmas banner up!

I would like to take this opportunity to wish you all a Merry Christmas!


Other Posts You Might Like