
Pages

Showing posts with label alcohol inks. Show all posts

Friday, 31 October 2025

Halloween Trio


Happy Halloween! 🎃 DT Annalisa here, and today I’m sharing my fourth and final handmade Halloween card of the season! This project features a bright alcohol ink background and the adorable Spooky Circle Tags from Time For Tea Designs.


To create the background, I used Ranger alcohol inks, Yupo paper, Ranger blending solution, 99% isopropyl alcohol, and the Tim Holtz Ink Air Blower. The colours I went with are Ranger Indigo, Flamingo, and Amethyst.

Once the Yupo paper was dry, I die-cut it using the Sweet Scalloped Dies and attached it to a card base with liquid glue.


Next, I coloured the Spooky Circle Tags and candy images with Copic markers, then added a few white gel pen accents for extra pop. The stars are from Santa’s Nice List, and the sentiment comes from the Haunted House stamp set. I adhered all the elements with liquid glue.


For a touch of sparkle, I used a Quickie Glue Pen along the edges of a few images and sprinkled on some Lawn Fawn Prisma Glitter. ✨

Thank you so much for stopping by and checking out my post! Don’t forget to use my discount code T4TANNALISA10 when you shop at Time For Tea Designs to get 10% off your order.


Monday, 13 December 2021

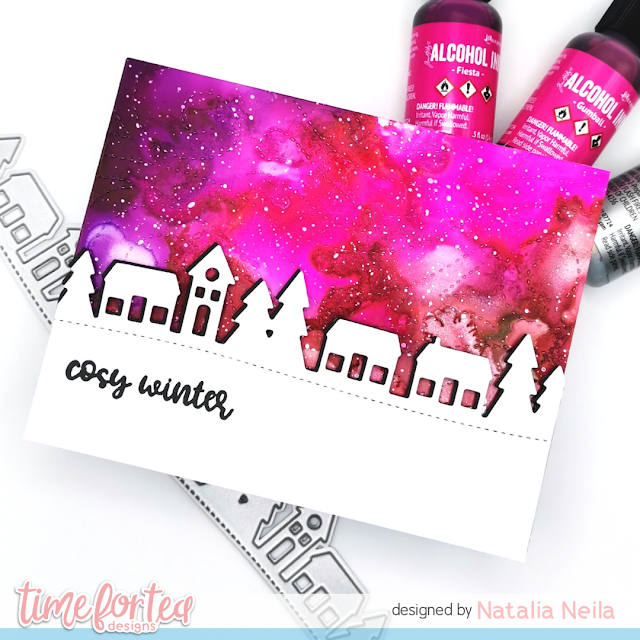
Cosy winter & alcohol inks

Hello, Tea Timers! 

Natalia here with you today. I have a quick card to share with you today.

To start with, I made my background panel with alcohol inks. I used Fiesta, Gumball, Boysenberry and Sterling Alloy. I also added some splatters with white gouache.

Once that was dry and ready, I used the Snow Flurry Cover die to give it some texture. I really like this die - it is so beautiful!


The next step was to die cut the Slimline Mini Village die twice, once from black cardstock and once from white cardstock. I stamped the sentiment 'cosy winter' from the A5 Cosy Winter Stamp set twice with Onyx Black Versafine ink onto the front panel.

I glued the black die cut houses behind my white panel to give it some shadow and extra depth - I learned this technique from my lovely friend Raquel who is a master with die cuts! 

I used double sided foam tape to stick the houses onto my alcohol ink background panel, and that's it! That completes this card. 

Do you use alcohol inks often? I certainly want to use mine more!

If you are looking to buy some goodies from the shop, either for you or for a crafty friend, use code T4TNEILA10 for a 10% off your shop!

Sending hugs,

Natalia


Monday, 25 October 2021

BIG HUGS and alcohol inks

 Hello, Tea Timers! 

It is Natalia here. I hope your weekend was as awesome as mine! I went to the Stamperama craft show up in Harrogate and had the best time! It was so great to meet Jo and Ant as well as Natalie and Jayne from the design team - we even did some crafting together! 

Now, let's talk about today's card! I took my alcohol inks out, which doesn't happen often, and made a few backgrounds with them. This rainbow coloured one was my favourite of all! and thought it would go so nicely with the 'big hugs' sentiment die.

The colours I used were: 

  • Rosewood
  • Dandelion
  • Clover
  • Glacier
  • Boysenberry
  • Sterling alloy for some shine


I certainly require more practice with these inks, and I should probably watch more videos on how to use them, but the main thing is that I had soooo much fun just playing with these - it was great! Watching the colours move is fascinating. I would recommend watching Jennifer McGuire's videos on alcohol inks for ideas. 

The big hugs sentiment die cut is a die I love because it is the right size to fill up your A2 card panel and it has a drop shadow (a must for sentiments in my books!). 

I die cut it from white cardstock 3 times, for dimension, and for the upper layer, I inked up some white cardstock with my WOW embossing pad and added some Catherine Pooler Halo embossing powder - it is soooo shinny! I love it. I then die cut the word HUGS from it, ensuring that only half of the letters had the embossing on it. I repeat the process with the word BIG and mounted all my letters together. 

Next, to ensure each letter was straight on the back shadow, I created a guide template: I die cut the BIG HUGS and shadow dies together, and used the openings as a guide to glue down my letters onto the vellum shadow.

I added a few sequins and gems and that completed my card!


I love how it turned out, it is so colourful and happy! I hope you do too. 

For a 10% off the Time for Tea Designs shop, use the code T4TNEILA10

Sending hugs,
Natalia


Monday, 24 May 2021

So hoppy you're my friend

Happy Monday crafty friends! 

DT Natalia here with you today, and I am back with a new card featuring the Tulip Add On Die Set and the Blooming Bunnies stamp set. 


When I craft, I like thinking of different ways in which I can stretch my dies and stamps, and use them differently. In this case, instead of using the Tulip Add On Die panel on a slimline card as I did last week (check it out here if you missed it!), I decided to use the gorgeous die cut tulips as the central focus of my card. 

I used alcohol inks to create three different panels from which I die cut the tulips. I used Dandelion, Sunset orange and Poppyfield, and on every panel I used Sterling Alloy for the shine effect - pictures do not pay the shimmer justice, specially these pictures I took yesterday, the weather was so grim here in the UK!


The orange panel on this card is and A2 size - 4.25x5.5" and the white panel is slightly smaller - 4x5.25". Each tulip has 3 white layers of cardstock plus the yupo paper tulip on top. Just as Laura Fadora says; #dimensionislife - and I can only agree. The 'friend' word die cut follows the same process, with a vellum shadow. If you follow me on Instagram, you already know I am hooked to these word sentiments from Time for Tea Designs; they are a perfect size, and they come with shadow, which I very much love with a sentiment! 

The bunnies are coloured with my Spectrum Noir markers and I used EB7, MB4, MB3, MB2 and MB1. For the cheeks I used PP3 and then I added some highlights with a white gel pen.

I used white embossing powder for the 'so hoppy you're my' sentiment and used the Blooming Bunnies coordinating die to die cut it and the bunny.


To save 10% off your shop, remember to use the code T4TNEILA10  

I hope you like the card and have a wonderful week ahead! See you next Monday with something very exciting!

Sending hugs,

Natalia

Other Posts You Might Like