Pages

Showing posts with label Life's Ups & Downs Clear Stamp and Die Set. Show all posts

Saturday, 29 October 2022

Halloween Pumpkin Kitty


Happy Friday! DT Annalisa here, I have a cute slimline Halloween card featuring the Trick or Treaters Digital Stamp Collection and Haunted House Clear Stamp Set from Time For Tea Designs.

I used coloured paper from my stash and die-cut them with the Simple Slimline Nesting Dies. I added Shaded Lilac and Dusty Concord Distress Oxide to the edges of the purple paper using my Beautiful Rainbow Blender Brushes, and Villainous Potion Distress Oxide splatter with a paintbrush.

 For the grass, I used the Slimline Hillside Scene Dies and added Cracked Pistachio to the edges and Mowed Lawn Distress Oxide splatter. I used liquid glue to adhere these to an 8.5 by 3.5-inch slimline card base.

I printed the digis and stamped the sentiment from the Haunted House Clear Stamp Set. The other stamps I used were  Kitty Capers (cat pointing) Life's Ups & Downs (hedgehog) Warm Winter Wishes (mouse). I coloured everything with my Copics and then added white gel pen accents. 

To cut out the images, I used the coordinating dies for the ones I had and my Brother Scan N Cut SDX125e for the others. To adhere the images to the card, I used liquid glue or double-sided foam tape.

Thank you so much for reading my blog post, you can use my discount code T4TANNALISA10 when you visit the Time For Tea Designs shop to get 10% off your order.


Saturday, 2 October 2021

Big Birthday Wishes!


Happy Saturday Teatimer's, hope you have had a good week. To say hello to the weekend and world cardmaking we have a fun hop going on over on Instagram so make sure to check it out! 
Since the weather has turned and has blown right into Autumn what better card to make than a fun Autumn themed birthday card. 
It was such a fun card to make and it was so nice to get to mix some old favourites with the newer designs. I went with a blustery evening with the critters making smores, even the little hedgehog joined in with the fun. I began but cutting out the Smile Inverted Scallop Frame Die and using that as a reference to cut out a rectangle to ink up my background. With the rectangle I inked it up with pink flamingo, dried marigold and squeezed lemonade distress oxide inks. Spritzing on water to add some texture.
I die cut out the smile scalloped die again out of white card stock and then cut out the Autumn Scene cover plate die out of the inside part. Then inked up the grass pieces with twisted citron and finishing off with some splatters of mowed lawn ink, the tree was also blended with some brown distress oxides. Then they were adhered to the sunset sky we created and the frame then adhered as well. 
I've been so short of time recently so I was so happy to have a stash of images already coloured up for this card. I always stamp out and colour up about 3 of each image as it's so much easier whilst you still have the pens out. So most of the images were already coloured up apart from the smores sticks and the little hedgehog. The images are from the Life's Up's and Down's stamp set I adhered all them to my card adding some dimension on some with foam pads. I just love the little hedgehog with his little smore stick he's just the cutest. 
I finished off the card with the Big Birthday Wishes Die I cut it out with white cardstock and out of some rich green cardstock I like the way that the green kind of reflects leaves on the trees. Then all was left to do was to adhere it onto my card base and that was my card all finished up. I hope you like it and don't forget to join in with the insta hop. If you want to get anything the shop you can get 10% off your order using the code T4TNATALIE10. Have a great weekend and I will see you next week. 

Saturday, 3 April 2021

Hoppy Birthday!


Well its Easter Weekend so I couldn't resist making a super cute bunny card! We aren't planning much this weekend but the little man is excited for an Easter egg hunt in the garden hopefully the weather is kind! How about you?
I used so many sets to make this card I find it so hard just sticking to the one but that's what we love about Time for Tea right everything just works so well together. I started my card by cutting out the largest rectangle from the Slimline Scalloped Nesting Dies and stencilling some clouds on there using the Scene it 6 x 6 stencil and some Tumbled Glass Distress Oxide ink. The grass was cut out from another of the large rectangles I cut using the Landscape Edge Standalone Die I just had to join it up and cut it twice to cover the length of the card. This was coloured with Twisted Citron Distress Oxide and a little bit of Mowed Lawn to give the edges some depth. I cut the fallen tree trunk using the Lift the Flap Slimline add on die  which I stamped on a woodgrain effect using the A5 Woodgrain Stamp  using dark brown distress oxide and going over with a lighter one. Then I cut the straight edges a bit wobbly to make them look more wood like. 
The flowers are cut from the spring blooms kit I blended a range of green, yellow and orange oxides for the leaves and some pinks and oranges for the flowers then die cut them out. 
All the stamped images I coloured up in Copic marker the images come from a range of stamp sets including Treat Yourself , Hip Hop Hurray, Life's Ups and Downs and Bears Picnic.


When I popped my card together I felt the layout didn't work with all three flaps open so I just had the middle one that opened and covered up the edges of the other flaps with my flowers and bunnies. Once everything was stuck down I popped on my sentiment and stuck it on my card base and that was my card finished up. I hope you like it and have a great weekend. Don't forget you can get 10% off in the shop using code T4TNATALIE10


Sunday, 21 March 2021

Enjoy life's ups and down's with Guest Designer Lounon


 Hello everyone !


Those two cuties are inseparable ! They have each other’s backs and can always put a smile back on each other’s faces. After their camping trip they couldn’t stay apart too long and decided to play in the park. They’re having so much fun !

Here is my card for this week as Time for Tea Design guest designer. I decided to use other stamps from the Life’s Up & Downs Clear Stamp Set.

I stamped the two cuties and their seesaw on my Xpress-it blending card and coloured them with my Illustrators. I fussy cut them.

After that, I drew and coloured a background and die cut it. I die cut an other circle, bigger, into red card stock. I matted and layered the two.

I also stamped my sentiment and matted and layered it.

Then, I die cut two rectangles, one into Neenah white solar card stock and one into red card stock. I matted and layered them. I glued my round background on it with foam pads and my sentiment with glue. Finally I glued the two cuties with foam pads.

Et voilĂ  !

May the craft be with you !

Lounon

Products used :

-Time for Tea design Life’s Up & Downs Clear Stamp Set

-Illustrator markers :

Seesaw : DR4 DR1 CR5 CR3 GY4 GY3 GY1 CT4 CT1
Hippo : BG7 BG5 BG3 BG1 FS5 FS4 FS8 + TB7 TB5 TB3 GY3 GY1 CT4 + white paint pen
Elephant : IG7 IG5 IG3 FS5 FS4 FS8 / TB7 TB5 TB3 CR8 CR5 CR3 + White paint pen
Grass : DG4 DG3 DG2 DG1 CG4 CG3 CG2 CG1 + GB7 GB4 GB2
Swing : DR4 DR1 CR5
Trees : TN9 TN7 TN5 TN3 AG5 AG3 AG1 + MG3
Sky : IB3 IB1

-Xpress-it blending card

-Neenah white Solar card stock

-Coloured card stock

-Double Stitched rectangle and circle dies

-Carnation Crafts Pretty Shabby Circle die

-Foam pads 

Monday, 28 December 2020

Winter fun

 Happy bank holiday to you all :D 

I hope you have had a lovely crafty Christmas so far. It is nearly time for us all to move out of 2020 and I can't wait to get the new year started. What are you all hoping to do more of in 2021? 

I want to be able to do more crafting and making time for me. Fingers crossed it works. 

On to my cards for today and I love this stamp set so much I couldn't resist doing a couple of cards with it. This is Life's Ups and Downs stamp set and you can make this adorable little interactive seesaw! It is so easy to do all you need is a brad/ split pin to make it work :)


That is all from me today. I hope you all have a great new year and I will see you in 2021 :D

You can still get 10% off any order at Time For Tea Designs by using my code T4TAMY10

Huge hugs

Amy xx

Thursday, 24 December 2020

Thank You Scene Card

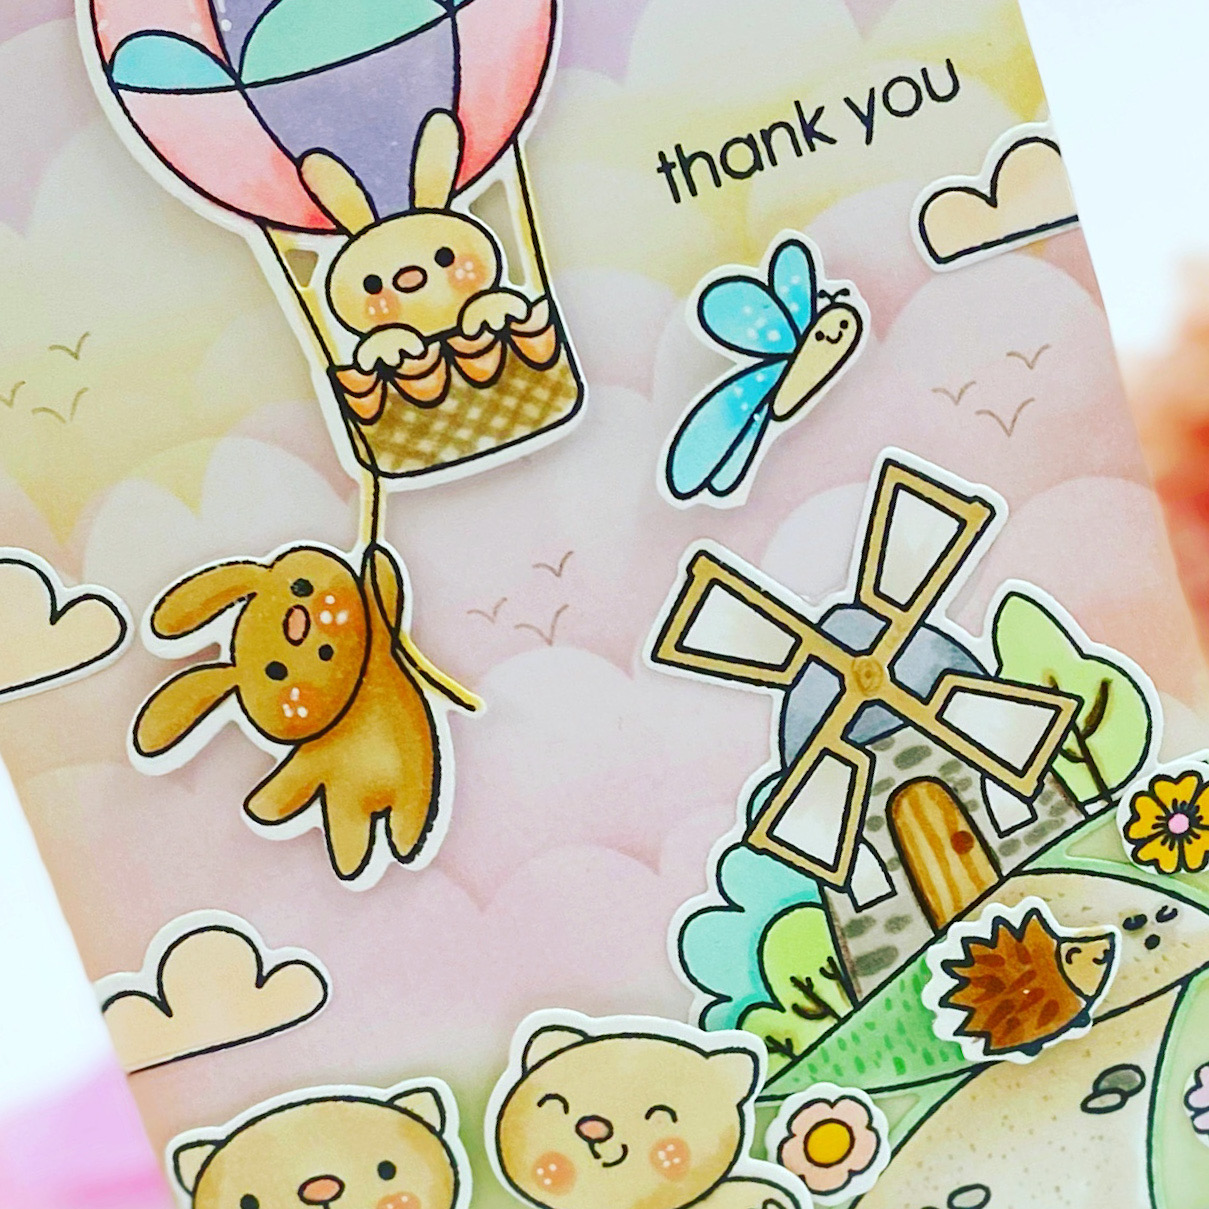
 Hello Vic here today. I’m sharing with you a really sweet card I made using the Up, up & Away stamp set. I love this stamp set as it has the cute bunny in the hot air ballon and the windmill. 


To make my card I wanted to create a pretty sky so I used the Scene It Stencil  along with some pretty soft distress inks and my Beautiful blending brushes. I added some green ink to the bottom of the card to look like grass. 


I then stamped my Up, up & Away stamp  images and I also used the clouds from the Buzzing For You Stamp Set and coloured them in with a light peach colour. I then stamped some flowers and added a hedgehog from the Life’s Up’s and Downs Stamp Set. 


I used my copic markers to colour the images in and my Coordinating Dies and run them through my die cutting machine. Once all my images are die cut I adhered the ink blended panel to my card base and started to adhere the images onto my card using foam tape. I then wanted to add another critter to my card and I stamped a dragonfly and some cute cats from the Crafty Cats Stamp Set and adhered this down. For my greeting I used the thank you sentiment stamp from Fairy Garden Stamp Set.


I love how this turned out and I think they look so cute all together on the card. I hope you feel inspired to mix up your stamps and make some cute scenes. It’s really fun to do even though the colouring took a little while it’s so worth it. Another tip I have is sometimes I stamp lots of images together and colour them and I keep them in a clear plastic sleeve to use on my cards. That way you can make your cards a bit quicker if you needed to. 

Don’t forget you can save 10% off your order using the code: T4TVICKI10 at the checkout. 

Thanks for stopping by today!

Vic 

Wednesday, 4 November 2020

You Warm My Heart

Happy Wednesday!

It's DT Shabneez here with a favourite card of mine as it makes me feel warm and cosy just looking at it!


The card was made using the Life's Ups & Downs Stamp Set.  The critters were all stamped and coloured using my Chameleon pens then die cut using the Co-ordinating Die Set - these really do save time!


To create the background I used the Large Oval Masking Stencil and blended my distress inks through it with the Beautiful Blender Brushes.  I added some gold spatters to finish. 

I used a die from the Oval Scalloped Nesting Dies to cut the oval from gold card which fits the masked image perfectly.  I just love that sentiment - don't you?

Don't forget you can get 10% off anything in store using my code T4TSHABNEEZ10.

Happy Crafting!


Other Posts You Might Like