Pages

Showing posts with label big birthday wishes. Show all posts

Wednesday, 3 January 2024

Birthday wishes for a brand new year!

Hey Tea-timers 

It's DT Ashlee here with my first T4T post for 2024! 

A brand new year means a new year of birthday celebrations so I thought I would get a start on my birthday card stash...


I used these Time for Tea designs products on this card :


To make this card start by die cutting the quilted cover die from a peach cardstock. Then using the birthday wishes sentiment die, die cut it twice. Once from blue card and once from black card before adhering together slightly off set and adhering to the card base. 

Stamp, colour and die cut a bunch of images from the birthday cake set. I used Spectrum noir tri-blend markers to colour mine and finished them off with a touch of white pen highlights....

Once they were all coloured and die cut I adhered them to the card base using varying levels of foam tape to create dimension and a fun little birthday treats section!

To complete the card and give it a little bling I added a touch of sequins, these were adhered in place using micro glue dots....


Thankyou for checking out my card today, I hope you enjoyed this birthday card....

Happy crafting, hugs Ashlee.

Thursday, 5 October 2023

Big Birthday Wishes


Hey there, Tea Timers!!  It's Amanda here! I'm excited to be here with you to share some birthday card inspiration!

To make this card, I started by creating a textured background on black cardstock.  To create the textured background, I used a patterned stamp and stamped it with Clear Glue Embossing Ink.  Next, I added clear embossing powder on top.  Then, I melted the powder with my heat gun.

Then, on a piece of white cardstock, I ink blended Catherine Pooler's It's a Girl, Limoncello, and Something Borrowed inks to create a rainbow background.  Then, I die cut my panel with the Big Birthday Wishes Large Sentiment Die.  I also cut another white panel with the die to use as a shadow.

Next, I stamped some images from the Baked with More Love Stamp Set and the Birthday Fox Stamp Set.  Once I got them colored in with my Copic markers, I die cut them out with their coordinating dies.

I adhered all my components onto the card with 3D foam squares.  I also added some different sequins all over the background using liquid glue.


Wednesday, 13 September 2023

big birthday wishes....!!

Hey there Tea-timers...

DT Ashlee here and today I've got big birthday wishes inspiration to share!

I've been having lots of fun creating with the brand new release from T4T, it's all so much fun....


Time for Tea designs products used for this card are :


To create this card I started with a yellow card stock base. I then die cut the star stitched cover die from green card stock and then add green ink splatters to it. The cover panel was then adhered to the yellow base using foam tape just so it popped up slightly from the base. 

Using the sentiment die I die cut it twice, once from black card stock and then once from a teal blue card stock. These were adhered together with liquid glue slightly off set creating a shadowed sentiment. I used foam tape to adhere this to the card base.

I stamped, coloured and die cut the sweet little birthday cake and candle and added that to the top corner of the card. 

To complete the card I added a sub sentiment "happy birthday" from the Birthday fox set (die cut using the co-ordinating die) and a touch of sequins!


 I hope you enjoyed this big birthday wishes card ready for a birthday! 

I will be back next week with more T4T inspiration. Until then happy crafting, hugs Ashlee.

Friday, 4 November 2022

Sending Big Birthday Wishes


Happy Friday, everyone! DT Annalisa here sharing a slim line card today featuring several stamps and dies from Time For Tea Designs. I created a bright watercolour background using distress ink reinkers and distress oxides. 

I used Arches cold pressed watercolour paper and painted on a mixture of Distress Ink Reinkers (squeezed lemonade, picked raspberry, peacock feathers) and Distress Oxide Ink (squeezed lemonade, twisted citron) with a paintbrush. I added some white splatter once the inks were dry.

I die-cut the panel using the Snow Flurry Cover Die. I then used the same die to cut some white card stock to get the outline. I used liquid glue to adhere everything to a slimline card base.

I used the Big Birthday Wishes Sentiment Die to cut out the sentiment three times and used liquid glue to adhere them together and then to the top of the card. 


I stamped, coloured (with Copics) and die-cut elements from five different stamp sets Lucky Ducks, Paper Plane Pals, Birthday Bear and Fairy Garden. I used a mixture of liquid glue and foam tape to adhere everything to the card. I added Glossy Accents to the bunny's goggles, balloon, ladybug and the word 'Big.'
 

Thank you so much for reading my blog post. Don't forget to use my discount code T4TANNALISA10 when you visit the Time For Tea Designs shop to get 10% off your order.

Saturday, 30 April 2022

Big Birthday Wishes!


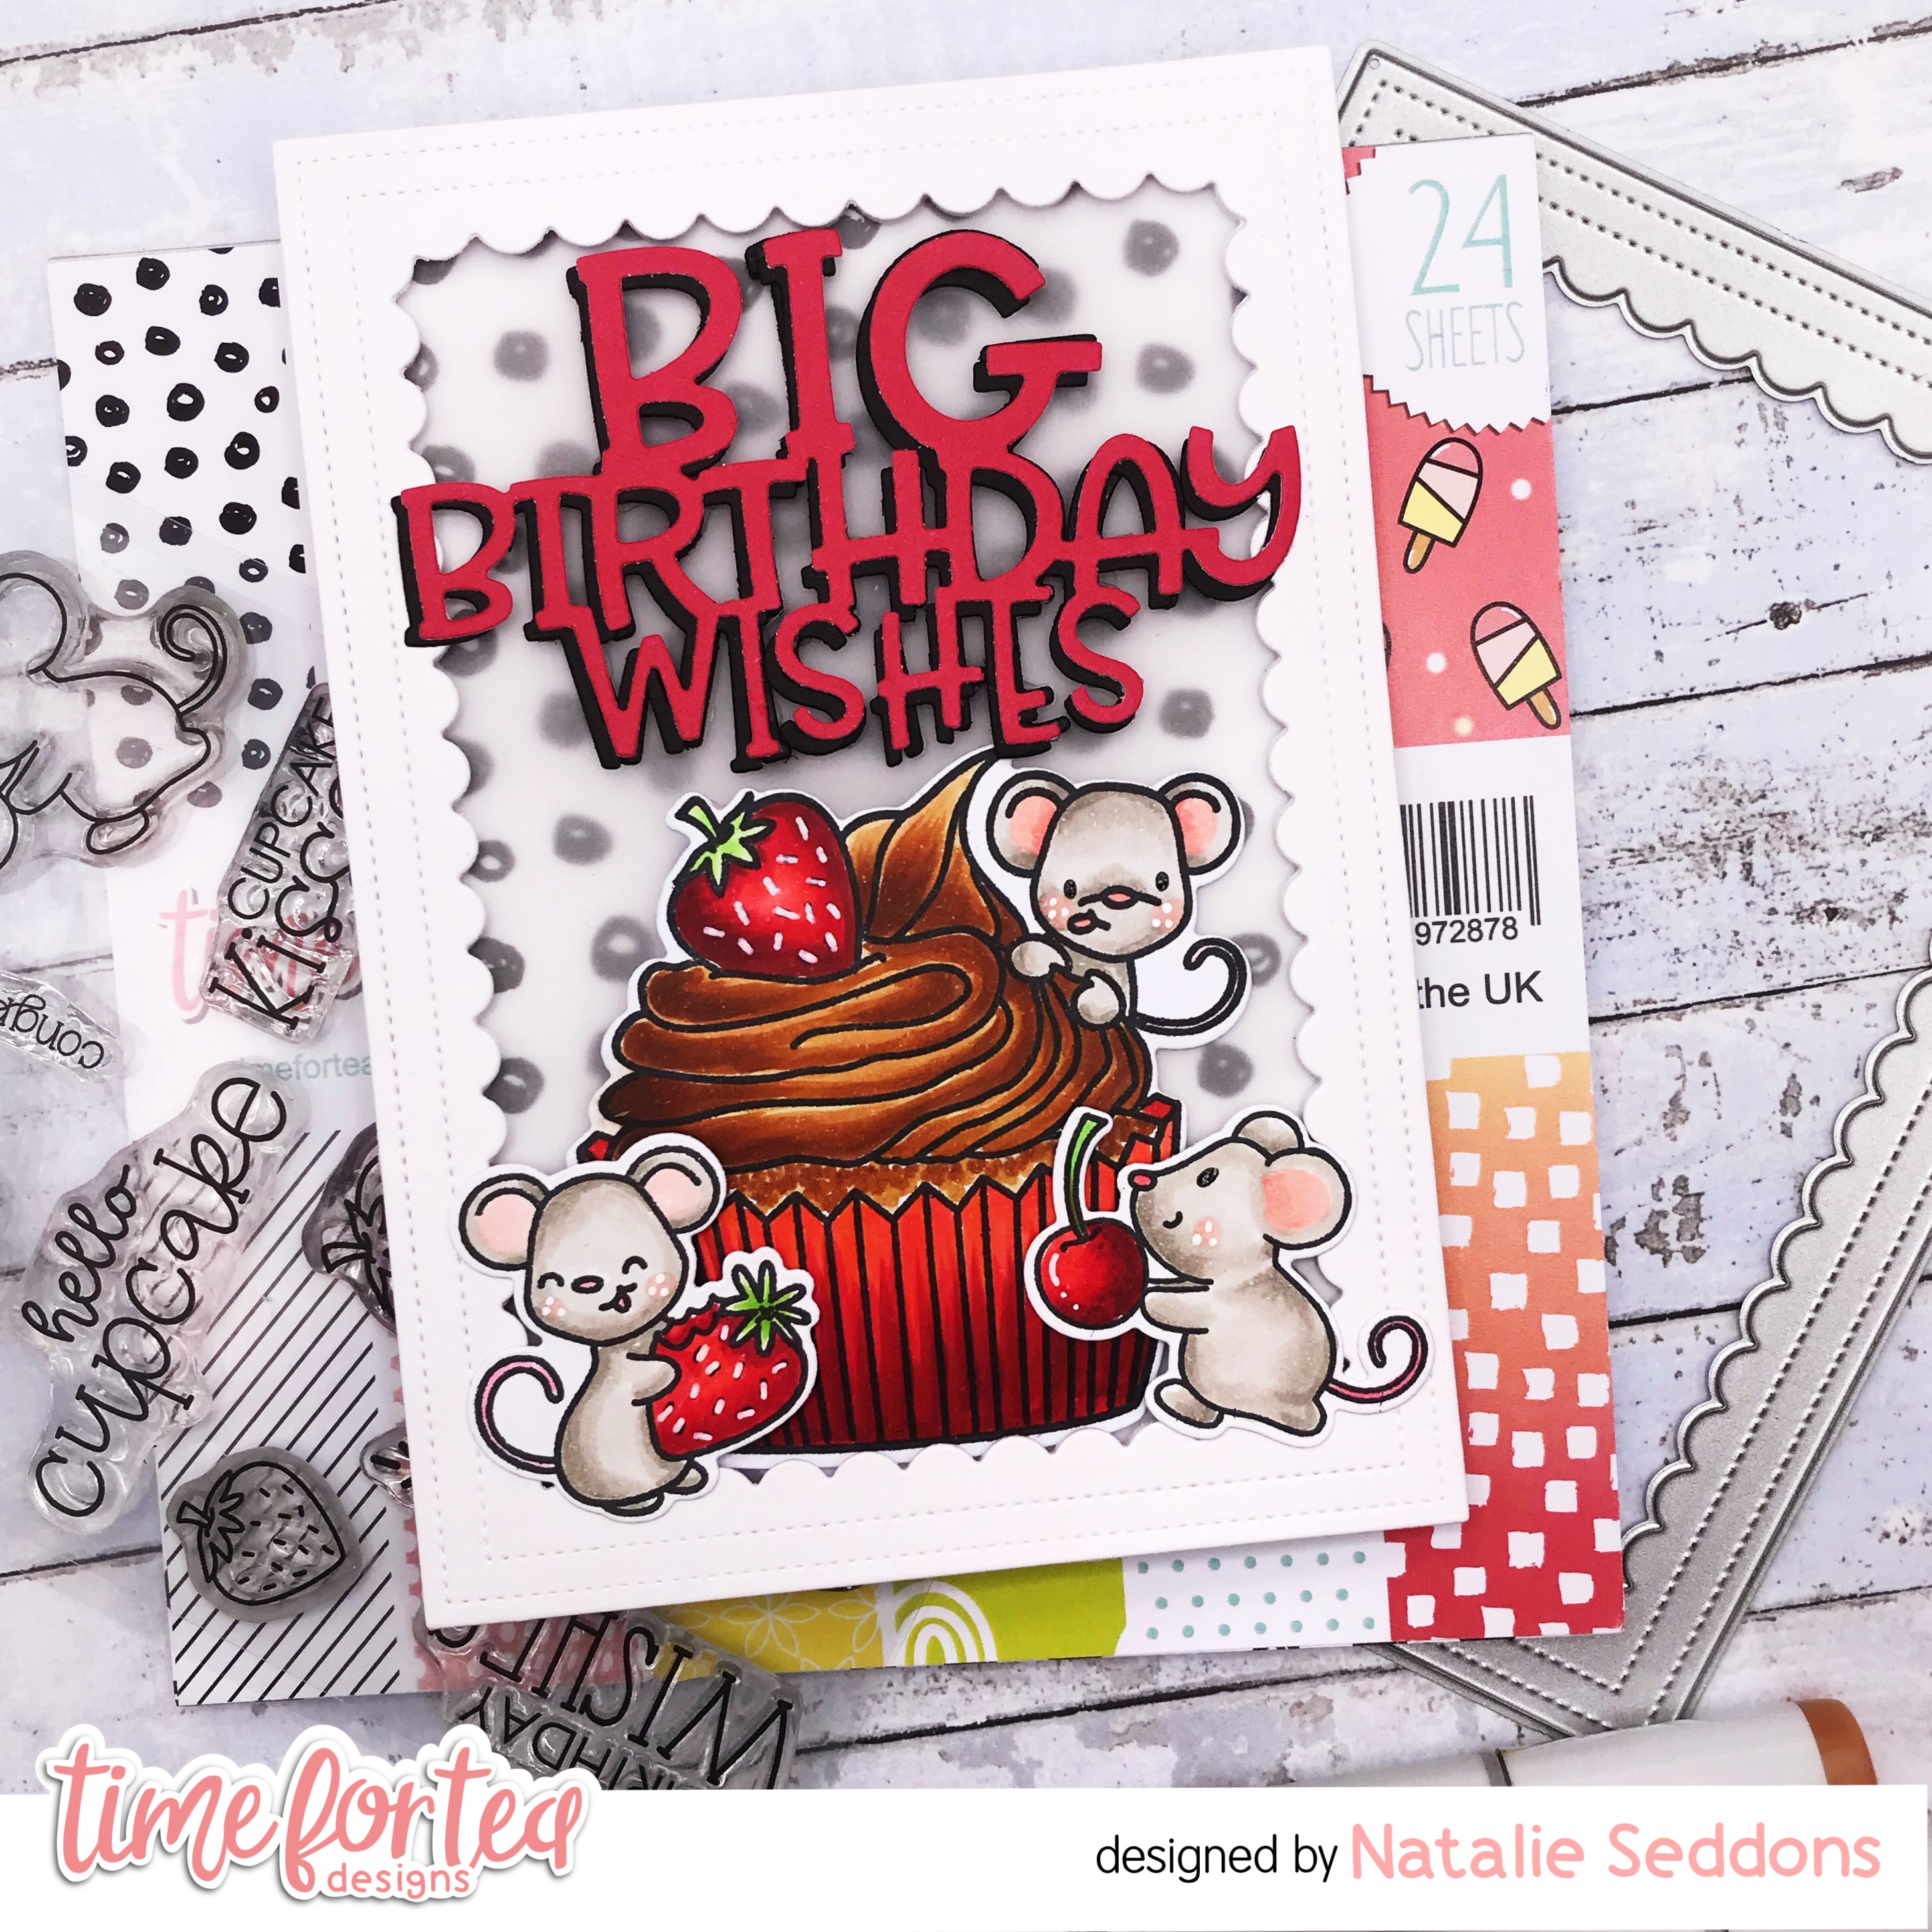
The weekend is finally here again, have you anything nice planned? I’m hoping for a crafty day 🤞 I’ve been trying to build up my Birthday card stash as I can never seem to find one when I need one and the Hello Cupcake Stamp Set with the Big Birthday Wishes Sentiment Die is a perfect combination for this. 

I really wanted to create a rich chocolate cupcake and combined it with red since strawberries are red. Creating an almost monochrome look for my card. I love how mixing up the colours gives a completely different to your card. Here's one I made a couple of months ago with the same set using a range of pink tones.


The pinks make it really sweet and cute where I feel the rich red and brown combined with the monochrome background give it a more sophisticated grown up feel. 
For my latest card I used the Smile Inverted Frame Dies to create a frame for my card and layered the cute polka dot paper from the Sweet Summer 6x6 Paper Pad and layered some Velum over the top to tone it down a little. It's a great technique for adding some interest to the background but toning it down so it isn't quite so busy. 
Once the background was layered up I just popped on the rest of the images. For the Big Birthday Wishes Sentiment I layered red card over the top of the black for a little added interest. 
I love how my card turned out and my Birthday card stash is slowly coming together. This one is such a quick and easy card to make and you could easily mix up the colours for a whole different look. 
If you want to purchase any of the items you can find them in the Time for Tea Shop and get 10% off your order using code T4TNATALIE10 
Thanks for reading and have a lovely weekend!


Saturday, 5 March 2022

Cute Sloth Video Tutorial

 Hi DT Vic here today and I have a fun Resist Embossing video. 


I absolutely adore the Be Slothy Stamp set and I just had to use them for my video today. I also made the background using the smaller images in the stamp set. In the video you will see how I created this background.


I used some Distress Ink ( Scattered Straw, Worn Lipstick and Tumbled Glass) along with my Beautiful Blending Brushes for the colours on my background. I started by using Versamark ink and sprinkling WOW Bright White Embossing Powder over the top. I heat set this and added the inks.


I then stamped and coloured my images using the following Copics: E23, E25, E27, E53, E55, E74, E79, YG91, YG93. I added these onto my card and die cut the sentiment using the Big Birthday Wishes Sentiment Die.


I loved how this turned out in the end. I hope you enjoy the Video and don't forget you can save 10% off your orders using the code: T4TVICKI10 at the checkout to receive 10% off your orders. 

Have a lovely weekend!

Vic x

Saturday, 2 October 2021

Big Birthday Wishes!


Happy Saturday Teatimer's, hope you have had a good week. To say hello to the weekend and world cardmaking we have a fun hop going on over on Instagram so make sure to check it out! 
Since the weather has turned and has blown right into Autumn what better card to make than a fun Autumn themed birthday card. 
It was such a fun card to make and it was so nice to get to mix some old favourites with the newer designs. I went with a blustery evening with the critters making smores, even the little hedgehog joined in with the fun. I began but cutting out the Smile Inverted Scallop Frame Die and using that as a reference to cut out a rectangle to ink up my background. With the rectangle I inked it up with pink flamingo, dried marigold and squeezed lemonade distress oxide inks. Spritzing on water to add some texture.
I die cut out the smile scalloped die again out of white card stock and then cut out the Autumn Scene cover plate die out of the inside part. Then inked up the grass pieces with twisted citron and finishing off with some splatters of mowed lawn ink, the tree was also blended with some brown distress oxides. Then they were adhered to the sunset sky we created and the frame then adhered as well. 
I've been so short of time recently so I was so happy to have a stash of images already coloured up for this card. I always stamp out and colour up about 3 of each image as it's so much easier whilst you still have the pens out. So most of the images were already coloured up apart from the smores sticks and the little hedgehog. The images are from the Life's Up's and Down's stamp set I adhered all them to my card adding some dimension on some with foam pads. I just love the little hedgehog with his little smore stick he's just the cutest. 
I finished off the card with the Big Birthday Wishes Die I cut it out with white cardstock and out of some rich green cardstock I like the way that the green kind of reflects leaves on the trees. Then all was left to do was to adhere it onto my card base and that was my card all finished up. I hope you like it and don't forget to join in with the insta hop. If you want to get anything the shop you can get 10% off your order using the code T4TNATALIE10. Have a great weekend and I will see you next week. 

Friday, 6 August 2021

Big Birthday Sundae


Hello everyone, and happy Friday. Annalisa here today, sharing a birthday card featuring some awesome new products that were released last week. I just love the Big Birthday Wishes Sentiment Die and how it fills up a card! I paired this with the kitty and the ice cream sundae from the Sundae Sweeties set and love the result.


To start, I stamped, coloured (with Copics) and die cut the kitty and ice cream sundae. I coloured some card stock with Kitsch Flamingo Distress Oxide (using my Beautiful Blender Brush) and used it to die cut out the Big Birthday Wishes sentiment and the small hearts. I also die-cut the sentiment die from some black card stock. I glued the pink sentiment to the black one, slightly offset to create a shadow effect.

For the background, I used a two-part ice cream stencil that I had in my stash, which I thought was perfect for this card. I used Kitsch Flamingo and Vintage Photo Distress Oxides for the ice cream and the cone. To get the glittery ice cream tops, I added some translucent embossing paste and then topped this with distress glitter once I removed the stencil.


I used some of the new Sweet Summer 6x6' Paper Pad with the Zig Zag Frame & Tag Dies to create a pretty frame for the card. I die cut this frame twice from white card stock and glued them together with liquid glue. I then added the patterned paper frame on top of these. I glued these to the ice cream background and added the kitty and sundae with some foam tape. Next, I added the sentiment and the hearts. 

To complete the card, I added some Stickles and white gel pen accents.

Don't forget, you can save 10% off your Time For Tea Designs order using the T4TANNALISA10 at the checkout.


Wednesday, 4 August 2021

Big Birthday Wishes Video Tutorial

 Hello Vic here today and I have a fun video tutorial for you today. I wanted to make a bright birthday card with lots of ink blending on my background. 


Here are the products you need for the card:


My card size is an A6 top folding card. I trimmed down another piece of white card to A6 for my card front. This is the piece that I will be ink blending onto.


I added some distress ink colours to my card front. Using the  Bokeh Bubbles 6x6 Stencil I then applied a red ink over the stencil. I added some splatters of black ink to my card front once the background was dry.


I then stamped my images using the Birthday Bear Stamp and Die Collection  . I coloured in my images with copic markers then using the coordinating dies I run the images through my die cutting machine. Here is a list of the copic markers I used to colour in my images. 


I then used a piece of black foam and using the Big Birthday Wishes Sentiment Die I run this through my die cutting machine. I used foam instead of card to give the sentiment a bit more bulk but if you don’t want to add more bulk to your card just use a piece of black card. 


I then stamped some balloons to add to my card but I die cut the balloon first as I found this easier to stamp the balloons and string. I used the same red copic markers to colour the balloons in and I added these to my card once all my images were adhered down. 


Once your images are adhered into the card your card is now complete. I had so much fun making this card and using bright colours on my background I hope you will give this a go. Don’t forget to tag us in your creations so we can see your cards and crafty projects.
You can also save 10% off your order using the code: T4TVICKI10 at the checkout this includes the brand new release too!

Thank you so much for popping over today!
Vic


Sunday, 1 August 2021

Big Birthday Wishes

 Good afternoon everyone, 

Happy Sunday, Lyndsey here and today I'm sharing some inspiration from our new summer release that went live on Thursday. If you haven't seen it yet (why not!?!) you need to check it out. Jo has once again worked her magic with an amazing selection of adorable images and fabulous die sets. This cute card has been made with the fabulous Birthday Bear stamp and die set.


To start as always I stamped and coloured my images using my Spectrum Noir markers (colours listed below in order of lightest to darkest)

Bear Body - EB1, EB2, GB8, GB10 

Bear Stomach and Nose - GB10, EB3, EB8, 

Balloon (red) - CR7, CR9, CR11, DR7

Balloon (blue) - TB1, TB3, TB4, TB5

Balloon (yellow) - CT1, CT2, CT4, GB5 

Butterflies - PP1, PL2, LV1


So I decided to make a little scene card and this little fella if off to surprise his friend with a bunch of brightly coloured balloons.

I used the 2nd largest of the A2 Layering Dies to cut a piece if white card, and used the Slimline Scene Builder Stencil and Peacock Feathers distress ink to create my background.

I cut some grass strips from green card using the Landscape Edge Dies and added the cute little picket fence from the Windmill Add On Dies.

The Big Birthday Wishes Die was cut from black card 4 times for dimension and added towards the top section of the card.

I finished off adding a few flying critters in the sky.


Thank you for joining me here on the blog today, if you haven't ordered your new release items yet, why not get yourself across to the store and use my code T4TLYNDSEY10 for 10% off your order.

Enjoy the rest of your weekend 

Lyndsey x

Other Posts You Might Like