Pages

Showing posts with label Box Clever Card. Show all posts

Wednesday, 26 July 2023

Here's the scoop....!

 Hey there Tea-timer friends...

DT Ashlee here and today I've got a box card to share using the box clever die set. This was so much fun to make and I really can't wait to make another one! You can create such cool little scenes inside them and it flattens perfectly to send in an envelope.


Other Time for Tea designs products I used to make this box card :


To create this card I die cut the box base from blue card stock and then went on to die cut all the pieces to create the scene. I added green splatters to the green card stock for the trees/grass before die cutting those pieces. I adhered the background pieces along with the grass in place first before adding the panels to hold all the elements. Once the panels were in I created the scene and added a kitty from cool critters with yummy ice creams. These were coloured with Spectrum noir tri-blend markers. Once the scene was complete and the box was all adhered together I finished it off with a cloud, sentiment and bush on the front of the box along with a touch of sequins! 

Isn't it just the cutest?! I hope you enjoyed this box card, I will definitely be making another one soon!

Thanks for stopping by, Happy crafting. Hugs Ashlee.

Saturday, 2 July 2022

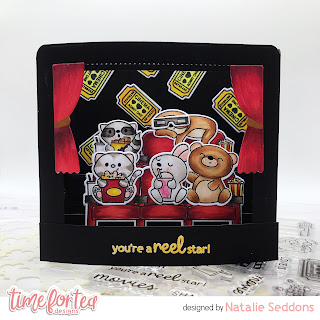
You're a reel star!


Happy Saturday Teatimer's I have a fun 3-D cinema card for you today. It was super easy to make and great for kids birthday cards or your movie loving friends. 
I cut out and coloured up the Movie Night Stamp using copic markers. Adding some finishing touches with a black gelly roll pen on the nose and some cute white dots on their cheeks. Once everything was cut out I could cut out the base. I used the Box Clever Die Set for this and cut it out of black card. This way I could figure out the height in which the seats needed to be. Adding the back one a little higher like it would be in the cinema.
It was at this point I realised I needed a pop of colour so added a lot of movie tickets in the background. Then at the sides I added some white panels which I stencilled the Popping Popcorn 6 x 6 Stencil using yellow and orange distress oxides, as you can see below.


To finish off the front I used the Purrfect Day Scene Builder Dies for the curtains and coloured them up with copic markers adding some little gold bands with a gold marker. Then for the sentiment I cut out another black strip and heat embossed my sentiment I didn't have any yellow embossing powder so coloured over my white with the same yellow copic marker over the top. I don't know whether this is good for your copics though so I wouldn't do it often and I scribbled off some ink on some scrap paper just in case. Then that was my card finished up. You can find all the products in the shop and get 10% off your order using code T4TNATALIE10. 


Friday, 12 March 2021

Thinking of you Skating Penguins


Hello everyone, and happy Friday! DT Annalisa here, my project today is a winter wonderland 3D card that features an older die set and some older stamp sets. I really enjoy revisiting older stamp and die sets and giving them some love.

I die cut the Box Clever Die Set from some heavy-weight white card stock and stamped the sentiment from the Happy Mail Critters as well as the tiny heart onto the front of the box card. The critters and other elements are from the Skating By Penguins, Beavering Away, and Life's Ups & Downs stamp sets. I stamped and coloured them with my Copics and die-cut everything so they were ready to be added to the card.


For the inside of the card, I coloured the hills with Speckled Egg Distress Oxide to give them the look of snow. For the back hill, glued an additional hill that I die cut using the Stitched Hillside Border dies from Lawn Fawn (you could also use the Landscape Edge Standalone Die from T4T.) I used the Box Clever Die to cut out the back section from some patterned paper from the Winter Wonderland Paper Pad for the sky.

I stuck down the snowy patterned paper to the back of the box and then assembled the box card using double-sided tape. I then used liquid glue to add all of the critters and elements to finish the card.

I hope you like this card and would love it if you could use T4TANNALISA10 for 10% off on your order the next time you purchase anything from Time For Tea Designs.


Thursday, 25 June 2020

Buzzing For You and Thinking of You Lily

Hi DT Sharon here today. I hope you all enjoyed the new releases that were revealed and all the inspiration the T4T DT have been sharing? I loved them all so much I made so many projects , the ideas just kept on coming!
So today I have 2 projects to show you, the first is a shadow box card.


I've used the Box clever die set  for the base. I blended some distress oxide inks over it to get the colour. I then stamped the hexagons from the Buzzing for you stamp set randomly over it. For the inside of the box I used the Scene it stencil to make the background clouds and grass. The sun and clouds dies are also included in the box clever set. I used the hearts die from several of the new releases to make the flowers. Then the bees were stamped, coloured and die cut and I attached them to the box using acetate. I wanted to make them look like they were floating in the air. Lastly I just added the sentiments.


For my second project I have used the Thinking of you Lily stamp and die set. I've used the set in 3 different ways.


For my first card I stencilled the white card with the Scattered Triangles stencil. I then stamped three lillies onto vellum with clear embossing ink and embossed them with white fine embossing powder. I coloured the lillies from the back using alcohol pens. 
For the purple card I stamped the lillies onto the white card with a purple ink randomly. I stamped a further lily using black and ink and coloured it with alcohol pens. I then placed it over a lily with 3D foam pads. The green dotty strip is using the Washi Strips stamp set with a green ink and then fussy cutting it out. 
For my last card I have just used gold embossing powder on cream linen card and navy card. I've also used the Squiggly Giggly stamp set to make the background and the Scalloped Frame die set which incidently has 35% off at the moment!

I hope I've inspired you today and you enjoy all the new releases. I have a code too to get 10% off across the store, just use the code  T4TSHARON10

Happy crafting and stay safe!

Sharon
x


Thursday, 20 February 2020

Hooray Spring is on its way!


DT Annalisa here. Spring is less than a month away so I am sharing a happy spring card featuring the adorable Hip Hop Horray stamp and die set. I decided to make this a slider card because the little trampoline and the bunny were made for this.


To start I used a clouds stencil, some Tumbled Glass Distress Oxide and my Beautiful Blender Brush to create the sky background. Next, I created some grass using Mowed Lawn Distress Oxide Ink and some water droplets. I cut the grass with Lawn Fawn's Stitched Hillside Borders die set. To get the stitched lines around both the grass and the sky I cut them both using the rectangle from Mama Elephant's Peek A Frame Creative Cuts die set. I added the sun and the clouds using the Box Clever Die Set. These smaller elements in the die set are so useful on my card projects.

I stamped and coloured two bunnies, carrots other some other cute elements in the Hip Hop Hooray stamp set. The little ladybug and one of the butterflies are from the Fairy Garden stamp set.

I used a slider die I had in my stash to cut out the slider area in the sky. I used a penny on the back end and adhered it to the jumping bunny to create the slider portion of the card.

I used the "Hip Hop Hooray" for the sentiment. I like that this sentiment can be used for anything you want it to!

Head over to Time For Tea Designs and use discount code T4TANNALISA10 to get 10% off your whole order including the new release stamps.


Tuesday, 4 February 2020

Thank you fairy much


Hi DT Sharon here and this box card features the lovely new release set "Fairy Garden". The set is great for making little scenes.
I've used them to make this little 3D box card. The die is available in the T4T store and is called "Box Clever". I've used oxide inks to colour it. Oxide inks are now available in the store too along with some great blending brushes which are ideal for using with the T4T products.
I cut around the fairies and accessories using my Scan n Cut and then coloured them with alcohol pens.

No photo description available.


All of these products can be found in the Time For Tea Designs store here

https://timeforteadesigns.co.uk/

You can use my code across the store to get 10% off everything. Here's the code

T4TSHARON10


Thursday, 14 November 2019

You Make me Smile


Hello! DT Annalisa here and today I am sharing a box card I created using some of the newest arrivals in the Time For Tea Designs shop; the Thanks A Whole Bunch and You’re Elephantastic stamp sets as well as the Box Clever Die Set. I also used the Butterflies Clear Stamp Set and Smile Sentiment and Scalloped Frame Die Set from previous releases. It's always great to be able to mix and match new and older stamp sets.

First I die cut out the Box Clever Die Set from some Neenah Solar White 110 lb card stock. Next, I stamped the flowers from the Thanks A Whole Bunch stamp set and coloured them with copics. I coloured in the base pieces from the die set with Twisted Citron and flicked on some Mowed Lawn for some extra detail.

I stamped, coloured and die cut the girl and other elements on the box card and adhered them to the base elements. I cut out some openings in the back base lawn piece using Lawn Fawn's Sandy Beach Accents die set. I used these openings to slip in the happy girl and flower. I used some acetate to pop up the cute butterfly so it looks like she is flying next to the girl.

For the sentiment, I stamped 'you make me' in black ink and used the 'Smile' sentiment from the Smile Sentiment and Scalloped Frame Die Set. I used Wilted Violet to colour some card stock and add some droplets of water before die cutting the smile sentiment.

Thursday, 31 October 2019

Facebook Live - Feline Spooky Halloween Special!!

Hi there!

Jo here just to let you know that the latest FB Live is now available to view at your leisure on YouTube!

Be sure to watch the video below as it shows how this card was made. There's also a supply list at the end of this post for the T4tD products I used.

I should just mention that the Digi Collection featured here is still available for free with any purchase in the T4TD shop. You'll have to be quick though as the offer expires at Midnight tonight!!


I have edited it a bit so it's not so long :) If you do want to see the full length version it is still available on our Facebook page.

In this weeks FB Live video I demonstrated how to make this shadow box card using the Box Clever Die set. 


 My images were printed onto super smooth cardstock and then adhered to some cheap cardstock to give them a bit of stability once they were used on my card. I coloured them with my Copic Markers and fussy cut them all out. The shapes were quite simple so cutting them out was relatively easy.


 I used the Box Clever Die to cut out the pieces for my Box card.
I assembled part of my card & suspended my cat & dog images onto acetate to make it look like they were flying or floating.


My background was the haunted house image from the set and I show in video how I coloured the spooky sky.


I added the Feline Spooky sentiment and some of the treat images as embellishments to the front and side panels of my card. I used Stardust Stickles to make them glittery.


Finally I suspended my cute spider from the top centre of my card window with some acetate.


Links to all the products I used are listed below.


PLEASE NOTE THAT OUR FB LIVE EVENTS WILL BE ON A THURSDAY at 8PM GMT FROM NOW ON! I'd be thrilled if you could join me. :) 

If you have any ideas for what you'd like me to demonstrate using T4TD products then please do let me know either via our FB or IG pages! 

Take care & Yappy Howlloween!

Other Posts You Might Like