
Pages

Showing posts with label Small heart xoxo dies. Show all posts

Friday, 18 February 2022

Thank You Penguin


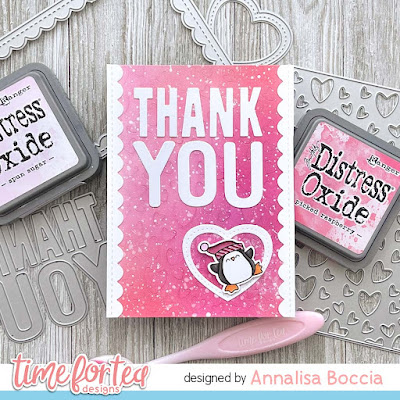
Happy Friday! DT Annalisa here today sharing a thank you card using the adorable Skating By Penguins Clear Stamp Set and some Time For Tea Designs dies.

To start, I applied Spun Sugar and Picked Raspberry Distress Oxide using my Beautiful Blender Brush, I then added white splatter with a paintbrush. Once the panel was dry, I dry embossed it with the Scattered Hearts Cover Plate. 
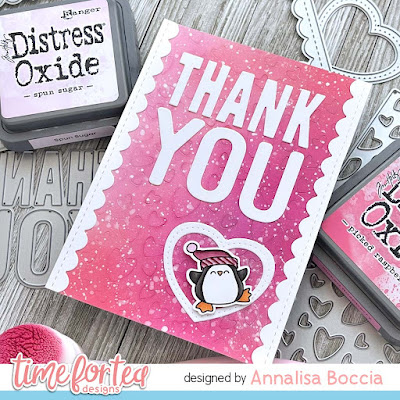

I then used three dies to die cut some white card stock: Thank You Sentiment Die Set, Small Heart XOXO Die Set and Falalala Scalloped Slimline Dies. For the scalloped frame, I cut off the bottom and top and kept two scalloped strips of 5 5/8 inches. I used liquid glue to adhere the border, sentiment and heart to the pink panel.

I stamped, coloured and cut out the penguin and used some foam tape to attach it to the middle of the heart.
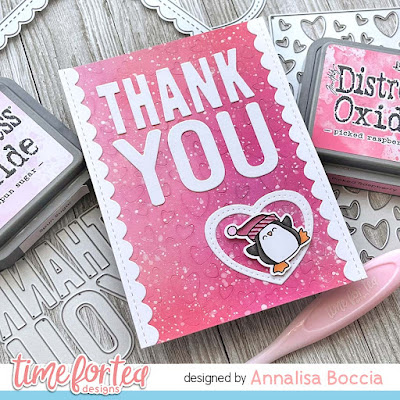

To complete the card, I added the decorated panel to a white card base made of heavy white cardstock. 

Thank you so much for reading my blog post, you can use my discount code T4TANNALISA10 when you visit the Time For Tea Designs shop to get 10% off your order.

Thursday, 11 March 2021

Thank You Piggy Card

 Hello DT Vic popping in today with an easy Thank You card. This card is also great to make in batches as you can never have to many Thank You cards.


For my thank you card I wanted to have a soft card with some cute critters. I started with a light grey card base and trimmed a piece of white card down for my card panel. Using this white I piece I used the Small Hearts XOXO Dies. I used the heart with stitched and embossed the die onto my card a number of times. 


I adhered this piece onto my card using foam tape. Next I used the Thank You Sentiment Die and using some light pink card I die cut the Thank You out three times and adhered them together. I added three layers to add some dimension to the words but you can just die cut this once and add foam tape to the back. 


Once I adhered this to the middle of my card I stamped out my images. I used the Workout Pigs Stamp and Dies. I love these cute pigs so much and I thought it would be super fun to add them to my card. I coloured the pigs in with my copic markers and then using the coordinating dies I run them through my die cutting machine. I then adhered them onto my card using foam tape. 


To finish my card off I added some hearts using the Scattered Hearts Cover Plate Die. I always keep some of the hearts that the die cuts out as they are the perfect size to add to your cards so if you have this die make sure to save some of the hearts for your next card. I then stamped my sentiment using the Be Kind Be You Stamp Set. I used a light pink ink to blend with the rest of the card.

I hope you have fun making your own thank you cards. Don’t forget you can catch Jo live tonight at 8pm on our Facebook page. 

You can also save 10% off your order using the code: T4TVICKI10 at the checkout. 

Thank you so much for stopping by today!

Vic

Friday, 22 January 2021

Adorable Piggy Shaker Card

 Hello DT Vic here with you today. I am sharing a fun video tutorial for you today. In my video I’m using the brand new Workout Pigs Stamp Set aren’t they the cutest!


I will also show you how I made my embossed background using dies. Please note that the sandwich I used is for the sizzix big shot machine so if you are using a different machine you will need to check which plates to put in your machine as they will be different to the sizzix and may even damage your machine if you don’t check. 


I go through all the steps in my video including how I made the cute shaker heart. I first started by adding some ink to my card panel using the Heart Grid Masking Stencil. I added some pink distress ink to my stencil. Next I embossed the Scattered Hearts Cover Plate Die. You can see how I done this in the video. Once this was complete I made a shaker heart using the Small Heart XOXO Die.


I used a piece of vellum as my window instead of acetate as I love the effect it gives. I then stamped and coloured my images using copic markers and they are all listed on the screen of my video. Once I put my shaker card together I adhered everything down. I then heat embossed my sentiment which is from the Be You, Be Kind Stamp Set. This is such a fantastic stamp set as there is so many lovely greetings on this. 


I then added a few sequins to my card to finish the card off. I love how this turned out and I love embossing my dies as it gives you so many different embossed backgrounds it’s a great way to stretch your dies. 

Don’t forget you can save 10% off your order using the code: T4TVICKI10 at the checkout. I hope you all enjoyed the release this month there is so many beautiful products to choose from. I know you will all love crafting with them and I can’t wait to see what you make!

Thank you so much for stopping by today!

Vic

Friday, 17 July 2020

XOXO I've Missed You

Happy Friday! DT Annalisa here and today I am sharing a colourful slim line shaker card I created using the new Mini Frame & Banner Die Set. When I first got my hands on these dies I knew I had to make a slimline card as these mini frames are perfect for this!


I started by cutting some patterned paper from Lawn Fawn's Really Rainbow collection. The base was cut to 3 1/2 wide by 8 1/2 inches tall; the rainbow patterned paper, 8 by 3 inches. A big thanks to Kristina Werner for her free pdf of basic card sizes - check out her video and blog post on this, it is such a great resource.

I then die cut out the three frames into the rainbow paper. I cut the square twice and the circle once. Next. I cut out the frames from white card stock and placed them into the cutouts in the patterned paper and connected them on the back with tape.

I cut out some striped purple patterned paper from Lawn' Fawn's really rainbow 6x6 inch petite paper pack and adhered it to the red striped background.

I stamped the three unicorns from the Unicorn In Training stamp set, coloured them with my copics and die cut them out using the coordinating dies. I adhered these to the stripped purple paper where the opening of the squares and circle openings lined up.

I stamped the "I've missed you!" sentiment from the Big Hugs stamp set onto the rainbow patterned paper. I used the XOXO die from the Small Heart XOXO Die Set on the same patterned paper as the background of my card and adhered it using liquid glue to the rainbow patterned paper. I popped the slimline rainbow paper up on some foam tape and stuck it down over the unicorns and purple striped paper after I added some clear sequins.


Be sure to use my discount code - T4TANNALISA10 - for 10% off in the T4T shop which can be used on anything at any time!

Thursday, 9 July 2020

Big Hugs!!!

Hi there , DT Sharon here today to show you a card I made using a new A7 die and stamp set called "Big Hugs".


I started off using the Hello stitched rectangle nesting die as a background and I stenciled the triangles using the scattered triangle stencil and distress oxide inks. I then die cut the Hooray sentiment cover plate and again used the inks to colour it. The whole die was a bit too large to fit all of my card so I just cut the top and bottom end off . As you can see it's a versatile die!  The hearts are from the new release and they are the Small Heart xoxo die set. Again coloured with inks. Next I stamped and die cut the little hamsters and coloured them with alcohol pens. I then adhered them to the card using 3D foam pads. Next came the sentiment which I stamped onto a little banner die and adhered with 3D foam pads.

You can find lots of lovely T4T products including the ones I've used in the Time For Tea Designs store here 

If you would like to save 10% off your crafty goodies from the store ( and who wouldn't)! just use this code
T4TSHARON10

Enjoy your crafting!

Sharon x

Other Posts You Might Like