Pages

Showing posts with label Slimline card. Show all posts

Thursday, 18 August 2022

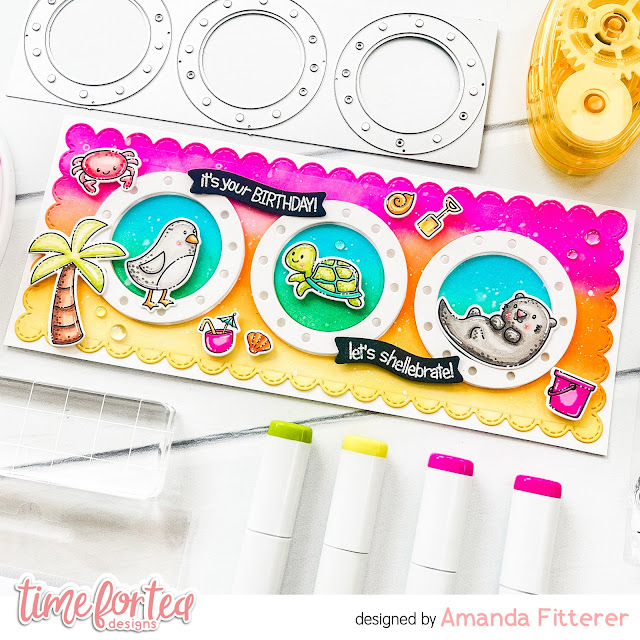
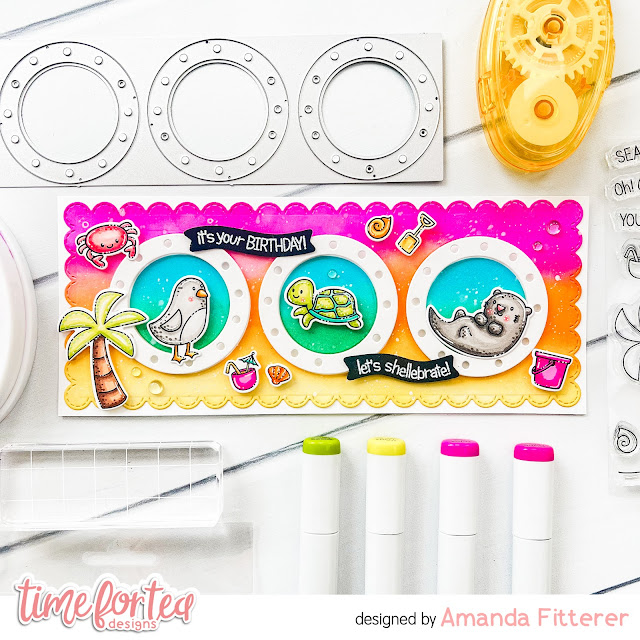
Slimline Beach Scene

Happy Thursday, Tea Timers!  It's Amanda sharing this beautiful and bright card using the New Release!  Are these little critters too cute or what?!

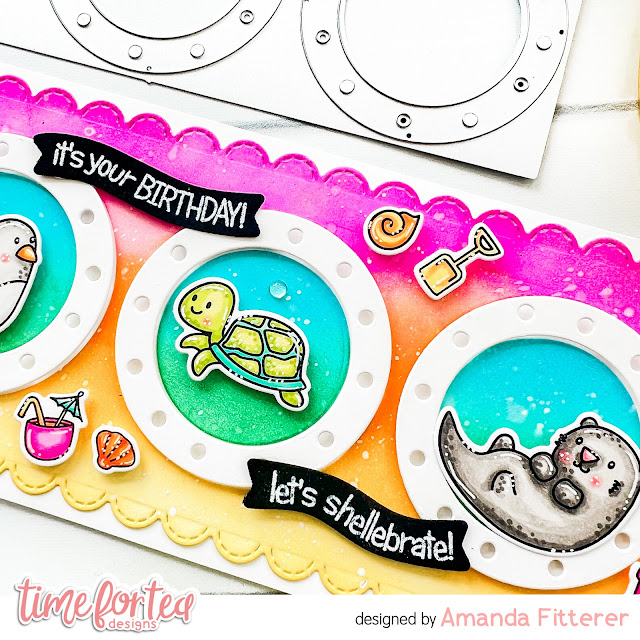
To create this card, I started my creating my background.  I die cut a slimline scalloped frame and used Catherine Pooler inks to create a blended background.  I placed this background onto my slimline card base.  

Next, I cut my Slimline Porthole Dies and placed them on my background with 3D foam squares.  I ink blended the inner circles with blues and greens and then glued them down.

I stamped my critters from the Beach Buds Stamp Set, colored them with Copic markers, and then die cut them out with the coordinating dies.

Aren't they just the cutest little beach buddies you ever did see?!
I'll be back next week with another card showcasing this adorable new release!
Xx, Amanda


Thursday, 17 February 2022

Treat Yourself

Hello, DT Kitty here. It's Thursday afternoon and time for my latest Time For Tea DT card. With Valentine's over that means Spring is on the way! I decided to create a slimline scene featuring some gorgeous bears...

For this card I used the Bears Picnic Stamp & Hillside Village Stamps (for the trees). I coloured them all with Copics and cut them out. I created the background by using the Scene It Stencil with some Mermaid Lagoon Distress Oxide Ink. I blended Twisted Citron & Mowed Lawn onto a strip of card and die cut it using the stitched border die from the Slimline Hillside Scene Dies. I used the Bold Sentiments Stamps for all the sentiments and used the coordinating Bold Sentiments Die to cut them out. I assembled everything onto the card with foam pads and added some heart embellishments to finish.


You can get 10% off your order on the website using the code T4TKITTY10


Kitty xx

Thursday, 27 January 2022

Birthday Bunnies

Hello crafty friends, Kitty here! It's time for my usual Thursday DT spot for Time For Tea Designs. As it's been so dark and cold I thought I would brighten things up and make a spring themed card. So of course out came the bunnies and a cute scene was made...


I started out by creating the background. I used the Scene It Stencil to create the clouds with a little Salvaged Patina Distress Oxide Ink. I then used Mowed Lawn & Twisted Citron Inks to create the grass. I used the fence from the Windmill Add On Die Set. I die cut white card using the Slimline Slopes Die and attached the piece on top of my background. I stamped all my images from the Blooming Bunnies Stamp Set and coloured them with Copics. I cut them all out and added them onto the card with foam pads. I stamped the sentiments from the Bold Sentiments Stamp Set and die cut with the Bold Sentiments Die Set. I added them onto the card and added some pearls to finish.


Thank you ever so much for dropping by today.
Don't forget you can use my DT code T4TKITTY10 for 10% off your order.

Kitty xx

Thursday, 20 January 2022

So Lucky To Have You

Hello & Happy Thursday! Kitty here and it's time for my usual afternoon DT spot for Time For Tea Designs. I went full on bright and busy for this slimline card. It was so much fun to make and I love adding lots of little detail...


I started out my creating my background panel. I gently blended Salvaged Patina & Twisted Citron Distress Inks three times on a slimline panel. I then blended Twisted Citron onto card and die cut it with the Grass Die from the Landcape Edge Dies. I added this onto each section. I created the front panel by blended Kitsch Flamingo & Picked Raspberry Distress Oxide Inks. I then used the Chic Chevron Stencil with Picked Raspberry Ink over the top. I used a Square Label Die to create the three windows and added white dots around them with a pen. I then added acetate behind the windows, added sequins to each window and fixed it onto the back panel to create the shaker windows. I used the Smitten Kitten Stamp Set for each of the images. I coloured them with Copics, cut them out and fixed them in place on the windows. I cut the sentiment from the Brighter Days Sentiment Cards into three pieces and added them along with some heart embellishments.


As always, thank you ever so much for joining me today, don't forget to join us tomorrow for our Blog Hop. You can use my code T4TKITTY10 for 10% off your order at Time For Tea Designs.

Kitty xx

Friday, 8 October 2021

Halloween Shaker Card Video Tutorial

 Hello DT Vic here with you today and I have made a fun video tutorial that’s perfect for Halloween. I love creating Halloween cards they are always so fun to make. 


In my video I show you the steps on how to create a fun slimline shaker card. 


I went for traditional colours using black, purple, green and orange. You can of course use whatever colours you want for your card. The products I used are:

Slimline Postage Frames Die

Slimline Scalloped Nesting Dies

Starry Sky 6x6 Stencil

Spooky Circle Tags Clear Stamp Set

Spooktacular Clear Stamp Set

Beautiful Blending Brushes


For the shaker background I done some emboss resist this is fun technique to try and I also show you how to create different compartments for your sequins so you can add different colours of sequins to each heart. I used my copics to colour my images and the greeting is a SVG cut file that says Happy Halloween. 


I hope you enjoy the video tutorial and have fun creating some Halloween shaker cards. 

You can also save 10% off your order using the code: T4TVICKI10 at the checkout including the new release too!

Have a lovely day!

Vic


Tuesday, 31 August 2021

Sweet Friend

Hello all tea timers, Claudia here,  how are you? Today I have a new inspiration, a slimline using this adorable die
I am in love with this die, which as you know has two versions, one with the tulips vertically and another with tulips horizontally 

 I used these adorable mice that belong to two sets,  Hello Cupcake and Sundae Sweeties

As a background I chose this patterned card from the last release,    Sweet Summer Paper Pad this paper is one of my favorites!


I find this card very funny, I hope you like it too. 
 Don't forget to use the code T4TCLAUDIA10 to get a FANTASTIC 10% discount!

Thursday, 19 August 2021

Cool Birthday

Hello crafty peeps! It's Thursday and time to share my latest card. I'm still loving playing with the latest release and with such cute images who can blame me?! I had so much fun creating this sweet summer scene... everyone loves an ice cream, right?


For this card I used the Cool Critters Stamp Set. I coloured the images with Copics and cut them out with the Cool Critters Coordinating Dies. I blended Faded Jeans & Salvaged Patina Distress Oxide Inks to create the sky effect. I then blended Lucky Clover & Twisted Citron to create the grass & hedge. I used the Grass Die from Slimline Hillside Scene Dies and the Stitched Cloud from the Landscape Edge Dies to die cut each piece. I layered them together and die them with the postage stamp die from the Slimline Postage Stamp Dies. I attached the panel onto a white card base with foam pads. I added all the images and sentiment onto the card with foam pads and added some gems to finish.


Save 10% off your order with Time For Tea Designs using my DT code T4TKITTY10

Thank you ever so much for joining me today.

Kitty xx


Tuesday, 20 July 2021

See You Soon

 Hello dear friends how are you? Claudia here to wish you a good week. 

Today I have a card a little different than usual, I created small windows that show the landscape and this cute bear taking a walk in the car. 


  For this scene, I imagined the panda leaving for summer vacation and greeting his friends with a "See you soon." 
To create it I combined two sets of stamps , Car Critters   and   Hillside Village 


To prepare the base of my card, I used two sets of die cuts from the latest collection, Slimline Postage  and      Slimline Hillside Dies, and I did the coloring with alcohol markers.
I had fun creating this card, I hope you like it. 

  Don't forget to use the code T4TCLAUDIA10 to get a FANTASTIC 10% discount!


Thursday, 1 July 2021

Be Slothy

Hello crafty friends, it's Kitty here with my usual Thursday afternoon post. Today I am sharing a fun Slimline card featuring some cute sloths...


For this card I used the Be Slothy Stamp Set to create all the images. I stamped them in black ink, coloured them with copics and cut them out. To create the background I die cut kraft card using the medium Slimline Scallop Nesting Dies. I then die cut the panel using Tulip Aperture Slimline Die to create the shaker windows. I used the Chic Chevron Stencil with a little brown ink to add a bit of patterned to the panel. I added acetate onto the back of the panel, sequins and fixed it onto some blue card. I mounted the panel onto card and onto a slim card base. I added each of the images onto the panel with glue and foam pads along with some stamped sentiments from the same stamp set.


Thank you for stopping by today, I will be back next Thursday with another T4T DT creation. Don't forget you can use the code T4TKITTY10 for 10% off your order at Time For Tea Designs. See you all soon!

Kitty xx

Monday, 28 June 2021

Mirror stamping paper pals

Hello crafty friends! 

It is DT Natalia here today, and I wanted to share with you how I made this slimline card using mirror stamping! 

It was my first time using this technique but I will certainly use it again as it is a game changer and stretches the use of our stamp sets so much. 

I thought this technique would go great with either the Paper Plane Pals or the Car Critters clear stamps, and this time I decided on the lovely paper plane pals. 

To start with, I stamped out the images from the set and set those aside. I then used my Waffle Flower Water Media Mat to do the mirror stamping and followed the steps below: 

  1. Take the stamp you want to mirror and place it on your stamping block (not your stamping platform for this one, I am afraid!)
  2. Ink it up with your ink of choice, I used memento as I was going to use my Spectrum Noir alcohol markers for colouring.
  3. Stamp the image onto the mat - be careful here not to move the block too much as you put it down as that will smudge the print and you won't get a neat impression. 
  4. Take a piece of cardstock and place it directly onto the stamped image on the mat - again, careful not to move it or the image will smudge. I found my first impression was never neat so I picked the image up a couple of times and I for me, the second image was the best of all.
  5. You will notice that the image is not as neat as if you stamped directly onto the paper with your stamp, but that is OK - use a black fine liner (I used my uni ball one) to go over the lines and nobody will ever know!  
Can you tell just by looking at my card which one is mirror stamped? 

I then coloured the images and used the coordinating dies to cut them out. For the mirror stamped images, I just fussy cut them and used a craft knife to make a slot in the place for the bunny to sit in. 

I thought the planes were looking a little too plane so I took the little hearts and stars from the stamp set and stamped them onto the planes with my memento dew drop inks. I did a bit of masking with a piece of paper so that the little decorations would be all over the plane, coming out the edges. 

If you look closely (it is always so hard to capture small details in pictures isn't it), you will also notice that I stamped some clouds onto vellum and used white embossing powder on them. I just think the little details is what finish up a card nicely and add to it!


Now onto the background: I used the middle from the slimeline scalloped nesting die set and die cut it from a pearlescent teal cardstock which has a bit of shimmer to it. Then I cut a white piece of cardstock just a bit smaller, where my elements would go. I used the new slimline scene builder stencil for the clouds, together with broken china distress oxide and a blending brush. What I love the most about this stencil is the fact that it is slimeline sized! so easy to create slimline scenes. 

I added the little birds flying on the sky directly onto the background and used a few gems and sequins from my little things from Lucy's cards to finish off the card. 

I hope you like it and most of all, I really hope it inspires you to try something new! 

Remember to use the code T4TNEILA10 to get a 10% off your shop - there is also a 30% off all standalone dies going on at the moment! (code does not apply) 

Sending hugs,

Natalia


Thursday, 28 January 2021

I Miss You Face!

 Hello DT Vic here today and I am sharing a very cute slimline card with you today using the gorgeous Workout Pigs Stamp Set. These stamps are just the CUTEST!!! I had so much fun creating this card today. 


For my card today I used the Slimline Scalloped Trio Circle Nesting Dies and die cut a rectangle onto some dark pink card then using the trio circles I die cut another piece of card using a light pink card. I adhered these onto my card base. Next I stamped up the gorgeous pigs using some copic friendly paper and I coloured in the pigs. I then trimmed the images out and placed them onto my card using some foam tape.


 I then added some hearts by doing this I saved some pieces from the Scattered Hearts Cover Plate Die and adhered them onto my card using PVA glue. 


I then used the Wavy Hello Sentiment Die and run this through my die cutting machine twice, once with white card then I used a blue card. I adhered these together with the blue card underneath the white card peeking out. I then added some heart envelopes using the Be Kind Be You Stamp Set. I adhered the hello sentiment onto my card along with the envelopes. Next I used some black card and stamped the I Miss Your Face sentiment which I then embossed using some white Embossing Powder. I trimmed this down and adhered the sentiment onto my card.


To finish my card off I added some gems. I really loved how this card turned out and the pigs are sure to put a smile on someones face. 


You can save 10% off your orders including the brand new release using the code: T4TVICKI10 at the checkout. 

Don't forget you can catch Jo on our Facebook page tonight at 8pm where Jo will be live crafting. 

Have a lovely day!

Vic x

Wednesday, 6 January 2021

Sending Winter Hugs

Happy New Year to you all!

It's DT Shabneez with my first post of 2021 and what a start it's been with yet another lockdown!  To make you feel better I have a card that is sending you winter hugs because I feel we all need them!


I have used the Winter Wishes Wreath Stamp in a different way by breaking the wreath up on my card and I think it looks quite effective don't you?


The wreath was stamped twice onto my card base which I die cut using the Slimline Scalloped Trio Circle Nesting Dies.  I stamped the sentiments around the wreath and coloured in the images using my Chameleon pens.

Don't forget you can get 10% off anything in store using my code T4TSHABNEEZ10.

Happy Crafting!


Thursday, 26 November 2020

It's A Penguin Party!

 Hello Vic here today sharing a cute slimline card I made. I am so in love with the new release and wanted to make a fun Christmas card using the Skating By Penguins Stamp Set.


To start with I used the Falalala Scalloped Slimline Die Set and using a pink piece of card I die cut a frame. I then used the Falalala die and die cut this using some silver sparkle card. I then used a piece of white card and made my slimline card base and I started to ink blend some blue distress ink onto my card using my Beautiful Blender Brush. I started to ink blend the top of the card in blue and then I switched to a light purple foe the bottom of the card. I then added some hills using the Landscape Edge Die and some more white card. 


I wanted to add some details to my sky and I used the Carolling Critters Stamp Set that have snowflakes in the stamp set. I used my inks that I used to make the sky and stamped the snowflakes onto my card. I then adhered the hills down using some double sided tape. 


I then stamped out my images using Memento Black Ink and the Skating By Penguins Stamp Set. I coloured the penguins in with my copic markers then I used the Coordinating Dies and run them through my die cutting machine. I always secure the dies with some washi tape so that they they don't slip while being die cut. I then adhered the frame, Penguins and greeting onto my card using some Foam Pads.


To finish my card off I added some sparkle using some Stickles onto their hats and the hills. 

I hope this card inspires you to make a fun penguin scene. Don't forget you can save 10% off your Time For Tea Designs purchases using the code: T4TVICKI10 at the checkout. 

Thanks for stopping by today!

You can watch Jo live tonight at 8pm on our Time For Tea Designs Facebook page.

See you there!

Vic

Saturday, 21 November 2020

Falalala, you make me so happy!


Hi all Design Team Member Natalie here to share my adorable snowy reindeer card. The reindeers are from the new release in the Happy New Year Critters stamp set. It's such a fun versatile set that can be used for many occasions and as always mixes well with the other stamp sets. These Chubby cheeked reindeers are definitely one of my favourites from the new sets so I had to make a Christmas card with them.
I began by cutting out the new Falalala Scalloped  Slimline Dies I cut two of these out of white cardstock. I blended  Spun Sugar and Worn Lipstick Distress Oxides on one of them spritzing some water on to add some added texture. The other I created a snowbank on using the standalone Landscape Dies which I added the sentiment to. I made sure to keep the frames aside to use for later.
I cut out the Falalala out of white cardstock and fun foam and layered them so it popped out more. The snowflakes again are cut from white cardstock but I just kept them one layer. 
The reindeers are coloured with copic markers I used the same colours on both and like always batch coloured and die cut a lot whilst I had my pens out it just saves so much time in the long run. 
To pop my card on my card base I temporarily stuck the frame and pink base together with washi tape so it didn't move and I could make sure it was lined up correctly. I added doubled sided tape after just taking off one side at a time and popped it on my card base. Then the other frame I popped aside I layered it on top so the snowbank wasn't higher than the frame.
I hope you liked my card today I really enjoyed making this one and the pink sky was so fun to make. 
Don't forget you can get 10% off in the shop using code T4TNATALIE10
Happy Saturday everyone hope you have a great weekend!


Saturday, 10 October 2020

Home Sweet Home Video Tutorial


Hi Vic here this morning and I have a fun Slimline card to share with you today. 

I absolutely love the Home Sweet Home Clear Stamps the bears are adorable with all their little accessories.


I have also included how I make my Slimline card base in the video with measurements so it will be easier for you to create your own card base when using the slimline dies. 


I used the Scalloped Slimline Trio Circle Nesting Dies along with the Scalloped Slimline Die to use on my card base. I then stamped and coloured all my images using copic markers and I then used the Home Sweet Home Coordinating Dies and run them through my die cutting machine.

I added some details with my white gel pen and then moved onto my sentiment. I used some pink and white card to die cut the Home Sweet Home Sentiment Die and started to adhere everything onto my card base.

To finish up the card I added some Nuvo Drops. I had so much fun making this card! 
You can see all the gorgeous New Release Products Here. Don’t forget you can save 10% off your order using the code: T4TVICKI10 at the checkout 
Thanks for stopping by today!
Vic


Friday, 28 August 2020

Up, up and Away


Happy Friday everyone. DT Annalisa here and my project today features the Up, Up & Away Clear Stamp Set from the August release as well as the little mouse from the Treat Yourself Clear Stamp Set. The mice in this set are adorable!

I cut out some white card stock using the Scalloped Slimline Die and used three Distress Oxides (Salty Ocean, Shaded Lilac and Spun Sugar) on my Sunny Side up Again stencil to create the clouds. I used the same stencil and Twisted Citron to create the grass and then added some water droplets.

I die cut out a sheet of fun foam using the scalloped slimline die and adhered it to the background scene and then a slimline card base. Fun foam is a great way to add some dimension without having to cut up a lot of foam tape!


I stamped and coloured the three images and then cut them out. I mounted the hot air balloon on some foam tape. I also die cut out the 'up, up and away' sentiment using the Pandamonium Party coordinating die set and adhered it to the background using foam tape. I used liquid glue to stick down the mouse and the bear with the kite.

To finish the card I added some coloured sequins that I have had in my stash for a long time.

If you are interested in purchasing any of the T4T products used in my project, I have a 10% discount code for the T4T store which can be used on anything, anytime and has no time limit - T4TANNALISA10.


Friday, 14 August 2020

Rainbow after the Storm


Happy Friday! DT Annalisa here sharing a bright card featuring two new stamp sets and two new dies from the July release. This huge release is awesome and can be used to create so many awesome and unique cards!

To start I created a card base 3 1/2 wide by 8 1/2 inches tall and coloured the edges with Salty Ocean Distress Oxide ink. Next, I used the new Scalloped Slimline Die - this is such a great die for slimline cards! I used the Sunny Side up Again stencil and Squeezed Lemonade Distress Ink to create the sun and rays. I used Twisted Citron to create the grass and then added some water droplets on top of the sun and the grass.


Next, I die cut the Rainbow Mini Shaker Die five times from heavy card stock. For the base section, I left the inside rainbow areas in rather than taking them out. I coloured each rainbow section in using Distress Oxides and my Small Beautiful Blender Brushes - the small brushes made this process so much easier! I layered on the other die-cut rainbow sections and glued them down using liquid glue. For the final section, I used some acetate to create a clear barrier, before I glued it on the top I added in some glitz chunky glitter to each rainbow section. The Recollections glitter fits perfectly in each section.

I stamped the kitty with the umbrella and raindrops from the All Occasion Critters Clear Stamp Set and cut them out using the coordinating dies. I used my copics to colour in the kitty stamp. I also stamped, coloured and die cut the little bees from the set - they are so adorable.

I used the coordinating dies from the Storms Don’t Last Forever stamp set to cut out the clouds. I coloured the larger ones in with my grey copics to make them look dark and stormy. I stamped the sentiment 'the greater the storm the brighter the rainbow' and die cut it out.

Once everything was stamped and coloured I adhered all the elements to the card. I added some sparkle to the umbrella and raindrops with my Wink of Stella pen to complete the card.

If you are interested in purchasing any of the T4T products used in my project, I have a 10% discount code for the T4T store which can be used on anything, anytime and has no time limit - T4TANNALISA10


Friday, 31 July 2020

Rainbow Cards - Two Cards with One Stamp Set & Giveaway!

Hi everyone! 
I hope you are all doing well?

Jo here sharing the edited video from Thursday's FB Crafting Live.


In this video I share how to make two really different cards with the same Stamp and coordinating Die set.
There's also a chance to win a card I made on Create & Craft TV this week so be sure to check it out!


The really cool thing with the Storms Don't Last Stamp and Die set is that you can use the coordinating Die's on there own as I've done in this card. 


I ink blended my background and then created a pattern with the raindrops stamp from the set.


In the set there are some small stamps that you can use to create backgrounds too or you can add them as a pattern to the arches of your rainbow as I've done here.


The sentiments also have coordinating dies making it super easy to cut them out and pop them over your rainbow.


The smaller stamps in the set fit perfectly in the Aperture Slimline Die. I love this die as there is so much you can do with it!


This was super simple to make and looks so cute with those little smiley faces!


Some simple die cutting and our Iridescent Rain Drops finish it off nicely!


While we're talking about the Rain Drops! Great news they are back in stock!! Woop! But numbers are limited so be quick! We also have restocked the Clear Drops which also super popular so if you've been hankering after some grab them now.
Finally I need to let you know about some new colours in our Enamel Drops which are ideal for your summer creations. I will link them all below for you to check out!

Don't forget to watch the video to find out how you can win one of the cards I made below. I made these while I was on Create & Craft TV this week and they are from our Christmas In July Collection. This collection is exclusive to Create & Craft until the 8th August.


Enjoy the video and have a great weekend guys!

Crafty Hugs
XOXO


Other Posts You Might Like