Pages

Showing posts with label Summer Haze Enamel Dots. Show all posts

Friday, 7 November 2025

Pamper Yourself

Happy Friday, DT  Annalisa here! Today’s card features the Queen For The Day Printed Cardstock and coordinating dies. The printed cardstock sheets from Time For Tea Designs are absolutely stunning in person, and I always enjoy creating with them!

For the background, I used watercolour paper along with the X Marks the Spot Stencil. I pressed Salvaged Patina, Cracked Pistachio, and Twisted Citron Distress Inks onto the stencil, then spritzed it lightly with water. Placing the stencil ink-side down onto the watercolour paper, I pressed gently for a few moments before lifting it away and heat-setting the ink.


Next, I added some splatter using the same colours with Distress Watercolour Pencils. Once the panel was dry, I die-cut it with a stitched square die from my stash.

For the card base, I created a 5-inch square card and blended Kitsch Flamingo Distress Oxide across the top panel using a blender brush. I then adhered the stenciled panel to the pink base with liquid glue.


I die-cut the images and sentiments from the Queen For The Day Printed Cardstock using the coordinating dies. Some elements were attached with liquid glue, while others were popped up with double-sided foam tape for dimension. The small shelf is from the Baked With Love Kitchen Add-On Clear Stamp Set, which I coloured with Copics and cut out using the coordinating dies.

To finish the card, I added Summer Haze Designer Enamel Dots.


Thank you so much for stopping by and reading my blog post! Don’t forget to use my discount code T4TANNALISA10 when shopping at Time For Tea Designs to receive 10% off your order.


Friday, 11 April 2025

Easter Bunny Wishes


Happy Friday, DT Annalisa! For my card today, I used the Bunny Builder Dies and the Eggstra Special Layering Stencil (now on sale) to create this adorable purple and pink Easter card.

I began by ink blending Wilted Violet Distress Ink onto purple cardstock through the Eggstra Special Layering Stencil. I applied the ink lightly with my Beautiful Blender Brush for the first layer of the eggs. Then, I used more pressure with the pattern layering stencil to create a darker shade of purple.


Next, I used a stitched rectangle die to cut out the ink-blended background and adhered it to an A2 card base using double-sided tape. 

For the bunny, I die-cut white cardstock with the Bunny Builder Dies and ink-blended the die-cut elements using Hickory Smoke, Candied Apple, Worn Lipstick, Carved Pumpkin, Twisted Citron, and Mowed Lawn Distress Inks with my Beautiful Blender Brushes. After assembling the bunny with liquid glue, I added accents with a white gel pen for extra detail.


I also applied Worn Lipstick Distress Oxide to a piece of white cardstock, allowed it to dry, and then die-cut it with the Easter Wishes Large sentiment die. I cut the same sentiment from white cardstock and used liquid glue to adhere the two layers slightly offset. I added white gel pen accents to the pink layer for an additional touch. I adhered the sentiment to the card base using liquid glue.

Next, I stamped and colored two eggs from the Eggstra Special Birthday stamp set using Copics. I die-cut them with the coordinating dies and added white gel pen accents. I then used liquid glue to attach the eggs to the card base above the Easter Wishes sentiment.


Finally, I adhered the assembled bunny to the card base using 1mm double-sided foam tape. To complete the card, I added Summer Haze (light purple) and Sweet Summer (white) Designer Enamel Dots for embellishment.

Thank you so much for reading my blog post! Be sure to use my discount code T4TANNALISA10 when you visit the Time For Tea Designs shop to get 10% off your order.


Friday, 17 November 2023

You are the Pumpkin Spice in my Latte


Happy Friday, DT Annalisa here! November can be dark and dreary, so why not treat yourself to a caffeinated beverage! My card today is happiness in a mug - for me, that is an iced latte or a cappuccino, while others enjoy a pumpkin spice latte. I combined the Takeout Coffee Cup Dies with the Pumpkin Spice stamp set to create this coffee-themed card.

I used the Zig Zag Frame & Tag Dies and die-cut watercolour paper. I used carved pumpkin Distress Oxide Spray for the inner panel, and tea-dye Distress Oxide Spray for the frame. To darken the edges of the frame, I ink blended on ground espresso Distress Ink with a blender brush. 

I used liquid glue to stick both pieces of watercolour paper to an A2 card base.


I die-cut the coffee cup sections from watercolour paper. I used tea-dye Distress Oxide Spray on the cup base, lid and whipped cream. I then ink-blended on ground espresso to the cup and lid with a blender brush. I ink blended ground espresso onto craft cardstock for the cup sleeve. I glued all the cup elements to the card base using liquid glue.

I stamped and coloured (with Copics) the pumpkin (Pumpkin Spice), acorns (Jumping With Joy) and kitty in the pumpkin (Trick or Treaters Digital Stamp Collection) and cut them out. I added white gel pen accents with a Gelly Roll Pen. 


I stamped the sentiment from Pumpkin Spice, cut out some of the words with the coordinating die set, and trimmed those without dies. I used liquid glue to stick everything to the card base. I added three orange Summer Haze Designer Enamel Dots to complete the card. 

 Thank you so much for reading my blog post, be sure to use my discount code T4TANNALISA10 when you visit the Time For Tea Designs shop to get 10% off your order.


Friday, 15 September 2023

Eat the Cake and Party


Happy Friday. DT Annalisa is here today sharing a card encouraging you to eat the cake! It features the Let’s Party stamp set from the latest release

I ink smooshed picked raspberry Distress Ink re-inker mixed with water onto watercolour cardstock. Once it was dry, I used the Stitched Quilted Cover Die to add texture to the background. I love this die so much! 

I trimmed patterned paper from the Gorgeous Gingham 6x6' Paper Pad and ink blended salvaged patina Distress Oxide onto it using my Beautiful Blender Brush. I used double-sided tape to stick it down to the pink panel. I then stuck the completed panel to an A6 card base.

I die-cut white card stock using the large Wide Stitched Frame Dies and adhered it with double-sided tape to frame the card.

I stamped and coloured (with Copics) several images from the Let’s Party and Gummy Bears clear stamp sets and cut them out with my Brother Scan N Cut SDX125e. I added white gel pen accents with a Gelly Roll Pen. 

I used double-sided foam tape to stick the images to the card. 

I used the eat the cake sentiment die-to-die-cut teal-coloured card stock three times. I used liquid glue to stack them on top of each other and then to the card base. I also die-cut the confetti from the same card stock and used liquid glue to stick it to the card.

I inked the small confetti stamps with picked raspberry Distress Oxide and stamped them onto the pink background. I added three bright pink Designer Enamel Dots (Summer Haze) to complete the card.  

Thank you so much for reading my blog post. Remember to use my discount code T4TANNALISA10 when you visit the Time For Tea Designs shop to get 10% off your order.

Friday, 25 November 2022

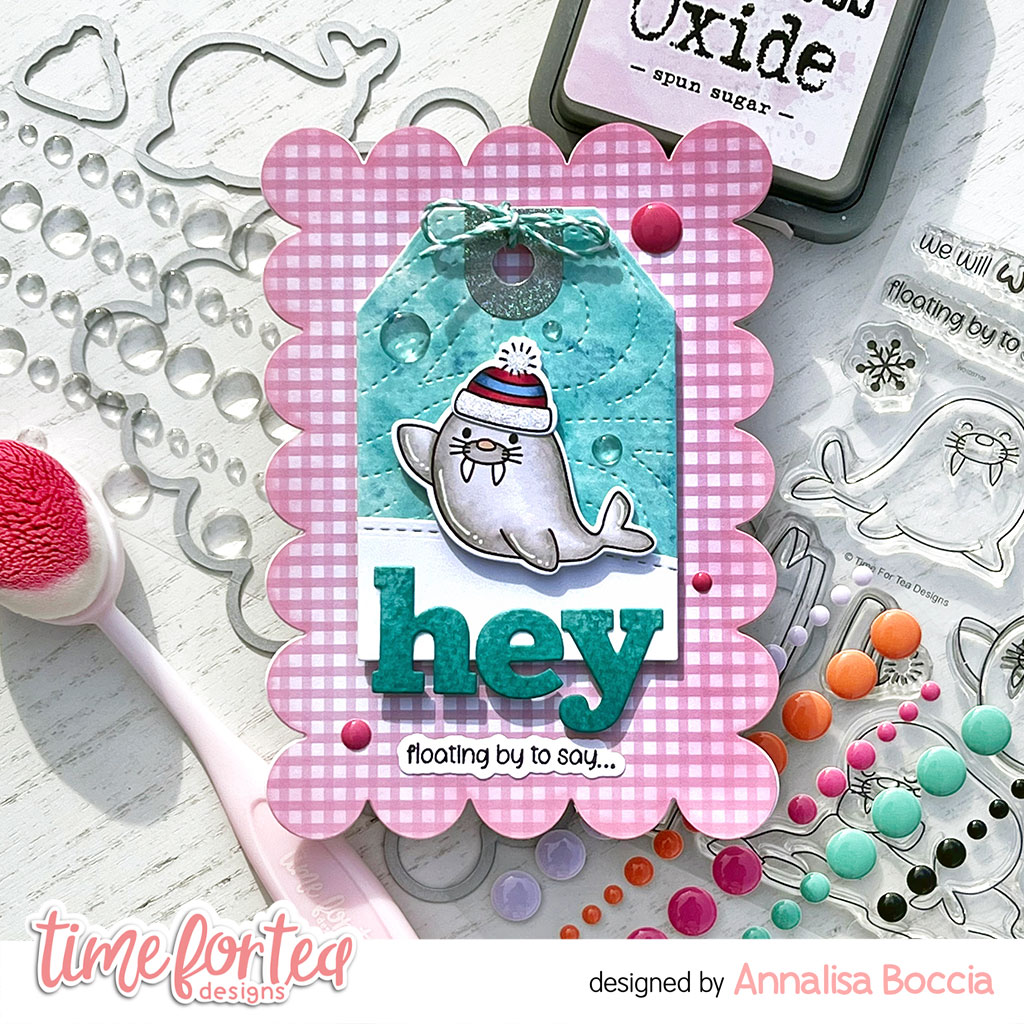
Floating By to say Hey


Hello and happy Friday. DT Annalisa here sharing a fun scalloped card featuring the new Walrus Be Friends stamp set by Time For Tea Designs. I love how the Walrus is waving hello.

To start, I die-cut a piece of Gorgeous Gingham 6x6' Paper Pad with the Large Scallop Celebrate Frame Dies. I ink-blended Spun Sugar Distress Oxide ink to the sides of the paper with my Beautiful Blender Brush. I then adhered this to a card base that I created using the same die. 


I sprayed Distress Mica Stain in Shiny Bauble onto watercolour paper. I love the shine mica stain has. Once it was dry, I die-cut it first with the Snow Flurry Cover Die and then with the tag die found in the Memory Keeping Essential Dies. I also used some of this paper to die-cut the hey sentiment from the Hey, Hello, Hi Dies. I ink blended on Peacock Feathers Distress Ink to the letters to darken them up. 

I cut some white card stock with the Slimline Hillside Scene Dies to create a snowy hill for the Walrus to sit on. I cut it again with the tag die and then glued it on top of the tag. I glued the 'hey' to the base of the tag with liquid glue. I tied a bow onto the tag with some Lawn Fawn teal Lawn Trimmings. 


I stamped the seal and hat from the Walrus Be Friends and coloured them with my Copic markers. I die-cut them with the coordinating dies and added some white gel pen accents. I used liquid glue to adhere the hat to the Walrus and then used double-sided foam tape to stick them to the tag. I then added double-sided foam tape to the back of the tag and placed it on the scalloped card base. 

I stamped and die-cut the sentiment and glued it to the bottom of the card base below the tag. To complete the card, I added "Summer Haze" and "Clear Bubbles" Designer Enamel Dots.


Thank you so much for reading my blog post, you can use my discount code T4TANNALISA10 when you visit the Time For Tea Designs shop to get 10% off your order.


Other Posts You Might Like