Pages

Showing posts with label Wide Stitched Frame Dies. Show all posts

Friday, 14 November 2025

Sending Happy Mail


Hello and happy Friday, DT Annalisa here! Today, I am sharing a cheerful, happy mail card I created using the You Got Mail clear stamp set from Time For Tea Designs. The coordinating die set for this collection is currently on super sale, so be sure to grab it while you can!


To create the background, I began with watercolour paper and a combination of Twisted Citron, Salvaged Patina, and Picked Raspberry Distress Sprays. I layered the colours one at a time, heat-setting between sprays to create depth and texture. For a final touch of shimmer, I added a spritz of Peacock Feathers Distress Spritz, which gives the background a beautiful sparkle!

Once the panel was dry, I adhered it to a 5 3/4" x 4 1/4" card base.


Next, I used the Wide Stitched Frame Dies to cut a frame from White Silver Neenah cardstock, then attached it to the background with liquid glue.

For the focal elements, I stamped several images from the You Got Mail stamp set, colored them with Copic markers, and die-cut them with the coordinating dies. I added a few white gel pen highlights using a Gelly Roll pen for extra detail. The cute little acorn is from Jumping With Joy, and the flowers are from Ewe Are The Best, both cut with their matching dies.


I arranged the images on the card front, adhering some flat with liquid glue and others with foam tape for dimension. To finish everything off, I added three Designer Enamel Dots from the Summer Haze collection for a fun pop of colour and shine.

Thank you so much for stopping by and checking out my project today! Don’t forget to use my discount code T4TANNALISA10 when you shop at Time For Tea Designs to receive 10% off your order.


Friday, 6 December 2024

Season's Tweetings


Happy Friday from DT Annalisa! Today's project features the new A6 stamp set, Seasons Tweetings. This adorable set is my favourite from the brand-new release by Time For Tea Designs, as it includes cute birds dressed up for winter—one even holds a take-out coffee cup!

To begin, I ink-blended Saltwater Taffy Distress Oxide, Festive Berries Distress Ink, and Chipped Sapphire Distress Oxide onto white cardstock using my Midi Beautiful Blender Brushes. I added splatters with a brush, water, and silver watercolour paint, then set the panel aside to dry.


Next, I use the Wide Stitched Frame Dies to die-cut White Silver Metallic cardstock from Neenah. I adhered the frame to the ink-blended cardstock with double-sided tape, then attached these to a card base using liquid glue.

I stamped several images and a sentiment from the Seasons Tweetings stamp set, along with Christmas ornaments from the Merry Cheesemas stamp set. I coloured these images with Copic markers, added accents with a white gel pen, and cut them out using the Brother Scan N Cut SDX125e.


I fussy-cut around "tweetings" and used the Simple Slimline Nesting Dies to die-cut around "seasons." I adhered the sentiments and birds to the card with double-sided foam tape, while using liquid glue for the remaining images.

To complete the card, I added Clear Bubbles Designer Enamel Dots.

Thank you so much for visiting my blog! Remember to use my discount code T4TANNALISA10 when you shop at the Time For Tea Designs store to receive 10% off your order.


Friday, 12 July 2024

Simply the Zest


Happy Friday, DT Annalisa here. The Time For Tea Designs new release is perfect for cards in the heat of the summer. I loved colouring the fruit with bright colours! These cute critters are about to squeeze the fruits to make a deliciously refreshing summer drink - like the ones I have been drinking as it is super humid. 

I used the A6 Simple Nesting Dies to die-cut a piece of patterned paper from Brighter Days 6x6' Paper Pad. I used double-sided tape to stick it to an A6 card base.

Next, I ink-blended ALTENEW Sunkissed Crisp Dye Ink through the new Diagonal Stripes Stencil. I removed the stencil and ink blended lightly using the leftover ink on my blender brush to fill in the white areas. I added splatter using the ink, water and a paintbrush.

I stuck the striped panel to the card base with liquid glue and used double-sided tape to stick a white stitched frame that I die cut with the Wide Stitched Frame Dies on top of it.


I stamped and coloured (with Copics) the limes, lemons and oranges from Squeeze the Day and cut them out with their coordinating dies. I added white gel pen accents with a Gelly Roll Pen. The critters are from Sweet Cart Critters, I cut them out with their coordinating dies.

I stuck the stamped elements to the card with double-sided tape, including the sentiment. I added Summer Haze Designer Enamel Dots in orange to complete the card.


Thank you so much for reading my blog post. Remember to use my discount code T4TANNALISA10 when you visit the Time For Tea Designs shop to get 10% off your order.


Wednesday, 12 June 2024

Warm hugs and yummy treats!

Hey Tea-timers...

Who needs some warm winter hugs? It's winter here in Tasmania now so we need all the warm hugs and warms drinks we can get so today's card is inspired by that!


To create this card I started with a pink card stock base before adding ink blending to it using a red distress oxide ink and spritzing with water to create a mottled effect. I then used the middle sized frame die from the wide stitched frame die set to cut out a frame and adhere to the base....


Using the warm hugs large sentiment die I die cut this twice. Once from black card and then once from white card before adhering them together slightly offset and then adhering in place on the frame!


I stamped, coloured and die cut a cup of the warm drinks and a yummy treat from the Pumpkin spice stamp set. These were adhered in place before completing the card with a touch of pretty sequins....

That's all for my card today, I hope it makes you feel nice and warm!

Happy crafting, hugs Ashlee.

Wednesday, 18 October 2023

Lost....

Hey Tea-timer friends..

It's DT Ashlee here with you today!

Who's ready for some more Time for Tea designs inspiration using the super cute set Happy trails?! This would have to be one of my most favourite T4T stamp sets, It's just so cute!


I used these T4T products to create this card :


To create this card I started with a blue card stock base (this would fill in the sky area) I then die cut the large sized frame from yellow card and went ahead and die cut al my pieces for the grass and road from the slimline set. 

Once all my pieces were die cut I adhered them all together using liquid glue and foam tape for the frame which created the scene. 

I stamped, coloured and die cut a bunch of images from the happy trails set and arranged them onto the card base. These were coloured using Spectrum noir tri-blend markers with added white pen highlights.

To complete the card a stamped sentiment and a small touch of pretty sequins!


That's all for my card today, have you got someone that you would be lost without that you could send a card like this too?!


Thanks for stopping by, happy crafting. Hugs Ashlee.

Wednesday, 27 September 2023

New home

Hey there Tea-timer friends...

DT Ashlee here, I hope you are all well and getting in lots of crafty time!

Today I'm sharing a new card using just die cuts, yep I didn't use any stamps on this card just a range of Time for Tea designs dies....


I used these T4T products for this card....


To create the card I die cut the base using the wide stitched frame dies and a piece of light grey cardstock. I then die cut the open door pieces and adhered them all together. I added a little bit of brown inking around the edge of the door. This was then added to the card base using foam tape to start adding dimension. I die cut steps from a darker grey card and adhered those with foam tape too....


I die cut all the sentiment layers from different colours of cardstock and adhered those over the door using foam tape. To complete the card I added a touch of pretty pink sequins!

I like how this card turned out with using just dies, how about you challenge yourself and make one too?!


Thanks for checking out my card, I hope you liked it! Until next post happy crafting, hugs Ashlee. 

Friday, 15 September 2023

Eat the Cake and Party


Happy Friday. DT Annalisa is here today sharing a card encouraging you to eat the cake! It features the Let’s Party stamp set from the latest release

I ink smooshed picked raspberry Distress Ink re-inker mixed with water onto watercolour cardstock. Once it was dry, I used the Stitched Quilted Cover Die to add texture to the background. I love this die so much! 

I trimmed patterned paper from the Gorgeous Gingham 6x6' Paper Pad and ink blended salvaged patina Distress Oxide onto it using my Beautiful Blender Brush. I used double-sided tape to stick it down to the pink panel. I then stuck the completed panel to an A6 card base.

I die-cut white card stock using the large Wide Stitched Frame Dies and adhered it with double-sided tape to frame the card.

I stamped and coloured (with Copics) several images from the Let’s Party and Gummy Bears clear stamp sets and cut them out with my Brother Scan N Cut SDX125e. I added white gel pen accents with a Gelly Roll Pen. 

I used double-sided foam tape to stick the images to the card. 

I used the eat the cake sentiment die-to-die-cut teal-coloured card stock three times. I used liquid glue to stack them on top of each other and then to the card base. I also die-cut the confetti from the same card stock and used liquid glue to stick it to the card.

I inked the small confetti stamps with picked raspberry Distress Oxide and stamped them onto the pink background. I added three bright pink Designer Enamel Dots (Summer Haze) to complete the card.  

Thank you so much for reading my blog post. Remember to use my discount code T4TANNALISA10 when you visit the Time For Tea Designs shop to get 10% off your order.

Friday, 14 July 2023

You've Got my Seal of Approval

Happy Friday! DT Annalisa here sharing a sea-themed card I created for my niece's 17th birthday. She has a friend obsessed with fishing, so I knew I had to use the Sealed With A Kiss and the coordinating dies for her birthday card.

I used the following Time For Tea Designs supplies to create the card:

Walrus Be Friends coordinating die set
Fintastic Friends (stripped fish)
Fintastic Friends coordinating die set
Beach Buds (shells)
Beach buds coordinating die set
Darling Daffodils ("Happy Birthday")
Darling Daffodils coordinating dies


I used water and Peacock Feathers Distress Ink on Distress Watercolor Cardstock by Ranger for the background panel. I did the 'ink smooshing' technique and liked how it turned out - the type of paper you use makes a BIG difference.

I adhered the water panel to an EU A6-sized card base. I used double-sided foam tape to stick the large frame from the Wide Stitched Frame Dies on top of the scene.


I stamped, and coloured (with Copics) several images from the stamp sets listed above and cut them out with their coordinating dies. I added white gel pen accents with a Gelly Roll Pen. I added sparkles to the edges of some images with a Quickie Glue Pen and Lawn Fawn Prisma Glitter.

I stuck the images to the card base using a combination of liquid glue and double-sided foam tape for dimension. 

Thank you so much for reading my blog post. Remember to use my discount code T4TANNALISA10 when you visit the Time For Tea Designs shop to get 10% off your order.

Wednesday, 28 June 2023

A pizza my heart

 Hey there Tea-timer friends...

It's DT Ashlee here. Do you like pizza?! If you answered yes then you are in for a pizza treat with this card!


I used these Time for Tea designs products :


To create this card I started with a teal blue card stock base that I added scattered hearts stencilling to using Catherine Pooler ink in the colour Cummerbund. 

Using black paint mixed with water I gave the base a splatter of paint! 

Using the wide stitched frame dies I die cut a frame from light grey card and backed it with a darker grey. I then adhered that angled onto the card base using foam tape to start adding in some dimension. 


I stamped, coloured and die cut three of the pizzas from the lets spoon set then adhered them onto the frame. 

Now it was time for a sentiment so I stamped and die cut the 'you stole a pizza my' and adhered it below the pizzas. Using the Anthonys alpha set I die cut the word HEART to finish the sentiment. I die cut it from grey cardstock and also from pink card so that I could offset it creating a shadow. Once that was all done I adhered it in place and finished it all off with a touch of sequins and 
embellishments!


Thanks for checking out my card today, I hope you enjoyed it. Happy crafting, Hugs Ashlee.

Friday, 16 June 2023

Sunrise Daffodils


Happy Friday! DT Annalisa is here sharing a spring sunrise card with beautiful daffodils and butterflies from Time For Tea Designs. The Darling Daffodils stamp set also has some great sentiments like miss you, thank you and happy birthday that cut out beautifully with their coordinating dies.

I ink-blended white cardstock with Fired Brick, Abandoned Coral, Spiced Marmalade and Mustard Seed Distress Oxide Inks using my Beautiful Rainbow Blender Brushes. I added white splatter with a paintbrush, water and Copic opaque white. I used double-sided tape to adhere this panel to an A2 card base. 


I stamped and coloured (with Copics) several images from the Darling Daffodils and cut them out with their coordinating dies. I added white gel pen accents with a Gelly Roll Pen. The bee, worm and smaller butterfly are from I Really Dig You.

I used liquid glue to stick the grass and daffodils to the ink-blended panel. I then glued down a stitched frame from the Wide Stitched Frame Dies on top of this.

I used double-sided foam tape to stick the remaining elements and sentiment to the card.


Thank you so much for reading my blog post. Remember to use my discount code T4TANNALISA10 when you visit the Time For Tea Designs shop to get 10% off your order.


Friday, 21 April 2023

Waving Hello from Under the Sea


DT Annalisa waving hello to my fellow card fans today! I have an underwater scene created using stamps, dies and stencils from Time For Tea Designs.  I love creating ocean-themed cards and had so much fun making this one.

For the background, I used the Tiger Stripes 6 x6" Stencil. I used Mermaid Lagoon Distress Spray Stain on Distress Watercolor Cardstock by Ranger. I ink-blended Mermaid Lagoon Distress Oxide using my Beautiful Blender Brush to the white areas. I added splatter using a paintbrush, water and Copic opaque white. Once the panel was dry, I used double-sided tape to adhere it to a 4 1/4 by 5 3/4 inch card base.

For the stamp sets, I used Get Whale Soon (plus its' coordinating dies), Beach Buds (plus its' coordinating dies), Sealed With A Kiss (plus its' coordinating dies) and Fintastic Friends (plus its' coordinating dies). I coloured the images with Copic markers and added white gel pen accents with a Gelly Roll Pen.  

Next, I added sparkles to the edges of some images with a Quickie Glue Pen and Lawn Fawn Prisma Glitter. 

I used double-sided foam tape to adhere the frame I created using the Wide Stitched Frame Dies to the card base. I used liquid glue to stick all the images to the card. I adhered the sentiment using double-sided foam tape. 

Thank you so much for reading my blog post, you can use my discount code T4TANNALISA10 when you visit the Time For Tea Designs shop to get 10% off your order.


Friday, 3 March 2023

Hello, Meow You Doing?


Hello, and welcome! DT Annalisa here sharing a bright tea-themed card featuring a kitty in a giant mug from the Tearrific Pals stamp set from Time For Tea Designs.

I started with a 5 3/4 by 4 1/8 inch and the Scattered Hearts Stencil. I placed the Scattered Hearts Stencil on my Wendy Vecchi 7-inch Make Art Station and used the strong magnets to ensure the stencil didn't move while I ink-blended. I used Peacock Feathers, Picked Rasberry and Squeezed Lemonade Distress Inks and my Beautiful Rainbow Blender Brushes to apply ink. 

I die-cut white cardstock using the Wide Stitched Frame Dies. I used the large frame and the thin-lined frame created when I used all three dotted frames together. I really liked the way the thin and thick frames looked together so I decided to use both. I used liquid glue to adhere both the card base.

I stamped the kitty in the tea mug, the sugar cubes and the tea bag, coloured them with my Copics and cut them out with their coordinating dies. I added some white gel pen accents, stickles and Glossy Accents for added interest. Once everything was dry, I used double-sided foam tape to adhere the elements to the card.


For the sentiment, I stamped the 'hello' from Let's Chat Clear Stamp Set and used the coordinating die set to cut it out, I cut out three additional backers for the sentiment and glued them all together and to the card with liquid glue (for added dimension). I completed this same process for the 'meow you doing?' using the Purrfect Day Clear Stamp Set and the Coordinating Dies. 

I added Clear Bubbles Designer Enamel Dots for a finishing touch to the card. These bubbles are so pretty, and I love using them on cards.

Thank you so much for reading my blog post, you can use my discount code T4TANNALISA10 when you visit the Time For Tea Designs shop to get 10% off your order.


Wednesday, 22 February 2023

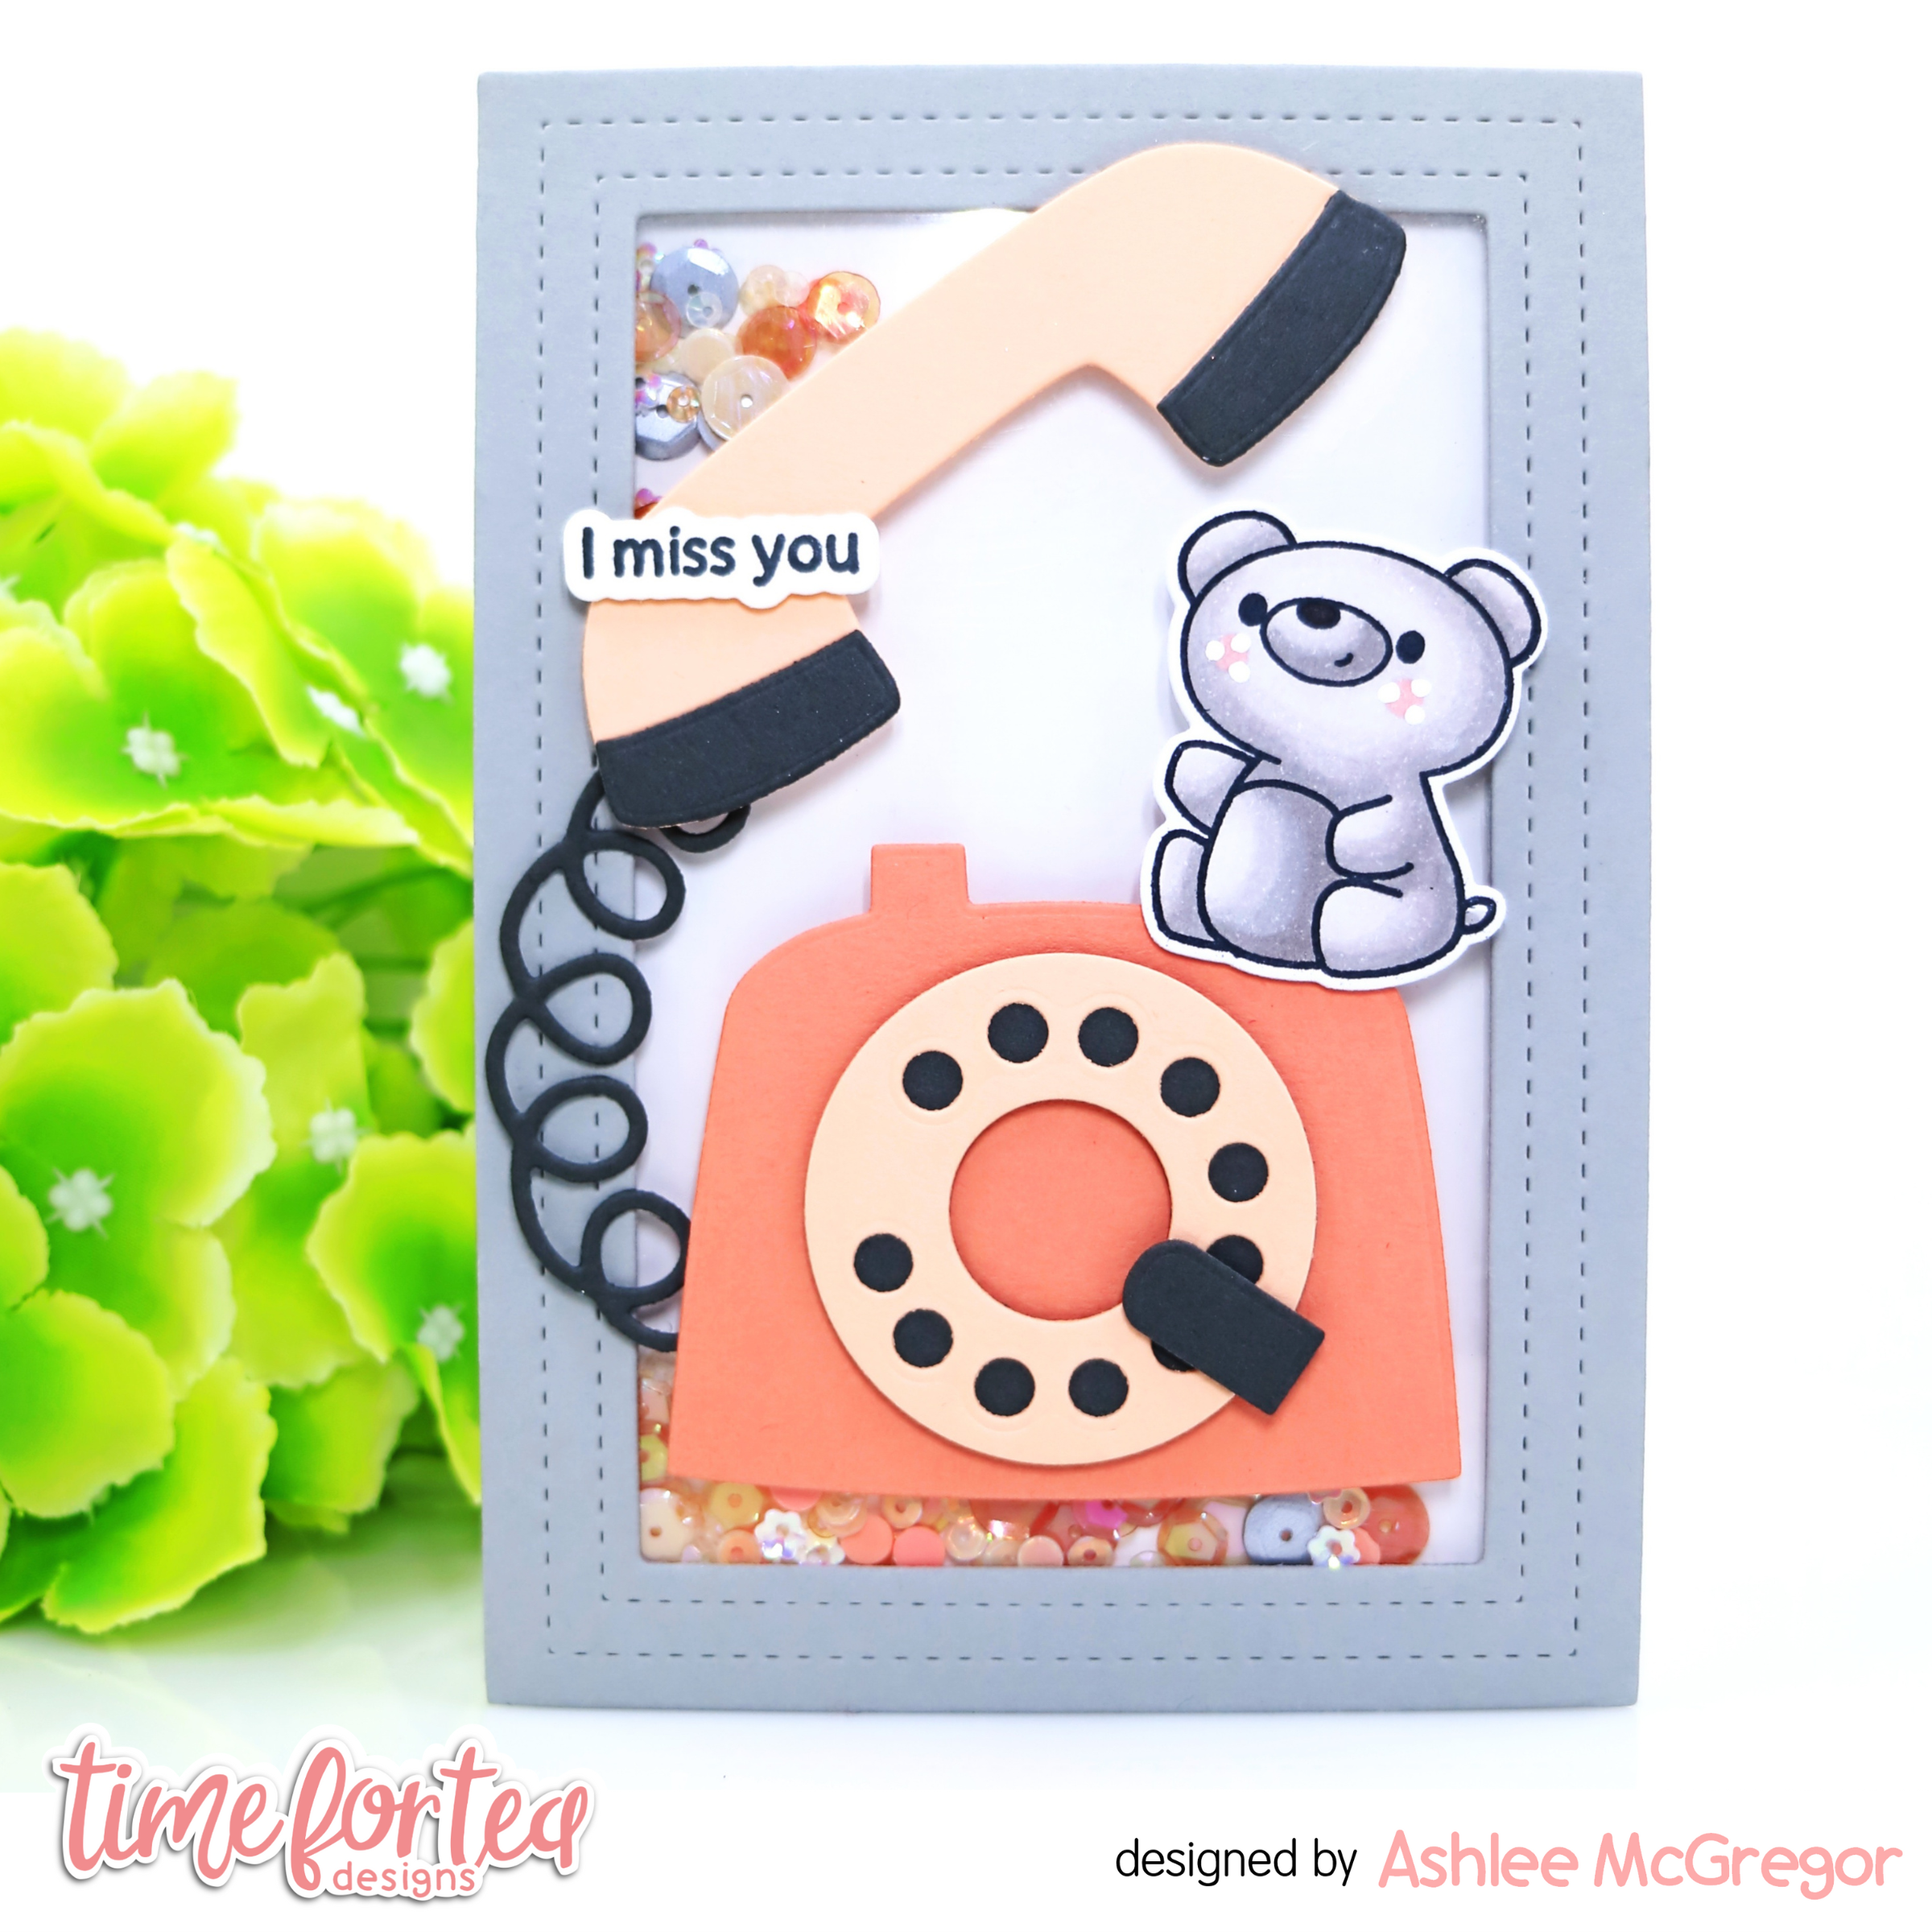
Retro shaker

Hey there Tea-timers...

It's DT Ashlee here and I'm sharing a Retro shaker card featuring the awesome Retro phone builder die!!


To create this card I started by making a shaker card base. I used the wide stitched frame dies to create the frame, adhered acetate to the open space and then added foam tape around the edges. I filled the shaker portion with a bunch of pretty sequins and then backed it with a piece of cardstock. 


I then went on to create the retro phone by die cutting all my pieces from cardstock and adhering together with foam tape and liquid glue....

I adhered it to the card base and then added a super cute little teddy from the Let's chat stamp set  (Coloured using Spectrum noir tri-blend markers and die cut using the co-ordinating dies)

To complete the card a little sentimen and now it's time to shake, shake, shake!!


That's all from me for today, I hope you enjoyed this shaker card inspiration...
Happy crafting, hugs Ashlee.

Wednesday, 30 November 2022

Let it snow, let it snow....!!

Hey there tea-timer friends... 

DT Ashlee here today to share a new card with you and this one uses more of the new release goodies!!

I am totally loving all the new sets, they are so fun and super adorable too...


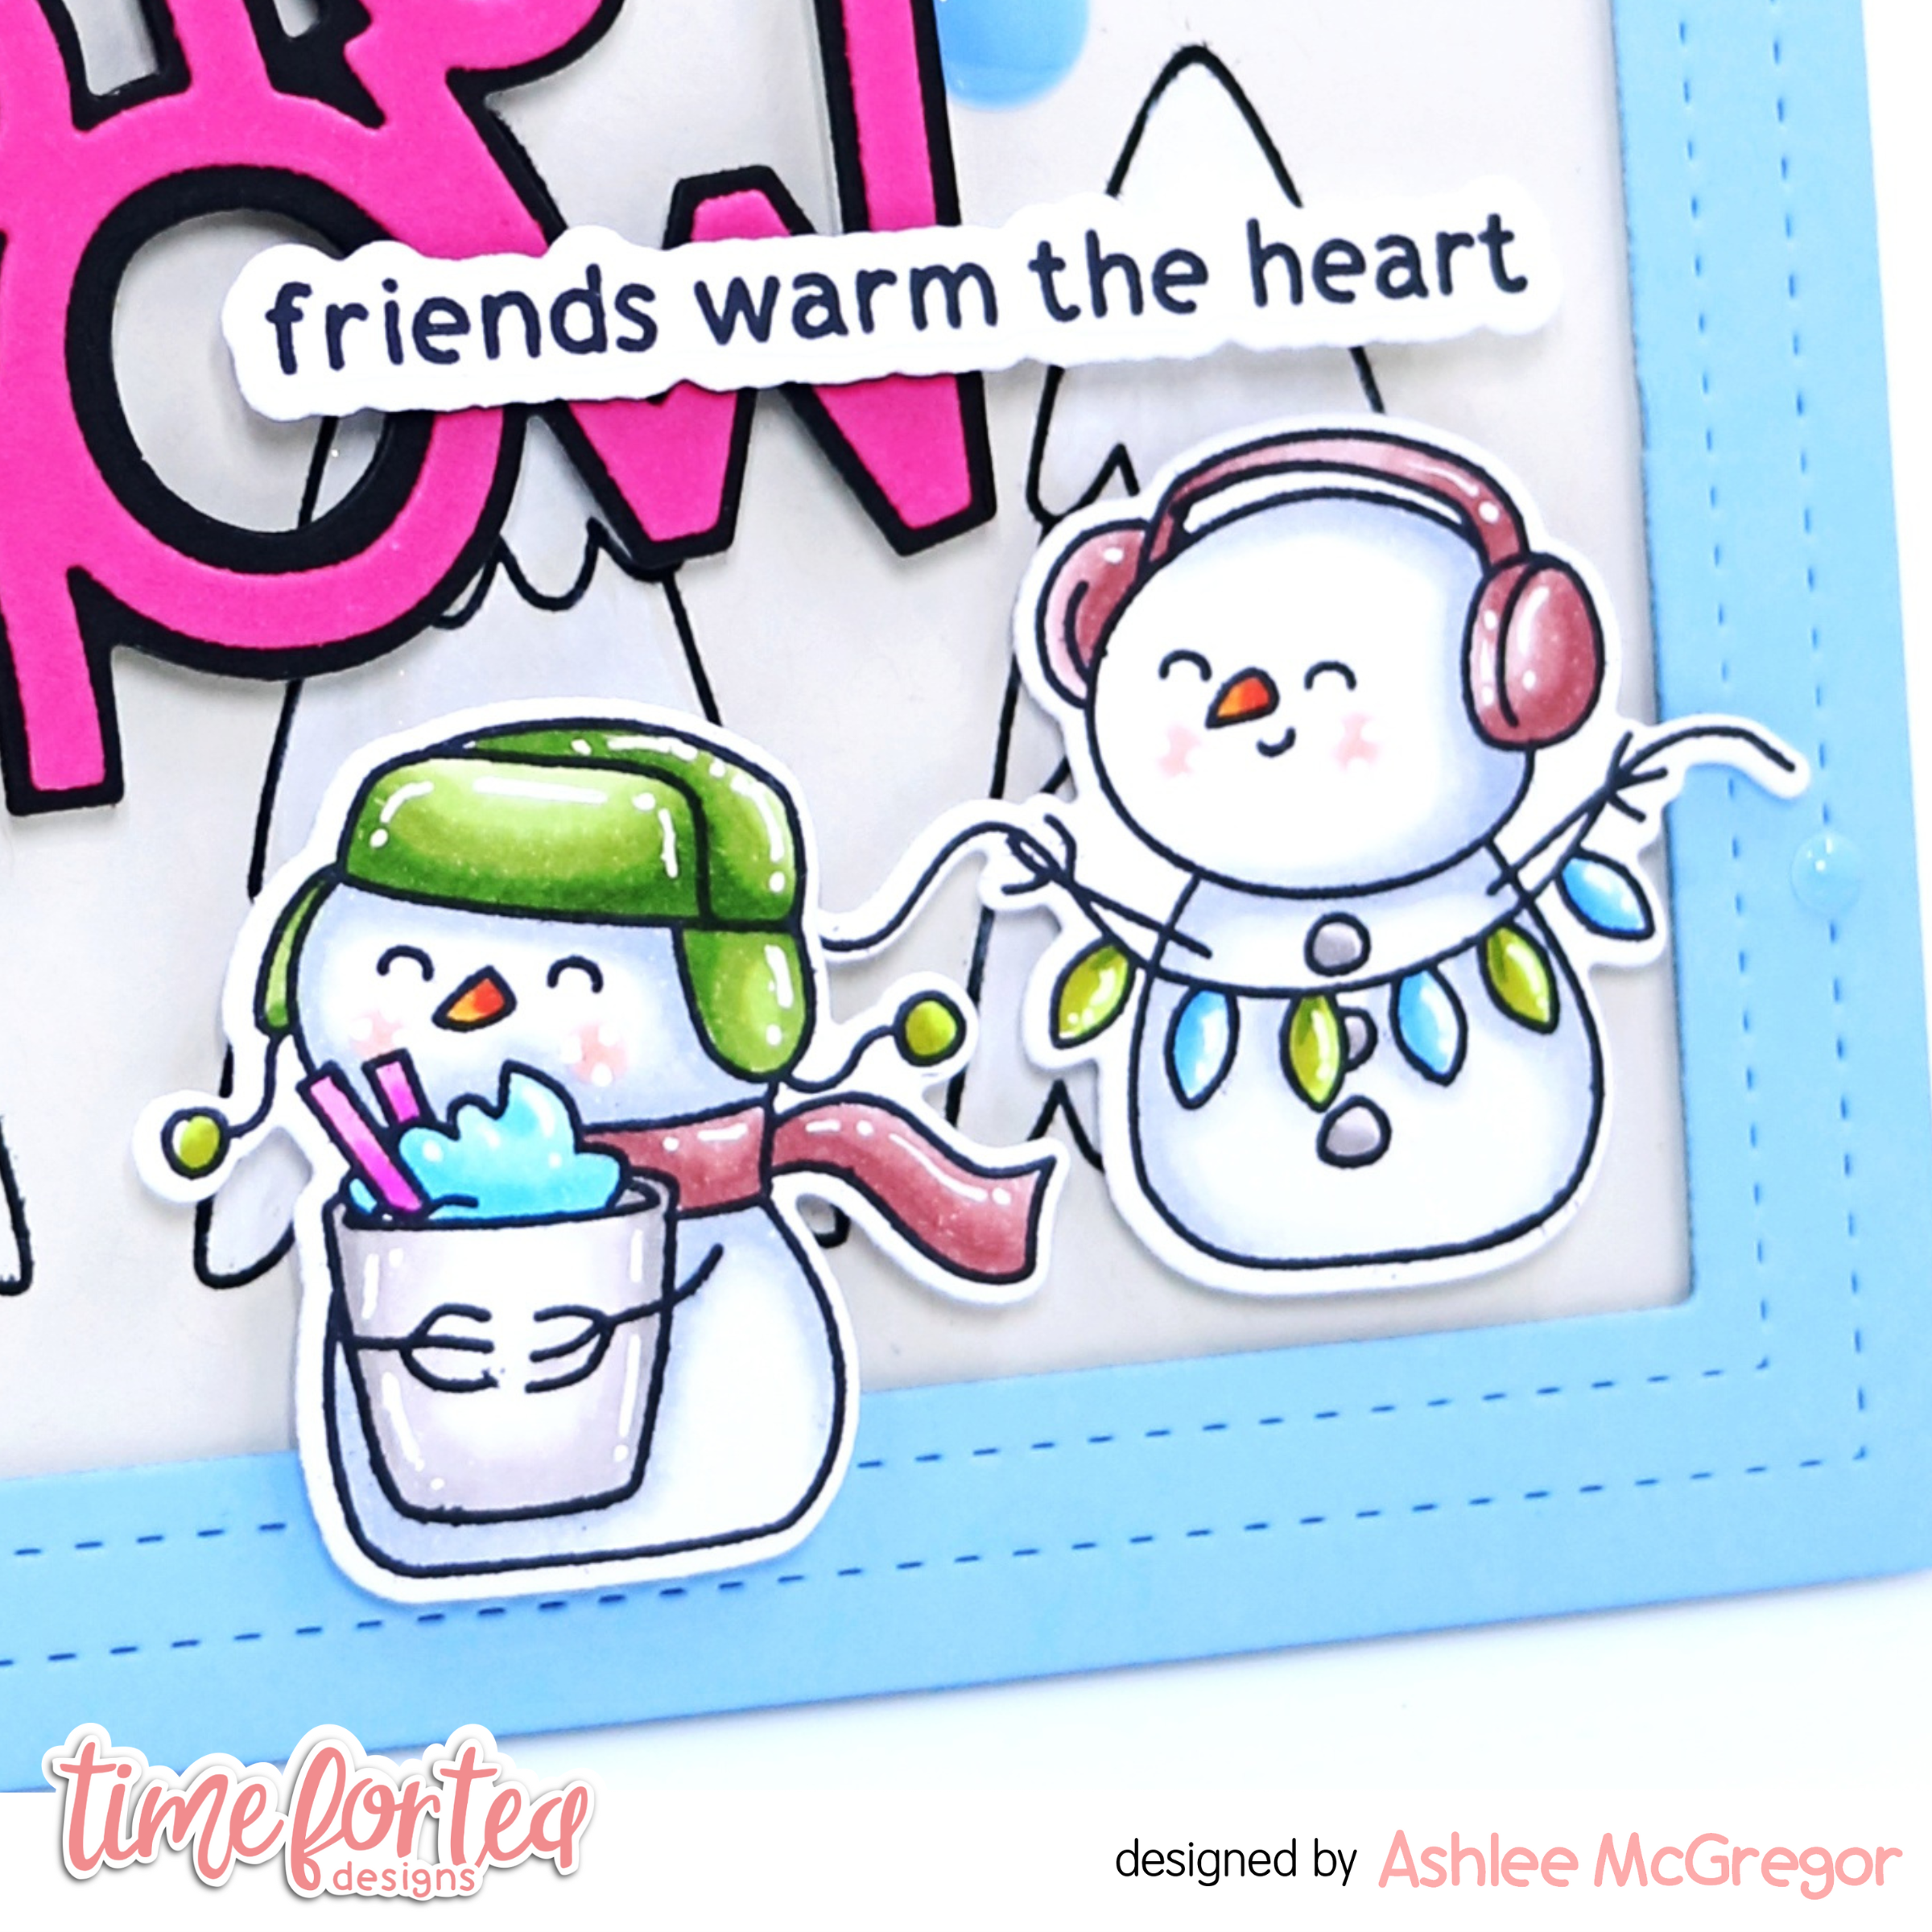
This card uses the Snow much fun Stamos and co-ordinating die set along with these previously release T4T products...


To create this card I started with a white card base that I stamped a row of the trees on and coloured with a white glitter pen (sorry I couldn't capture the sparkle in the photo).

I then added a wide stitch frame that was diet from a light blue cardstock. This was mounted with foam tape to add dimension to the base. 


A poppin sentiment was added by die cutting the let it snow sentiment from black and bright pink cardstocks. A sub sentiment was stamped and die cut using the co-ordinating die and added onto the side of the large sentiment. 


I stamped, coloured and die cut a couple of the cute snowmen and added them to the scene. To complete the card I popped on some of the T4T enamel dots.

What do you think of this fun snow scene card? I hope you enjoyed it...


Happy crafting, till next post. Hugs Ashlee. 


Want to do some shopping at the T4T store? You can use the code T4TASHLEE10 for a discount off your order

Wednesday, 23 November 2022

Who's at the door....?!

 Hey there tea-timers...

DT Ashlee here with a fun and festive card to share with you. I absolutely can not wait for Christmas, what about you?!

This card features a stamp set from the new release at Time for tea designs called Gingerbread family and it is oh SO cute....


I combined the gingerbread family with a couple of previously released dies to make a Christmas door scene...


To create this card I started by making my card base from a creamy tan coloured cardstock die cut from the wide stitched frames. 

I then die cut all the pieces to create the door and Christmas scenery from a bunch of different coloured cardstock before assembling it all onto the card base. 

The sentiment was stamped with Memento tuxedo black ink and die cut with the co-ordinating die. 

I stamped, coloured and die cut the two sweet little gingerbread and added them onto the doorstep with their yummy treats!!
(These were coloured with Spectrum noir tri-blend markers)


To complete the card a touch of sequins adhered using micro glue dots...

I just love how this card came together and I can't wait to create some more with this brand new set!!

Thanks for stopping by the blog today, happy crafting. Hugs Ashlee.


(Want to do some shopping at the T4T store? You can use my discount code T4TASHLEE10 for 10% off your order)

Other Posts You Might Like