Pages

Showing posts with label coffee lover dies. Show all posts

Friday, 23 September 2022

Coffee First


Hello everyone, DT Annalisa here today. I have a coffee-themed card that I created using stamps, stencils and dies. I love how giant the coffee cup is next to the alligator! I have to thank my niece Tonya for the adorable miniature frappuccino and coffee cup creations seen in this photo - she knows just how much I love Starbucks! 

I ink blended Vintage Photo Distress Oxide ink onto some white cardstock through the Coffee Stains 6 x6" Stencil using my Beautiful Blender Brush. I removed the stencil and ink blended some more to cover the white areas. I then stamped on coffee beans from the Snappy Before Coffee stamp set using the same distress oxide ink. I cut the panel using a 4-inch x 5 1/4-inch stitched rectangle die.


I created a cream A2 card base and ink blended the edges with Simon Says Stamp Khaki Ink. I used Anthony's Alpha Dies to cut out the letters for 'Coffee' three times and ink blended the edges with the same ink. 

I stamped the alligator from the Snappy Before Coffee stamp set and cut it out with the coordinating die set after colouring it with my Copics. The large coffee cup is from Coffee Lover - I also used the coordinating die set to cut it out. I added some white gel pen accents with a Gelly Roll Pen.


I assembled the card by using liquid glue to adhere the stencilled panel to the card base. I used foam tape to adhere the alligator, coffee cup and sentiment to the card. I used liquid glue for the letters. I threw caution to the wind and put them on NOT STRAIGHT! As a perfectionist, this was HARD but I like how it turned out. 

Thank you so much for reading my blog post, you can use my discount code T4TANNALISA10 when you visit the Time For Tea Designs shop to get 10% off your order.


Tuesday, 23 November 2021

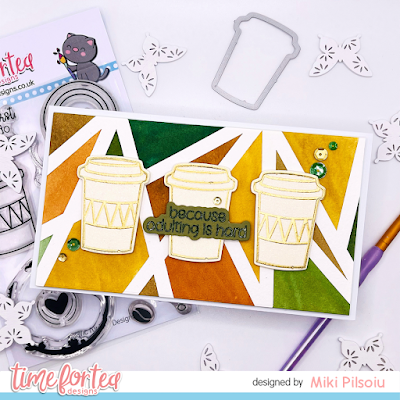
Coffee - because adulting is hard!


Hi Tea Timers! Welcome back to the T4TD blog! 

It's Miki here and today I'm back with some new inspiration! If you've been following me for a while you must know I am a coffee addict, hence I LOVE all the coffee sets from Time for Tea Designs. For today's card I picked the Coffee Lover stamp set - it's just so versatile, I had to make a card with it.


For this card I chose to do watercolors - say whaaat!? You might have guessed by now that this isn't my jam but I tried this technique in one of the Online Card Classes many moons ago and I loved it. To start with, I cut a panel of Canson Watercolor Paper and taped it to a board. I then took some thin washi tape and started creating some geometric shapes. Once I was happy with my design, I went in with my watercolors - I use the Mozart Komorebi palette. I tried to pick earthy tones like browns, muddy yellows, dark greens etc. I usually just mix my paints to get new shades and if it doesn't work out the way you think, not to worry! you can just paint over it. Once I was done with my panel I immediately removed all the tape and left it aside to dry. - I filmed a reel while making this background which will be available on my Instagram tomorrow if you're interested to see this in action!

While the panel was drying, I focused on the coffee cups. I picked some beige cardstock and the coffee cup from the Coffee Lover stamp set and embossed it in gold 3 times. I then used the matching die to die cut them. For the sentiment, I decided to use a dark green cardstock and emboss it in clear embossing powder to make it stand out. I love how Jo makes matching sentiment dies in her sets - I think they give such a neat look to a card. I then used the die to cut another 2 times from the same cardstock to add some dimension to my sentiment strip.

Once my panel was dry I picked the largest die from the Mini Slimline Scalloped Dies and die cut my panel. I made a cardbase slightly larger than my panel and adhered my panel to it using foam tape. I then added my 3 coffee cups, again with some foam tape at the back for extra dimension and glued my sentiment down. To finish off the card, of course I added some gems to frame everything.

I hope you like this card and I hope it encourages you to try a technique that you're less comfortable with. I had so much fun playing with watercolors again!

If you shop on the T4TD website, please remember to use my code T4TMIKI10 for 10% off your whole order.

Thanks for tuning in and I'll see you next week with the new release reveal!!

Crafty hugs,
Miki

Thursday, 21 October 2021

Have a brew-tiful day

 Hello Tea Timers! Silvia’s back with a new coffee themed card!

I started die cutting one of the beautiful dies from the “Square Label" set from watercolor cardstock and I colored it with vintage photo Distress spray stain and walnut stain Distress oxide spray.

I then blended some ground espresso Distress oxide ink through the “Coffee Beans" stencil, I splattered with water and I covered droplets with vintage photo Distress embossing glaze and I heat embossed them. 

I also splattered with picket fence and antique bronze Distress paints.

I stamped images from “Coffee Lover" and “Snappy Before Coffee" stamp sets, I colored them with alcohol markers and I cut them with coordinating dies (here and here).

I next cut a rectangle from “Sweet Summer" patterned paper pad and I put everything together.

That’s all for today, I hope you’ll like the card.

Thank you so much for stopping by and don’t forget you can get a 10% off your Time for Tea order with the code T4TSILVIA10.

Hugs, Silvia.


Thursday, 30 September 2021

“Because adulting is hard” coffee card

Hello crafty friends and welcome back to Time for Tea Designs blog. Silvia’s here today to share with you a coffee themed card!


I first die cut a panel with the largest die of the "Large Scallop Celebrate Frame" set from Distress Mixed Media Heavystock. I then used walnut stain Distress Oxide spray and tea dye and vintage photo Distress stain spray, water and heat gun to color it.


I then stamped 5 coffee cup from the “Coffee Lovers" stamp set, I colored them with alcohol markers, I cut them with coordinating dies and I heat embossed in white the cute “cream” heart from the same set.


I put everything together using a mix of liquid glue and foam tape and I matted it with one of the cute patterned paper from the "Sweet Summer" paper pad.
I ended my card adding a heat embossed sentiment on dark brown cardstock and that's all.


I hope you get some inspiration by this card and you like it.

Thanks so much for stopping by today and don't forget you can get a 10% off your Time for Tea order with the code T4TSILVIA10.

Have an amazing day!!! Hugs, Silvia.


Sunday, 19 September 2021

Coffee Lover

 Good afternoon Teatimers, 

Lyndsey here on the sunny Sunday afternoon and today I want share this fabulous coffee themed card with you using the new Coffee Lover stamp and die set. I absolutely love the sentiments in this set and its totally true that some of us need a coffee fix before taking on the world each day! ☕


To start I coloured the coffee cups very simply using CR11, DR5 and DR7 for the band and adding a little BG1 and BG3 for shading on the cup. Finishing with EB3, EB5 and EB8 for the little coffee beans. 

I used the A2 Layering Dies and cut a piece from coffee coloured card using the largest size and white card using the next size down.

To create my panel I masked of a section towards the left hand side and created an ombre effect using Antique Linen and Brushed Corduroy distress inks. Whilst the masking was still in place I used the Coffee Beans Stencil with the Brushed Corduroy applying a little more pressure to my brush to get the darker colour.

Finally after removing the masks I stamped the spilt coffee ring stamp up with the Brushed Corduroy ink and stamped across the blended section.


I added the coffee cups and beans onto the panel using foam pads before stamping the 'Coffee' in the top right hand corner. To finish off I stamped and cut out the adulting sentiment and added this towards the bottom right hand corner of the panel.

The whole panel was adhered to the coloured piece and added to a 6x6 card blank cut down to size leaving a small border around the edges.

Thank you for joining me here on the blog today, don't forget to use my code T4TLYNDSEY10 for 10% off your order in store 😀 

Enjoy the rest of your weekend 

Lyndsey x


Thursday, 16 September 2021

Coffee first then I do the things

Hello Tea Timers!!! Silvia's here with you today and  I'm so excited about our latest release....it's soooooo adorable, isn't it?!

I'm totally in love with the new amazing  coffee stencils and today I'd like to share with you a cute background I made with the "Coffee Stains" one.

I started cutting a 5,5"x 4,24" panel from kraft cardstock and I ink blended some tea dye, vintage photo and ground espresso Distress Oxide inks through the stencil in a random way.


I also added some heat embossed stains with vintage photo Distress embossing glaze because I love the translucent effect of this powder. I spalttered with water, brown inks and white and gold acrylic paints loosened with water.


Next I stamped two coffee cups from the "Coffee Lover" stamp set, I colored them with Spectrum Noir alcohol markers, I added a white embossed heart on them and I cut them with coordinating dies.


I put everything together, I added an embossed sentiment and that's all.


Thank you so much for stopping by today and don't forget that you can get a 10% off your Time 4 Tea order with the code T4TSILVIA10.

I wish you an amazing day. Hugs, Silvia.

Other Posts You Might Like