Pages

Showing posts with label slimline postage stamp frame dies. Show all posts

Tuesday, 14 July 2026

Just Saying Hello!

Hello Everyone!

Michelle from the Design Team here and today’s inspiration is a postage stamp scene with a trio of curious bunnies. It is so fun and I just love everything about it!

Supplies used: 

Love Is In The Air

Paper Plane Pals

Adventure Awaits


I started with a soft powder blue background stamped and heat embossed with the most charming collection of white outlined travel doodles - paper planes, suitcases, dotted flight paths and fluffy clouds. It gives the card such a dreamy, breezy feel and is the perfect backdrop for everything that follows.

The main feature of this card is three oversized postage stamp frames arranged across the background, each one framing a different adorable character. Tucked inside the stamps are a sweet white bunny, a warm brown bunny and a fluffy grey bunny, each peeking out from behind brightly coloured backgrounds of yellow, teal and pink. They are just the most precious little trio and each one has the rosiest little cheeks!


Dotted between the stamps are three bold black label boxes carrying the sentiment split across them, "Just", "Saying" and "Hello", which is such a fun and creative way to deliver the message. Little pink hearts are scattered around the background adding extra sweetness to the whole design.

The layout is beautifully balanced with the stamps overlapping slightly to give the card real depth and a lovely layered look that draws you right into the scene.


This card is just perfect for popping in the post to someone you have been meaning to catch up with, and what better way to say hello than with three of the cutest bunnies around!


Michelle


Sunday, 17 August 2025

Let's Hang Out!

Hello!

Michelle here from the Design Team with a card that’s full of charm and a little bit of climbing mischief. This cute fluffy cat has found the perfect tree branch for a nap or maybe just a quick hangout.

Supplies used:

Purrfect Day

Branches - Seasons Tweetings

Leaves - Jumping for Joy

A5 Woodgrain Stamp

Slimline Postage Stamp Frame Dies


To start with, I stamped out the cat from Purrfect Day and two branches from Season Tweetings. I coloured them with alcohol markers and used their coordinating dies or fussy cut them.


I really like the woodgrain stamp and have been meaning to use it so I thought I would it would be a great idea to use with this card as a background. I used white heat embossing powder and light blue/teal cardstock. I really like how it turned out, it gives the extra pop of colour and adds texture without stealing the spotlight.

For the main focal image, I created a leafy tree top scene with ink blending, splatter and soft blue skies peeking through the branches. The cat and the branches were then popped with foam tape for some dimension. 


I did some partial die cutting with the Slimline Postage Stamp Frame Dies from white cardstock to frame the main image. 

The sentiment is a fun one and sets the tone perfectly. ‘Meowdy! Let’s hang out.’ I think this would make a great card to send to a friend, especially if you’re overdue for a catch-up.


Thanks for hanging out with me today!

Michelle

Friday, 16 August 2024

One In A Melon


Happy Friday! DT Annalisa here sharing a colourful fruit-filled card I created using the new Fruitful Friends stamp set and coordinating dies. I combined these with the Slimline Postage Stamp Frame Dies that are on a super Summer SALE until August 18th!

I used Tim Holtz Distress Sugary Gumdrop Mica Stain, Twisted Citron and Mowed Lawn Distress Oxide Sprays on water-coloured cardstock. I love the shine the mica stain gives! Once the panel was dry, I trimmed it to 4 1/4 by 5 1/2 inches and glued it to an A2 card base.

I die-cut vellum with the Slimline Postage Stamp Frame Dies. I then used the  Simple Square Nesting Dies to die-cut four small squares from white card stock. I ink-blended two with abandoned coral Distress Ink and two with twisted citron and mowed lawn Distress Oxides. I added stitched lines along the outside of each square with a white Gelly Roll pen.


I stamped and coloured (with Copics) several images from Fruitful Friends and cut them out with their coordinating dies. I added white gel pen accents with a Gelly Roll Pen. The butterfly is from I Really Dig You, I die-cut it with the coordinating dies.

I used liquid glue to adhere the squares to the vellum postage die-cuts. Next, I glued the stamped and coloured images to the small ink-blended squares and then used double-sided foam tape to adhere them to the card base.

I die-cut the letters 'melon' from white card stock using Anthony's Alpha Dies. I ink-blended the top of each letter with abandoned coral Distress Ink and the bottom with twisted citron and mowed lawn Distress Oxides. I added white gel pen accents with a Gelly Roll Pen.


I die-cut the same letters from black cardstock and glued the ink-blended letters to these (slightly offset to create the look of a shadow). I used double-sided foam tape to adhere the letters to the card base.

I masked off the word 'melon' from the 'you're one in a melon' sentiment stamp, and inked it with Versafine Onyx Black. I trimmed it down with a slim rectangle die and used double-sided foam tape to stick it to the card.


Thank you so much for reading my blog post. Remember to use my discount code T4TANNALISA10 when you visit the Time For Tea Designs shop to get 10% off your order.

Friday, 7 June 2024

Seal of Approval


Happy Friday, everyone DT Annalisa here sharing an ocean-themed slimline card created with the Sealed With A Kiss stamp set and two stand-alone die sets from Time For Tea Designs.  It was my first time using the Best Fishes stencil and I love it!

I die-cut Distress Watercolor Cardstock by Ranger using the Slimline Scalloped Trio Circle Nesting Dies. I smushed peacock feathers Distress Ink onto my glass matt, sprayed it with water and pressed the die-cut panel into it several times to get the beautiful watercolour look.


I die-cut white heavy stock paper with the Slimline Postage Stamp Frame Dies and ink-blended salvaged patina and peacock feathers Distress Ink onto the center area of the panel. Next, I used a Beautiful Blender Brush to ink-blend peacock feathers Ink through the Best Fishes 6 x 6” Stencil.


I then used a palette knife to apply a layer of Wendy Vecchi translucent embossing paste over the stencil in the same area as the ink-blended fish.


Once the paste was dry, I used double-sided tape to stick the trio slimline panel down to the postage stamp frame. I created a slimline card base, used double-sided tape and stuck the panel to it.


I stamped and coloured (with Copics) several images from Sealed With A Kiss and cut them out with their coordinating dies. The shells were from Beach Buds. I added white gel pen accents with a Gelly Roll Pen.


I adhered the images to the card base using liquid glue or double-sided foam tape for dimension.


Thank you so much for reading my blog post. Remember to use my discount code T4TANNALISA10 when you visit the Time For Tea Designs shop to get 10% off your order.


Friday, 17 February 2023

Big Bunny Hello


Happy Friday! DT Annalisa here today sharing a no-line coloured card featuring several Time For Tea Designs products. I don't often use this technique with my Copics as it is out of my comfort zone, but I am glad I did.

For the background, I added Saltwater Taffy, Abandoned Coral and Picked Raspberry Distress Oxide ink to watercolour paper with a paintbrush. I added some splatter and spots with a paintbrush for added interest.

Once the panel was dry, I used the Dotty Hearts Panel Die to add the pretty stitched hearts. I adhered this to an A2 card base (8.5 by 4 1/4 inches) with double-sided tape. I die-cut the frame from the Zig Zag Frame & Tag Dies and glued it to the panel.


I stamped the bunny and phone from Let's Chat with pale Fadeout ink from Ink on 3, which works well for no-line colouring. I used my Copics, adding darker tones near the edges of the images; this helped to ensure that the lines were no longer visible once the image was coloured in. I added white gel pen accents before using double-sided foam tape to adhere the images to the card base.

I stamped the sentiments from Let's Chat with Versafine Onyx Black and cut them out with the coordinating die set.


I used the large heart die from the Slimline Postage Stamp Frame Dies to die-cut three hearts. I ink-blended them with Salvaged Patina, Stormy Sky and Faded Jeans Distress Ink using my Beautiful Blender Brushes. I added white splatter using a paintbrush and Copic opaque white.

I used liquid glue to adhere the three coloured hearts to the card. I then used double-sided foam tape to stick the sentiments to the card. I add three blue Festive Fun Designer Enamel Dots for the final touch.


Thank you so much for reading my blog post, you can use my discount code T4TANNALISA10 when you visit the Time For Tea Designs shop to get 10% off your order.

Friday, 3 February 2023

Bunny Valentine


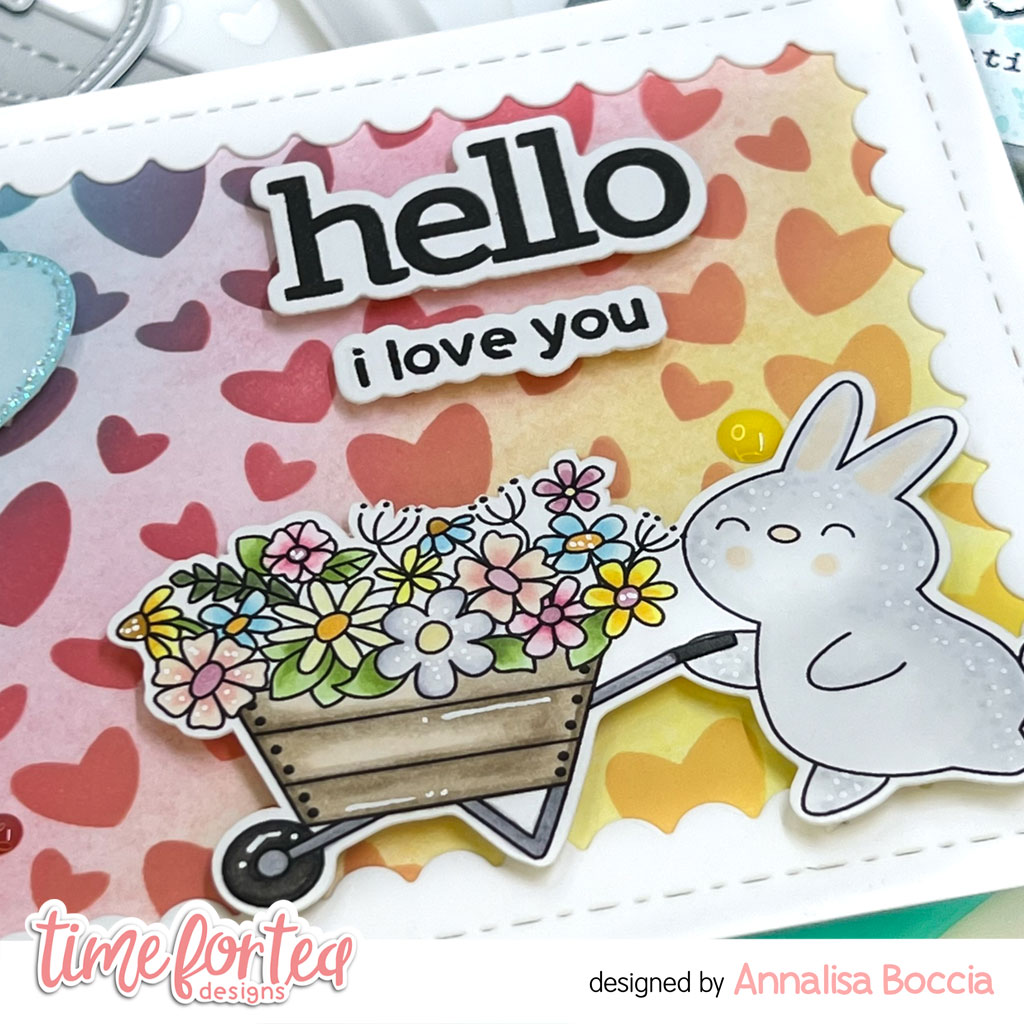
DT Annalisa here wishing everyone a happy Friday! It is bitterly cold (-35 Celcius with windchill) where I am in Canada, so I wanted to share a bright spring Valentine's day card. It features the adorable Blooming Bunnies stamp set and the Scattered Hearts Stencil, perfect for Valentine's Day cards.  


For the background, I ink-blended Salvaged Patina, Worn Lipstick, Dried Marigold and Mustard Seed Distress Oxide onto the Scattered Hearts Stencil with my Beautiful Rainbow Blender Brushes onto some white cardstock. After removing the stencil, I ink-blended lightly with only the ink on my brushes. I die-cut white cardstock with the large frame in the Smile Inverted Scallop Frame Dies and used liquid glue to adhere it to the ink-blended panel. I used double-sided tape to stick this panel to an A2 card base. 

I stamped the bunch of flowers, masked them out and stamped down the wheelbarrow, and finished by stamping the bunny. I used my Brother Scan N Cut SDX125e to cut around the bunny and the cart. I then used my Copics to colour them in and added accents with a white Gelly Roll Pen.

I stamped the sentiments from Let's Chat and cut them out with the coordinating die set. I used the heart from the Slimline Postage Stamp Frame Dies to die-cut white cardstock. I ink-blended this with Salvaged Patina Distress Oxide ink and added sparkles to the edge with a Quickie Glue Pen and Lawn Fawn Prisma Glitter.

I used double-sided foam tape to stick all of the elements to the card. To complete the card, I added Sweet Summer Designer Enamel Dots.


Thank you so much for reading my blog post, you can use my discount code T4TANNALISA10 when you visit the Time For Tea Designs shop to get 10% off your order.


Friday, 27 January 2023

Love You Lots Penguins


Happy Friday, everyone! Have you enjoyed Time For Tea Designs' Valentine's Week so far? There has been so much inspiration from the DT and a great sale (20% off the Valentine's collection). Don't forget, there is a Valentine Themed Facebook/YouTube Live this afternoon at 4 PM, followed by the Stinkin' Cute Virtual/Live Class at 3 PM on Saturday. I hope you can join in and create with us. 
 
I am sharing a card with a vibrant and bold sentiment; the Love You Lots Large Sentiment Die is perfect for your Valentine's Day cards. Create a pretty ink-blended background and pair it with some cute critters, and there you go!

I ink-blended white cardstock with Picked Raspberry, Abandoned Coral and Wild Honey Distress Oxide Inks using my Beautiful Rainbow Blender Brushes. I added white splatter with a paintbrush and Copic opaque white.

I die-cut the ink-blended panel with A2 Stitched Hearts Cover Dies and used double-sided tape to adhere it to an A2 card base.


I sprayed Distress Mica Stain in Shiny Bauble to Distress Watercolor Cardstock by Ranger and added water colour metallic silver splatter once it was dry. I cut this panel with the Love You Lots Large Sentiment Die once, cut out three more of this large sentiment from white card stock and glued them together for added dimension. I also used the large heart die from Slimline Postage Stamp Frame Dies on the sprayed cardstock. I cut the heart three more times and glued them all together. 

For the sub sentiment, I stamped the 'you mocha me crazy' from The Perfect Blend stamp set with Versafine Onyx Black for a crisp impression. I used liquid glue to adhere the large sentiment and the heart to the card base. 


 The cute penguins are from the Mistletoe Kisses Digital Stamp Collection. I coloured them with my Copics, fussy cut them out and used a utility knife to cut around the arm of the penguin with the hat on so I could slip in the small coffee cup. It is from Bearing Gifts and fits perfectly in the arm of the penguin! I used foam tape to adhere the penguins to the card. 

I added Designer Enamel Dots, the pink ones are from Sweet Summer, and the pink ones are from Festive Fun.

Thank you so much for reading my blog post, you can use my discount code T4TANNALISA10 when you visit the Time For Tea Designs shop to get 10% off your order.


Tuesday, 26 October 2021

Because adulting is hard!

Hello Tea Timers, Claudia here to talk about coffee, one of my great passions.... And as a lover of this drink I created this slimline postcard full of cups, coffee beans and joy, like the one that gives us the smell of coffee every morning


For this card I used the set  Coffee Lover   with many adorable elements . for the structure I used the die cutters Slimline Postage Stamp


 I created the background by blending distressing and spraying drops of color to create contrast, and to give more emphasis to the sentiments, I used white embossing powder on black cardstock. I hope you like it!!! 
See you next week for a new inspiration , and don't forget to use the code T4TCLAUDIA10 to get a 10% discount in the shop!!!

Tuesday, 19 October 2021

Animals Alpha

   Hello Tea Timers, Claudia here with a new inspiration.  Today I'm happy to show you my Alpha Animals , I really liked the idea of building a game for children by combining the die set Anthony's Alpha to the figures of the various stamps with the sweetest animals and here is the result . 


To make it, I die-cut the white paper base using Slimline Postage Stamp die set and the beautiful paper pad Sweet Summer paper pad  and Brighter Days paper pad


I had fun finding the little animals to create each letter.  I made some but now I have to complete the whole alphabet , I think it's a nice game to play with the kids on the weekend, don't you think? 


I hope you enjoyed my inspiration, I wish you a fantastic week and I remind you to use the code T4TCLAUDIA10  for your purchases in the shop, you will have a 10% discount.

Thursday, 19 August 2021

Cool Birthday

Hello crafty peeps! It's Thursday and time to share my latest card. I'm still loving playing with the latest release and with such cute images who can blame me?! I had so much fun creating this sweet summer scene... everyone loves an ice cream, right?


For this card I used the Cool Critters Stamp Set. I coloured the images with Copics and cut them out with the Cool Critters Coordinating Dies. I blended Faded Jeans & Salvaged Patina Distress Oxide Inks to create the sky effect. I then blended Lucky Clover & Twisted Citron to create the grass & hedge. I used the Grass Die from Slimline Hillside Scene Dies and the Stitched Cloud from the Landscape Edge Dies to die cut each piece. I layered them together and die them with the postage stamp die from the Slimline Postage Stamp Dies. I attached the panel onto a white card base with foam pads. I added all the images and sentiment onto the card with foam pads and added some gems to finish.


Save 10% off your order with Time For Tea Designs using my DT code T4TKITTY10

Thank you ever so much for joining me today.

Kitty xx


Other Posts You Might Like