Pages

Thursday, 16 September 2021

Stretch Your Supplies; Nesting Dies | with HandamdeByTasha

 Hey Crafty People!

It's Tasha, I'm back with a new inspirational video and this month I'm showing you how I stretched my new Square Label dies to create a fun slimline card.


I love these new layering dies, but I have to admit that I don't often make square cards, so I wanted to find some new ways to use them.


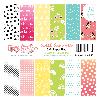
I used the papers from the Summer paper pad, and I layered the die cuts before cutting the whole thing down with a slimline die!!! I cut it to 8"x3".
It's a great way to use your dies and highlight these gorgeous patterned papers.


Once I had my layered slimline panel, the rest of the card came together really quickly. I layered the panel onto a scalloped die cut that is the full 8.5" x 3.5" of a standard Slimline card.

For my sentiment, I added a stacked up celebrate die cut, and a sub sentiment from the pre printed sentiments available at T4TD.

A few white enamel dots round the design off nicely! 😁


Thanks so much for spending this time with me!

I hope you like my card and feel inspired to stretch your own supplies!

Have a lovely, happy, safe & wonderful week!!!

Stay Crafty!

Byeee!

HandmadeByTasha


Affiliate links are used
Large Scallop Celebrate Dies
Shop at:
T4TD
Sweet Summer Paper Pad
Shop at:
T4TD
Square Label Dies
Square Label Dies
Shop at:
T4TD
Slimline Postage Dies
Shop at:
T4TD
Brighter Days Sentiment Strips
Shop at:
T4TD

Wednesday, 15 September 2021

August Challenge Winner

  I'm excited to be here today to announce the winner for our August Challenge.

Huge thanks to everyone who joined in with our Mood Board Challenge.

Drum roll please ......

Here is our random pick winner for a £25 spend in the T4TD shop:

#3 Jordycards


Here's her card:

Congratulations Jo!

Please grab our winners badge from the side bar to display on your blog and contact Jo to claim your prize - joannadavies@timeforteadesigns.co.uk

Don't forget there's still plenty of time to play along with our September challenge - Autumn Colours.


We're looking forward to seeing your entries.

Enjoy!

Jane
x

Tuesday, 14 September 2021

Trick or Treat!

Hello all friends, Claudia  here.  Today with these two very fun lollipop cards. I literally love this set  Spooky Circles Tags  I love this kitty, the ghost , but the spider? Really adorable. 
This set is paired with the Simple Circle Dies . die cut set which I think is absolutely essential in our craft room! 


As a base for my card I used the pad  Sweet Summer Paper Pad . I think a card like this is very nice to give to our children or to decorate the basket of candy, do not you think? I hope you like my inspiration. 

            I hope you like my inspiration. I wish you a wonderful week.

Don't forget to use the code T4TCLAUDIA10 that allows you to have a 10% discount in the shop!!! 


Hello Friend

 Hello Tea Timers!  I'm so excited to be on the Time for Tea Designs blog today as a Guest Designer!  For my first card I used the adorable Car Critters to create a cute scene card.

Using a copic friendly ink and copic friendly cardstock I stamped the car and panda and coloured them with my copic markers.  I used B99, B97, B95 & B93 to colour the main body of the car. For the lights I used some Y15, Y13 & Y11.  I added some C3, C1 & C00 to white areas of the panda to help give the images some shading.  B78, B75 & B72 were used for the panda's scarf.  Using the co-ordinating dies I die cut the images and set aside while I worked on the rest of the card.

Taking a piece of white cardstock I used a Time for Tea Designs blending brush to lightly apply some Distress Ink in Peeled Paint along the bottom quarter of the card panel to create my grass to ground my scene.  For the sky I used Blueprint Sketch Distress Ink with a very light hand.  To add interest to my scene I splattered some ink in the same colours.  Once the panel was dry I cut the panel down to 3.25" x 4.5". I also cut a panel of striped patterned paper from Brighter Days 6" x 6" Paper Pad to 3.75" x 5".  The ink blended panel was adhered to the patterned paper.  The two layers were then adhered to an A2 white side folding card base.

My car and critter were adhered to the scene with foam tape for some dimension.  For the sentiment I used the Large Script Hello sentiment die and cut the outline from white cardstock and the word from gold glitter card.  I adhered the two together and on to the card front with liquid adhesive.  Finally, to finish off the card and sentiment I white heat embossed the word 'friend' from the *** stamp set.


Before I called this card done, I used a white gel pen to add some highlights to the coloured images.

Thank you so much for stopping by today, I look forward to seeing you again soon with another card!  Elaine xoxo


Monday, 13 September 2021

COFFEE first and paper smooshing technique

Hello, tea timers! 

DT Natalia here. I hope your weekend was a lovely one!

Have you seen the NEW RELEASE yet? Too good & fabulous sentiments! I run on coffee, so this release was very, very relevant to me! I truly enjoyed making all the cards and I am excited to show them to you! 

For today, I have this card featuring the Coffee Lover Stamp and Die collection where I used a couple of my all time favourite techniques: using paste with stencils and paper smooshing. 

I have a video which I will post tomorrow on my IG account with how I made those cups, but it is so simple! I used the following distress oxides: 

  • barn door
  • dried marigold
  • kitsch flamingo
  • broken china
and then I used white WOW embossing powder for the cups. 


A trick: to make your cups stand up, use craft foam behind them! I used used the coordinating dies to cup 4 cups from foam and used liquid adhesive to glue them to my paper smooshed cups. I love dimension on a card! 

For the background, I used the new Coffee Beans 6x6" stencil with transparent matte texture paste from Ranger. I love the additional detail it gives to the card. 

And now, can we take a moment to admire the great sentiment? 'coffee first then I do the things' - yes! it should say 'at least TWO coffees first...' I love it!

I'm hoping this card inspires you! Use the code T4TNEILA10 for a 10% off your shop, including the new release items

Sending hugs,
Natalia

Sunday, 12 September 2021

Brew-tiful Day

 Good afternoon Teatimers and happy Sunday,

DT Lyndsey here and I'm so excited to be sharing this 3D card with you today using these adorable critters from the new release stamp set Snappy before Coffee.


So these happy fellas are taking their usual morning stroll through the park, fuelled by a cup of steaming hot coffee from cart. Don't they just look so happy to be bumping in to each other?

I knew I wanted to create a cute little scene with these characters and the Box Clever 3D card was just perfect for this.

To start I stamped and coloured my images using my Spectrum Noir markers (colours listed below in order of lightest to darkest)

Green - CG2,  CG4,  DG3 

Yellow - LY2, LY1, LY3, CT4 

Red - CR11, DR5,  DR7 

Blue - IB1, IB2, IB3

Light Brown  - EB1, EB2, GB8 

Dark Brown  - EB3, EB5,  EB8
 
Light Grey - IG1,  IG3,  IG5 

Dark Grey  - IG5,  IG7,  IG9 


I cut the box die twice from white card and used the stitched rectangle to cut an aperture in one piece. On the inside back of plain piece I used the Slimline Scene Builder Stencil and Salty Ocean distress ink to create a cloudy sky.

I cut the grass sections from the set from the die set from white card and added colour with Twisted Citron and Lucky Clover distress inks.

I cut another of the box die with an aperture in from patterned paper from the Sweet Summer paper pad and added this to the front of the card. Using some strong doubled sided tape I assembled the box and folded into shape.


The characters were then added to the card to create my little scene and a couple of white puffy clouds also from the 3D box die set were added to the background. Finally finishing off with a stamped sentiment in the bottom RH corner.

I absolutely love how this card turned out and admit that this set is my fave from the release, I just love those snappy crocs!

Thanks for joining me here on the blog today,  don't forget to use my code T4TLYNDSEY10 for 10% off your order in store if you fancy purchasing any of the new release! 😀 

Enjoy the rest of your weekend,

Lyndsey x

Saturday, 11 September 2021


 Happy Saturday Teatimers! So release day came did you get anything? What's your favourite product? 

As usual Jo has rocked it with this release there's cute critters, a fab new standalone die which I've used so much! Then who doesn't love coffee products!
As soon as I saw the cute Dog Gone Mutts Stamp set I knew I had to create a cute scene card with a white picket fence and the red dog kennel. 
I stamped out all the critters, accessories and the sentiment and set them aside then began to work on my card base. I used the middle sized Slimline Scallop Nesting Dies to cut out the card base. I cut it twice out of 360gsm white card stock and on the back one scored a line one scallop down all the way across the top to create the fold for the card and taped it using strong double sided tape. 
For the scene part I used the rectangle from the Slimline Postage Stamp Frame Dies but it was a tad too long so I just chopped off about 5mm's off the edge. I ink blended this with Tumbled Glass and hint Chipped Sapphire around the edges to darken it up a little. I also added a few Chipped Sapphire splatters for a little bit of interest. The grass I cut another rectangle out and used the Landscape Edge Standalone Die I just had to cut half and then line it up to cut the other half as they aren't quite long enough. I did this twice and then inked them up using Twisted Citron and Mowed Grass Distress oxides. Then for the last part of the background I used the clouds and Picket Fence from the Windmill Add on Die set. I just cut them from white card stock and left as is. 
When I'm colouring I try not to use too many colours so it's not too hectic so used a range of browns and warm greys for the dogs. Then used the same brown for the wood on the kennel and a warm red for the rest of it and pop of yellow for the ball. I like how the final colouring turned out and I didn't need loads of colours to get them all looking different apart from two of the dogs but they aren't next to each other so I think it works ok. 
Once they were all coloured and die cut I just stuck everything together as the grass was a bit longer than the sky panel I just flipped it over once it was stuck and used the edge to guide my scissors. 
I love the final look of the card and I hope you do too! If you haven't treated yourselves yet you can get 10% off in the shop using code T4TNATALIE10. 
Hope you have a great weekend and I will see you again next week. 


Other Posts You Might Like