Pages

Saturday, 31 May 2025

🛥️ Boat Buddies 🛥️

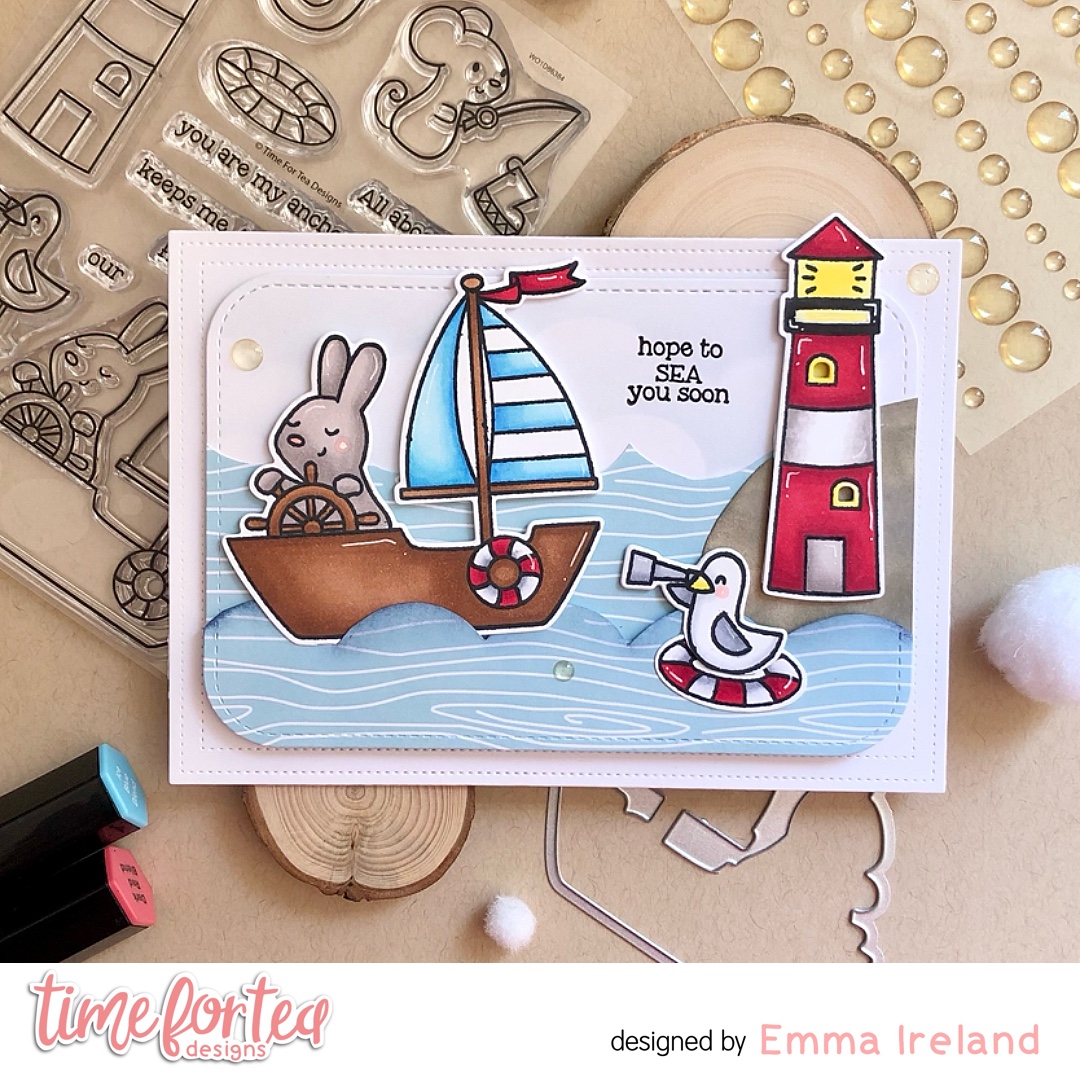
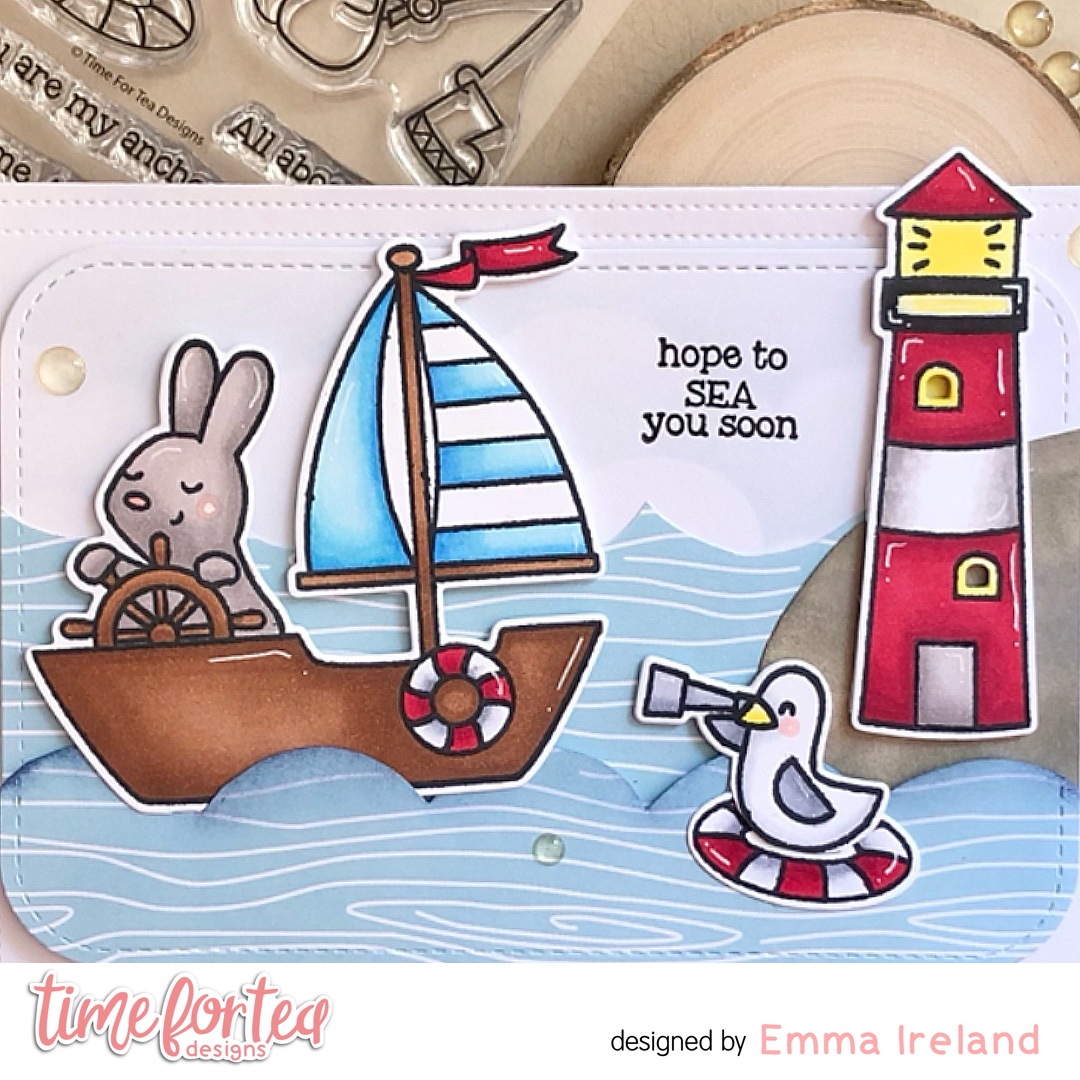
Hello Tea Timers. I’m back today with a new card for you featuring the NEW ‘Boat Buddies’ stamp and coordinating die set alongside the ‘Rounded Corner Stitched Rectangle dies. This NEW RELEASE is just gorgeous. So many cute critters!

Making the Card:

To create this card I cut out two pieces of white card using the ‘Rounded Corner Stitched Rectangle dies’ and the ‘Smile Inverted Scallop Frame dies‘. To create the waves I used a sheet from the ‘Joyful Winter‘ 6×6 paper pad and cut it with the largest ‘Rounded Corner Stitched Rectangle die’. Using the edge of the Beach Scene Builder stecil I drew along the largest wave and then cut it out with my Cutterbee scissors. I added a little Tim Holtz ‘Stormy Sky‘ distress ink along the edge to make it pop.

To colour my images, I stamped them on to Crafters Companion Solar White card stock with Memento Tuxedo Black ink and coloured them with my Spectrum Noir Tri-Blend markers. I cut them out with their coordinating dies and arranged them onto my card. I have also added some ‘Clear Bubbles‘ Enamel Dots.

NEW RELEASE:

* Boat Buddies Stamp & Coordinating Die Set

* Rain or Shine Mice Stamp & Coordinating Die Set

* Cacti Critters Stamp & Coordinating Die Set

* Adventure Awaits Stamp & Coordinating Die Set

* Thinking of You Sentiment Die

* Rounded Corner Stitched Rectangle Dies


Thank you for visiting the T4TD blog today. For a 10% discount on your order, use my code - T4TIRELAND10

Hugs, Emma xxx

Friday, 30 May 2025

Hope Your Birthday is on Point


Happy New Release Friday! It is DT Annalisa here, and I'm excited about the latest stamps and dies from Time For Tea Designs! For my first card featuring these new products, I chose to work with the Cacti Critters set and the Rounded Corner Stitched Rectangle Dies. Gardening, just like card making, is my 'happy place,' so I felt inspired to create this card as my debut project.


To start, I used a palette knife to spread Distress Crackle Paste through the I Really Dig You Stencil onto Distress Watercolour Paper. I allowed this to dry overnight before colouring the panel with Distress Watercolour Pencils in the colours Ground Espresso, Scorched Timber, Hickory Smoke, and Peacock Feathers.

Next, I adhered the background to a card base using double-sided tape.


I then die-cut a frame from white cardstock using two of the Rounded Corner Stitched Rectangle Dies and attached it to the card base with liquid glue.

For the focal point, I stamped the images and sentiment from the Cacti Critters set, colored them with Copics, and used the coordinating dies to cut them out. To add some details, I used a white gel pen for highlights.


Finally, I used double-sided foam tape to attach the images and sentiment to the card base.

I absolutely love the texture on the background of this card!


Thank you so much for reading my blog post! Be sure to use my discount code T4TANNALISA10 when you visit the Time For Tea Designs shop to get 10% off your order.

Wednesday, 28 May 2025

Thinking of Ewe

 Hey friends! It’s Safia from the design team and today I’m sharing a card I made using my leftover pieces from last week. Making cards out of scraps is one of my favorite things to do. To start my card I cut out the leftover sheep and the greeting I wanted. Then I pulled out some patterned paper to inspire my ink blending behind the sheep. 


Once my blending was done i added a little splatter and then stuck it behind this grey frame die. Then I took the entire panel and glued it onto my layered patterned paper cardstock.

I also have a little reel on how I made this card so be sure to check out my page later to see how I put it all together. Thanks for stopping in! 

Supplies:

Tuesday, 27 May 2025

Thinking of you Every Daisy


Hey all! Jill (@tinytreasureworkshop) here with today's card! For this card, I inkblended an ink panel with orange and pink Distress inks and masked off the bottom and top to create a frame. I added splatters of white and pink for added interest.

Next, I colored in images from the "Oops A Daisy" stampset and mounted them on the panel with foam tape. I added a few butterflies from the stampset for embellishment! A quick and simple card that is sure to leave anyone smiling! 

Thanks for stopping by!

Monday, 26 May 2025

Squeeze the Day with Sentiments


Hi. Design team member 
Koren Wiskman here. I hope that I can inspire you to create something fun with all of these awesome T4T supplies. Today I am using the Squeeze the Day Stamp Set and Coordinating Dies to create this project. 


The card size is A2 (4.25in x5.5in.) The front panel is cut to 3.25in x 4.75in. This is my favorite size card to create. I have tried so many others but this size is the one that keeps my heart happy. My card bases are typically made using a neutral gray cardstock. These two details about my cards rarely change. 


Background

The card panel on this project is simply patterned paper. I chose lemons but the Squeeze the Day Stamp Set is so versatile, I want to do limes, and oranges and even hugs! 


Sentiment

I used the sentiments from the Time for Teas Designs Squeeze the Day Stamp Set to heat emboss using various colors of cardstock and embossing powder. I tried to match with my lemons in the background. I've done cards like this in the past and it's a great way to use your sentiment stamps. This Squeeze the Day set also has Coordinating Dies so it's so easy to cut them out. The are popped up with various heights of dimension using foam squares. 


The entire panel is also popped up using craft foam and tear tape adhesive. 


I hope that I've inspired you to create something today. Check out the Squeeze the Day Stamp Set and Coordinating Diesin the T4TD shop.


Koren 

Sunday, 25 May 2025

Wishing You A Happy Day!

Hello Everyone!

Michelle from the Design Team here and I bring to you some friendly crocodiles and their sweet little neighbours wishing you a happy day!

One of my favourite things to do is that I like to mix and match my stamp sets so that I get more from them. Today’s inspiration uses the following sets:

To make the card, I stamped all my images onto white cardstock with the exception of the windows. These were something that I made myself but is very easy to do - its just drawing a lot of rectangles, squares and having a little patience! I coloured the images with alcohol markers and added highlights with a white gel pen. 

The background is a panel of white cardstock that has been die cut with a stitched rectangle die and then ink blended with a brick stencil and pink ink.


For the sentiment, I kept this simple. I heat embossed this onto black cardstock with white embossing powder and die cut it with a banner die.

The fun part was laying out all the windows and deciding what was happening in each one. I wanted some of the windows to tell a story - the crocs having a brew to catch up on where to go after their beach holiday, a cute little crew that are either eyeing up the delicious smelling pie or wondering what is happening outside. For the other windows, just warm homey touches such as cacti, books and of course a buzzy bee! 


I hope you all enjoyed the card.


Happy Crafting,

Michelle

Saturday, 24 May 2025

It’s Your Day!

Hello Tea Timers. DT Emma here and I’m back today with a new card for you. Today’s inspiration features the ‘It’s Your Day Sentiment Die set and the ‘Pretty Pastels6×6 paper pad from Time For Tea Designs.

Making the card:

I wanted to try a little something different today, keep it simple, and only use the standalone dies I have in my T4TD collection. I used the ‘It’s Your Day’ die to cut out the bunting shape from a sheet of the ‘Pretty Pastels’ 6×6 paper pad and the sentiment dies I cut out of plain white card, twice, and stacked them together to create dimention.

For the background layers I have cut the largest out of plain white card stock and the smallest from another sheet of the ‘Pretty Pastels’ 6×6 paper pad. I used double sided tape to adhere them together.

For a finishing touch I added some T4TD ‘Festive Fun’ enamel dots. 

Thank you for visiting my blog today. For a 10% discount on your next order, use T4TIRELAND10

Hugs, Emma xxx

Friday, 23 May 2025

Purple Let's Party

Happy Friday, DT Annalisa here! I'm excited to share a colourful purple party card I created using several Time For Tea Designs stamp sets and Ranger alcohol inks.

To create the background, I used a variety of alcohol inks, Ranger blending solution, 99% isopropyl alcohol, and an alcohol ink applicator with a felt tip on Yupo paper. The colours I chose are Ranger Indigo, Glamingo, and Amethyst.

I die-cut this panel using the Sweet Scalloped Dies and adhered it to a card base with liquid glue.


For the sentiment, I die-cut the Let’s Party Large Sentiment Die once from silver glitter cardstock and twice from white cardstock. I glued these layers with liquid glue to add dimension before attaching them to the card base.

Next, I die-cut a circle from white cardstock with the Stitched Circle Dies and ink-blended it using Speckled Egg and Tumbled Glass Distress Oxide for the sky section. I added splatter using Speckled Egg Distress Watercolour Pencil mixed with water and applied it with a watercolour brush.


I ink-blended with Lost Shadow for the ground section and added splatter using Pumice Stone Watercolour Pencil. I then die-cut vellum with the Scalloped Circle Dies and glued it to the ink-blended circle before attaching it to the card base.

I stamped images from the Birthday Fox, Let’s Party and Lucky Ducks, coloured them with Copics, and cut them out using their coordinating dies. I added white gel pen accents for extra detail.


Finally, I used thin double-sided foam tape to adhere the images to the card and finished it off with Summer Haze Designer Enamel Dots.

Thank you so much for reading my blog post! Be sure to use my discount code T4TANNALISA10 when you visit the Time For Tea Designs shop to get 10% off your order.

Wednesday, 21 May 2025

Ewe Are The Best Card


Hey friends! It’s Safia here today sharing a fun card I made using the Ewe Are the Best digital stamps. These are available in regular stamps and dies too but they might be sold out right now. But keep watching the site if you’re looking for them! 
To start my card I just printed off the entire set and colored in most of the images using my COPIC markers. 


Once I colored my images I started on the background. For this I had a scrap of a shape I had cut out from a previous card and used the leftover pieces as a stencil for my background. This trick works so well for so many different shape cutout leftovers! Keep those scraps my friends. 


The last thing I did on this card was add some silver rhinestones to make it look like a starry sky. I hope you’ve enjoyed this card, Thanks for stopping in!


Tuesday, 20 May 2025

Stay Cool and Relax


Hello everyone! Jill (@tinytreasureworkshop) here with today's card! I love to stretch my supplies and finding new ways to use them!

For this card, I ink blended an ink panel to resemble a sunset sky. I used the Flirty Flowers Cover Plate as a stencil. I die cut one panel out and then placed it over my ink blended panel. I used Frostbite paste from Simom Hurley which is dries to a beautiful glitter finish. I love how it resembles Snowflakes.

Next, I colored in images from the "Walrus Be Friends" set and placed them on the panel


Thanks for stopping by!
Jill

Other Posts You Might Like