If you remember, I made another card with the bee hive die a few weeks ago, where I used the negative from the die cut. This time, I decided to use the positive and make a shaker card! If you know me, you know how much I love a shaker - I just think they are so much fun!
I started off by trimming a panel from yellow cardstock to the size of the slimline die. I then cut the the die from white cardstock to create my front panel.
I cut some acetate a bit smaller than my card front and adhered them together with some thin double sided tape. Once my window was ready, I used double sided foam tape to build my shaker. This is the best foam roll for shakers, I love that it is narrow and works great for smaller areas.
I filled in my shaker with some Nuvo sequins which I find very pretty, and then adhered my yellow panel on top to close it off. I used my stamping platform to guide me while putting these two panels together.
My card front was now good to go, and all I had to do was stamp and colour my bees and accessories. Aren't they super cute? I love them! I used a mix of my Spectrum Noir and my Ohuhu to colour the stamped images and then used the coordinating dies to cut them.
To mount them onto the card front, I used double sided foam tape. Lastly, I added the Bee Happy sentiment, stamped in white on black cardstock and that completed my card!
I hope you like it, remember to use the code T4TNEILA10 for a 10% off your shop!
Good afternoon everyone and happy Bank Holiday weekend,
I'm holding on to the last bit of summer with my card today, as soon as I saw the Cool Critters stamp set I knew I had to make a little scene. These little friends are enjoying some cool refreshments on a sunny afternoon in the park!
To start as always I stamped and coloured my images using my Spectrum Noir markers (colours listed below in order of lightest to darkest)
Raccoon - IG1, IG3, IG5, IG7, IG9
Rabbit - BG1, BG3, BG5
Cat - GB1, GB3, GB5
Blue - TB1, TB3, TB4
Pink - PP1, PP2, PP3
Teal - BT1, BT3, BT4, BT6
Yellow - LY2, LY1, LY3
Brown- EB1, EB2, GB8
To make my 3D card I cut all the pieces from the Dienamic Display Card Die from white card. For my sky I used the Slimline Scene Builder Stencil and Salty Ocean distress ink. I used the Landscape Border Dies to give a grass cut to the my middle pieces and added colour with Twisted Citron and Lucky Clover distress inks.
To add more interest to the background I also cut a cute picket fence, clouds and tree from the Windmill Add On Dies, using my markers to give the tree some colour.
I added all my elements onto the different layers of the card to create the little scene. Finishing off with a white embossed sentiment on black card.
Thank you for joining me here on the blog today, I hope you enjoyed my card.
Don't forget you can use my code T4TLYNDSEY10 for 10% off your order in store.
Well Saturday has come around again quick Teatimers hope you all having a great bank holiday weekend. I shall be back at work Monday so making the most of my last two days off and the sun is out today too!
This week I wanted to build on my birthday card collection I never seem to have one when I need one you know. The new Birthday Bear Clear Stamp Set is perfect for this its such a cute set and doesn't have to be used for birthday. I stamped out my critters and coloured them up and tried to shade them so they look more 3-D you can see on the bear where I added darker browns under their chin and places I thought would be in shadow. Once coloured up I cut them out with the coordinating dies and left them to the side whilst I worked on the rest of the card.
I used the Large Scallop Celebrate Frame Dies to cut out the background and ink blended using a combination of Shaded Lilac, Dried Marigold and Kitsch Flamingo Distress Oxide Inks. I spritzed with water to add some texture and set aside to dry.
For the sentiments I white heat embossed the make a wish sentiment from the bear set and cut out using the matching dies. The celebrate is from the die set we used to cut out the base I cut it out twice using white and the same deep purple cardstock I used for the other part of the sentiment.
Once the base was dry I used the new Bokeh Bubbles 6x6 stencil with white pigment ink to create some circles just for some added interest. Again setting it aside to dry.
Once everything was dry I adhered everything together and finished up with some sequins and adhered it onto the same deep purple card stock and popped it onto my card base.
I hope you like my card and have a lovely weekend!
If you want to treat yourself in the Time for Tea shop don't forget you can use code T4TNATALIE10 to get 10% off your order 💖
Hello everyone, Annalisa here sharing the INSIDE of a card rather than the outside, (shocking I know!) because the inside is the show stopper on this card. I love how this pop-up card turned out using the Happy Mail Critters from Time For Tea Designs.
I used my Brother Scan N Cut SDX125e to cut a card base and inside the pop-up area for the card base. I purchased the design from Lori Whitlock's SVG Shop (Mailbox Pop-Up Card) and adapted it to create my card. The sky was ink blended using Salty Ocean Distress Oxide Ink and the grass was from some green patterned paper I had. I coloured the tree and leaves with Copic markers.
The mailbox, bird and heart envelope are from the Happy Mail Critters, the planters, bush and small leaves and flowers are from the Windmill Add On die, the mouse is from Treat Yourself, the cat is from the Smitten Kitten and the flower and butterfly are from Be Slothy.
I stamped, coloured (with Copics) all of the elements and die cut them out. The Windmill Add On die elements were coloured using Distress Oxides (Mowed Lawn, Lucky Clover, Picked Raspberry, Vintage Photo, Peacock Feathers, Squeezed Lemonade, Faded Jeans.) I added a green splatter to the greenery and some white gel pen highlights to some of the elements.
I used liquid glue to adhere the critters and other items to the inside of the card. I finished up the inside by stamping the sentiment 'hello, sending paper hugs."
Thank you so much for visiting the T4T blog, you can use code T4TANNALISA10 when you visit the shop to get a 10% discount on your entire order.
Good afternoon crafty friends, DT Kitty here. As usual on a Thursday afternoon I am
sharing my latest card. This week I created a box card with a cute scene...
So
normally I would use one of my die sets to create this box shape but I
actually wanted slightly different dimentions so I used it as a template
then scaled it to the right size to create my own! They are still so
easy to create and so much fun! I used the gorgeous cute mice from the Hello Cupcake & Sundae Sweeties. I coloured each of the images with Copics and die cut them using the coordinating dies. I created the background sky panel using the Scene It Stencil and a little Mermaid Lagoon Distress Oxide Ink. I used the grass die from the Landscape Edge Dies to create each of the inner panels. I blended Twisted Citron & Mowed Ink Distress Oxide Inks onto each piece before assembling the box together. To finish I added a few Clear Drops.
That's all from me today. Don't forget you can get 10% off at Time For Tea Designs using the code T4TKITTY10. Thank you for joining me and will be back next Thursday with my nex creation.
Hey everyone, Lien here. Today I am sharing this card on the Time For Tea Designs Youtube Channel. I am featuring the Sundae Sweetiesstamp set that was previously released. I decided to make a monochrome card with a pop of red, I hope you like it xxx
You can click HEREto watch on the Time for Tea Designs Youtube channel.
I started with the cute image and sentiment from the Sundae Sweeties stamp set from Time for Tea Designs. I colored the image using copic markers (listed below). Afterwards, I used the matching dies to cut it out.
For the background, I trimmed down a patterned paper from the Brighter Days Paper Pad from Time for Tea Designs and a piece of white card stock (for the grounding).
Cherry: R35, R24, R22 / W7
Cream: W3, W1, W0
Ice: W8, W6, W5, W3
Cone: W4, W3, W1
Cat: W7, W5, W4, W2 / W7
With all the elements ready, I assembled the card on a mini slimline card base. I finished it of using some hearts sprinkles and glossy accents. I hope you like it xxx
Thinking of buying some T4TD supplies? With T4TLIEN10you will get 10% of your order at Time For Tea Designs! Happy shopping xxx
Hi all friends, today I have a new inspiration to show you using the fantastic set Antony's Alpha Dies
I have so many ideas and one of them is to create a stencil to make the background of my card, it was easy because I die cut the alphabet on a sheet of acetate but we can also use a cardstock, then I shaded with Distress and created a shaker card using the die Smile Inverted Scallop Frame
I really like the set Hello Cupcake so I chose these little mice having fun in the middle of the cupcake cream.
I chose this pattern from the new collection Sweet Summer Paper Pad to create two borders and finish the card. These new cards are really beautiful and very useful, and I'm sad to use them, does this happen to you too? !!!
Now I wish you a Good week, and don't forget to use the code T4TCLAUDIA10 to get 10% off the store !!!
The background is really simple as I wanted the focus to be on the little guys. I used some kitsch flamingo distress oxide and mixed it with water to splatter it with a round brush (size 8) on a while piece of white cardstock.
I wanted the cherries and strawberry to follow a rainbow colour as I thought that would be cute, and I used both my spectrum noir and my ohuhu to colour in the stamped images.
I can't help but laugh at that last little guy. He is so cheeky: "nope, this one is mineee!"
I did some masking for the stamp as I wanted it on one line only, and then for the first time ever I used my Brother machine to cut it out - I was well impressed!
There is a sell going on over at the Time for Tea shop, in case you didn't know! A lot of the supplies are out of stock so grab the ones that aren't while they last!
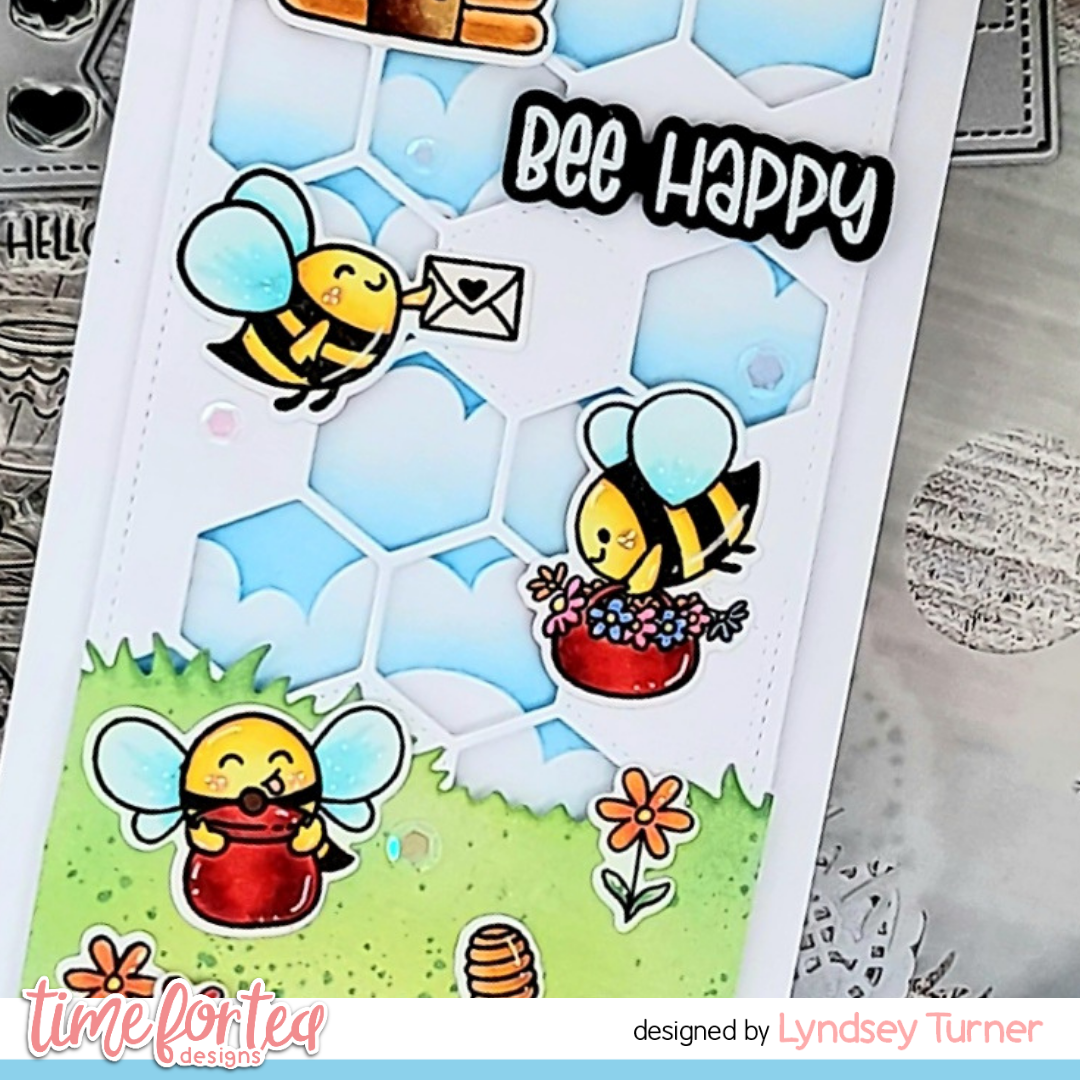
Lyndsey here sharing some inspiration on this Sunday afternoon using the adorable Bee Happy stamp set.
I think most of the team have been inspired by this months mood board challenge for our creations this week I know I have!
So for my card, to start as always I stamped and coloured my images using my Spectrum Noir Markers (colours listed below in order of lightest to darkest)
Yellow - CT1, CT3, CT4, GB5
Red - CR7,CR11, DR5, DR7
Orange - GB2, GB3, GB5, TN4
Brown - TN4, TN5, TN7
To create the background I took a DL card blank and masked off the edges using washi tape. I used the Slimline Scene Builder Stencil and Salty Ocean distress ink to create a cloudy background. The Beehive Slimline Die was cut from white card and added to the card blank using foam tape for dimension.
I cut a piece of grass from white card using the Landscape Border Dies and added colour with Twisted Citron and Lucky Clover distress inks, trimming to the width of the hexagon panel.
The images were arranged around the card and I finished off with the 'BEE HAPPY ' sentiment stamping white card and embossed in white.
Thank you for joining me here on the blog today, don't forget to use my code T4TLYNDSEY10 for 10% off your order in store. If you hurry we also have a flash sale on until tonight where if you use the code SUMMERFUN35 you get a massive 35% off your order. Go fill your baskets!!
If you fancy joining in with our monthly challenge you can do so HERE. The challenge is supper fun and you can win the chance to guest design on a future challenge and a £25 to spend in the Time for Designs store, so what are you waiting for! The chance to win the spends is generated randomly too so no need to be shy and worried your not good enough. The challenges run from the first day of the month to the last day of the month so you have until the 31st August to get your entries in.
Happy Saturday Teatimers I have another Bee Happy card for you this week. My mojo had left me and I was feeling a little uninspired so I decided to use the new monthly challenge for a bit of inspiration. I loved the colours and the bees are just super fun so that's where I started.
Here's a photo of the challenge it's super fun and you can win the chance to guest design on a future challenge and the chance to win £25 to spend in the Time for Designs store, so what are you waiting for! The chance to win the spends is generated randomly too so no need to be shy and worried your not good enough. The challenges run from the first day of the month to the last day of the month so you have until the 31st August to get your entries in.
My card looks really complicated but it was so quick to make the bees are so easy to colour as they are only small so not much shading is needed I just finished them of with a pop off pink on their cheeks. You can find them in the Bee Happy stamp set I cut mine out with the coordinating dies too which is great for cutting out the little heart flight marks.
For the shaker card I used the Bee Hive Slimline Die which I cut out in White, Red and a Golden Yellow cardstock. Then again out of white fun foam because the lines are so narrow this is the best way to make the shaker card and so much easier. I adhered my white fun foam cut out straight onto my white card base and filled different sections with either red cardstock or yellow seed beads leaving a few just plain white. Once these were filled I adhered some acetate straight on top and then the Golden Yellow cut out on top of that. Before adhering my letters and bees I also adhered some of the white cut out on the top of the acetate for a little added interest.
Then it was time for the main details this is where I totally regret adding some dimension with my letters but I'll remember for next time. I cut out the letters with Anthony's Alpha's out of black cardstock and adhered those on first so that I could get the placement right. With the bee on the right I cut the envelope out of their hands and placed it so that it looked like the bee was holding the letter B.
Its such a fun card and is so quick to make but still looks so detailed and I love the shaker element. I hope you like it too and I can't wait to see all of your challenge entries. Don't forget you can get 10% off in the Time for Tea shop too using code T4TNATALIE10 💓
Hello everyone! Annalisa here sharing a thank you card featuring the Bee Happy stamp set and the coordinating dies for my DT card. I love how you can create bright and happy cards with this stamp set.
This card fits right in with the August T4T Summer mood board Challenge! Bee (I just had to!) sure to submit your card on the Challenge Blog for your chance to win! For each challenge, we will select a random winner to receive a £25.00 gift certificate to use at T4T! We will also select one winner to Guest Design for us the following month.
To start, I die cut some heavy white card stock with the Dotty Hearts Panel Die. I added this to a card base and set it aside to create the rest of the card.
I die cut a circle from black card stock using the Simple Circle Dies. I then used an older T4T stencil to create a honeycomb background with some Squeezed Lemonade Distress Oxide. I cut another circle from this cardstock with the same die set. I of course used my Beautiful Rainbow Blender Brushes to apply the Distress Oxide to the card base, they allowed me to get a softer feel on the edges.
I glued both circles to the dotty hearts panel with liquid glue. I then stamped, coloured (with my Copics) and die cut the bee and other elements. I added some highlights to all of the images with my white Gelly Roll Pen.
I used liquid glue to attach all of the elements, except for the bee, instead, I added an action wobbler to the back of the bee. I just love how this made the bee 'buzz' with movement.
For the sentiment, I used the 'thanks' from the "Thanks A Whole Bunch" which is an older T4T stamp set but you could certainly use the Be Kind Be You stamp set. I like using the older stamp and die sets with newer ones to get the most bang out of my supplies! I die cut the sentiment out with the Pandamonium Party coordinating die set.
Thanks for checking out my card, don't forget, for a 10% discount on your order, use T4TANNALISA10.
Hello crafty peeps! It's Thursday and time to share my latest card.
I'm still loving playing with the latest release and with such cute
images who can blame me?! I had so much fun creating this sweet summer
scene... everyone loves an ice cream, right?
For this card I used the Cool Critters Stamp Set. I coloured the images with Copics and cut them out with the Cool Critters Coordinating Dies. I blended Faded Jeans & Salvaged Patina Distress Oxide Inks
to create the sky effect. I then blended Lucky Clover & Twisted
Citron to create the grass & hedge. I used the Grass Die from Slimline Hillside Scene Dies and the Stitched Cloud from the Landscape Edge Dies to die cut each piece. I layered them together and die them with the postage stamp die from the Slimline Postage Stamp Dies.
I attached the panel onto a white card base with foam pads. I added all
the images and sentiment onto the card with foam pads and added some
gems to finish.
It's Tasha here, and today I'm sharing some inspiration for taking an ink blended background and turning it into two card designs, for the effort of one! ;)
I'm always excited for a technique which results in two-for-one, and this way gives you two totally different designs, with no waste.
I had so much fun playing with the new Confetti stencil, and the brand new teal blender brush is absolutely fantastic!!!
To get the sprinkles look, I just rotated and shifted the stencil between each ink colour; such a super easy way to get more from your supplies.
As a backdrop for my die cut sentiment, I just scored an a2 panel of Neenah 80lb, horizontally every 1/4 inch; this is one of my favourite ways to add some texture & detail to a plain background and it's so easy to do!
I decorated the finished design with a sprinkling of coloured gems.
The adorable little mouse I included in my other card is from the Birthday Bear stamp & die collection. I stamped it out onto Neenah 80lb using Fadeout Ink, which is perfect for No-Line Colouring, and coloured it using my Copic markers.
I think he looks so adorable, almost like he is climbing up the sentiment with your birthday cupcake! 😍
Thank you so much for spending this time with me, I always appreciate it so much.
I'd love to know what you think about my card, so don't forget to leave a comment! :)
How adorable is this kitty with his big ice-cream?! I totally love him so much!!!
I started making my card cutting a rectangle from one of the beautiful patterned papers from the "Brighter Days" 6x6 paper pad and I cut a white panel using the biggest die from the "Large Scallop Celebrate Frame" set.
I then colored it mixing together speckled egg, salvaged patina and picked raspberry Distress spray stain.
I stamped the adorable kitty from the "Sundae Sweeties" stamp set, I colored him with Spectrum Noir alcohol markers and I cut him with coordinating dies.
I put everything together and that's all.
I hope you'll enjoy this card and don't forget you can get a 10% off your Time for Tea order with the code T4TSILVIA10.