Pages

Wednesday 30 September 2020

Don't worry... Take it easy!

Hello Hello!
DT Anila on the blog today with this Slothy slimline card.
I have used a new stamp set called Be Slothy!


I stamped, coloured and die-cut the images. Stencilled the clouds and grass using the Scene it stencil and distress oxides. 
I stamped some colourful flowers from the BEE happy stamp set. Adhered the images to the panel and popped it on a colourful card base.
Added the sentiments using foam tape.
Used the speech bubble die to add additional sentiment.


That's it for today!!

If you wish to buy any of the products from the T4TD shop you can use my code T4TANILA10 and avail an extra 10% off your purchase.

Until next time...
Take care and happy crafting!


Saturday 26 September 2020

Coffee at Sunset Slider


DT Annalisa here. Fall has arrived and with it come some spectacular sunsets which I have been enjoying on my evening walk with my husband. Today I am sharing a slider card with two friends sharing coffee on a sunset walk. To create this card I used several T4T products.

To start I stamped the mountain background, hot air balloons and sun and clouds from the Grateful For You Landscape Clear Stamp Set and coloured them with Copic markers.

I stamped, coloured and die cut the critters using the All Occasion Critters Clear Stamp Set and coordinating dies. I used the slider die in this set to cut out a section of the sky to create the interactive element of this card.

I adhered all of the critters down to the background, including the mouse on the cloud to the slider element. Once all the critters where on the background I adhered the scene to some black card stock (with foam tape) which I then glued to a white card base.

I plan on enjoying the beautiful fall sunsets and weather until the snow flies!

If you are interested in purchasing any of the T4T products used in my project, I have a 10% discount code for the T4T store which can be used on anything, anytime and has no time limit - T4TANNALISA10


Let's have Coffee!


 Hi everyone the weekend is here already! I am absolutely loving clean and simple cards at the minute especially now I'm back at work so less crafting time. This one was inspired by Michelle Short who guest designed for us for the August release I loved the texture and detail she achieved using the sun die but with white on white. It gives added interest but doesn't take away from the main image.

I started like I always do and cut out the Sunburst Cover Plate Die I then used this to measure out my card base. The two hexagons are from the Bee Happy Hexagon Stitched Nesting Dies and are one of my go to dies. They have been so useful in framing small images and again they have the added texture detail but being in white don't detract from the image. I popped the smaller frame up with foam tape as well to give it some extra height. 
The little critters are from the All Occasion Critters Stamp set that was in the August release too they are so sweet. They didn't really take much colouring as they are only small. I used my go to my beloved Copics and cut them out with the matching dies. I popped them onto the top hexagon and stamped on my sentiment and stuck everything together. 
It's such a great design for when you need a quick card but still want it to really pop! I hope you like it as much as I do. Have a nice weekend and don't forget you can get 10% off in the shop using T4TNATALIE10 


Thursday 24 September 2020

Kite tags

Hello...
DT Anila on the blog today sharing these cute gift tags.


I have used the Kite dies to make these tags. 
Die cut the base from colourful sheets and the top in white. Assembled them, added coloured bows. 
Added a stamped sentiment to go for any occasion.


Adorn your gifts with these lovely gift tags.

Avail 10% off your cart value across the T4TD website using my code T4TANILA10.

Happy crafting.
Anila


Bestsellers Back In Stock!


Happy Thursday!

Those long awaited restocks are here!!

Some of your favourite T4TD products are now in stock & are shipping NOW!
These are some of our most popular items so order now to be sure not to miss out!


Grateful For You Background Stamp Set


We have more restocks coming too so sign up to our newsletter via the website here, or look out for news on the Blog.

Looking for more inspiration? Be sure to join us tonight for more crafty chat & live card making with Jo on our Facebook Live every Thursday evening at 8pm. 

Crafty Hugs, Jo 


Wednesday 23 September 2020

Up In The Air!

Happy Wednesday!

It's DT Shabneez here sharing a card I made using the Up, Up & Away stamp set together with the Sunburst Cover Plate die and the Landscape Edge Die Set.

I'm a big fan of paper pads and have one that was just perfect for die cutting the Sunburst, giving a beautiful gradient of colour.  I die cut the clouds and stuck them underneath.


The images were stamped and coloured using my Chameleon pens - this time with the addition of the colour tops to blend easily from one colour to another.  I added glitter glue to parts of the hot air balloon and in between the sunburst.

You can get 10% off anything in store using my code T4TSHABNEEZ10.

Happy Crafting!


Products Used:


To A Sweet Friend Bee Card Video Tutorial


 Hello Vic here today! I’m so excited to be sharing a video tutorial today. 


I wanted to make a shaped card and I used the Circle Of Love Nesting Die to make my card base.


I die cut 2 larger circles and a smaller circle using the next size down. 

The two larger circles will be your card base and the smaller circle is what we will be working on.

On the piece that will be the back of your card score a line at the top about half an inch from the top, this will then be adhered onto the front circle. Making a circle shaped card. 

Using theBuzzing For You Stamp Set I took both clouds from the stamp and stamped the clouds onto my circle panel using versamark ink. This will act as a glue for your embossing powder. 


I then added white embossing powder over the clouds and heat set this with my heat gun. 


Using some distress ink and a Beautiful blending brush I ink blended over the heat embossing. I then die cut some grass using the Landscape edge die


I adhered the grass pieces to my card.


I then stamped my images using the Bee Happy Stamp Set and coloured the images in with my copic markers. I then added a sentiment To A Special Friend and heat embossed the greeting.


I adhered all my images down and added some sequins.


The bee card is now complete. I loved making this card and I hope you have fun creating your cards. If you use this technique don’t forget to tag is on social media we love looking at your creations.

You can also save 10% off your Time For Tea Designs order using the code: T4TVICKI10 at the checkout.

Thanks for stopping by today!

Vic

Saturday 19 September 2020

Cute Hello Note Cards!


Happy Saturday everyone it's Design Team member Natalie here and I have some adorable note cards to share with you today. I made two variations but I feel like you could make a whole series of them. These I made quite a while ago so have quite bright summery colours but some rich autumn colours with the Woodland critters stamp set would be so cute. 
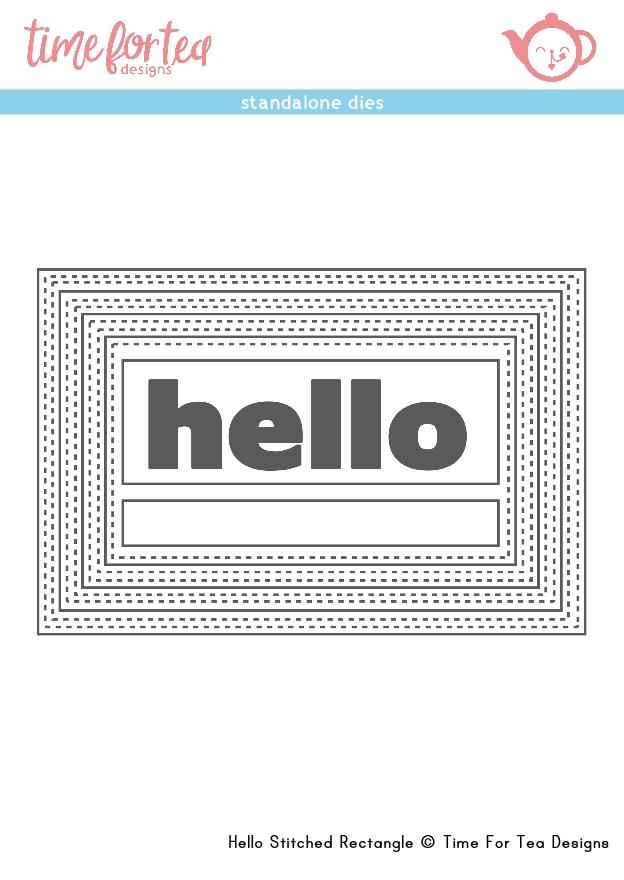
I started out by cutting out six rectangles using the Hello Rectangle Stitched Nesting Dies four I stuck together at the top to make two card bases and the other two will be our toppers. Taking the topper pieces i stamped out the Essential Stripes off centre and more towards the top so it's more aesthetically pleasing. I like the softer colours as it doesn't distract from the soft coloured images. I stamped my stripes with Distress Oxide so made sure they were fully dry before cutting out the Hello die and also made sure I kept all the tiny pieces like the inside of the e and o. 
The cute raccoon and bear are both from the All occasions critters stamp set which I coloured very simply as they only small with Copic Markers. I cut these out with the coordinating dies and also cut out the die shape out of some fun foam I like using this as it gives a cleaner look than foam tape. Using the foam tape again I also cut out another hello die.
To put the card together I stuck on the topper to the base of the card then stuck the foam tape hello in the gap where I die cut it from then stuck on the hello I cut from the striped background on top and added the stripped pieces from the inside of the o and e. The critter was added in the same way but i just chopped off a bit of the fun foam where it meets up to the letters and that was my cards finished.
I hope you like them and as always don't forget you can get 10% off  in the shop using T4TNATALIE10 
Have a great weekend everyone and I will see you all again next week!


Friday 18 September 2020

Happy Days Windmill Scene


Happy Friday! DT Annalisa here sharing a fun interactive windmill scene. This certainly was a labour of love as it took longer than my usual projects! For this scene I used several products from the August release - the Windmill Builder Standalone Die, Windmill Add On die, Treat Yourself Clear Stamp Set, Plaid Background Clear Stamp Set, Hogs & Kisses stamp set and coordinating dies.

I started by colouring white cardstock with distress oxides and inks in the colours I wanted for each of the elements in the windmill and add on die sets. For the windmill, I used Faded Jeans, Chipped Saphire, Pumice Stone and Squeezed Lemonade Distress Oxides. I cut the elements out and assembled the windmill - for a great tutorial on how to do this, check out the instructional video on YouTube.

For the add on die set, I used the following Distress Oxides: Walnut Stain Peacock Feathers, Squeezed Lemonade, Spiced Marmalade, Mowed Lawn, Lucky Clover and Picked Raspberry. I added some splatters to the greenery for interest. Next, I cut out all of the elements and adhered them to the card base after I had created the sky and the grass areas. I used Squeezed Lemonade and Spiced Lemonade Distress ink for the sky and Twisted Citron and Mowed Lawn for the grass. This process took quite some time due to all the small elements, especially all of the flowers!

I stamped and cut the adorable critters from the Hogs & Kisses, Treat Yourself stamp sets and adhered them to the card. The butterfly and ladybug (inside the house!) are from the Fairy Garden stamp set; the little bird is from the Moovellous Clear Stamp Set.

To finish the card I stamped the sentiment from the Plaid Background Clear Stamp Set.

Check out my Instagram account to see this card in action!

If you are interested in purchasing any of the T4T products used in my project, I have a 10% discount code for the T4T store which can be used on anything, anytime and has no time limit - T4TANNALISA10


Wednesday 16 September 2020

Follow your dreams

Hello Hello!
DT Anila on the blog today with this colourful shaker card.


I stamped and coloured the bear image from the Bears picnic stamp set. On a card, I stencilled some clouds and grass. Using Hi as a kite die, I created the shaker element. Fussy cut the image by snipping off some extra parts like the small kite etc. I adhered the image on to the grass. Mounted the shaker element. Drew the string passing through the image using a black marker. Stamped the image and added the other elements.


That's it for today!!

If you wish to buy any of the products from the T4TD shop you can use my code T4TANILA10 and avail an extra 10% off your purchase.

Until next time...
Take care and happy crafting!


Plates of Food!

Happy Wednesday!

It's DT Shabneez here with a fun slimline card using the Treat Yourself Stamp & Die set together with the Scalloped Slimline Die set.

For this creation in my head I had a picnic blanket with plates on it so that's what I tried to recreate!  Of course picnics need food and I added some cute mice enjoying themselves.


All the images were stamped and coloured using my Chameleon pens then die cut with their co-ordinating dies to make life easier!


I made the plates using 2 sizes of circle nesting dies and adhered them to the picnic table!

Happy Crafting!

Products Used:


Saturday 12 September 2020

Missing you Pig Time!


Happy Saturday everyone it’s Design Team member Natalie and I have another card to share with you all. 
I love finding ways to stretch my dies so I had to turn that fun windmill into a little Piggy house. It was a quick card to make with not too much colouring. The base of my card is cut from two of the larger quilted square nesting dies I just scored one at the top all the way across about 1 cm down and then added some double sided tape and stuck them together . Then I cut out the one smaller to make the card I used the Sunny Side up die to stencil the clouds in a soft grey to look like a stormy sky. Then splattered some dark grey for some added detail and stamped out some birds and the sentiment. The Picket Fence is cut from the Windmill Add on die set and I just added some shading with a cold grey copic marker. The Piggy house I cut out the top bottom and door out of white card stock so that it would be a bit sturdier and my paper was really thin then just cut them out again from some pretty paper and popped it all together. Patterned paper is such a quick easy way to do this and look so pretty. 
The grass is die cut with the new Landscape Edge standalone die set I love this set as most of my cards are scenes it adds fun details and layers. I coloured it in with some green oxide inks and added a splash of dark green for some extra detail then coloured up my piggies. I wanted an extra muddy puddle too so I stamped out the pig with the umbrella again but masked off the pig and wiped away the foot then just filled in the line I could have drawn my own I guess which might have been easier but I must have been feeling lazy. Then I popped all my card together it really didn't take long other than deciding how I wanted things laid out. I hope you like my card and don't forget you can get 10% off in the shop using code T4TNATALIE10  . Hope you all have a good weekend!


Hogs and Kisses Coordinating Dies


Other Posts You Might Like