Pages

Sunday 31 October 2021

Netfilx and Chill

Good afternoon Teatimers, 

I'm pretty sure by now you've seen our new release which is fabulous by the way, but if you haven't you'll be surprised to see something a little bit different from the norm, especially if you like a bit of memory keeping/scrapbooking.

Now to be honest although I'm extremely tempted after seeing my teammates amazing samples I haven't got time to develop a new hobby.  However this new release is so much more than just memory keeping and really works well for cardmaking too!

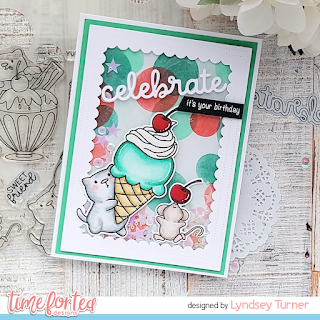
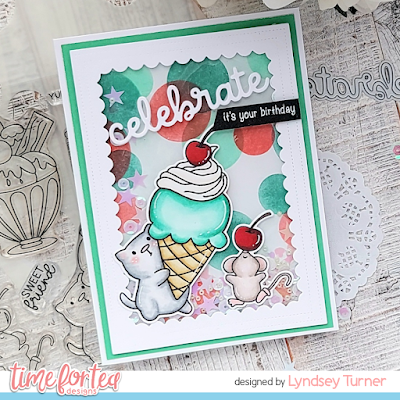
If you have taken part in our Blog and Instagram hop you'll have seen a sneak peek of my card that I'm sharing today. I decided to get creative with the Tall Alphabet stamps and Sweet Summer Ephemera pack to create this cheeky card.

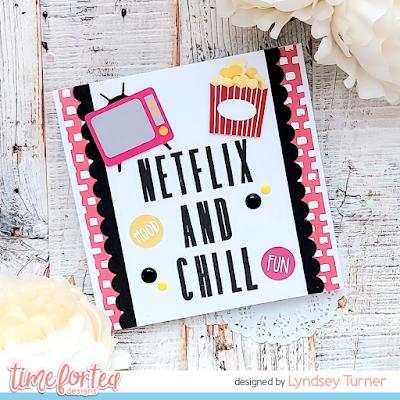
As soon as I saw the TV and Popcorn die-cuts an idea came to mind. So encouraged by my daughter (who also has the same sense of humour as me) I created this tongue and cheek Netflix and Chill card (and yes I know exactly what it means!🤣🤣🤣)

So I started by trimming a piece of white card to 10.5xm wide and stamping the sentiment towards the bottom 2/3rds in black ink. I then trimed a 6x6 card blank down to 13cm and added a piece of pink patterned paper from the Sweet Summer paper pad cut to 12cm wide. To create my Scalloped edges I die cut the largest die from Slimline Scalloped Frame Die from black card and literally cut it in half and added these to the back of the panel. 

I added the die cuts using foam pads for dimension and finished off with a couple of the circular mood stickers and enamel dots.

I love how this card turned out.

Thank you for joining me here on the blog today. Don't forget to use my code T4TLYNDSEY10 for 10% off your order in store.

Enjoy the rest of your weekend Lyndsey x

Saturday 30 October 2021

Missing You!


Happy Saturday Teatimer's it's DT member Natalie sharing all the details on how I made my cute card from the blog hop yesterday. 

There wasn't much colouring so it was a super quick card to make. I started by cutting out the Sun Ray Cover Plate Die and ink blending Squeezed Lemonade Distress Oxide over the top. I then used that as a guide to cut out the back piece for the sky from white card. This was then ink blended with tumbled glass and the Slimline Scene Builder Stencil. Next step was to adhere the Sun Ray on top of the sky using foam tape. 
To make the scene the road is cut out of grey paper using the Slimline Hillside Scene Builder Dies and layered over the top of yellow paper. The buildings were stamped using the new City Break Clear Stamp Set I used a orange, pink and purple lawn fawn inks to get the pretty ombre effect. I fussy cut it out and layered them both onto the card. 
The car and panda I found in my stash of pre coloured images its such a handy pile to have! You can find them in the Car Critters Stamp Set. I adhered them to the card but it just needed a few finishing touches so I stamped out the hot air balloon from the City Break stamp set and the Sentiment is from the Speech Bubbles Clear Stamp Set and that was my card finished up. I hope you love the new release as much as we do! As you can see its super versatile and great for both journaling and card making. 
If you want to get any of the new products or anything else in the Time for Tea Shop you can get 10% off your order using code T4TNATALIE10. Have a great weekend!

Winner of the Time For Tea and Simon Says Stamp with a Blog Hop


We are very happy to announce that the winner of our blog hop in celebration of Time For Tea Designs now being available in the Simon Says Stamp shop is..... drum roll, please ... 


... Gail (ionabunny)! Congratulations!! We have sent you an email and will make arrangements for you to receive your prize! 

Thank you everyone for commenting and participating. 

We would also like to thank Cassie Trask, Lauren Taylor, Lynnea Hollendonner, Rebecca Keppel, Carrie Rhoades, Mahala Kiss, Jess McAfee and Annalisa Boccia for the beautiful projects they created.


Friday 29 October 2021

Memory Keeping Happy Planner Style


Annalisa here, sharing something a little different from my usual card creation. I have made a couple of memory pages in my Happy Planner using elements of the brand new release. My husband and I discovered a love of hiking last year and we have enjoyed so many hikes. I decided to create a spread dedicated to a hike we did this October at Rock Dunder, located in Eastern Ontario. We absolutely LOVE hiking in the fall, as it is cooler and you get to enjoy the beautiful colours of fall.

On all of our hikes, I stop and take A LOT of photos so I needed a two-page spread to showcase the beauty of this location. To start, I went through my photos and added several to my favourites folder on my iPhone. From there, I imported them into one of the most used apps on my phone – Snapseed. I just love editing my photos in this app, mind you with my new iPhone Pro 13 the photos are pretty incredible as is!  

Once the images are edited I import them into Photoshop and I have templates to fit the boxes in the Happy Planner layout. I have ones for one box, two, etc. depending on the photo I want to add. I then print them onto photo paper with my Xerox printer and cut them out with my paper trimmer.

The best part is starting to create my layout and figuring out how I want to show the ‘story’ or memory. For this spread, I used two pages for one day rather than the traditional weekly spread that is in the Happy Planner. I used photos, paper, stickers, etc. to cover up the dates and the calendar and notes sections. I started on the right and finished that page before starting on the left page, I do however layout the images on both pages before starting to adhere anything down.


I use double-sided tape to adhere everything for the most part, as the paper isn’t very thick so I didn’t want it to warp. I used several of the NEW and awesome products including, Memory Keeping Essentials Dies, This & That Stamps, Creating Memories Stamps, Tall Alpha Stamps, Sweet Summer Ephemera Pack, and the two new sticker packages - Noted Tabs and Mood Circle Stickers & A5 Label and Banner Sticker Sheet.

I also paired the new release with some goodies from previous releases: Paper Plane Pals (Panda), You’ve Got Mail (mushrooms), Woodland Critters (acorn, leaf), Butterflies  (mushroom)  Spring Blooms Dies (leaves) and the Sweet Summer 6x6' Paper Pad.

For the journaling, I use my Micron 05 black pen, I am particular with the pens I use as I like a nice thick line. I stamped with various inks including oxides - please note that most inks will show on the other side of the page on this particular paper. I also used Distress Oxides to colour the edges of the pages.


Thanks for stopping by, I hope that this helps inspire you to give memory keeping a try! Don't forget you can get 10% off at the T4T store using my discount code – T4TANNALISA10.


New Release Blog Hop and Giveaway!

Hello, Tea Timers! 

It is NEW RELEASE time! and we want you to celebrate with us by joining our Blog hop and Instagram hop for a chance to win a giveaway

Make sure you hop along with us for lots of inspiration as well as a chance to win a £30 voucher to the Time for Tea shop! To participate, leave a comment on each of the DT members' blogs. We are also doing an Instagram hop, so make sure you check that out too!


Here is the complete blog hop list, see you there!:

Annalisa Boccia

Jane Taylor

Jayne Vaughan

Lindsey Turner

Natalia Neila

Natalie Seddons

Silvia Galloni


A random drawing will determine our winner* and will be announced right here on the T4TD Blog & IG stories on Friday, the 5th of November.

*one winner will be drawn from the blog and IG hop participants

Thursday 28 October 2021

Sending You Love

Hello crafty friends and welcome to my latest post for Time For Tea Designs. This week I've created a fun box card.

 
For this card I used the You've Got Mail Stamps & You've Got Mail Dies. I coloured in all the images with Copics Pens and added some highlights with a white pen. I created my box die with mint card and added some grass using the Landscape Edges Dies. I used the Scene It Stencil to create the sky along with some Salvaged Patina Distress Oxide Ink. I added the stamped & die sentiment to the front of the box with foam pads. I finished by adding some bubbles onto the back panel.


Dont' forget you can use my discount code T4TKITTY10 to get 10% off your next order on the Time For Tea website.

Kitty xx

Have a howling good day

Hello crafty friends and welcome back to the Time for Tea's blog! Silvia's here today with a new card.

I started cutting a rectangle from white cardstock and creating my background on it. I used hickory smoke Distress archival ink to stamp musical notes all over the cardbase and I darkened edges ink blending black soot Distress Oxide ink.

Next I die cut another panel using the smallest die from the "Slimline Scallop Nesting" set, I ink blended it with milled lavander, victorian velvet and seedless preserved Distress Oxide and I splattered with clean water,  picket fence Distress paint and empty tomb Distress mica stain.

I stamped the dog pack image from the "Dog Gone Mutts" stamp set, I colored it with alcohol markers and I cut it with coordinating dies

I then heat embossed in white one of the sentiment from the stamp set on black cardstock, I put everything together and that's my finished card.


It's all for today. Thank you so much for stopping by and don't forget to come back here tomorrow to discover the amazing new release....you're gonna love it!!!

I wish you an amazing day and remember that you can have a 10% off your Time for Tea order with my coda, T4TSILVIA10.

Big hugs, Silvia,

Wednesday 27 October 2021

Snappy Before Coffee

 Hi Everyone!

It's Jane here today with a fun and bright card.


I started by creating my background using papers from the Sweet Summer pad. 


I then stamped, coloured and die cut the images from Snappy Before Coffee and arranged them into a little scene on the card front. The greeting is also from this stamp set.

I hope you like my card using this awesome stamp set and pretty papers. If you'd like to purchase any items from T4TD you can get 10% off by using my code - T4TJANE10.

Thanks for looking today. 

Stay safe and keep crafting!

Jane
x

Tuesday 26 October 2021

Because adulting is hard!

Hello Tea Timers, Claudia here to talk about coffee, one of my great passions.... And as a lover of this drink I created this slimline postcard full of cups, coffee beans and joy, like the one that gives us the smell of coffee every morning


For this card I used the set  Coffee Lover   with many adorable elements . for the structure I used the die cutters Slimline Postage Stamp


 I created the background by blending distressing and spraying drops of color to create contrast, and to give more emphasis to the sentiments, I used white embossing powder on black cardstock. I hope you like it!!! 
See you next week for a new inspiration , and don't forget to use the code T4TCLAUDIA10 to get a 10% discount in the shop!!!

Clean and Simple Fall Card: Hogs & Kisses

Hey everyone, Lien here. Today I am sharing this card on the Time For Tea Designs Youtube Channel. I am featuring the Hogs & Kisses stamp set from Time For Tea Designs. For this card, I tried to feature some fall/ autumn themed colors in a CAS card. I hope you like it xxx 


You can click HERE to watch on the Time for Tea Designs Youtube channel.


I started by coloring one of the pigs from the Hogs & Kisses stamp set from Time for Tea Designs using my copic markers (listed below). Afterwards, I used the matching dies to cut it out. 


For the background, I took an A2 sized panel, after masking off an area using purple tape, I used my distress inks to create a gradient background. Afterwards, I white heat embossed the sentiment on top of this gradient. 


As everything was prepped, I adhered it all together on a card base. I finished the card of using some Teardrops and glossy accents. I hope you like the card!


Thinking of buying some T4TD supplies? With T4TLIEN10 you will get 10% of your order at Time For Tea Designs! Happy shopping xxx 


Supplies:
  • Time For Tea Designs - Hogs & Kisses
  • Time For Tea Designs - Hogs & Kisses Die
  • Mama Elephant - Basic Rectangles
  • Transotype: Perfect Colouring Paper
  • Gina K. Designs Amalgam Ink Obsidian 
  • Versamark Clear Embossing Ink
  • Distress Inks: Wild Honey, Fired Brick, Aged Mahogany
  • Copic Markers: E13, E11, E01, E00 / G00, G000 / BG78, BG96, YG17, YG03, YG00 / E77
  • Ranger Embossing Powder: White (super fine detail) 
  • Ranger: Glossy Accents
  • Black Glaze Pen
  • Little Things from Lucy's Cards: Teardrops
  • Thin Foam Squares from Scrapbook Adhesives
  • NUVO Deluxe Adhesive
  • Pritt Adhesive Roller

Monday 25 October 2021

BIG HUGS and alcohol inks

 Hello, Tea Timers! 

It is Natalia here. I hope your weekend was as awesome as mine! I went to the Stamperama craft show up in Harrogate and had the best time! It was so great to meet Jo and Ant as well as Natalie and Jayne from the design team - we even did some crafting together! 

Now, let's talk about today's card! I took my alcohol inks out, which doesn't happen often, and made a few backgrounds with them. This rainbow coloured one was my favourite of all! and thought it would go so nicely with the 'big hugs' sentiment die.

The colours I used were: 

  • Rosewood
  • Dandelion
  • Clover
  • Glacier
  • Boysenberry
  • Sterling alloy for some shine


I certainly require more practice with these inks, and I should probably watch more videos on how to use them, but the main thing is that I had soooo much fun just playing with these - it was great! Watching the colours move is fascinating. I would recommend watching Jennifer McGuire's videos on alcohol inks for ideas. 

The big hugs sentiment die cut is a die I love because it is the right size to fill up your A2 card panel and it has a drop shadow (a must for sentiments in my books!). 

I die cut it from white cardstock 3 times, for dimension, and for the upper layer, I inked up some white cardstock with my WOW embossing pad and added some Catherine Pooler Halo embossing powder - it is soooo shinny! I love it. I then die cut the word HUGS from it, ensuring that only half of the letters had the embossing on it. I repeat the process with the word BIG and mounted all my letters together. 

Next, to ensure each letter was straight on the back shadow, I created a guide template: I die cut the BIG HUGS and shadow dies together, and used the openings as a guide to glue down my letters onto the vellum shadow.

I added a few sequins and gems and that completed my card!


I love how it turned out, it is so colourful and happy! I hope you do too. 

For a 10% off the Time for Tea Designs shop, use the code T4TNEILA10

Sending hugs,
Natalia


Sunday 24 October 2021

Celebrate (its your birthday)

 Good afternoon Teatimers,

Who loves a shaker? I know I do!. Today I'm sharing this adorable shaker card made using the cute Sundae Sweeties stamp set


To start I coloured my images using my Spectrum Noir markers (colours listed below in order of lightest to darkest)

Cat  - BG1, BG3, BG5,  BG6 

Mouse - EB1,  EB2,  GB8 

Cone - LY2, LY1, LY3, GB1

Ice Cream  - GT1,  GT2,  GT3 

Cream - FS5, TN1, Blender 

Cherry - DR4, DR5, DR7 


To create the background I trimed a piece of white card to C6 size and used the Bokeh Bubble stencil  and distress inks in Abandoned Coral,  Cracked Pistachio and Lucky Clover.

To create the shaker I cut a frame  from Smile Scalloped Frame Die and added a piece of acetate to the back. I used 1 layer of shaker tape to the back of frame,  added a sequin mix to the centre and carefully added the stencilled panel to the back.

The whole panel was added to a piece of coordinating card and adhered to a 5x7 card blank trimed down to size.

The critters were placed onto the front of the panel and the celebrate from the Large Scalloped Frame Die was die cut and layered 3 times for dimension. I finished off by masking the sentiment stamped from the Pandamonium set leaving the it's your birthday part onto black card and embossing with white power.

Thank you for joining me here on the blog today,  don't forget to use my code T4TLYNDSEY10 for 10% off your order in store.

Enjoy the rest of your weekend Lyndsey,x

Saturday 23 October 2021

Celebrating Time For Tea and Simon Says Stamp with a Blog Hop and Giveaway


GIVEAWAY ALERT!

Hello everyone and happy Saturday! We are so excited that our products are now available in the US over at Simon Says Stamp! To celebrate this, we have some North American-based designers helping us spread the news with a blog hop. Be sure to hop along with us to see some adorable creations with a few of the new Time For Tea products that are now available over at Simon Says Stamp! We hope that you will be inspired along the way. 

We would love to give you the opportunity to get some fun Time for Tea products for FREE, that’s why we are giving away $30 in T4TD products from Simon Says Stamp! Be sure to leave a comment on EACH blog as you hop along with us to enter this giveaway. A random drawing will determine our winner and will be announced right here on the T4TD Blog on October 30, 2021.


Happy Winter Birthday!


Happy weekend Teatimer's it's DT member Natalie here with a winter birthday card. I just love the Winter Wreath set it's such a beautiful design and works so well on it's own or combined with the critters. To get started here's a list of materials I used.
 

· Winter wreath stamps and dies

· Salvaged Patina and Evergreen Bough Distress Oxide Inks

· Distress Oxide

· Autumn Scene Cover Plate Die

· White Fun Foam

· White and Red Cardstock

· Copic Paper

· Copic Markers

· Ink - Blending Brushes

· White Wow Embossing Powder and Embossing Ink

· Cosmic Shimmer Glue

How to Create

1) Cut out the Rectangle Die from the Autumn Scene Cover Plate Die from the white cardstock. Blend the Salvaged Patina all over the card stock and add Evergreen Bough Distress Oxides on the edges. Spritz water on top and dab off with tissue paper. Dab some of the oxides onto a paint palette and add water to add some splatters of colour. Leave to dry.

2) Stamp out the Winter Wreath stamp twice, three of the acorn leaves, two acorns, the trio of toadstools, one flower and the leafy branch onto Copic Paper. Colour with the Copics and Die cut out with the coordinating dies. Snip off the top of one of the wreaths halfway up at each side.

3) Using the wreath as a guide stamp and heat emboss the Happy Winter Birthday sentiment onto the ink blended card stock.

4) Stick on the full wreath around the sentiment with the cosmic shimmer glue. Cut out the fun foam using the coordinating die for the wreath and stick to the back of the half wreath using the cosmic shimmer glue and cut off the excess. Then stick this on top of the wreath using the glue. Sticking the trio of toadstools underneath.

5) Adhere the leaves onto the edges and the big acorn and acorn leaf onto the wreath. Then pop up the acorn at the bottom and the flower at the top of the wreath using some of the fun foam.

6) Pop the finished up piece onto the red card stock around 120cm x 150cm and adhere straight onto your card base.

I hope you like my tutorial for today I thought I'd try a different method so let me know which style you prefer. If you want to recreate my card or get anything in the Time for Tea shop you can get 10% off your Time for Tea order using code T4TNATALIE10 . Happy shopping and I'll catch you same time next week!

Friday 22 October 2021

Tips For Quick Card Making! | With HandmadeByTasha

 Hey Crafty People!

It's Tasha, and I'm sharing some of my favourite tips for quick cardmaking!


This cute card came together in no time at all, thanks to several tips that I love to follow. You can check out my video here:


I hope that you enjoy my video and that these tips will help you create adorable cards quickly & easily!


Thanks so much for spending this time with me!

I hope you like my card and feel inspired to stretch your own supplies!

Have a lovely, happy, safe & wonderful week!!!

Stay Crafty!

Byeee!

HandmadeByTasha

Bunny Hugs Enclosed


Happy Friday! DT Annalisa here, for my latest card, I have used several Time For Tea Designs goodies that were released this past winter and spring. With so many beautiful new stamps being released, I enjoy giving some love to my older sets!


To start, I cut a panel from some white cardstock with my A2 Layering dies. I stamped the Plaid Background Clear Stamp Set with some dark teal ink onto this panel. I stamped it several times using my MISTI to get a good impression as this is a larger stamp.

I then stamped the clouds from Paper Plane Pals, the bunnies from Blooming Bunnies and the little envelope from the Happy Mail Critters Digi Stamp Add On Collection - I love that T4T has digis that are free for everyone to use. I cut out the images after colouring them with my Copics.

I stamped the sentiment from the Be Kind Be You stamp set and coloured the word 'hugs' using Prismacolor coloured pencils. I then adhered the elements of the scene using liquid glue. To complete the card, I glued some white fun foam to the back of the panel and glued this to an A2 card base. 


I hope you like this card and would love it if you could use T4TANNALISA10 for 10% off your order the next time you purchase anything from Time For Tea Designs.

Thursday 21 October 2021

Cutie Driver

Hello, DT Kitty here. It's my turn today to share my latest card. I decided to make a cute scene with some different ink combos and of course some cute critters had to feature...


I always love using pink and green on cards and actually it does blend together quite nicely. I created the background first by blending Kitsch Flamingo, Spun Sugar and Twisted Citron Distress Oxide Inks. I splattered the background with some white ink and some water. I used the clouds dies from the Landscape Edge Dies to create the clouds which I cut from white card and vellum. I used the road die from the Slimline Hillside Scene Dies to create my road. I used the You Are Awesome Sentiment Dies to create my sentiment. I used the Car Critters Stamps & Dies (also sold separately) and coloured in the images. I popped them onto foam pads along with the sentiment and added them onto the card. To finish I added a few gems and sequins.


Supplies;
Time For Tea Designs Stamps - Car Critters
Time For Tea Designs Dies - Car Critters, You Are Awesome, Landscape Edges, Slimline Hillside Scene
Distress Oxide Inks - Kitsch Flamingo, Spun Sugar, Twisted Citron
Hero Arts Ink - Unicorn White
Coloured Card & Vellum
Gems & Sequins


Don't forget you can use my DT code which is T4TKITTY10 to get 10% off your next order at Time For Tea Designs.

Thank you for joining me today, I will be back soon with another creation.

Kitty xx

Have a brew-tiful day

 Hello Tea Timers! Silvia’s back with a new coffee themed card!

I started die cutting one of the beautiful dies from the “Square Label" set from watercolor cardstock and I colored it with vintage photo Distress spray stain and walnut stain Distress oxide spray.

I then blended some ground espresso Distress oxide ink through the “Coffee Beans" stencil, I splattered with water and I covered droplets with vintage photo Distress embossing glaze and I heat embossed them. 

I also splattered with picket fence and antique bronze Distress paints.

I stamped images from “Coffee Lover" and “Snappy Before Coffee" stamp sets, I colored them with alcohol markers and I cut them with coordinating dies (here and here).

I next cut a rectangle from “Sweet Summer" patterned paper pad and I put everything together.

That’s all for today, I hope you’ll like the card.

Thank you so much for stopping by and don’t forget you can get a 10% off your Time for Tea order with the code T4TSILVIA10.

Hugs, Silvia.


Wednesday 20 October 2021

Dog Gone Mutts - A CAS Card

 Hi everyone!

It's Jane here today with a sweet and simple CAS card using the awesome Dog Gone Mutts stamp and die set.


I started by choosing a strip of paper from the Brighter Days pad and then stamped and coloured up the dog house and bowl from Dog Gone Mutts in matching shades.


Don't you just love this dog having a good old scratch? I think I was channelling a Golden Labrador when I chose his colours.


I used the matching dies to cut out the images and sentiment and popped the dog and kennel up onto foam pads.

Thanks so much for looking today. Stay safe and keep crafting!

Jane
x

Tuesday 19 October 2021

Animals Alpha

   Hello Tea Timers, Claudia here with a new inspiration.  Today I'm happy to show you my Alpha Animals , I really liked the idea of building a game for children by combining the die set Anthony's Alpha to the figures of the various stamps with the sweetest animals and here is the result . 


To make it, I die-cut the white paper base using Slimline Postage Stamp die set and the beautiful paper pad Sweet Summer paper pad  and Brighter Days paper pad


I had fun finding the little animals to create each letter.  I made some but now I have to complete the whole alphabet , I think it's a nice game to play with the kids on the weekend, don't you think? 


I hope you enjoyed my inspiration, I wish you a fantastic week and I remind you to use the code T4TCLAUDIA10  for your purchases in the shop, you will have a 10% discount.

Other Posts You Might Like