Pages

Saturday 30 July 2022

Get Well Soon Whale Card

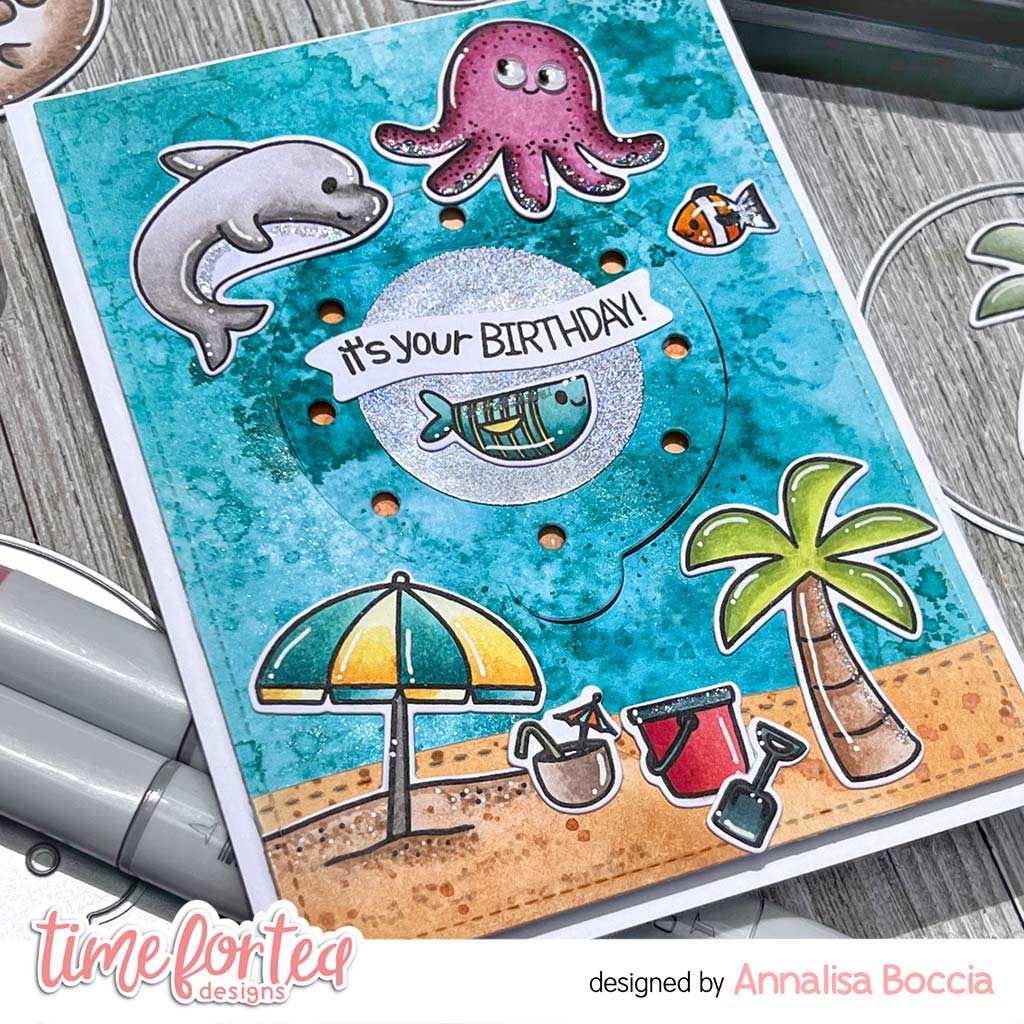
 Hi Vic here today and I am sharing a very fun video tutorial today. I am using the Get Whale Soon Clear Stamp Set for my images today.


In the video tutorial I show you how I inked up the background and made some shimmery splatters for a really pretty background. I am also showing you how I coloured up the whales. 


Here are the copies I used to colour the whales and images: 

BG000

BG02

RV52

RV55

R27

C3

R20

R22

I also used my memetic tuxedo black ink pad to stamp my images. 


I used the Get Well Soon Large Sentiment Die and I die cut this from some sparkly glitter card. 


I hope you enjoy the video tutorial. You can also save 10% off your oder using the code: T4TVICKI10 at checkout this includes the new release too. 


Have a lovely day,

Vic x

Friday 29 July 2022

Oh, Crab I Forgot!


DT Annalisa here, hello and welcome to a brand new release! The July release is full of sea creature stamps, sea-themed dies, and stencils that I love! I had so much fun creating several cards featuring all the goodies I received. I used the Fintastic Friends and Beach Buds stamp sets and the Porthole Lift the Flap dies for my first card.

To start, I used a stitched-rectangle die to cut down a panel of Distress White Heavy cardstock by Ranger. I then did some ink smooshing using Peacock Feathers Distress Ink. Once this was dry I used the medium-sized die in the Porthole Lift the Flap dies to cut out the center of the panel. I used the circle die in the set to die-cut two circles of silver paper which I glued to the inside and outside of the flap.

For the sand, I ink blended Rusty Hing and Dried Marigold Distress Ink onto cardstock and die cut it with both the stitched rectangle die and the Slimline Hillside Scene Dies. I added some splatter of Rusty Hinge Distress Ink.

I created an A2 card base from white card stock, ink blended some sand using the same colours as the outside and added some ink splatter and white dots for interest.

I stamped and coloured the images with Copics and then die-cut them with their coordinating dies. For interest, I added highlights with a white gel pen and some Lawn Fawn Prismaglitter using a Quickie-glue pen to some of the elements on the card.

I stamped and die-cut the sentiments and used liquid glue to adhere them to the top panel and the card base. I used foam tape to adhere the sea panel to the card base. I then glued down all of the elements to the top panel and card base using liquid glue.

This card took quite some time to complete but I really enjoyed the process. I just love working with Jo's adorable designs and bringing them to life on a card. 

Thank you so much for reading my blog post. Don't forget to use my discount code T4TANNALISA10 when you visit the Time For Tea Designs shop to get 10% off your order.

Pocketpage memorykeeping spread.

Goodmorning friends,
I hope you are doing well.
I am in love with the new memorykeeping collection, they are so versitile and I hope to inspire you with some different project in with I use the stamps.

For this page ma documented a day and used the linkerschouder paper collection to match with the stamps.


I really hope you like this page and can’t wait to see what you create with the stamps
Love Suzanne 


Wednesday 27 July 2022

Meow you doing?

Hey Tea-timer friends...

It's DT Ashlee here with you today and I have a new card I made to share with you all!!

I've created a card that was inspired by the inside of a home full of shelves and a perfect spot for kitty to relax...


I used these Time for tea designs products :

- Purrfect day stamp and die collection

- Purrfect day scene builder


To create the card I started with a minty aqua coloured cardstock base and die cut the window/added in the window pieces to make a window that could see the sky outside. 

I then die cut three wooden shelf panels that I adhered to the card base using foam tape....

I stamped, coloured and die cut the super cute images from the Purrfect day set so I could fill the shelves!! Kitty looks very happy up there on the shelf I think don't you?....

All the images were coloured using alcohol markers from Spectrum noir (tri-blends) and Altenew.


To complete the card I finished it off with a sentiment and some sequins for a little bling.

A nice comfy home with sunlight and a happy kitty!!

Thanks for stopping by the T4T blog today, I hope you enjoyed my latest card.
If you would like to do a little shopping at the T4T store here is a discount code for 10% off your order 
- T4TASHLEE10 -

Happy crafting, hugs Ashlee.

Monday 25 July 2022

Meowdy... Let's Hang Out!

Hello Tea Timers, it's DT Randy and I am back on the blog with a fun card scene that's somewhat of an extrovert vs. introvert type scene. I feel like with our friends, there's always one who loves to go out and there's the one friend who prefers to stay in and read a good book. I am definitely the latter unless food is involved!


Sets used:


I first stamped out my images and used the following Copic Markers to color them:


  • Cats: YR00, YR02, YR12, YR14, YR16
  • Books: RV21, RV23, RV25, YG21, YG23, YG25, BG11, BG13, BG15, Y11, Y13, Y15, R20, R22
  • Plant: V00, V01, V04


I then die cut the images using the coordinating die set. And set them to the side. I then took the Autumn Scene Cover Plate die and cut it out of white cardstock. I took the tree trunk and blended it with Antique Linen, Tea Dye and Vintage Photo. To create my tree, I used the same technique that I used in the "Build a Tree in Minutes" tutorial you can find here. I essentially use the grass die from the Landscape Edge die set and cut it out of cardstock in different angles. This time I used Twisted Citron, Mowed Lawn and Forest Moss to blend the tree. 


I took the Stitched Window Cover die and cut it out of white cardstock. I then used Uncharted Mariner, which has been my favorite new blue and blended it onto the window. I trimmed another piece of cardstock down to size and used a Cloud stencil I had in my stash to blend with Salvaged Patina. You can use the Slimline Scene Builder Stencil as well to create the same cloud look. 


To finish off my card, I stamped the sentiments onto pink cardstock using embossing ink and heat embossed it with White embossing powder. I used the coordinating dies to cut them out. I used liquid adhesive to adhere all the images to complete the scene and foam tape for the sentiments.


I hope you enjoyed this tutorial. I love creating these scenes as it is always fun to tell a story. If you liked any of the products that I used in this post, don't forget to use the code T4TRANDY10 at checkout for some savings. Have a crafty day!


Sunday 24 July 2022

Love is.......

Good afternoon Teatimers,

Well I finally managed to get to the cinema yesterday to watch the new Top Gun movie and it did not disappoint. So its only fitting that I share this cute cinema themed card with you today!


To start I stamped and coloured my images from the Movie Night stamp set using my Ohuhu Markers (colours listed below in order of lightest to darkest) and cut out using the matching dies.

Raccoon - CG020, CG050, NG03, NG06, NG07 

Bunny - RG110, RG120, RG150 

Seats - R1, R3, R4, R8, - NG03, NG06, NG07 

Blue Ice Cup - PB7, PB8, PB9

Popcorn - GY6, Y6, E220

Popcorn Bucket - B260, B64  PB4

Chocolate - BR1 BR3 - P4, P5


To create my background I started with an A6 size piece of white card and added a pattern with the Popping Popcorn 6x6 Stencil and distress ink in Twisted Citron. I then stamped the popcorn, ticket and drink images randomly around the panel. 


I stamped the sentiments onto black  ard and embossed in white before cutting out with the matching dies. I added my images to the center of the card, adding the sentiments below. 

The whole panel was matted onto red then black card before adhering to a 5x7 card blank trimed down to size.

Thank you for joining me here on the blog today, you can use my code T4TLYNDSEY10 for 10% off your order in store. 

Enjoy the rest of your weekend 
Lyndsey x 


Saturday 23 July 2022

Have a Beary Good Day!


Happy Saturday Teatimer’s it’s DT member Natalie here on the blog with this super sweet bear card. I haven’t been well the past few weeks so needed a quick card for my post for today. Luckily when I colour up my stamps I always stamp and colour about three out of each image and then I have some left for another project later on. 

These sweet bears are from the Bears Picnic Clear Stamp Set. It’s such a sweet set with four bears a picnic basket some little ants and picnic food. I’ve used it many times and still love it so much! 

As you can see I added two of the same stamp but just coloured them up in different ways. As I wanted it to look like two friends having a Frappuccino in the park and then flying their kites way up in the sky. 

The background was pretty simple to make too the Stitched Slimline Slope Dies make for quick easy backgrounds. I just inked up the inside with different Distress Oxides to give the impression of grass and sky. Great for when your in a rush! I did layer the frame twice to add some depth and dimension. 


 For the sentiment I heat embossed white onto black card. I love this technique as it makes the sentiment really pop. Then to finish off my card I added some details with my gelly roll pens just adding some dots of colour in the sky and grass and then little dots on the cheeks and some shiny black noses. 

I hope you like my card for today and if you want to pick up any of the products you can get 10% off in the Time for Tea shop using code T4TNATALIE10 ❤️

Step by Step tutorial: creating a background with a single image

 Hi Tea-Timers! Sorry this month’s tutorial blog is coming to you a little later than usual, unfortunately my own little teaspoon has been quite poorly (but is hopefully on the mend now!).


This month, we’re looking at how to create a card background using just one image. I love the bold, graphic look that this creates, and it makes for a fairly quick card, too!

First off, these are the supplies you’ll need:

  •           “Let’s Spoon” stamp set
  •           Wow Embossing Super Fine Bright White embossing powder
  •           Versamark embossing ink
  •           Heat gun
  •           Pistachio Green cardstock from Tonic Studios
  •           Neenah Classic Crest white cardstock, 110lb
  •           Black cardstock from Time for Tea Designs
  •           Scotch 3M foam tape
  •           Gina K Onyx Black Amalgam ink
  •           Copic markers (listed out below)
  •           X Cut non-stick scissors
  •           Tim Holtz guillotine
  •           Mini paper trimmer from Time for Tea Designs


Instructions:

  •           Cut a panel of white card to US A2 size (5.5” x 4.25”)
  •           Place your chosen image onto an acrylic block [TIP: stamp the image out a few times on some scrap paper first to make sure the stamp is seasoned and will produce a nice, crisp image! The first few goes with a stamp can be a little patchy!]
  •           Use some Copic-friendly ink to stamp the image on your page
  •           Stamp the image repeatedly over the page – I changed the direction of my image to help nestle the images together, and also to create a whimsical look. [TIP: have some images falling off the side of your page, too, as this creates a more cohesive background]
  •           Colour your images with your chosen medium. I used Copics for mine, and the colours I used are set out below:
          Avocado: G99 / YG67 / YG17/ YG23 / YG21
          Avocado stone: E29 / E37 / E35 / E33 / E31
          Avocado outer: E35 / E31
  •         You can choose to use the entire panel and place it straight on to an A2 card base, or trim it down and place it on a co-ordinating card base. I trimmed mine by just over ½” from each of the length and width (if you watch the video, you’ll see why!)
  •       Add the panel to your base with foam tape, then add the finished panel to a card base with tape runner.
  •           Grab some black card stock and dust it with anti-static powder. Stamp out your sentiment in embossing ink, then add white embossing powder over the top. Heat set with a heat gun.
  •           Add the sentiment to the card panel with foam tape.


This is such a good design to use with any small image, but I think the more graphic/clean the better – all of the images in the Let’s Spoon stamp set are perfect for this, but you can use any! I’d love to see what you create, so if you’re inspired by this, please do share your creations on social media and tag us so we can see!


Don’t forget to use discount code T4TJAYNE10 to get 10% off your purchase!

Have a wonderful crafty month... until next time!

Friday 22 July 2022

Circle Monotone Wreath


Hello everyone, DT Annalisa here sharing another holiday card featured in Papercraft Essentials Magazine in the UK in October 2021. For this circle card, I used the A5 Winter Wishes Wreath Stamp coordinating dies from Time For Tea Designs. I love the beautiful wreath in this set and decided to use them as the main design element.


Materials:

  • Circle Of Love Nesting Dies (these are no longer available but you could use the Simple Circle Dies)
  • Beautiful Blender Brush
  • Low tack Mint Tape from Scrapbook.com for creating a mask
  • Ranger Distress White Heavystock
  • Distress Oxide Inks  – Salvaged Patina and Peacock Feathers
  • Salvaged Patina Distress Spray stain
  • Heat tool and anti-static powder tool
  • Brutus Monroe Sterling embossing powder
  • VersaMark by Tsukineko embossing ink
  • Stickles Stardust and Ranger Inkssentials Enamel Accents White
  • Art Glitter liquid glue
  • Stamping platform - MISIT from My Sweet Petunia

Instructions:

  1. Dust cardstock with an anti-static powder tool, stamp the large wreath in embossing ink and cover it with white embossing powder and heat set.
  2. Use blender brushes to Distress Oxides and die-cut wreath with the coordinating die.
  3. Die cut a 5 ¼ diameter circle from white cardstock and dust with an anti-static powder tool. Use a stamping platform to stamp ‘warm winter wishes’ in embossing ink, cover with silver embossing powder and heat set.
  4. Use low tack tape to protect the sentiment and add a splatter of distress ink spray stain.
  5. Adhere wreath around the sentiment using liquid glue and add some Stickles and white accents.
  6. Create a card base by partial die cutting using the same circle die used to make the front panel.
  7. Adhere the decorated front panel to the card base with liquid glue.

TIP:  for a bolder/more intense splatter use a distress ink rather than an Oxide, even better use a spray stain!

Thank you so much for reading my blog post. Don't forget to use my discount code T4TANNALISA10 when you visit the Time For Tea Designs shop to get 10% off your order.


Wednesday 20 July 2022

Movies and popcorn

 Hey Tea-timer friends...

It's DT Ashlee with some new T4T inspiration for you!!

Here is the list of products I used for this card...

- Movie night stamp and die collection

- Popping popcorn stencil


To create this card I started with a yellow cardstock base which I covered using the popping popcorn stencil inked with distress oxide inks. I then stamped, coloured and die cut some images from the movie night set to create a little bunch of friends sitting watching a movie!!

I added a sentiment stamped directly onto the stencilled card base using black ink, one above and one below where I adhered the image. 

To complete the card I added a touch of sequins!!


Thanks so much for stopping by the T4T blog today and checking out my latest creation. I hope you enjoyed it and it inspired you to get crafty too!!

Happy crafting, hugs Ashlee.


If you want to do some time for Tea designs shopping of your own you can use my code T4TASHLEE10 for a discount off your goodies. 

Video: A Cozy, Hygge "Hello" Card!

Hi, Friends! Lauren here and I'm back with a new video tutorial on YouTube! This month I wanted to use colors that felt cozy or hygge along with the Purrfect Day stamp set. I stamped all of my images on alcohol marker friendly ink and colored them with Spectrum Noir Illustrator markers. I also made sure to pick colors that I thought would work well with the Gorgeous Gingham paper pack.

I used the Stitched Window Cover Plate to create a frame and windows for my scene and the "Hello" dies from the Hey Hello Hi dies as my sentiment. You can watch today's video to see how I colored and assembled my card!

Click the image below to start the video and make sure to leave a comment if you have any questions!


Here is a quick list of the Time For Tea Designs supplies I used and make sure to enter my code T4TLAUREN10 at checkout for 10% off your order!

Thanks for joining me today and see you next month!

XO. Lauren

Find me on my social media here!

Monday 18 July 2022

In the Clouds with the Cloud Dies

Hello Everyone, it's DT Randy and I am back on the blog today creating a scene exclusively around the Cloud Dies set. The cloud dies will allow you to create any fun cloud scenes, especially if you do not have a cloud stencil.


Sets used:
I first cut out a 3.25in x 5.75in card panel from white cardstock as I wanted to make a mini slimline card. I then blended Peacock Feathers, Salvaged Patina, Twisted Citron, Mustard Seed and Picked Raspberry Distress Oxides to create a bright and fun background. I then splattered white watercolor over the panel.


I then stamped out the Hot Air Balloon image from the Up, Up & Away stamp set and used the following Copic Markers:

  • Balloon: RV21, RV23, RV25, YG21, YG23, YG25, Y11, Y13, Y15, Y17, BG11, BG13, BG15
  • Critters: E000, E01, E11, C00, C01, C02, C03, C04


I then die cut the clouds from white cardstock. I first adhered the large clouds using liquid adhesive. I trimmed off the excess piece. Any excess piece, I decided to use on the opposite side of the card. This allows me to not waste any of the cloud pieces. Once I had the larger clouds on the card, i heat embossed the sentiment directly onto the card.

To complete the card, I used foam tape to adhere the image and the remaining small clouds.

I hope you enjoyed this tutorial. You can use any of your favorite blends for the background and the clouds will pair perfectly with it. If you like any of the sets that I used, don't forget to use the code T4TRANDY10 at checkout for extra savings!


Sunday 17 July 2022

Purrfect Day!

 Good afternoon Teatimers,

Hope you are enjoying the sunny weather and having a purrfect weekend.

I thought I'd share this cute kitty card with you today using the Purrfect Day stamp set. I wanted to give the feel the kitties were nesting in amongst the items on shelves maybe causing a little bit of mischief?


To start I stamped and coloured my images using my Ohuhu Markers (colours listed below in order of lightest to darkest)

Cats - CG020, CG050, CG070 

Vases - Y030, Y050, Y1 - PB9, MG060, B64

Leaves - GY2, GY42, GY43 - GY4, GY2, GY42


To create the wallpaper background I used the Tiger Stripes 6x6 Stencil with distress ink in Peacock Feathers onto a panel of A6 white card.


The "Shelves" were the Stitched Window Cover Die cut 2 twice from white card to give some dimension.

I added the kitties in and around the books and plants using foam pads and finished off with a few enamel dots.

The whole panel was added onto a 6x6 card blank cut down to size.

Thank you for joining me here on the blog today, don't forget you can use my code T4TLYNDSEY10 for 10% off your order in store.

Enjoy the rest of your weekend 

Lyndsey x 

Friday 15 July 2022

Mini Scalloped Slimline Winter Birthday Card


Hello everyone, DT Annalisa here sharing another holiday card that was featured in Papercraft Essentials Magazine in the UK in October 2021. For this card, (along with the other five I created) I used the A5 Winter Wishes Wreath Stamp Set. I just love the adorable mushrooms in this set and decided to use them as the main design element.


Materials Used:

  • T4T Slimline Scallop Nesting Dies - Lovely Friend
  • T4T Blender Brushes
  • Neenah 80lb card stock
  • Distress Oxide Ink  – Salvaged Patina
  • Soft Pool Hero Arts Shadow Ink.
  • Shimmer Spray - Silver Sparkle and a small paint brush
  • Heat tool and anti-static powder tool
  • Brutus Monroe Ultra Fine embossing powder in Icicle (clear)
  • Versafine Onyx Black
  • White Gelly Roll Pen10 by Sakura
  • Ink On 3 Blackout Detail Ink (alcohol ink friendly)
  • Inkadinkado Stamping mask paper
  • Copic Sketch Markers
  • Stamping platform - MISIT from My Sweet Petunia
  • Ranger Inkssentials Glossy Accents
  • Double-sided tape (3/8 inch)
  • Double-Sided Adhesive Foam Roll (1/4 inch)

Instructions:

  1. From white card stock, die-cut the smallest scalloped T4T die from the Slimline Scallop Nesting Dies - Lovely Friend.
  2. Dust this panel with an anti-static powder tool, stamp “happy winter birthday” in Versafine Onyx Black, and cover with clear embossing powder and heat set.
  3. Using the stamping platform, stamp the three mushrooms onto the panel to the right of the sentiment.
  4. Stamp mushrooms onto masking paper and cut them out right along the line. Place the mask on top of the mushrooms, the smallest mushroom needs its’ own mask.
  5. Stamp the mushrooms on top of the mask on both sides of the sentiment, after stamping down the initial mushrooms.
  6. Remove masks and colour mushrooms using Copic markers, then add highlights/dots using a gelly roll pen.
  7.  Stamp the small snowflakes above the mushrooms with shadow ink.
  8.  Add dots of white enamel accents.
  9. Apply a thick line of glossy accents and add glitter, tap off excess and leave to dry.
  10. Trim white cardstock to 2 15/16 by 6 7/8 inches and add Salvaged Patina Distress Oxide with blender brushes.
  11. Use a small paintbrush to add a splatter of Shimmer Spray - Silver Sparkle to this panel.
  12. Cut a card base from white cardstock to 3 1/8 by 7 inches and adhere the teal panel to this using double-sided tape.
  13. Use foam tape to adhere the scalloped panel to the rest of the card.

TIP: use a high-quality masking paper for best results, the mask can be used several times.


Thank you so much for reading my blog post. Don't forget to use my discount code T4TANNALISA10 when you visit the Time For Tea Designs shop to get 10% off your order.


Other Posts You Might Like