Pages

Tuesday 30 April 2024

Let's celebrate 🦊

Hello everyone! 

It's about time for me to switch from invites for a coffee to your 'regular' birthday card 😉 Time for tea has got numerous of perfect stamp sets do create a colorful happy birthday card to brighten up someone's birthday! For this card I chose to work with the Birthday Fox Clear Stamp Set. Stamped my images onto white cardstock and coloured them in with Copic markers. One reason I chose the foxes is because their beautiful true to nature colour orange combines with basically any other colour in my Copic stash. I went for aqua and pink accessoiries on the stamped images and love how they go together with orange!


Now I needed a background that would compliment all these bright colours on the stamped images and thought yellow would be perfect to create a happy ensemble. I die cut a circle and added distress oxides squeezed lemonade and mustard seed at the top, and tea dye with aged mahogany at the bottom. I used wild honey together with the Movie Star 6 x6" Stencil and added paint splatters to complete the circle. 


I adhered the background to a scalloped circle in white cardstock which would enable me to pick a paper with design. I rarely put 2 papers with design on top of each other - I find it too busy for the eye - but adding a plain divider such as this white circle helps me to calm it down. So I matched the pink and used a square die cut for the background panels. Adhered everything onto a white cardbase and now it's time for me to add the stamped and coloured images!

Using 3D foam tape enables me to create depth into the scene so the cake goes in front of the partying foxes. I stamped the sentiment onto the card, and added enamel dots (summer haze) as a finishing touch.

I love how colourful this card turned out, hope it puts you in de partying mood as well!


~Ilona~


Monday 29 April 2024

"The Sky's The Limit" with Using Diecuts as a Stencil

 Hi Tea Timers, welcome back to the blog. Today, I wanted try a technique where I would use cloud diecuts as a stencil. Normally, I would just adhere the diecuts onto the panel but wanted to have the positive space of the clouds onto the card panel. I thought this would be a simple but effective technique.

Sets used:

(Coordinating die set available here)

I first stamped out my images and fussy cut them out. The only image that I really had to color was the panda's scarf, which I used Copic Markers to color it. Coordinating dies are available as well but I decided to fussy cut them out.


I then die cut out the clouds from cardstock, several times. I used low tack tape to adhere to the back of the diecuts and then placed them around the A2 Panel.

Once I had the clouds in place, I carefully blended Abandoned Coral, Carved Pumpkin, Scattered Straw, Twisted Citron and Salvaged Patina Distress Oxides onto the Panel.


Once completed, I removed the clouds and splattered white watercolor over the panel. 

I arranged how I wanted my images to go onto the panel and then decided where to stamp the dashed lines onto the panel. I used a stamp platform to stamp it onto the panel with black ink.


I also decided where I wanted the sentiments to go, in the clouds and stamped them using black ink. 

Once complete, I added my images using liquid adhesive as well as foam tape. I thought it would be nice to die cut out more clouds and add them using foam tape to give it a layered look.

I hope you will try this technique as well if you have yet to try it. All the items that I used are linked above. Don't forget to use the code T4TRANDY10 at check for some savings. Happy Crafting!

Friday 26 April 2024

Warm Hugs in a Mug


Happy Friday, DT Annalisa here! I tried no line colouring in today's card, I love the look of it, but it is a technique that I find quite tricky, since you have no dark outlines, you must create contrast in the right places to get the right look. 

I ink blended Simon Says Stamp Khaki Ink for the background over the Coffee Beans 6 x6" Stencil using my Beautiful Blender Brush onto white cardstock. I removed the stencil and used a lighter hand and what was left on my brush to fill the white areas. I added brown splatter with a paintbrush, water and Khaki Ink.


I die-cut the ink-blended panel with a stitched rectangle die and then used double-sided tape to stick it to an 80 lb Neenah Desert Storm card base ink-blended with vintage photo Distress Oxide. 

I used salvaged patina Distress Spray Stain on the smooth side of Distress Watercolor Cardstock by Ranger. Once it was almost dry I sprayed water using a Distress Sprayer that filled in the white spaces with a pale teal colour. 


I die-cut the teal panel with the Warm Hugs Large Sentiment Die. I ink-blended another piece of Neenah Desert Storm with vintage photo Distress Oxide and die-cut it with the same die. I glued the two die-cuts together slightly offset to create a shadow.

I stamped elements from Let's ChatPumpkin SpiceWarm Hugs and Get Whale Soon with Ink on 3 fadout No Line Coloring ink. I coloured them with Copics, cut them out with their coordinating dies and added white gel pen accents with a Gelly Roll Pen


I adhered the images and the sentiment to the card base using double-sided foam tape for dimension.

I added teal and pink sequins from the Candy Christmas Squin Mix from Pawsome Stamps using liquid glue to complete the card.


Thank you so much for visiting my blog post, be sure to use my discount code T4TANNALISA10 when you visit the Time For Tea Designs shop to get 10% off your order.

Wednesday 24 April 2024

hello....

Hey there Tea-timers...

DT Ashlee here with some clean and simple inspiration for you this week.  

I used these Time for Tea designs products :

- Hey, Hello, Hi dies

- Flirty flowers cover die


To create this card I started with a white card base. I then die cut the cover plate from white card stock also and adhered that to the card base. I then die cut the two sentiments Hi and Hello before adhering those to the card base with foam tape giving the card some dimension. 


The card was completed with a touch of pretty sequins adhered with glue dots (these are so good for adhering sequins). 

That's all for my card today, a nice easy one to mass produce for lots of hello cards!

Until next post, happy crafting. Hugs Ashlee.

Tuesday 23 April 2024

Let's hang!

Hello! 

Ilona here on the T4T blog! I'd like to share a card today which made me smile while making it, because of the cute sloths and the happy colours! I hope it'll make you smile too :)

As usual, I started with stamping and coloring my critters. These are the sloths from the Be Slothy Clear Stamp Set. After coloring, I used my Scan 'n Cut machine to cut them out.

I stenciled a tropical background with Distress Oxide colors Squeezed Lemonade, Twisted Citron, Mowed Lawn and Rustic Wilderness onto a Simple Nesting Dies - A6 panel. 


I adhered this panel onto a slightly larger panel in pink cardstock, and stuck those onto a scalloped bordered panel in bright orange. 

I made a sentiment with the Anthony Alpha Dies out of pink cardstock, and die cut another set in white. I adhered the pink letters onto the white and made sure a little white edge sticks out. This creates an illusion of shadow and helps to create contrast between the letters and the background.


I adhered the sentiment with plain glue, and added the sloths using 3D foam tape. Last but not least I added orange Time For Tea Designs Designer Enamel Dots from the 'summer haze' collection.


Thanks for hanging out with me at the blog :)


Monday 22 April 2024

I'm QUACKERS About You!

 Hi Tea Timers, welcome back to the blog. I finally got my hands on the Lucky Ducks set and I had to create a card immediately. I wanted to create a scene where 2 ducks meeting each other at the pond.

Sets used:

I first stamped out my images and used the coordinating die set to die cut out the images. I then used Copic markers to color them. Once I completed coloring the images, I set them to the side.

I then took an A2 panel and blended a cloud stencil with Kitsch Flamingo and Scattered Straw Distress Oxides.


I then created my pond and grass parts by cutting out a hill piece and a grass piece with the landscape dies. For the pond, I blended the hill piece with Peacock Feathers and Salvaged Patina Distress Oxides. I splattered this piece with white watercolor.

For the pond piece, I took an x-acto knife and cut a slit in the middle of the piece off to the side. I wanted to fit my duck in this piece.

For the grass piece, I blended it with Twisted Citron and Mowed Lawn Distress Oxides. I also splattered this piece with white water color.

For the sentiments, I die cut out the word 'love' from gold cardstock. I then heat embossed the stamp sentiment onto teal cardstock with white embossing powder. I took the coordinating die to cut it out.

To assemble my card, I adhered the grass piece and then the pond piece behind it. I then adhered the stamped grass pieces behind the pond pieces. 

I then added the duck into the little slit that I cut in the pond. With the second duck, I adhered it with foam tape. 

I finished my card by adding my sentiments to the top of the card with liquid adhesive.

All of the items I used today are linked above. Use the code T4TRANDY10 at checkout for extra savings.


Saturday 20 April 2024

Summer birthday with Kaja

Hi all,

It's Kaja from Kajcyika crafts and today I am back with an adorable card that was inspired by the heat wave that we had in Slovenia last week. It really felt like it was already summer!

Take a look:


I love summer and I knew that I wanted to create a subtile sea in the background, so I started by inkblending some blues and greens into a piece of white cardstock. Once it was all nicely blended, I took the hearts from the A2 Stitched hearts cover die and die cut 4.

To add the wavy effect, I added some white gel waves with the help of Beach scene builder stencil that I used as a guide.

Next, I stamped out and colored a bunch of images from the Beach buds stamp set. I made sure that I used the colors that I knew would nicely coordinate with the blues in the background.


Then, I cut down a piece of striped paper from the Sweet summer paper pad. I trimmed it down to be the same size as my card base. To create a focal point, I used a slightly smaller rectangle, on which I glued down the hearts.

I stamped out the sentiment from Beach buds stamp set in black ink on a piece opf gray cardstock and this time I decided to go with a simple 'It's your birthday'.

I glued everything on the square card base using double sided foam squares and liquid glue.

Hugs,
Kaja

Friday 19 April 2024

Thanks for Everything


Happy Friday, DT Annalisa here! Today, I share a bright spring thank you card that features the Darling Daffodils and Bold Sentiments stamp sets from Time For Tea Designs.

For the background, I ink-blended black soot, chipped sapphire, picked raspberry, spiced marmalade and squeezed lemonade Distress Oxides with my Beautiful Blender Brushes. I added white splatter with a paintbrush, water and white watercolour paint.


Once the panel was dry, I die-cut it with the Sweet Scalloped Dies. I adhered this panel to a 5 3/4-inch by 4 1/16-inch white card base.

I ink-blended twisted citron and rustic wilderness onto white cardstock. I die-cut this panel with the largest Sweet Scalloped die and the Slimline Hillside Scene Dies. I added white splatter with a paintbrush, water and white watercolour paint. I used liquid glue to stick down the grass border to the card base. 


I stamped and coloured (with Copics) several images from Darling Daffodils and cut them out with their coordinating dies. I added white gel pen accents with a Gelly Roll Pen

I stamped 'thanks for everything' from the Bold Sentiments stamp set and die-cut it with the coordinating die set.

I used liquid glue to stick the images and sentiments to the card base to complete the card. 


Thank you so much for reading my blog post. Remember to use my discount code T4TANNALISA10 when you visit the Time For Tea Designs shop to get 10% off your order.

Wednesday 17 April 2024

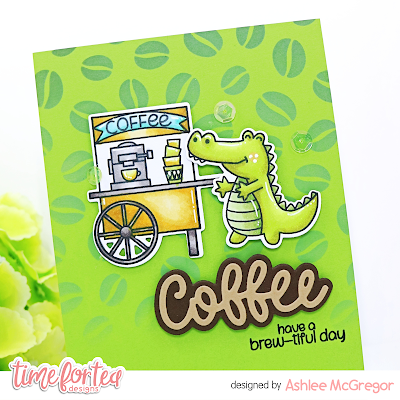
Snapoy for coffee!

Hey there Tea-timer friends...

DT Ashlee here with some SNAPPY inspiration for today's Time for Tea designs card!


I used these T4T products :


To create this card I started with a green card stock base. I then added stencilling to it using the coffee bean stencil and green ink from Catherine Pooler. I die cut the coffee sentiment from brown card stock pieces before adhering to the card base with foam tape. Once that was in place I added the sub sentiment stamped directly onto the card base with black ink.

I stamped the coffee cart and croc for my card images. These were coloured using Spectrum noir tri-blend markers before die cutting with the co-ordinating dies!


To complete the card I finished it off with a touch of sequins.

What do you think of this snappy coffee card? I think it turned out a bit cute if I do say so hehe. Love that little croc waiting for coffee!

Thanks for checking out my card, happy crafting. Hugs Ashlee. 


Tuesday 16 April 2024

Happy engagement!

 Hello everybody!

There's has been a proposal!👰 Not to me, I married quite some time ago, but a co-worker of mine was proposed to by her boyfriend during a romantic getaway. Ofcourse I had to make a card to congratulate them. 

Time for Tea has got a clear stamp set especially for engagements, but I do not have this particular set in my stash, so I had to be creative on this theme. I scowered through my supplies and found the Stinkin' Cute Clear Stamp Set has got critters in there which, with a little bit of imagination, can be seen as a couple getting engaged 😃

So I stamped those and colored them with Copic alcohol markers. (And yes, brown skunks DO exist! I thought it would make the look somewhat 'softer' as I was going for a romantic warm sunset vibe). This time I fussy cut them out with my Cutter bee scissors. 


My next step was to cut a panel with the Simple Nesting Dies - A6 from white cardstock. I chose warm Distress oxide colours for my sunset sky background: dusty concord, abandoned coral and scattered straw. The ground has been made with tea dye and aged mahogany. 


For the sentiment I used Anthony's Alpha Dies on smooth white cardstock combined with the Simple Sentiments Clear Stamp Set. The word 'engagement' was heat embossed onto a strip of black cardstock.

I adhered the colored critters and the sentiment onto the panel with foam tape and adhered the entire panel onto a white card base with double sided tape.

Lastly I added some die cut hearts in black and gave the 'boyfriend' skunk a ring to offer to his 'girlfriend' skunk. The ring used to be a sweet from the Bearing Gifts Clear Stamp Set, which I trimmed down to a circle. 


Now isn't this a nice romantic scene? 😍

Hope the receivers like it as much as I do!


~Ilona~

Monday 15 April 2024

I'm A Sucker For You

 Hi Tea Timers, welcome back to the blog. DT Randy here with a card featuring a card with one of my favorite sentiments. Mainly because it's a lyric to one of my favorite songs. 


I wanted to create a background specifically for the sentiment and decided to use the lollipops from two sets.

Sets used:

(coordinating dies available here)

To create my background, I took Ann A2 card and stamped the images around the card. Once I had my background filled out, I set it to the side to decide on my color scheme.


I decided to go with a rainbow color scheme. Instead of hopping around the card with the different colors, I wanted to create a rainbow with lines of colors.

I used the following Copic Marker Combos for each line:

V01, V04, V05
RV11, RV13, RV14
R21, R22, R24
YR12, YR14, YR16
Y11, Y13, Y15, Y19
YG21, YG23, YG45
BG11, BG13, BG15, BG18

Once I had my background completed, I set it to the side to work on the sentiments.


I stamped and heat embossed the sentiments onto purple cardstock with white embossing powder.

I then die cut out the sentiments using the coordinating dies for them. I completed the card by adhering the sentiments onto the background, near the top with foam tape.

I hope you enjoyed this tutorial today. All of the items I used are linked above. Don't forget to use the code T4TRANDY10 at checkout for extra savings.

Saturday 13 April 2024

Celebration withxes and Kaja

 Hi all,

It's Kaja from Kajcyika crafts and today I am back with an adorable card with two little foxes!

Take a look:


I don't know about you, but I just love adorable little critters, so I decided to color two cure little foxes from Birthday fox stamp set. 

I decided to go with a traditional orange color in combination with gray and small white gel pen details. Since this is a celebration card, I added a cute little balloon that I colored in with green.


To create the background I used a Stitched hearts cover die and a piece of white cardstock. I wanted to have a bright scene, so I decided to create the center of the card using a rectange die from the same die set, but I used patterned paper from Brighter days paper pack instead of a normal cardstock.

Next, I added the sentiment from the same Birthday fox stamp set that reads 'let's celebrate'. I used black ink and stamp it out at the bottom of my little scene.

The last thing I did, was that I glued everything on a card base using double sided foam squares and liquid glue.

Hugs,
Kaja

Friday 12 April 2024

Let Your Dreams Take Flight


Happy Friday! DT Annalisa here with a new card to share that features the Love Is In the Air stamp and its' coordinating dies. I enjoyed colouring in all the cute balloons with my Copic markers.

To create this card, I started with a light blue card stock base that I die-cut with the Sweet Scalloped Dies and then Snow Flurry Cover Die to add texture. Next, I ink-blended the edges using my Beautiful Blender Brush, Surf, and Seafoam Pawsitively Saturated ink. I added silver splatter with a paintbrush, water and silver watercolour. 


Once the blue panel was dry, I adhered it to some silver dotted patterned paper that I glued to a 5 3/4-inch by 4-inch card base.

I stamped and coloured (with Copics) several images from Love Is In the Air and cut them out with their coordinating dies. I added white gel pen accents with a Gelly Roll PenI used a metallic silver marker to different patterns to the balloons. The sentiment is from Paper Plane Pals that I stamped and then cut out with the coordinating dies


I stuck the images to the card base using a combination of liquid glue and double-sided foam tape for dimension.

Thank you so much for reading my blog post, be sure to use my discount code T4TANNALISA10 when you visit the Time For Tea Designs shop to get 10% off your order.


Wednesday 10 April 2024

Meeoooowww!!

Hey there Tea-timers...

DT Ashlee here with some new T4T inspiration for you!

MEOOOOWWW...

To create this card I decided to choose a colour of card that I don't usually gravitate towards and that was orange. I then used the Pawsome prints stencil along with brown distress oxide ink to create a paw pattern/inked card base....


Using the You had me at MEOW sentiment die I die cut that from two different brown cardstocks before adhering together with liquid glue and adding to the card base using foam tape....

I added a couple cute little kitty faces by stamping, colouring and die cutting them from the Sweet cart critters set! These were adhered using foam tape also so that my card has lots of nice dimension!!

To complete the card in my usual style I finished it all off with a touch of pretty sequins. That's all for my card today, I hope you enjoyed this kitty themed card....


Until next post happy crafting, hugs Ashlee. 

Tuesday 9 April 2024

You, me and a cup of ....

Goodday everyone!

In case you haven't noticed yet, one of my favorite themes on a card is... coffee!
This week I'd like to show you another invitation to send out to someone.

I took my Takeout Coffee Cup Dies and ran them through my die cut machine using a vanilla cardstock. I added Distress Ink (Antique linen) to emphasize the shape of the cup. Used a nice chocolate brown for the coffee cup wrapper and topped it off with a pink heart. 


For the Coffee Sentiment Die I used light pink glitter cardstock and blueish aqua smooth cardstock. The 'you, me and a cup of' sentiment was taken from the The Perfect Blend Stamp Set, although I left out the 'tea' part 😉 I stamped it onto black cardstock with Versafine watermark ink and heat embossed it with white embossing powder. 

Using the Simple Nesting Dies A6 I die-cut a panel out of light pink smooth cardstock. With the Scattered Hearts 6 x6" Stencil and Distress Oxide (Picked raspberry) I stenciled on the background, making sure I'd fade out towards the edges by starting in de middle of the panel and not re-inking my brush when moving towards the edges. I think it makes the background more subtle and draws the attention to the center of the card, where the coffee cup and sentiment are going to be.


After my ink had dried, I assembled the stenciled panel onto a blue scalloped panel - matching the color to the one used on the coffee sentiment. 
I used 3D foam tape to adhere the coffee cup and sentiments onto the card base.
Lastly, I added some nice orange enamel dots, taken from the Time For Tea Designs Designer Enamel Dots (summer haze)


I hope this card inspires you to send out an unexpected invitation to a lovely person you'd like to share your coffee with!

All the best

~Ilona~


Monday 8 April 2024

You Had Me at Meow: Cat Background

Hi Tea Timers, welcome back to the blog. One of the large sentiment dies that I really adore is the "You Had Me at Meow" sentiment die. I wanted to create a cat background to pair with this sentiment.

For this card, I decided to use the cats from three stamp sets to create a fun cat background. I also added some accessories featured in this set to help fill out the background.

Sets used:

(Coordinating dies available here)

I first stamped arranged the cats onto an A2 card base and stamped them on using black ink. With any big, blank spaces, i took the same cats and stamped them again to fill out those spaces.

I then took some of the accessories featured in the stamp sets, such as the mouse, paw print, etc. and stamped them around the card as well.

Once I had my background completed, I used Copic Markers to color the background. 

Once I finished coloring my background, I set it to the side to start working on the sentiment.

I first die cut the sentiment from teal cardstock and then green cardstock. I then took the negative space and placed it on top of the background.

This is a good trick to helping you align the words as this sentiment die is not connected together. Once I had it where I wanted the words to go, I then added liquid adhesive and added in each letter to their respective spaces.

I hope you enjoyed this blogpost today. All of the items that I used are linked above. Don't forget to use the code T4TRANDY10 at checkout for extra savings. Happy Crafting!

Other Posts You Might Like