Pages

Monday 30 October 2023

Just One More Day Until "Trick or Treat"

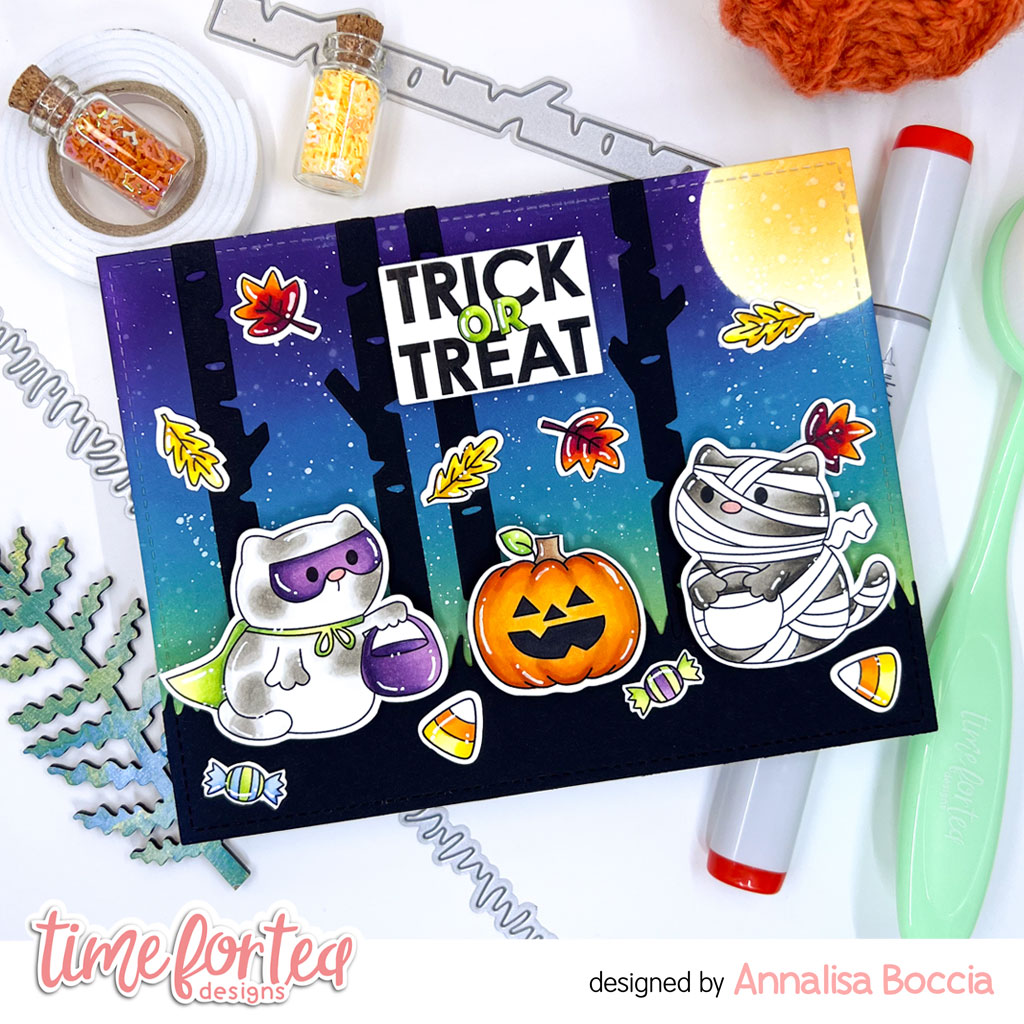
 Hi Tea Timers, welcome back to the blog. We are just one more day away until Halloween and I wanted to share one last card using the Trick or Treaters Digital Stamp set. This set has all that you need to help create a fun Halloween scene.

As it is a Digital stamp set, you will receive it immediately once you purchase it. All you have to do is print out out onto cardstock and color with your preferred art medium. I prefer to print using a laser printer as I like to use Copic Markers.


Sets used:

I printed out my images and fussy cut them. I used Copic Markers to color the images that I used in this card.

To create my background, I took an A2 panel and blended Black Soot and Weathered Wood Distress Oxides with the Tiled Wall Stencil. I left space on the bottom to just blend with Hickory Smoke.


I then die cut out the door and the steps with white cardstock. For the door, I blended Uncharted Mariner and Peacock Feathers. I trimmed down cardstock to fit behind the door and blended it with Mustard Seed and Scattered Straw.

I adhered the door and the steps first using liquid adhesive. I trimmed off the excess door. 


I then arranged where I wanted the pumpkins and trick or treaters to go and adhered them with liquid adhesive. To complete my card, I had a quote bubble die and used it to cut out the 'Trick or Treat' sentiment.

I hope everyone has a wonderful Halloween tomorrow. Enjoy the festivities and don't forget to check out all of the items I used linked above. Use the code T4TRANDY10 at checkout for extra savings.

Friday 27 October 2023

Time to Trick-Or-Treat


DT Annalisa here today! The kids will be trick-or-treating on Halloween in my area in just a few days! I created this nighttime trick-or-treat scene using the Trick or Treaters Digital Stamp Collection with the Haunted House clear stamp set. I love the ability to re-size digi stamps to what I need for my cards.

I ink-blended villainous potion, peacock feathers and twisted citron Distress Oxides onto Distress White Heavy cardstock by Ranger with my Beautiful Rainbow Blender Brushes. I splattered on water and Copic opaque white with a paintbrush. 


To mask the moon area for this scene, I added temporary adhesive to the back of the negative portion of one of the circles in the 
Circle Grid Masking Stencil. To colour the moon area, I used the outer section of the stencil for the mask and ink-blended squeezed lemonade and rusty hinge Distress Inks. 

I used the Winter Trees and Slimline Hillside Scene Dies to die-cut black cardstock. I used liquid glue to stick the trees and the grassy area to the ink-blended panel and glued this panel down to an A2 white card base.


I stamped and coloured (with Copics) several leaves from 
Jumping With Joy. I resized and printed several Trick or Treaters Digital Stamp Collection images and coloured them with my Copics. I added white gel pen accents with a Gelly Roll Pen to the coloured images. I cut out all the stamps with my Brother Scan N Cut SDX125e.

I stamped 'Trick or Treat' and die-cut it with one of the smaller A2 Layering dies. I adhered the images to the card base using liquid glue or double-sided foam tape for dimension. 


Thank you so much for reading my blog post, be sure to use my discount code 
T4TANNALISA10 when you visit the Time For Tea Designs shop to get 10% off your order.

Wednesday 25 October 2023

Ewe are the best....!!

Hey there Tea-timers...

It's DT Ashlee here and I think EWE are the best! I've got a new card to share using the super cute set Ewe are the best....


I used these Time for Tea designs products :


To create this card I started with a yellow card stock piece that I die cut from the stitched quilted cover die. I then used a blue card stock piece that I added blue inking too before die cutting from the wonky windows die. These two die cut panels were adhered together using liquid glue.

Using the scene builder die I die cut a bunch of cloud and sun elements before adhering those to the card base. 

I stamped, coloured and die cut two cute little sheepies before adding them to the scene jumping in the sky!


To complete the card I stamped and die cut the sentiment "Ewe are the best" and added a few pretty sequins!


 That's all for my card today, I hope you like it. Thanks for stopping by the blog. Happy crafting, hugs Ashlee. 

Monday 23 October 2023

Let's Make a "SPOOKY" Cute Card!

 Hi Tea Timers, welcome back to the blog. We are a little over a week away from Halloween and I have another Halloween Card inspiration featuring the Haunted House Clear stamp set.

I wanted to create a monochromatic card with a hint of color to get a spooky but cute feel for the card. 

Sets used:


I first stamped out my image and fussycut it out. I then used a mixture of Warm Grays and Cool Grays to color my Haunted House. 


I then took an A2 Panel and die cut out two hill pieces using the die from the Landscape Edge set. I blended the pieces with Black Soot and Weathered Wood Distress Oxides. I splattered both pieces with White watercolor.

Using another A2 Panel, I blended Chipped Sapphire, Uncharted Mariner and Black Soot Distress Oxides over the panel. I splattered this panel with white watercolor as well. I also die cut the tree from white cardstock and blended it with Black Soot and Weathered Wood. 


With the alphabet dies, I die cut the word "Spooky" using white cardstock. To assemble my card, I used a mixture of foam tape and liquid adhesive. 

I hope you enjoyed this blog post today and are working on some spooky cute cards! All of the items that I used for my card are linked above. If you make a purchase, use the code T4TRANDY10 at checkout for some savings. 

Friday 20 October 2023

Halloween Night Sky


Happy Friday, DT Annalisa here today. Halloween is quickly approaching, so I am sharing a spooky night scene card. This time of year it is always fun to create bold scenes with colours I rarely use for backgrounds like purple! I created this nighttime scene using the Trick or Treaters Digital Stamp Collection with the Haunted House clear stamp set. 

For the background, I used a circle mask in my stash and sprayed temporary adhesive to attach it to watercolour paper. I spritzed the paper with water and sprayed uncharted mariner Distress Spray Stain, I used my Ranger Heat It tool to dry the panel. Next, I added snow flurries Distress Mica Stain spray and once again dried this with my heat tool. I removed the moon mask and gently spritzed the side of the moon with water to create that 'spooky' moon look. I dried the panel with my heat tool, I find it is vital to dry the panel after spraying it with stains or water. I just love how mica stains really make things pop!


For the ground, I ink-blended villainous potion and black soot Distress Oxides. I then used a silver shimmer spray on top of this and dried it with my heat tool. I die-cut it using the Slimline Hillside Scene Dies. I created a 5-inch by 6 3/4-inch card base and used liquid glue to adhere the panels. I ink-blended squeezed lemonade and scattered straw Distress Ink onto the moon area. 

I resized the cat on the broom digi in Photoshop and printed it on Neenah Solar White 80 lb card stock. I stamped the sentiment and haunted house (I masked certain areas of the stamps to get the look I wanted). I used my Brother Scan N Cut SDX125e to cut out the images, coloured everything with my Copics and added white gel pen accents with a Gelly Roll Pen. I also used the Gelly Roll Pen to add stars to the sky.


I used liquid glue to stick everything down to the card base. I ink-blended black soot Distress Oxide to the edges of the card to complete it.  

Thank you so much for reading my blog post. Remember to use my discount code T4TANNALISA10 when you visit the Time For Tea Designs shop to get 10% off your order.


Thursday 19 October 2023

Sweet Birthday Wishes


Hey there, Tea Timers!!  It's Amanda here! I'm excited to be here with a birthday card using a combination of Birthday Cake and Love is in the Air.
For my background, I used the Stitched Quilted Cover Die, trimmed down to fit.

Next, I stamped my images and colored them in with Copic markers.  I die cut them out using the coordinating dies.

I, then, ink blended my background with Catherine Pooler's Tiara, Cummerbund, and All That Jazz inks.
Then, I adhered everything to my card base using 3D foam squares and liquid glue!


Isn't it just so sweet?  Here are some close-ups!

That's it for me today, friends!  Thanks for stopping by the Time for Tea Designs blog today!  See ya soon!


Wednesday 18 October 2023

Lost....

Hey Tea-timer friends..

It's DT Ashlee here with you today!

Who's ready for some more Time for Tea designs inspiration using the super cute set Happy trails?! This would have to be one of my most favourite T4T stamp sets, It's just so cute!


I used these T4T products to create this card :


To create this card I started with a blue card stock base (this would fill in the sky area) I then die cut the large sized frame from yellow card and went ahead and die cut al my pieces for the grass and road from the slimline set. 

Once all my pieces were die cut I adhered them all together using liquid glue and foam tape for the frame which created the scene. 

I stamped, coloured and die cut a bunch of images from the happy trails set and arranged them onto the card base. These were coloured using Spectrum noir tri-blend markers with added white pen highlights.

To complete the card a stamped sentiment and a small touch of pretty sequins!


That's all for my card today, have you got someone that you would be lost without that you could send a card like this too?!


Thanks for stopping by, happy crafting. Hugs Ashlee.

Monday 16 October 2023

"I believe in you... you are purrrfect!"

 Hi Tea Timers, welcome back to the blog. We are just 15 days away from Halloween and I thought it would be the perfect time to break out some of the Halloween sets. This card is more a fusion between Halloween and inspirational as it features the cute cat with a broom from the Trick or Treaters Digital stamp set.

Sets used:


I first printed out my image onto a Copic-friendly white cardstock using a laser printer. I find that laser printers work best when coloring with alcohol markers as the lines won't smear.

Once I printed out my image, I fussy cut the image out and used the following Copic Markers to color the cat: C-0, C-2, C-4, C-6, C-8, N-5, N-7, V04, V05, Y21, Y23, E23, E25.


To create my background, I first cut a circle from cardstock using one of the circle dies. I then adhered the circle onto an A2 panel using low tack tape. With the circle as a mask for the moon shape, I blended Saltwater Taffy, Worn Lipstick, Seedless Preserves and Villainous Potion Distress Oxides. 

I then splattered the panel with white water color to give it the galaxy/stars look. To create a cute paw print moon effect, I blended  Saltwater Taffy and Worn Lipstick Distress Oxides with the Pawsome Prints Stencil. With the cloud dies, I die cut them from white cardstock. 


I then arranged my clouds and the image of the cat onto to the panel to see where I could stamp my sentiment. Once I found the perfect position for all of the elements, I stamped my sentiments using black ink.

For the cat, I used foam tape to adhere it in front of the moon. For the clouds, I used liquid adhesive. I then trimmed off the excess for the bigger clouds and adhered it onto the opposite side of the card.

I hope you enjoyed this tutorial today. If you are in need of a new Halloween Stamp, check out this digital set linked above. Use the code T4TRANDY10 at checkout for extra savings. 


Friday 13 October 2023

Ocean Waves


Happy Friday! DT Annalisa here today sharing an ocean-themed card I created using several adorable stamps from Time For Tea Designs. I love how many ocean critters are available now in the T4T portfolio as making ocean-themed cards is one of my favourite things to do! 

I used the following supplies to create the card:


I created an inky ocean using ink smooshing with peacock feathers Distress Ink, water and some acetate. I die-cut the panel with the Ocean Waves Dies and set it aside to dry. For the sand, I ink-blended Kraft cardstock with Vintage Photo Distress Oxide. I also added brown splatter with a paintbrush. I die-cut the panel with the Landscape Edge Standalone Die.


I added white water colour splatter to the ocean and sand background sections. I used liquid glue to adhere the ocean and sand sections to an A2 card base.

I stamped and coloured (with Copics) several images from the stamp sets listed above and cut them out with their coordinating dies. I added white gel pen accents with a Gelly Roll Pen.


I added sparkles to sections of the images with a Quickie Glue Pen and Lawn Fawn Prisma Glitter. 

I adhered the images to the card base using liquid glue or double-sided foam tape for dimension.

I stamped the ‘wavin' hello!’ sentiment from Fintastic Friends and cut it out with the coordinating die. I added double-sided foam tape to the back and stuck it down to complete the card.


Thank you so much for reading my blog post. Remember to use my discount code T4TANNALISA10 when you visit the Time For Tea Designs shop to get 10% off your order.

Thursday 12 October 2023

You're Invited to Eat Cupcakes!


Hey there, Tea Timers!!  It's Amanda here! I'm excited to be here with you to share  inspiration using the Let's Party and Birthday Cake stamp sets!

To make this card, I started by stamping out the cake holders and bunny from the Let's Party  and the cupcakes from the Birthday Cake stamp set.  I colored them in with Copic markers and then die cut them out using the coordinating dies.

I created the layers using my paper trimmer and some scalloped dies.  I ink blended Catherine Pooler's Cotton Candy and Do-Si-Do inks for the background.

Here are a few more images!


That's it for me today, friends!  Thanks for stopping by the Time for Tea Designs blog today!  See ya soon!


Wednesday 11 October 2023

Calorie free....

Hey there Tea-timer friends....

It's DT Ashlee here with you today and for today's card I'm sharing a birthday card with calorie free cake, yep thats right birthday cake is calorie free did you know?! 


T4T products used for this card....


To create this card I started with a blue card stock base. I then die cut the lets party sentiment four times from a darker blue card stock so that I could glue them to the card base creating a bit of a cover plate look. once those were all adhered in place I cut off the excess from the edges and then stamped the sentiment directly onto the base using Memento tuxedo black ink.


I stamped, coloured and die cut the birthday cake images and adhered those using different levels of foam tape to create dimension!

To complete the card a touch of sequins and some white pen highlights to the images.


That's all for my post today, I hope you like this calorie free card. Happy crafting, hugs Ashlee.

Monday 9 October 2023

Happy CAKE Day!

 Hi Tea Timers and welcome back to the blog! I am back with another card featuring the delicious cake image from the Birthday Cake Clear stamp set. I wanted to create an assortment of cake for this card to go with my makeshift sentiment.

Sets used:

(Coordinating dies available here)

I first stamped out my images and fussy cut them out. For the cake stands I used, BG11, BG13, BG15, BG18, YG21, YG23, YG45.

For the cakes I wanted to "bake" 4 different ones that are my favorites: Chocolate, Strawberry, Red Velvet and Rainbow Sprinkles. I used the Copic markers for each cake:

Chocolate: E00, E11, E13, E33, E35, E37, E39
Strawberry: E00, E11, E13, RV11, RV13, RV14. RV17
Red Velvet: R32, R35, R37, R39
Sprinkles Rainbow: R22, R24, YR14, YR16, Y15, Y19, YG13, YG17, BG11, BG13, V04, V05, RV13, RV14, RV17 


To create the sprinkles, I just dotted each marker over the icing.

I first die cut out the Window die from teal cardstock. To create my background, I trimmed down a piece of white cardstock to fit behind the window. I blended Worn Lipstick and Saltwater Taffy Distress Oxides with the Tiled Wall stencil.

I then die cut the word 'cake' from gold cardstock. I heat embossed the word 'happy' and 'day' onto pink cardstock and trimmed down the words.


I then arranged my card before adhering any of the elements. I then used liquid adhesive and foam tape to adhere all of the elements to complete my card. 

I hope you enjoyed this card today and will create your own bakery. If you like any of the sets used today, all links to the products are above. If you make a purchase, use the code T4TRANDY10 at checkout for extra savings. Happy Crafting!

Friday 6 October 2023

Sending You Rainbow Hugs


Hello, DT Annalisa here! For my project today, I am sharing a sympathy card for some friends who recently lost their dog. Losing a loved one is always hard - I wanted to let them know I have been thinking about them. I used the Pawsome Dies with the Pawsome Rainbows 6x6' Paper Pad to create this card.

I die-cut a panel from white card stock using the A2 Layering dies. I used the medium paw die in the Pawsome Dies set and cut it into this panel twice. I added double-sided foam tape to the back of this panel and set it aside.

I stuck a piece of patterned paper from the Pawsome Rainbows 6x6' Paper Pad to an A2 white card base, ensuring it would fit behind the 3 3/4 inch panel with paws cut into it. I then took the panel with paws and stuck it over the patterned paper. 


I stamped and coloured (with Copics) the small dog from the Sweet Village stamp set and cut it with its' coordinating die.

The sentiment is from Get Whale Soon; I stamped 'sending you' and 'hugs' and die-cut these out with their coordinating dies.

I used liquid glue to stick the sentiments and dog to the card to complete it. 

 
Thank you so much for reading my blog post. Remember to use my discount code T4TANNALISA10 when you visit the Time For Tea Designs shop to get 10% off your order.

Thursday 5 October 2023

Big Birthday Wishes


Hey there, Tea Timers!!  It's Amanda here! I'm excited to be here with you to share some birthday card inspiration!

To make this card, I started by creating a textured background on black cardstock.  To create the textured background, I used a patterned stamp and stamped it with Clear Glue Embossing Ink.  Next, I added clear embossing powder on top.  Then, I melted the powder with my heat gun.

Then, on a piece of white cardstock, I ink blended Catherine Pooler's It's a Girl, Limoncello, and Something Borrowed inks to create a rainbow background.  Then, I die cut my panel with the Big Birthday Wishes Large Sentiment Die.  I also cut another white panel with the die to use as a shadow.

Next, I stamped some images from the Baked with More Love Stamp Set and the Birthday Fox Stamp Set.  Once I got them colored in with my Copic markers, I die cut them out with their coordinating dies.

I adhered all my components onto the card with 3D foam squares.  I also added some different sequins all over the background using liquid glue.


Other Posts You Might Like