Pages

Wednesday 31 January 2024

Get WHALE soon!

 Hey Tea-timers...

DT Ashlee here today with some new card inspiration. For today's theme I have a get well card ready to send someone that need's a little pick me up while they are recovering.


I used these Time for tea designs products :

- Get whale soon stamp set

- Get whale soon co-ordinating die set

- Get well soon large sentiment die

- I really dig you stencil

To create this card I started with a light grey card stock base that I added ink blending too over the I really dig you stencil (I used Hickory smoke Distress oxide ink). 

I then added my focal sentiment by die cutting the get well soon die two times. Once with white card and once with black so that these could be adhered together slightly offset creating a shadow. This was then adhered to the card base using foam tape to start adding dimension. 

Now my card base was complete I stamped, coloured and die cut the cute whale images before adhering these also to the card with foam tape. I coloured all images using Spectrum noir tri-blend markers. 


To finish it all off I added a small touch of pretty sequins.

That's all for my card today, I hope you like it and I sure hope it makes the recipient smile. Happy crafting hugs Ashlee. 

Monday 29 January 2024

Love is In the Air (feat. Moles!)

Hi Tea Timers, welcome back to the blog. We are over 2 weeks away from Valentine's Day and my inspiration for V-day continues with a card that features the adorable moles.

I wanted to create a scene where one mole is floating in the air with the balloons of love while the other mole is peaking out watching.

Sets used:

(stamp and die bundle available here)

I first stamped out my images and used Copic Markers to color them. I then die cut them out with the coordinating dies.


For the background, I took an A2 panel and blended the stencil onto it with Spun Sugar, Kitsch Flamingo and Picked Raspberry Distress Oxides. I then splattered white water color over it.

With another A2 panel, I die cut out a grass piece and a soil piece from the landscape edges. With the grass piece, I blended it with Twisted Citron and Mowed Lawn Distress Oxides. With the soil piece, I blended it with Tea Dye and Gathered Twigs. I splattered white watercolor over these two pieces.


I then assembled my card using liquid adhesive and foam tape. To complete my card, I stamped the sentiment directly onto the card.

All of the items I used today are linked above. Don't forget to use the code T4TRANDY10 at checkout for extra savings. Happy Crafting!


Friday 26 January 2024

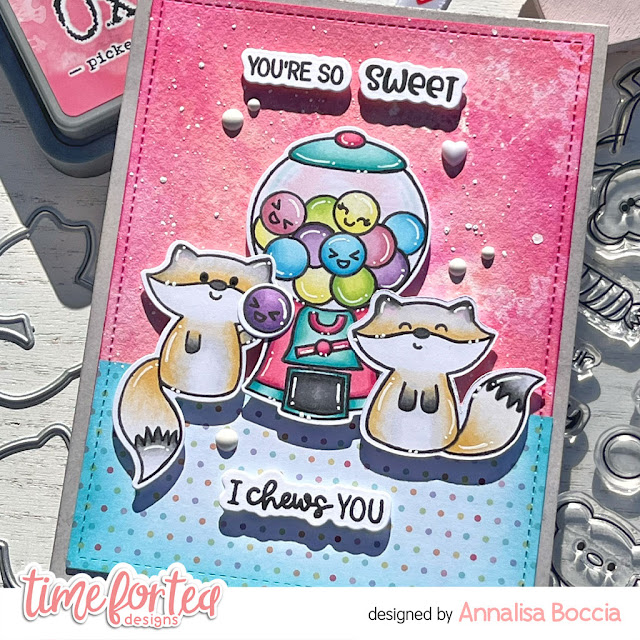
I Chews You my Valentine


Happy Friday! DT Annalisa here sharing a sweet Valentine's Day card featuring the adorable Gummy Bears and their coordinating die set.

I pressed picked raspberry and abandoned coral Distress Ink onto acetate, sprayed it with water, then took the acetate and smooshed the ink onto watercolour paper. I added white splatter with a paintbrush, water and Copic opaque white.


Once dry, I die-cut the inked panel with a stitched rectangle die in my stash. I glued this down onto an A2 card base that was ink-blended with hickory smoke Distress Oxide. 

I trimmed a piece of patterned paper from the Pretty Pastels 6x6 Paper Pad down to 1 and 3/4 inches high and ink-blended the edges with peacock feathers Distress Ink. I also die-cut it with the same stitched rectangle die and then glued it to the pink-inked panel. 


I stamped and coloured (with Copics) images and the sentiment from the Gummy Bears and Birthday Fox stamp sets and cut them out with their coordinating dies. I added white gel pen accents with a Gelly Roll Pen

I used double-sided foam tape to stick all the elements to the card base. I added white enamel dots and a white enamel heart to complete the card. 


Thank you so much for reading my blog post, be sure to use my discount code T4TANNALISA10 when you visit the Time For Tea Designs shop to get 10% off your order.

Wednesday 24 January 2024

REEL star!

Hey Tea-timers...

DT Ashlee here today with new T4T inspiration and this one is a movie themed card for the movie lovers! 

You're a REEL star....


T4T products used to create this card :


To create this card I started with a yellow card stock base that I stamped a bunch of the movie clapper images on. I then inked around the top edges of the card with a Catherine Pooler yellow ink. 

I stamped, coloured and die cut a cute kitty eating popcorn and a bunch of popcorn to add creating the movie scene! These were all coloured using Spectrum noir tri-blend markers. 


To complete the card a stamped/diecut sentiment along with a touch of pretty sequins!


I hope you like this movie themed card and it inspires you to create one too. Happy crafting, until next post hugs Ashlee. 


Monday 22 January 2024

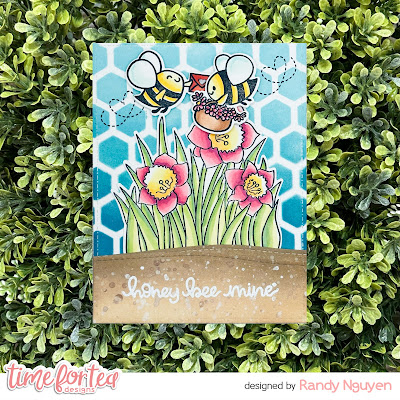
Honey BEE Mine!

 Hi Tea Timers, welcome back to the blog. We are less than a month away from Valentine's Day and I have another card for inspiration. This time I combined two stamp sets to create this scene. 

Sets used:

Darling Daffodils stamp and die bundle available here

I first stamped out my images and used Copic Markers to color them. I then die cut out the images using the coordinating die sets.

I took an A2 panel and blended the Honeycomb Stencil with Salvaged Patina, Peacock Feathers and Uncharted Mariner Distress Oxides. 


With another A2 panel, I die cut out two hill pieces to create the soil. I blended it with Antique Linen and Gathered Twigs Distress Oxides. I splattered it with brown and white watercolor to give it some texture.

With the sentiment, I heat embossed it directly on to one of the hill pieces with white embossing powder.

I took all of my pieces and placed them on the background to know where I wanted to stamp the bee lines. Once I knew where the bees were going to go, I stamped the bee lines with black ink.


I then adhered my pieces using liquid adhesive and foam tape. 

I hope you enjoyed this blog post today. All of the products I used are linked above. Don't forget to use the code T4TRANDY10 at checkout. Happy Crafting!

Friday 19 January 2024

Birthday Wishes


Happy Friday, DT Annalisa here sharing a cupcake birthday card featuring the beautiful Big Birthday Wishes Large Sentiment Die and the cute mouse from the Birthday Bear Clear Stamp Set.

I sprayed Distress Mica Stain Cocktail Party onto watercolour cardstock, heat-set the ink, and then die-cut it with the Big Birthday Wishes Large Sentiment Die. I cut two more pieces of paper using the die and glued them together for added dimension.

I ink-blended squeezed lemonade Distress Oxide onto white cardstock using my Beautiful Rainbow Blender Brushes. I then ink-blended abandoned coral Distress Ink through the Dancing Dandelions 6 x 6" Stencil. I used a stitched rectangle die to trim down the panel.


I used the A2 Layering dies to die-cut Neenah Metallic cardstock for the back panel, which I glued onto an A2 white cardstock card base. I die-cut vellum with the smaller Large Scallop Celebrate Frame Dies and used vellum adhesive to stick it to the card base.

I stamped and coloured (with Copics) the mouse from the Birthday Bear stamp set and cut him out with the coordinating dies. I added white gel pen accents with a Gelly Roll Pen

I used liquid glue to stick down the large sentiment to the card base. I added double-sided foam tape to the back of the mouse and cupcake and stuck him down so the candle was in place of the letter 'I' in the word wishes.


I used the tiny stars and circles in the  Open The Door Holiday Add-On Die Set to die-cut silver metallic paper. I used liquid glue to stick these down to the card to complete it.

Thank you so much for visiting my blog. Remember to use my discount code T4TANNALISA10 when you visit the Time For Tea Designs shop to get 10% off your order.

Wednesday 17 January 2024

I wish I could make it better....

 Hey there tea-timer friends...

DT Ashlee here with a clean and simple card design for this week which is perfect when you only have a small amount of time to get a card made!


I used these Time for Tea designs products for this card....

- Hey, Hello, Hi dies

- Simple sentiments clear stamp set


To create this card I started with a peach coloured card stock cut to my card base size. I then used the shadow of the hello die to die cut the space for the sentiment. Once the sentiment shadow was die cut I adhered a white card base in place with liquid glue. 

I stamped the sentiment "I wish I could make it better" directly onto the card with Memento tuxedo black ink beneath the shadow cut. 

Using black card I die cut the hello word piece four times so I could glue them all together making the sentiment pop up from the card base giving it some dimension. To complete the card a tiny touch of sequins and it was all done!

I'm really happy with how this easy design turned out, I think I will definitely be re-creating it with different sentiment. 

Until next post happy crafting, hugs Ashlee. 


Monday 15 January 2024

From Coffee Cups to Cupcakes - Stretching Your Die Sets

 Hi Tea Timers, welcome back to the blog. Last week, I created a Valentine's Day card using the Takeout Coffee Cup Die set. This week, I want to use the same set but this time use the same dies to bake up some cupcakes for another Valentine's Day card!

I really enjoy finding different ways to create die sets since its a fun way to stretch them for different uses.

Sets used:


These are the dies that I used to create the cupcakes. I die cut them all out of white cardstock and then inkblended them.


For the Heart Sprinkle, I blended it with Abandoned Coral and Lumberjack Plaid Distress Oxides. The frosting I used Saltwater Taffy and Worn Lipstick. For the cake part, I blended it with Antique Linen and Tea Dye. For the Cupcake Wrapper/Liner, I blended it with Salvage Patina, Peacock Feathers and Uncharted Mariner. 

I assembled the cupcake by adhering the cake part over the wrapper. I then added the frosting on top and then the heart sprinkle behind the frosting. I used liquid adhesive for this part.


With the alphabet dies, I die cut out the word 'sweet' from gold cardstock. 

For the sentiments, I heat embossed them onto teal cardstock using white embossing powder and I trimmed them down.

For my background, I took an A2 panel and blended it with Milled Lavender, Seedless Preserves and Dusty Concord. I then blended the Confetti stencil over the background using Villainous Potion.


To assemble my card, I first adhered the cupcakes with liquid adhesive and foam tape. I then adhered the sentiments using liquid adhesive and foam tape as well.

I hope you enjoyed this blog post today and will feel inspired to stretch thhe dies in your stash as well. All of the items that I used today are linked above. Don't forget to use the code T4TRANDY10 at checkout for extra savings.

Happy Crafting!


Friday 12 January 2024

Pink Birthday Party Bunny


Happy Friday. DT Annalisa here sharing a sparkly pink birthday card, because who doesn't love pink and sparkly! I used a stencil, dies and stamps from Time For Tea Designs

I used the Simple Square Nesting Dies to die-cut Neenah Metallic cardstock for the back panel. I glued this onto a white cardstock card base. 

Next, I sprayed Distress Mica Stain Cocktail Party onto watercolour cardstock through the Diamond Burst 6 x 6" stencil. I heat set the ink and then spritzed water mist to create the light pink background in the white areas left behind. I stuck this to the card base with double-sided tape.

I ink blended peacock feathers, salvaged patina and tumbled glass Distress Ink to white cardstock. I scooped some white Perfect Pearls into a mini mister and added water, spritzed this onto the inked panel and then heat set it. 

I used the Square Label Dies to die-cut the teal-inked panel and a piece of vellum. I used liquid glue to stick the teal panel to the vellum one. I then glued this to the card base.

I used the Let’s Party Large Sentiment Die to die-cut silver metallic paper and paper from a Christmas cracker; I love being able to repurpose paper! I created a text shadow using silver paper by offsetting the text slightly when I glued the sentiments on top of each other. I glued these to the centre of the blue panel on the card base and added three pink Summer Haze Enamel Dots around them. 


I stamped and coloured (with Copics) several images from the Let’s Party stamp set and the stars from Happy Trails and cut them out with their coordinating dies. I added white gel pen accents with a Gelly Roll Pen. I used double-sided foam tape to stick these to the card base to complete the card.

Thank you so much for reading my blog post. Remember to use my discount code T4TANNALISA10 when you visit the Time For Tea Designs shop to get 10% off your order.

Wednesday 10 January 2024

L O V E....

Hey there Tea-timer friends..

DT Ashlee here and I have some new T4T inspiration to share with you!

 Today my card is a love themed one in preparation for Valentines day...


I used these Time for Tea designs products :

- Anthonys alpha die

- Oops a daisy stamp / co-ordinating dies

- A2 stitched hearts cover die


To create this card I started with a very light grey card base that I die cut from the stitched hearts cover die. This was then splattered with a distress oxide spray. I die cut the inside rectangle dies also from the cover die from yellow and the light grey card before adhering those in place with glue to the centre. 

I stamped, coloured and die cut the cute kitty cats from Oops a daisy set before and adhered them to the card base with levels of foam tape for dimension!

I added a big focal love sentiment by die cutting the letters from Anthonys alpha die set before completing the card with a touch of pretty sequins...

I hope you like this love card, thankyou for stopping by the blog. Happy crafting, hugs Ashlee.

Monday 8 January 2024

We Are the Perfect Blend!

 Happy Monday Tea Timers! Now that the holidays are over, it's time to think about Valentine's Day, which is over a month away. With so many sets in the shop the can be turned into a sweet Valentine's Day card, I wanted to highlight a card the featured die cuts!

This tutorial also features a layering of three different stencils that I thought paired well with the coffee theme.

Sets used:


I first die cut out the Takeout Coffee cup set from different color cardstocks. I used vellum for the cap of the cup with the whipped cream. I used liquid adhesive to put together my two drinks. For the whipped cream, I blended it with Worn Lipstick and Saltwater Taffy Distress Oxides.


I then started on my background. I took an A2 panel and first blended the coffee beans with Seedless Preserves and Villainous Potion Distress Oxides. I then blended the stains stencil with Milled Lavender. The last stencil I used was the sprinkles stencil with Worn Lipstick and Saltwater Taffy.

For the sentiment, I heat embossed it onto red cardstock with white embossing powder and trimmed it down to fit the panel.


I adhered the cups to my background using liquid adhesive. I then adhered the sentiment strips using foam tape.

To complete my card, I cut another panel from pink cardstock to find behind my background and adhered it using tape runner.

I hope you enjoyed this tutorial today and are working on your Valentine's Day cards as well. All the sets I used are linked above. Don't forget to use the code T4TRANDy10 at check for extra savings.

Happy Crafting!

Friday 5 January 2024

Big Pink Birthday Wishes


Happy New Year! DT Annalisa here sharing my first creation of 2024 that features the Big Birthday Wishes Large Sentiment Die. I love how this beautiful die fills a card. 

I ink-blended spun sugar, kitch flamingo, lumberjack plaid, and prize ribbon Distress Oxide ink with my Beautiful Blender Brushes to create a pretty pink background. I added splatter with a paintbrush, water and Copic opaque white and Distress Mica stain Cocktail Party. I die-cut this panel with the Simple Square Nesting Dies


I die-cut teal cardstock with the 5-3/16 inch die. I used double-sided tape to stick the pink square layer to the teal one, I then glued both of these on top of a square card base. 

I then ink-blended white cardstock speckled egg, salvaged patina and peacock feathers Distress Oxide. I die-cut this panel with the Big Birthday Wishes Large Sentiment Die. I die-cut this into two more pieces of white cardstock and stacked them on top of each other using liquid glue to stick them all together. 

I stamped and coloured (with Copics) the kitty with a party hat from Let’s Party and die-cut her out with the coordinating die. I added white gel pen accents with a Gelly Roll Pen. I used liquid glue to stick this to the right side of the card. 

I used the Open The Door Holiday Add On Die Set to die-cut several stars using scraps from my ink-blending for the rest of the card. I used liquid glue to stick them on the card. 


I added Clear Bubbles and Summer Haze Designer Enamel Dots to complete the card. 

Thank you so much for reading my blog post. Remember to use my discount code T4TANNALISA10 when you visit the Time For Tea Designs shop to get 10% off your order.

Wednesday 3 January 2024

Birthday wishes for a brand new year!

Hey Tea-timers 

It's DT Ashlee here with my first T4T post for 2024! 

A brand new year means a new year of birthday celebrations so I thought I would get a start on my birthday card stash...


I used these Time for Tea designs products on this card :


To make this card start by die cutting the quilted cover die from a peach cardstock. Then using the birthday wishes sentiment die, die cut it twice. Once from blue card and once from black card before adhering together slightly off set and adhering to the card base. 

Stamp, colour and die cut a bunch of images from the birthday cake set. I used Spectrum noir tri-blend markers to colour mine and finished them off with a touch of white pen highlights....

Once they were all coloured and die cut I adhered them to the card base using varying levels of foam tape to create dimension and a fun little birthday treats section!

To complete the card and give it a little bling I added a touch of sequins, these were adhered in place using micro glue dots....


Thankyou for checking out my card today, I hope you enjoyed this birthday card....

Happy crafting, hugs Ashlee.

Monday 1 January 2024

Have an AWESOME 2024!

 Hi Tea Timers, welcome back to the blog and HAPPY NEW YEAR! It has been a pleasure to be able to have blog post on Christmas Day and New Years Day! I wanted to ring in the new year with a wishful card that I hope all our Tea Timers have an AWESOME 2024!

This is also a reminder that there are digital products in the shop like this balloon set that is still free!

Sets used:

coordinating die set available here
stamp and die bundle available here

I like to resize my digital images in a word document. I switched the page to landscape and added my numbers to the document. I then resized them so they all matched the same height. I then printed my images onto white cardstock using a laser printer.

Once printed, I used Copic Markers to color my balloons. I fussy cut them out and started to work on my background.


On an A2 panel, I blended Worn Lipstick and Tattered Rose Distress Oxides with a cloud stencil. I then splattered gold watercolor over the panel to give it some interest.

Using the "Have an" stamp, I stamped it onto pink cardstock using embossing ink and heat embossed it with white embossing powder. I then trimmed it down into a strip.

I die cut out the word "awesome" from gold cardstock and set that to the side. I first adhered my sentiment strip using foam tape. I then adhered the awesome diecut underneath with liquid adhesive. I added the balloons underneath using foam tape. To complete my card, I used a fineliner pen to create the balloon strings.


I hope you enjoyed this post and I hope you have an awesome 2024 full of joy, happiness and crafty goodness! Links to all the products I used are above and don't forget to use the code T4TRANDY10 at checkout for some savings.

Happy Crafting and Happy New Year!

Other Posts You Might Like