Pages

Wednesday 31 March 2021

Birthday Beavers

Happy Wednesday!

It's DT Shabneez with my final blog post for the Time for Tea Designs DT.  I've had an amazing term on the Team and have made some wonderful friends on the journey.  I've loved sharing my creations and I'll continue doing so.  Please feel free to follow my blog HERE or on social media.

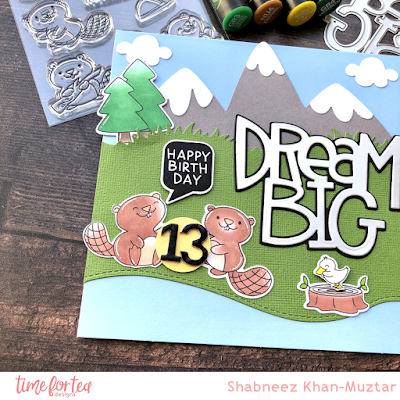
My final card is one I have made for my eldest son who will turn 13 in a couple of days time.  I've used my favourite die of all time - the Dream Big Sentiment Die together with the Mountain Scene Builder Dies and the Landscape Edge Standalone Dies.


I used the Beavering Away Stamp Set with the co-ordinating die set and coloured all the images in with my Chameleon pens.


After creating the scene I added a 'Happy Birthday' sentiment from the Speech Bubbles Clear Stamp set and used the co-ordinating die to cut it out.  

Enjoy the rest of your week and don't forget Jo has a live colouring class tonight at 7.30pm so please sign up if you're interested.

Last chance to get 10% off anything in store using my code T4TSHABNEEZ10!
Happy Crafting!


Sunday 28 March 2021

A calming yoga card today with Guest Designer Lounon


 Hello everyone !


Those three little pigs are so stressed out : their wolf neighbour is always so loud, doing renovation work at every hour of the day ! So, to relax, they decided to do some yoga. They are so calm now, that I am pretty sure the one in the middle fell asleep ðŸ˜›


Today, I share with you my last card for this month as guest designer for Time for Tea Design. It was such a pleasure to work with those adorable images, I really had a great time !

For this card, I used one of the little pigs and the sentiment from the Workout Pigs set. I stamped them on my Xpress-it blending card and coloured the scene with my Illustrators. It was so fun to do!

May the craft be with you!

Lounon

Products used :
-Illustrator markers :
Pigs : AP4 AP3 AP2 AP1 PP1
Blue blend : BT9 BT7 BT5 BT3 BT1
Green blend : CG4 CG2 CG1 DG1
Yellow blend : GY4 GY3 GY1 CT3 CT1
Floor : GB 10GB7 GB4 GB2 GB1
Mirror : IB1
Wall : LY1
Wood furniture : MB4 MB3 MB2 MB1
-Xpress-it blending card
-Craft Perfect coloured card stock
-Foam pads 

Saturday 27 March 2021

Spring Sale!


 Happy Saturday everyone did you see the Spring Sale in the Time for Tea shop yet? If not be sure to check it out there’s lots of fab dies to be had including this wavy hello sentiment die. Just be sure to add HOPPYSPRING21 in the promo codes as the checkout or if nothing in the sale takes your fancy you can still use T4TNATALIE10 to get 10% off your order you just can’t use both offers combined. 

There’s a great selection of dies in the sale which are perfect for creating fun scene cards and you know that’s my favourite kind of card making. 

Every so often though you need that quick last minute card though don’t you! This one was such a simple one to make I used the Slimline Scalloped Trio Circle Nesting Dies to cut out the white panel. Then layered behind a panel I had stencilled using the Zigga Zigga stencil using Distress Oxide inks. 

The Wavy Hello die I cut out twice once out of hot pink card and once out of white card which I offset layered on top of each other for some added interest. 

The critters are from the Bearing Gifts and the Happy New Year Critters stamp sets which I coloured simply using COPIC markers. I finished up by mounting the base on the same hot pink card stock and then popping onto my card base. I hope you enjoyed my card for today and don’t forgot to share your makes in the group and on Instagram we love seeing them so much! 

Hope you have a great weekend,  Natalie!

Friday 26 March 2021

Sending Bear Hugs


Happy Friday, DT Annalisa here. Spring is in the air, and I am sharing a clean and simple card (CAS) featuring several dies and stamps. I don't create CAS cards often, as I really struggle with this type of card because I can't seem to stop myself from adding so many things!

Before I get into how I made the card, I wanted to let you know about the Spring Sale that is on now until Wednesday, March 31st at midnight. You will get 30% off on a selection of dies when you use the code HOPPYSPRING21 at check out. But wait, there is more, there is a free Easter Basket Digi Stamp Collection that is perfect for your Easter cards!

I stamped the bears from the Bearing Gifts stamp set, die-cut them with the coordinating dies, and then coloured them with my Copics. I also stamped and cut out the sentiment. Next, I die cut the Wavy Hello Sentiment Die (which is on sale!) several times from some white card stock and adhered them together with liquid glue to add some dimension. 


For the background panel, I applied some Distress Oxides (Spun Sugar, Shaded Lilac, Tumbled Glass, Cracked Pistachio) on some heavyweight card stock using my Beautiful Blender Brush. I then added some splatter using water, white paint and Shaded Lilac. Once dry, I used the Dotty Hearts Panel Die on the coloured background. I trimmed off the top and bottom and adhered it to a white card base. I just love the dotted hearts that this die creates!


I assembled the card by gluing down the bears, the hello, and finally the 'sending you bear hugs' sentiment using liquid glue. To complete the card, I added a little heart that was die-cut out of silver paper that I had in my stash. I often die-cut several small hearts out of different types of card stock so they are ready to use.

Don't forget, you can save 10% off your Time For Tea Designs order using the T4TANNALISA10 at the checkout.


Thursday 25 March 2021

Spring Sale Now On Plus Free Digi Stamp!

 OUR SPRING SALE IS NOW ON!

HUGE SAVINGS ON SELECTED DIES AND OUR IMPERFECTLY PERFECT BRUSHES ARE BACK -
ONLY WHILE STOCKS LAST!


Here are just a few of our favourites from the sale!


FREE DIGI STAMP
Grab your Free Digi Stamp during the sale. No code required. Totally FREE!! 


Jo used this free stamp in her card during last night's Facebook Live. You can watch the replay via the Facebook Link below.


We hope you enjoy the Sale and Free Digi Stamp. Please do share anything you make with your Digis and Dies on our Facebook Page or Tag #TimeForTeaDesigns on Instagram.


Wednesday 24 March 2021

All The Bees Birthday Card

Happy Wednesday!

It's DT Shabneez with a card inspired by the bees I've been seeing more of in the garden lately.  I do love bees and of course the honey which they make.


I began by using the Bee Happy Stamp Set and stamped and coloured in the images using my Chameleon pens then die cut them out.  I stamped the sentiments using the Speech Bubbles Stamp Set and die cut them out too.


For my background I die cut the Slimline Scalloped Trio Circle Nesting Circles Die on white card then went over it with distress oxide inks through the Honeycomb Stencil.  I placed this on a DL card blank and added blue distress oxide and a little tone on tone stamping through the circles.  To finish I stuck on the bees and speech bubbles.

As always you can get 10% off anything in store using my code T4TSHABNEEZ10.

See you next week!


Monday 22 March 2021

Our First Ever Online Colouring Class - Tickets available now!

 Good Morning lovely Tea Timers!

I hope you had a great weekend? Did you see our announcement on FB & IG Live yesterday?

If not, you can see the replay here:

FB Announcement

I made a BIG announcement about our very first Online Colouring Class. Woop Woop!


Tickets are on sale now for this 2 hour Live class! This class is perfect for everyone interested in learning more about using their Alcohol Markers.

The Class will be held on Facebook on the 30th March at 7.30pm. Don't worry if you can't attend Live though, as the class will be available to watch as a replay for 30 days after the event.

As part of the Class you will receive a free digi stamp which includes a large scene image, several smaller images that you can decoupage up, or use separately, and several sentiments. The fantastic thing is you can print these out as many time as you like and try different colour combinations after the class is over.


Its really important to me that you have fun with your colouring and don't worry about it too much! In this class I will show you simple techniques that will take all the stress out of colouring for you. There are some basics you need to know but this doesn't have to be rocket science!

I would love it if you could join me for our very first class. Find out all the details including course requirements on our website


The class is suitable for Beginners and beyond so sign up now to receive all your course documents before the class.

Tickets are available now and are only £6.95!

Happy Crafting

Jo XOXO


Sunday 21 March 2021

Enjoy life's ups and down's with Guest Designer Lounon


 Hello everyone !


Those two cuties are inseparable ! They have each other’s backs and can always put a smile back on each other’s faces. After their camping trip they couldn’t stay apart too long and decided to play in the park. They’re having so much fun !

Here is my card for this week as Time for Tea Design guest designer. I decided to use other stamps from the Life’s Up & Downs Clear Stamp Set.

I stamped the two cuties and their seesaw on my Xpress-it blending card and coloured them with my Illustrators. I fussy cut them.

After that, I drew and coloured a background and die cut it. I die cut an other circle, bigger, into red card stock. I matted and layered the two.

I also stamped my sentiment and matted and layered it.

Then, I die cut two rectangles, one into Neenah white solar card stock and one into red card stock. I matted and layered them. I glued my round background on it with foam pads and my sentiment with glue. Finally I glued the two cuties with foam pads.

Et voilà !

May the craft be with you !

Lounon

Products used :

-Time for Tea design Life’s Up & Downs Clear Stamp Set

-Illustrator markers :

Seesaw : DR4 DR1 CR5 CR3 GY4 GY3 GY1 CT4 CT1
Hippo : BG7 BG5 BG3 BG1 FS5 FS4 FS8 + TB7 TB5 TB3 GY3 GY1 CT4 + white paint pen
Elephant : IG7 IG5 IG3 FS5 FS4 FS8 / TB7 TB5 TB3 CR8 CR5 CR3 + White paint pen
Grass : DG4 DG3 DG2 DG1 CG4 CG3 CG2 CG1 + GB7 GB4 GB2
Swing : DR4 DR1 CR5
Trees : TN9 TN7 TN5 TN3 AG5 AG3 AG1 + MG3
Sky : IB3 IB1

-Xpress-it blending card

-Neenah white Solar card stock

-Coloured card stock

-Double Stitched rectangle and circle dies

-Carnation Crafts Pretty Shabby Circle die

-Foam pads 

Saturday 20 March 2021

Quick Clean and Simple Card using your Stash


Do you have lots of coloured images that you just haven't used yet? Or backgrounds that you've created that you've not put on a project? I know I do. Today's card can be adapted to any of your images and backgrounds to make a quick, clean and simple card.

Please check out the video below to see how easily this card came together.


The images I used were coloured during a Facebook Live on Thursday evening. I also stamped and heat embossed my Plaid rug. I used a emboss resist technique to add my colour and then cut to size.


Why not try using a stamped or ink blended background you have in your stash, cut it down and add some of your cute critters?


I added a simple sentiment to the card base in Versafine Ink and some pretty sequins.


My bears had been water coloured using Arteza Water Brush Markers and I added Stickles to the donut glaze and Glossy Accents to the juice bottle.


If you would like to see the process of colouring my little bears and how I created the Plaid rug you can watch the Live replay of the Facebook Live on YouTube below,
or our Facebook page.

I hope you like todays' project. Be sure to follow the Blog and our Social Media for more projects in the future.

Hugs Jo
XOXO


Hello Sunshine!


I can’t believe how fast the weekend has come around again! It’s been a busy week in the garden getting it ready for summer so I thought I’d mark the occasions by bringing in some warm feelings with my latest card. Watermelons always remind me of our lazy summer holidays in France my little man always insists on picking the biggest one in the shop and carrying it all the way around. So that’s where my idea came from, I’m seriously regretting not adding a little slice of watermelon in the little mouse's paws though maybe next time! 

I started out by cutting out the Oval Scalloped Nesting Dies twice out of 360gsm white card stock. I scored one at the top about a cm down and then stuck them together to create my card base. 

To create the watermelon I cut another one out of the same white card and lightly blended worn lipstick distress oxide onto it. Then using the Zigga Zigga stencil I went over the top with Picked Raspberry distress oxide to add some texture. I also spritzed on some water and dabbed it off with paper towel to add more interest and splattered on some back soot distress oxide to represent watermelon seeds. 

For the green I cut out the frame die out of white cardstock and then out of green fun foam so I could add some depth. I find the fun foam much easier when it’s an awkward shape as it’s just one cut from the machine and fits perfectly. I used twisted citron and a tiny bit of mowed lawn to add some shading on the edges. 

Next I needed to add my sentiment and little mouse. I used the Hello Sunshine Sentiment Die and cut it out using black card stock and used the negative die cut to get them placed perfectly. The little mouse is from the Treat Yourself Clear stamp set I used warm grey Copics to colour them in. There wasn't much shading involved as they are so tiny. I just finished them off with a little R11 in the ear, on the cheeks and for the nose. I cut them out with the coordinating die and popped them on my card. 

After sticking everything down  I finished it up with some Black Nuvo drops and that was my card finished up. I hope you enjoyed my tutorial don't forget if you want to buy anything in the shop you can get 10% off using code T4TNATALIE10 

Friday 19 March 2021

New Design Team Announcement

 Hello there lovely Tea Timers!!

Have you heard the news?? We have announced our new Design Team and they an awesome group of super talented ladies! I can't wait for you to meet them!


First up, we have our Social Media Design Team. These lovelies will be providing inspiration to you daily on our Blog, Facebook, Instagram, Pinterest and Twitter pages. Their cards will be a great place to jump off from with your own projects with your Time For Tea goodies. Each of the team has a different style, and favoured way of colouring, so you'll find loads of new ways to use your existing Time For Tea products as well the New Releases. 


Next we have some new roles for 2021 and more members join our YouTube Team.
Our mission for 2021 is to bring you loads more tutorials and education. We will do that via our Blog and Jane will be sharing monthly tutorials on different techniques, showing you how to get the best from your Time For Tea Products.
Our YouTube team will also be giving you some amazing tutorials and demonstrations of our fabulous products. They will inspire you to try different styles, or techniques and show you step by step how they achieve their professional results.
We are super excited to be starting Time For Tea Designs Challenges in April too.
Challenge Coordinator Jane will be letting you know how you can participate and what prizes are available. The Challenge will run monthly, and will be your opportunity to share your Time For Tea creations. In doing so, you will have the chance to win a great prize and maybe even be a Guest Designer for the month.


Annalisa and Jennifer make up our Digi Team. These guys are huge advocates for Time for Tea and produce some of the most stunning cards using minimal products. They make the majority of their cards using the digital images of our Clear Stamp sets. Their cards are a great source of inspiration for anyone who doesn't have loads of supplies and is looking for a place to start.
We will also be adding more digital images to our collections as we start offering Online Colouring Workshops. Watch this space!

The last 2 pictures are of me and Ant of course, haha! Ant has been bugging me constantly about when he was going to be officially recognised as one of the team! This is his moment :) 
I asked what we should be called & this is what he came up with. LOL! 

So, please give the team, both new and existing (I won't say old, haha!) a huge amount of Time for Tea love. Look out for their first projects in April. 
XOXO


Happy Winter Birthday


Hello everyone, thanks for visiting my blog. I know that spring is just around the corner, but today I am sharing a wintery 3D card scene - great for those winter birthdays. I have used several different stamp sets from Time For Tea Designs as they all go so well together.

The card base is a step-card design from Lori Whitlock's SVG Shop that I cut with my Brother Scan N Cut SDX125e. I added some snowy hills that I die-cut using the Stitched Hillside Border dies from Lawn Fawn (you could also use the Landscape Edge Standalone Die from T4T) and coloured them with Speckled Egg Distress Oxide to give them the look of snow. I used the Sandy Beach Accents dies from Lawn Fawn to die cut the smaller snowbanks to slip the fire pit and trees into.

The mountains are from a die set in my stash, but you could also use the Mountain Scene Builder Dies from T4T. 


I used several clear stamp sets to create this card: Skating By Penguins (bird with scarf - I had to do some mirror stamping on this one!), Beavering Away, Life's Ups & Downs (hedgehog and smore), Winter Wishes Wreath (sentiment and snowflakes around it). I stamped, coloured and cut out the elements and adhered them to the card base with liquid glue. I stamped the sentiment and snowflakes to the hill before adhering it down the card so that it would be crisp.

If you are interested in purchasing any of the T4T products used in my project, use T4TANNALISA10 at checkout for a 10% discount which can be used on anything, anytime and has no time limit.


Wednesday 17 March 2021

I Can Bearly Wait To See You!

Happy Wednesday!

I can't wait until I can finally meet up with friends and family and I think this card carries the positive sentiments necessary to show that.


I've used a mixture of dies and stamps to create this.  I stuck a printed paper on my card base for the background then cut my grass border using the Landscape Edger Die Set.  The 'Hello' was cut from black and white card using the Large Script Hello Sentiment Die and the rainbow and clouds using the Storms Don't Last Forever Co-Ordinating Dies.


I coloured my bear from the Bear's Picnic Stamp Set using my Chameleon pens.  The sentiment from the same set was heat embossed in white on to black card.

You can get 10% off anything in store using my code T4TSHABNEEZ10.

Happy Crafting!


Sunday 14 March 2021

Exercise I thought you said extra fries!


Hello everyone !


Those two little pigs decided to have a healthier lifestyle. To get back in shape they started to exercise regularly ! But oh dear, it’s so hard not to think about delicious junk food !


Today, I share with you this slider card I made as guest designer for Time for Tea design. The Workout Pig set I used is so cute and it was such a fun card to make ! I made you a little tutorial for those who would like to make a similar one 😉


First I die cut a big stitched square into pink card stock.


Then I die cut a slightly smaller one into my green paper.


After that, I cut a piece of pattern paper with a smaller stitched square die and I also placed two circle dies on the middle. For the size of the circles make sure that the elements that will slide (in this case the fries) are a little larger than the width of the cut circle. You can put aside one of the circles and you should have those two parts :


I stamped, coloured and fussy cut the parts of the set I wanted to decorate the card.


After that, I prepared the pieces for the slider part. I stamped, coloured and fussy cut the fries four times. To reinforce them I glued them on coloured card stock and cut around them.


For the slide mechanism I decided to use buttons. You can also use little threads or coins. I made sure my biggest buttons were wider than the circle and I glued a little button on them.


It was time to put all the parts together !


I matted and layered the shinny green card stock on top of my pink square.


After that, I glued with foam pads the two other parts (the square and the circle) on top of the green card stock. Little tip to place your centre circle correctly and easily : place your four buttons against the bigger circle, your centre circle will automatically be centred! You must leave the buttons under the circle when you glue it, otherwise it would be difficult to add them after. Then, I glued each cornet of fries on top of the buttons. The slider part is over !


Finally I added my others parts on the card with foam pads.


Et voilà !


May the craft be with you !


Lounon


Products used :

-Time for Tea Design Workout Pigs clear stamp set

-Illustrators markers :

Pink blend : PP5 PP4 PP3 PP1

Green Blend JG5 JG2 JG1

Yellow blend : GY4 GY3 GY1 CT3

-Buttons 

-Centura Pearl Pink double sided card stock

-Pattern papers

-Stitched square dies

-Stitched circles dies

Guest Designer Franci shares some love for all the Mamas!

 Hi there! 

It's Franci here and I'm super happy to be guesting for Time For Tea Designs! 
I'm sharing a cute and fun Mother's Day card since all of you in the UK are celebrating today :)


Aww these little mice are so cute and that sentiment?! I love it! 
First of all I created my cardbase out of white cardstock and then I cut out a matching panel from some lilac cardstock. I inked it up with some pink Distress Ink on the Line Em Up stencil  and I put it aside to dry. I love this tone on tone effect: it reminds me about bakery curtains, the perfect match for my mice!


I stamped all my images from the Bake My Day set and the Baked With Love one, coloured them with copics and die cut them all with their coordinated dies.
Then I die cut my sentiment out of white cardstock and vellum and I glued it together. The shadow die in vellum gives it so much interest and it's even more amazing in real life!


I cut out a thin stripe out of white cardstock as the ground and I glued all my elements down into this cute scene with foam adhesive. I glued my sentiment at the top as well and then stamped all the little hearts. 

I love love loooove these images so much and I'm so happy how this happy card turned out! 

I hope you like it too and thanks a lot for stopping by! 
franci 

Other Posts You Might Like