Pages

Friday 31 July 2020

Rainbow Cards - Two Cards with One Stamp Set & Giveaway!

Hi everyone! 
I hope you are all doing well?

Jo here sharing the edited video from Thursday's FB Crafting Live.


In this video I share how to make two really different cards with the same Stamp and coordinating Die set.
There's also a chance to win a card I made on Create & Craft TV this week so be sure to check it out!


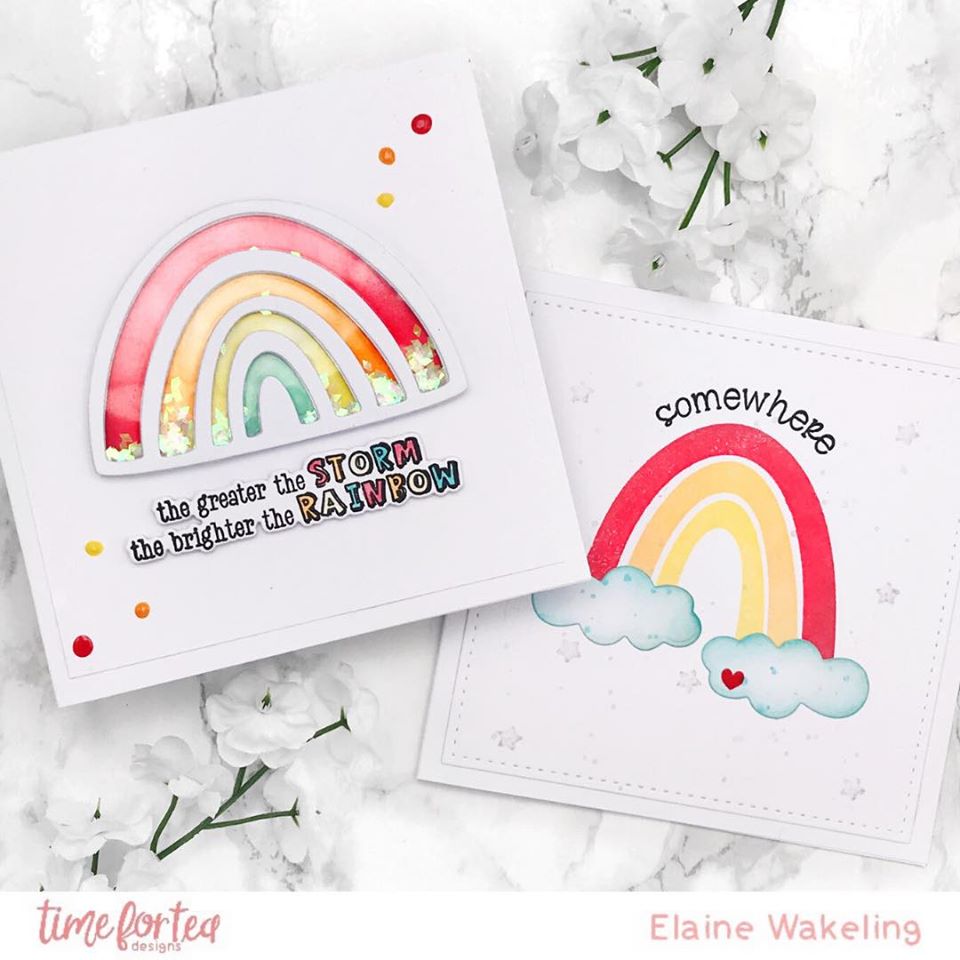
The really cool thing with the Storms Don't Last Stamp and Die set is that you can use the coordinating Die's on there own as I've done in this card. 


I ink blended my background and then created a pattern with the raindrops stamp from the set.


In the set there are some small stamps that you can use to create backgrounds too or you can add them as a pattern to the arches of your rainbow as I've done here.


The sentiments also have coordinating dies making it super easy to cut them out and pop them over your rainbow.


The smaller stamps in the set fit perfectly in the Aperture Slimline Die. I love this die as there is so much you can do with it!


This was super simple to make and looks so cute with those little smiley faces!


Some simple die cutting and our Iridescent Rain Drops finish it off nicely!


While we're talking about the Rain Drops! Great news they are back in stock!! Woop! But numbers are limited so be quick! We also have restocked the Clear Drops which also super popular so if you've been hankering after some grab them now.
Finally I need to let you know about some new colours in our Enamel Drops which are ideal for your summer creations. I will link them all below for you to check out!

Don't forget to watch the video to find out how you can win one of the cards I made below. I made these while I was on Create & Craft TV this week and they are from our Christmas In July Collection. This collection is exclusive to Create & Craft until the 8th August.


Enjoy the video and have a great weekend guys!

Crafty Hugs
XOXO


Wednesday 29 July 2020

Welcome Little one!

Hello everyone!
It's DT Anila at the blog today with a YouTube video tutorial for an adorable card using the new releases. 

Here's my card!!


Click here to check out the video on the YouTube.


All the products used for making the above card are listed along with the links in the video description on You Tube. 
If you wish to buy any of the products I have used here or any other T4TD products from their amazing range, remember to use my code T4TANILA10 and avail 10% extra off across the website. 

Happy Crafting!
Anila

Meowy Christmas to You

DT Annalisa here and in celebration of Jo being on Create and Craft this past Monday for her "Christmas in July" release, I am sharing an extra card this week! For this card I used two sets from her July release - the Christmas Surprise Clear Stamp Set and the Mew Are the Best Gift Clear Stamp Set. These two sets are adorable and I loved colouring them!


First I stamped the little mouse in the set and created a mask for him. I then stamped the kitty and presents on top of the mouse and mask. Next, I created a mask for the kitty and some of the presents on the left-hand side and stamped the tree on top of this. Once I had removed all the masks, I stamped the sentiment and extra Christmas ornaments.


For the kitty in the tree, I inked it up and then wiped off the ink from the areas below the paws (as it was designed to be used with the coordinating die). This way, even if you don't have the dies you can still use the kitty, dog and bunny in the tree!

Once everything was stamped I took my time colouring the adorable scene with my copic sketch markers and loved it. I often put on some Netflix or Spotify in the background and colour away for hours.

Once the scene was coloured I cut it out using the Quilted Square Nesting Die. For the blue background, I also used another square from this set and coloured it using one of the blues I used to colour the presents.

I adhered the scene to the blue background and then to a card base to complete the card.


Be sure to use my discount code - T4TANNALISA10 - for 10% off in the T4T shop which can be used on anything at any time!

Tuesday 28 July 2020

Time For Tea designs & Heffy Doodle Collab Winner Announced!


Hi folks I hope you're having a super Tuesday!

We're so grateful to everyone who stopped by the Hop & left wonderful comments. It was a truly amazing collaboration and Hop.
I would like to thank all the design team members from both T4TD & HD who made some fabulously inspirational projects for us all!

So onto our winner!! Our winner was randomly selected from all the comments left along the hop.

Congratulations to Sarah Louise!!

Please contact us via admin@timeforteadesigns.co.uk to claim your prize. 


Monday 27 July 2020

Christmas In July Video Tutorial

Hello Vic here today. I’m sharing a video tutorial where I made two Christmas cards using the gorgeous Christmas Suprise Stamp Set along with the Candy stripes Slimline Die and the Stripes Cover Plate Die.

You can view the video tutorial here:
https://www.youtube.com/channel/UCn1TiNPdBx5gJoyeWs2CF0g

The first card I made was the slimline Christmas card. To start with I stamped my images for my card using the die  Christmas Suprise Stamp Set  and coloured them in with my copic markers.

I then used the Christmas Suprise Coordinating Dies to die cut the images out. I will show you in the video how these dies work as it leaves two little slits in the Christmas tree for your critter to be poking out of the tree. 


I then used the cut the Candy stripes Slimline Die using some red card stock.

I have used a DL card as my card base as these dies will fit on that size card. I absolutely loved making some taller cards and the Candy stripes Slimline Die is so fun to use. 
I then trimmed down a piece of Kraft card and adhered the Candy stripes  panel to my kraft piece. Once this was adhered I then used some double sided  tape to adhere these onto my DL card base. I slightly trimmed off the edge to leave a small border around the card.
Using some dark green card I heat embossed two sentiments from the Christmas Suprise Stamp Set and used white embossing powder and my heat gun to heat set the sentiment. I then trimmed the sentiment down and adhered these onto my card along with the critters. Our first card is now complete.

For my second card I made a fun shaker card using some lighter colours rather than the traditional Christmas colours. I stamped my images using the Christmas Suprise Stamp Set and Coordinating Dies. After they were coloured and die cut I then used the Stripes Cover Plate Die and die cut a piece of white card.

Using some Distress Oxide inks I then blended some soft colours onto my die cut panel. I then turned this over and using some PVA glue I adhered a piece of acetate.

I then trimmed some foam tape and adhered this all around the edges of the back of my die cut.
I then filled this up with some very small polystyrene balls. 
Once my shaker part was full I added a piece of white card that I trimmed down to fit the die cut. I adhered this onto my card base. 

I adhered my images using foam tape and heat embossed my sentiment using some pink card and white embossing powder.  The Christmas cards are now complete.

I hope this tutorial was helpful and you can see the exciting new release HERE. I had so much fun creating these cards and don’t forget you can save 10% off your order using the code: T4TVICKI10 at the checkout.
Thanks for stopping by today!
Vic

Saturday 25 July 2020

Fun Christmas Present Card!


Hi everyone it’s DT member Natalie here sharing another Christmas card I made with the fab new release from Time for Tea Designs.
My fun Christmas present card is made using the new Slimline Candy Stripes Die. It was such an easy card to make and will be great for quick Christmas cards but still looks really special. 
I started by cutting out the die then cutting out a rectangle the same size out of some smooth card stock I ink blended a mixture of red distress oxides and splashed some water on. I cut the die panel out again of some fun foam foam and then layered all the panels on top of each other. 
I Popped some ribbon around the card panel tied it in a bow and stamped and die cut a tag and sentiment using the Mew are the Best Gift stamp and die set. Then popped it on my card base and that was my card finished up.
I hope you like my card and keep an eye out in the Time for Tea group for more inspiration. Don't forget you can also get 10% off your order using code T4TNATALIE10


Friday 24 July 2020

July Release Guest Designer: Michelle Short

Hello there, Michelle Short with you today and I am delighted to be guest designing here at Time for Tea Designs. I have three projects to share with you using the new July release, which is out today.
 

My first projects use the new Mini Rainbow Shaker Die, along with the Storms Don't Last Stamp & Dies. Although the Mini Rainbow Shaker Die is made to be used for shaker cards, you can also use the negative pieces to create a die cut rainbow too, which is what I did for my card and tag.
 
 
For the card, I cut the Mini Rainbow Shaker Die four times from coloured cardstock. I then added Distress Ink to the bottom edges for some added depth and dimension. They were added to an A2 white card base with thin foam tape. I then die cut the clouds from the Storms Don't Last Forever Die Set from white cardstock and stamped the face from the stamp set on top. They were added to the bottom of the rainbow with foam tape. For the sentiment, I used the Grateful For You Landscape Stamp Set and heat embossed it on to black cardstock. It was added to the card with more foam tape and then I added Iridescent Rain Drops to embellish.
 
 
For the tag, I die cut the Sunburst Cover Plate Die from white cardstock and then die cut it further using a tag die. I cut the tag die again from white cardstock and adhered the sunburst piece on top. I then used the other pieces from the rainbow that I cut for the card and added these on top using thin foam tape. The sentiment from the Storms Don't Last Forever Stamp Set was heat embossed on to black cardstock, cut in to strips and added to the tag with foam tape. To finish off, I added more Iridescent Rain Drops.
 

My final project for today uses the new All Occasions Critters Stamp Set and Dies, as well as the Grateful For You Landscape Set. I first took a panel of white cardstock and stamped the Grateful For You Background Stamp on to it using black ink. I then made a mask for the scene from mask paper and placed it on top. I took the Scene It 6 x 6" Stencil and placed it over the top. Using Mermaid Lagoon ink, I blended on clouds for the sky.
 
 
The masks were removed and the background coloured using Copic Markers. I then stamped the hot air balloons from the set on to a separate piece of white cardstock, along with the pig from the All Occasions Critters Stamp Set. They were also coloured using Copic Markers and fussy cut out with scissors. The background piece was added to a white A2 card base and then the balloons and pig added on top with foam tape. The sentiment from the set was heat embossed on black cardstock and cut out using the sentiment dies from the All Occasions Critters Die Set.
 
That's it from me today. A big thank you goes to Jo and her team for having me guest with them today. I hope you will check out the new products in the shop, it is such a wonderful release! Happy crafting!

New Release Reveal Day!!

Happy Friday!

It's DT Shabneez here and I hope you've enjoyed seeing all the elements from the new release which is now available to buy in the Time for Tea Designs store! 

I've combined a couple of the new release stamp sets on my card today to form a cute scene.  It's definitely somewhere I'd love to live as it looks so idyllic!


I used the Circle of Love dies to make my circular Easel card.  Next, I stamped and masked the Background Scene stamp and used the Sunnyside Up stencil as the backdrop.  Once I'd coloured in the background using a mix of pens and ink pads to form a scene, I went on to die cut the rabbit and bees from the All Occasion Critters stamp.  After colouring them in I adhered them to my scene.


I used one of the frames from the Mini Frame & Banner Die set to act as a stopper for the easel.

Happy Crafting!

Products Used:

Time for Tea Designs Background Scene
Time for Tea Designs All Occasion Critters
Time for Tea Designs Circle of Love Die Set
Time for Tea Designs Sunnyside Up Stencil
Time for Tea Designs Mini Frame & Banner Die Set
Chameleon Pens
Distress Oxide Ink Pads


It's New Release Day!!!

Yay!!
The New release has finally landed and we're so excited to share it with you!
If you've missed the sneak peaks you can check them out now here on the T4TD Blog. You can also see the full release on the Live Replay of our FB Live from last night!


We are also on Create & Craft TV on Monday at 4.30PM BST with our Christmas In July Stamps and Dies. Tune into Channel 683 on Sky or 95 on Freeview to watch demonstrate these super cute sets.


We really hope you enjoy the new release. Be sure to let us know what your favourites are and share your projects on the T4TD Friends Page with all our other fabulous Tea Timers!

Happy Crafting
XOXO


Thursday 23 July 2020

New Release Full Reveal!

Welcome to Full Reveal Day!


Jo will be sharing all the new release on FB Live at 8pm BST. I hope you can join us.

In the meantime here are some amazing cards from the DT!

Christmas In July


Stamps for all Occasions!


Beautiful Rainbows!


New Cover Plate Dies


Awesome Slimline Dies


I hope you see something that inspires you in the New Release! 
We are so excited to share it with you.

Don't forget to join us on FB later today to see the full collection in more detail.


Happy Crafting!

XOXO


Other Posts You Might Like