Pages

Thursday 31 December 2020

New Home Card


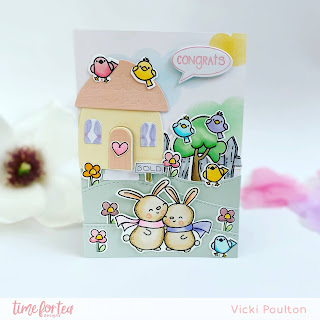
 Hello happy New Year’s Eve! DT Vic here today and I wanted to share a card I made recently using the adorable Cozy Winter stamp set. 


I started my card by stamping by images and colouring them in. I used Cozy Winter, and the Moovellous Stamp Set. I coloured them in with my copic markers and then using the coordinating dies I die cut them out. Next I cut down a piece of white card and using the Making Waves Stencil I used the large cloud and added some pastel inks to my card using my Beautiful Blending Brushes

I wanted to add some hills so I used my Landscape Edge Dies and some light green card and added a couple of hills to the bottom of my card. I adhered them down with some foam tape and I then started to add some of my images onto the card.  

For my house I thought it would be fun to use the Windmill Builder Standalone Die and turn it into a house. I drew some curtains on the window and added a heart on the door. I then drew a sold sign and placed this in front of the house. I added some more birds and flowers to my card and for my sentiment I stamped congrats from the Speech Bubbles Stamp Set. I used a light pink ink for this and adhered this down onto my card. 

I love how this turned out and it will make a really sweet new home card. 

I hope you have a fantastic New Year’s Eve and don’t forget you can save 10% off your order using the code: T4TVICKI10 at the checkout. 

Thanks so much for stopping by today!

Vic 

Wednesday 30 December 2020

A Winter Birthday Card for Daddy

Happy Wednesday!

It's DT Shabneez sharing a card I have made for my sons to give to their Daddy on his upcoming birthday!  I've used a mix of products as all the Time for Tea Designs products co-ordinate so well together.


I had bought the It's Your Day Sentiment Die Set some time ago and just never got around to using it until now!  It's definitely a set I can see myself using a lot more as it really is very versatile and I even used it to die cut the word 'DADDY' too!  


My image from the Cosy Winter Stamp Set was stamped and coloured using my Chameleon pens and i added some glitter to the snow.  I then die cut the scalloped circle from the Spooktacular Die Set and stuck it over the top of the image and it fits perfectly!  I stuck the It's Your Day banner over the top.

To finish I stamped and die cut the 'Happy Birthday' using the Speech Bubbles Stamp & Die Set which is an absolute staple in my craft stash.

I better get the boys to write in the card and get the presents wrapped!

See you next week!


Tuesday 29 December 2020

Snow Bunny Card & Colouring with Tri-Blend Markers for the first time!


Hello everyone! I hope you all had a fabulous Christmas. It's been extra cold here today and we even had a good covering of snow this morning, so today's card is perfect!

Todays card was filmed during our last FB Live before the Holidays so be sure to check out the video below. This video has been edited from the Live version, so if you like quicker videos when you're short on time, this is the one for you!

I used the Cosy Winter A5 Stamp & Die set for my bunny image and for the focal panel which is the circle part of the Snow Globe stamp.


I also used the Nordic Star Slimline Die for my centre portion. I love how the white die cut piece pops against that ink blended background.


I splattered white Gesso & some metallic Finetec paint onto my ink blended card base. I love how snowy & glowy this looked when it was finished :).


In the video I also show how I coloured my bunnies with Tri-Blend Brush Markers for the first time! I found them so easy to use and they are perfect for beginners. The bush nib is comparable with the Copic Markers. Your colour palette is limited but in a way that's a good thing as you don't feel you need to spend a fortune. The pens themselves are super affordable so I would definitely recommend as an alternative to more expensive options.


I finished off my card with this sweet sentiment from the Winter Wonderland Sentiment Cards, It fit perfectly with our theme and gives the illusion of heat embossing without the fuss.

I will try & upload a couple more videos over the next week or so while also trying to enjoy a much needed rest! :)

Our usual FB Lives will start again on the 4th January 8pm. I hope you can join us then too. In the meantime have a fabulous New Year. Stay Safe and take care!

Hugs Jo & Ant 
xoxo

Products I used for this card are listed below.


Monday 28 December 2020

Winter fun

 Happy bank holiday to you all :D 

I hope you have had a lovely crafty Christmas so far. It is nearly time for us all to move out of 2020 and I can't wait to get the new year started. What are you all hoping to do more of in 2021? 

I want to be able to do more crafting and making time for me. Fingers crossed it works. 

On to my cards for today and I love this stamp set so much I couldn't resist doing a couple of cards with it. This is Life's Ups and Downs stamp set and you can make this adorable little interactive seesaw! It is so easy to do all you need is a brad/ split pin to make it work :)


That is all from me today. I hope you all have a great new year and I will see you in 2021 :D

You can still get 10% off any order at Time For Tea Designs by using my code T4TAMY10

Huge hugs

Amy xx

Sunday 27 December 2020

Winter Plaid Card & New Video Inspiration

 Hi everyone! I hope you're all having an amazing Holiday.

If by any chance, any of you are lucky enough to get some crafty time in-between all the leftovers, chocolate & presents then I have a little bit of inspiration for you in a brand new video.

Check out the video link below to see how I made this pretty card.


Here are few pictures of the final card.


I love this Plaid background stamp and it looks great stamped in Distress Oxides. For my project today I chose my favourite winter green shade, Evergreen Bough.


I also used Distress Oxides to stamp the leaf, sprigs & flowers which I then die cut with the coordinating dies.


The video includes a section of real-time colouring with my Copic Markers, which I know some of you really like. If you don't want to watch that in so much detail though, you can fast forward that bit to see me put all the elements together.


I have a ton more ideas with these stamp sets too! look out for some more winter inspiration to come over the holidays including some organisational tips for your craft supplies.

I really hope you like the card today. 
Detail fop all the products I used are listed below. Use code T4TJO10 at the checkout to get 10% off your order too!
Jo
xoxo


Thursday 24 December 2020

Thank You Scene Card

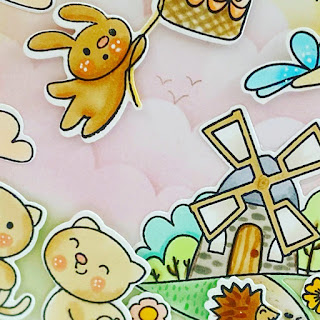
 Hello Vic here today. I’m sharing with you a really sweet card I made using the Up, up & Away stamp set. I love this stamp set as it has the cute bunny in the hot air ballon and the windmill. 


To make my card I wanted to create a pretty sky so I used the Scene It Stencil  along with some pretty soft distress inks and my Beautiful blending brushes. I added some green ink to the bottom of the card to look like grass. 


I then stamped my Up, up & Away stamp  images and I also used the clouds from the Buzzing For You Stamp Set and coloured them in with a light peach colour. I then stamped some flowers and added a hedgehog from the Life’s Up’s and Downs Stamp Set


I used my copic markers to colour the images in and my Coordinating Dies and run them through my die cutting machine. Once all my images are die cut I adhered the ink blended panel to my card base and started to adhere the images onto my card using foam tape. I then wanted to add another critter to my card and I stamped a dragonfly and some cute cats from the Crafty Cats Stamp Set and adhered this down. For my greeting I used the thank you sentiment stamp from Fairy Garden Stamp Set.


I love how this turned out and I think they look so cute all together on the card. I hope you feel inspired to mix up your stamps and make some cute scenes. It’s really fun to do even though the colouring took a little while it’s so worth it. Another tip I have is sometimes I stamp lots of images together and colour them and I keep them in a clear plastic sleeve to use on my cards. That way you can make your cards a bit quicker if you needed to. 

Don’t forget you can save 10% off your order using the code: T4TVICKI10 at the checkout. 

Thanks for stopping by today!

Vic 

Christmas Bunnies - Easy Heat Embossed Matching Cards & Tags


Hello everyone & Happy Christmas Eve!!!

Jo here with a last, last, last minute set of cards & tags for you.
I know its super close but I am so not ready to stop making Christmas cards. I've enjoyed making them so much this year, even more so because of these fabulous stamp & die sets.


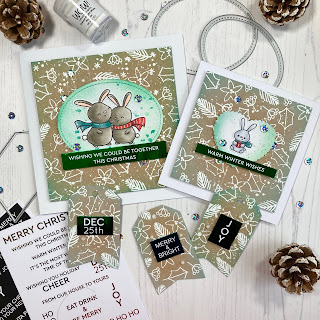
These cards were so easy the make as they just involved heat embossing onto Kraft card. The a bit of ink blending, our Cosy Winter bunnies & the fabulous Sentiment Strips which are so convenient for last minute projects like this and you're good to go.


I cut my Kraft cardstock to 5"x 5" as I am using a 6" x 6" card base. I used almost all the open line stamps from the Winter Wishes Wreath Stamp Set to stamp my images randomly in Embossing Ink.
You do have to work quickly here as the Kraft card is very absorbent & the ink does dry quickly.


Once stamped I covered with WOW Bright White Embossing Powder & heat set.
You know I love a good splatter effect & this project was no exception. I splattered white Gouache paint all over the background. This effect helps cover any issues with your heat embossing too as it creates a snowy layer. 


I die cut an Oval from our Oval Scalloped Nesting Die set and then ink blended some Evergreen Bough & Pine Needles Distress Oxide Ink around the edges. I used these same shades to blend ink around the edges of my embossed Kraft panel.
I also splattered the background of my oval with the watered down Distress Oxide Inks.

I stamped, coloured and die cut the sweet bunny couple and added them to the centre of my oval.


I had a scalloped heart left over from another project which worked perfectly on the smaller version of the card. This is a 5" x 5" card base so the Kraft Panel is 4"x4".
I used the small bunny for the image & placed on the centre of the heart.


To finish off I used the Sentiment Strips which I had previously foiled with Green Foil in my Minc Hot Foiling Machine. I love these strips and they look extra awesome in foil!!
Some silver sequins add just the right amount of bling.

I loved this technique so much I thought it would be perfect for some simple gift tags too! I think they look so elegant and wintery.


All I needed here was to cut my tag using the largest Tag in the Zig Zag Frame & Tag Die Set. I used the same stamping, embossing and ink blending as I did with the cards. I then added my sentiment with some foam tape.


I thought is was really fun to use the sentiment that was typed down the page for the Tag as it was the perfect size. I also added some Nuvo Glitter Drops rather than sequins as I felt that a. they looked like snow, but b. they also are not about to drop off when being transported with the Gift.


I love how this set turned out. It really gives me winter, Christmassy feels and was pretty simple to reproduce. 

I hope you enjoyed the cards today. An alternative to this would be to heat emboss onto white card stock and then ink blend rainbow colours over the top to give a totally different feel. I think that would look so much fun. Let me know what you think in the comments. How would you adapt this design for different occasions?

The details of the products I used are below.

Happy Christmas & stay safe
xoxo

Other Posts You Might Like