Pages

Saturday 30 March 2024

Eggstra special Easter with Kaja

Hi all,

It's Kaja from Kajcyika crafts and today I wanted to wish you all an eggstra special Easter!

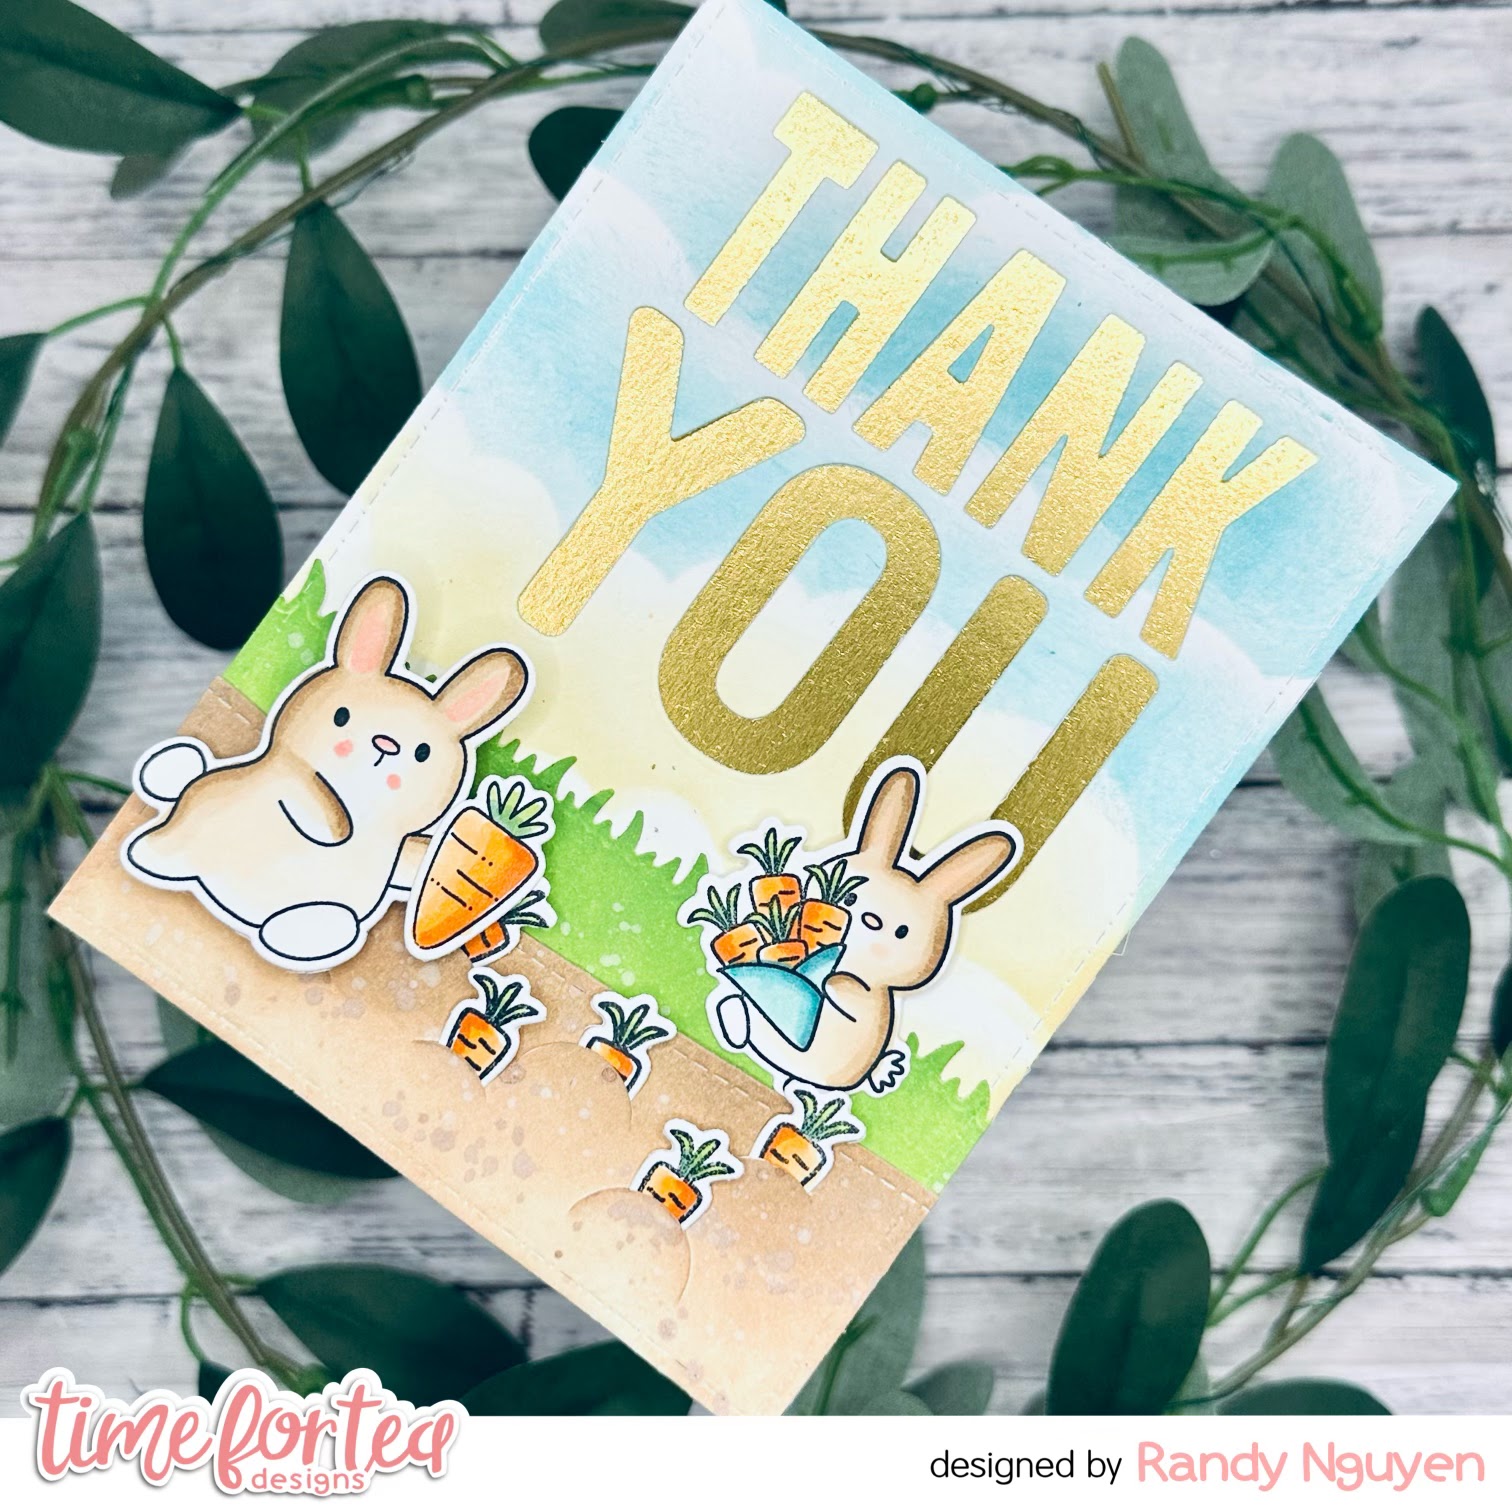
Take a look at my card:


I started off this card by creating the background and this time, I decided to go with a simple egg pattern. I stamped out a bunch of eggs from Eggstra special birthday stamp set that I colored in using watercolor markers. I made sure that I used brightful colors, so the card is looking cheerful and fun.

Once the eggs were stamped out and colored, I added some details with white gel pen.

I used the same technique for the bunny that can also be found in the Eggstra special birthday stamp set. For the bunny I went with gray and I colored the cheeks and ears in with pink that matches the eggs.

Next, I positioned the bunny in the center of my background and added the sentiment from the same stamp set that reads 'have an eggstra special Easter'.

I added some blue and gray cardstock to the card, so it all matches nicely with the colors I used for the eggs and bunny.

The last thing I did, was that I glued everything on a card base using double sided foam squares and liquid glue.

Hugs,
Kaja

Friday 29 March 2024

You Make Life Sweeter


Happy Friday, DT Annalisa here! Today, I share a cute pink card I created using all three stamp sets released in February from Time For Tea Designs. The more the merrier, right?! 


I ink-blended kitsch flamingo and abandoned coral Distress Oxide onto Distress White Heavy cardstock by Ranger with my Beautiful Blender Brushes. I added worn lipstick Distress Oxide and white splatter with a paintbrush, water and Copic opaque white.


I die-cut the pink panel with the Lots of Love Horizontal Cover Plate Die. I used liquid glue to adhere this to an A6 card base that I ink-blended with lost shadow Distress Oxide.


I used the scalloped heart in the Sweet Scalloped Dies on Distress White Heavy cardstock by Ranger and ink blended it with salvaged patina and peacock feathers Distress Oxide. I added splatter with a paintbrush, water and the same oxides. Once the heart was dry I stamped "You make life sweeter" from Sweet On You using Versafine Onyx Black.


I stamped and coloured (with Copics) several images from Sweet Cart CrittersSweet On You, and Warm Hugs. I cut the images out with their coordinating dies and added white gel pen accents with a Gelly Roll Pen


I used double-sided tape to stick the images to the card. I tied blue and white twine in a bow in the opening of the heart and attached it to the card base with double-sided tape. 


Thank you so much for reading my blog post. Remember to use my discount code T4TANNALISA10 when you visit the Time For Tea Designs shop to get 10% off your order.

Wednesday 27 March 2024

Easter egg wishes

Hey there Tea-timer friends...

DT Ashlee here. Today I am sharing another Easter card because we certainly don't have long now until the fluffy bunny will be here! 


To create this card I started with a yellow card base and added stencilling to it with the Mini egg pattern stencil and distress oxide ink...

Using the eggstra special slimline add on die I die cut two eggs from a teal blue card to add to the card base. These were adhere in place with foam tape to start adding dimension! I went on to create the sentiment "easter wishes". This was die cut from black card then cut again from white card with inking on it before adhering together slightly offset.

To complete this Easter card I added a sprinkling of pretty sequins. 


Now it's time to wait for the bunny and eat all the chocolate we desire... 
Well I know thats what I am doing hehe!

Until next post, happy crafting. Hugs Ashlee. 

Tuesday 26 March 2024

Let's do coffee ☕

Oh how I love my cup of coffee! Especially when accompanied by something sweet 🍫🍩. What makes it even better, is sharing it with a relative, friend or a nice colleague. Thus, another invite for coffee for me to share with you all today!

I took the digistamps Sweet On You and Warm Hugs which I printed on alcohol marker friendly white cardstock and coloured them with Copic markers. I then cut them out using my Scan 'n cut machine. Set the images aside and started working on the background.


Using the Simple Slimline Nesting Dies I die-cut two panels from white cardstock in two different sizes. The smaller size was about to get an upgrade πŸ”₯ Using tattered rose and abandoned coral distress oxide I stenciled a tiled wall onto the panel (Tiled Wall stencil). After that I used the Heart Apertire Slimeline add on to cut out 3 hearts. I then took the larger white panel and lined it up with the smaller panel, making sure I'd ink the inner parts of the cut out hearts. Distress oxides used are salvaged patina and peacock feathers. Added some splatters with acrylic paint and water and let it dry.

After both panels had dried completely, I taped them together with double sided tape. With the help of my stamping tool, I stamped on the sentiment from the Perfect Blend Clear Stamp Set. I used lilac structured cardstock to make a card base, to match the coloured images. Last, but not least, I added my coloured images Γ‘nd beautiful enamel dots Summer Haze.

Now, who's ready to grab a coffee with me?

~Ilona~


Monday 25 March 2024

Thank You Card

 Hi Tea Timers, welcome back to the blog. I wanted to create another thank you card and this time built a scene around the image of the bunny holding a bouquet of carrots. I thought it would be cute to create a little carrot garden.

Sets used:

I first stamped out my images and used Copic Markers to color them. I then used the coordinating dies to cut them out.

To create my background, I first took a cloud stencil and blended it with Scattered Straw and Salvaged Patina Distress Oxides onto an A2 panel. I then took the Thank You sentiment die and die cut it out of the background.

I took a piece of gold cardstock and trimmed it down to fit the back of the background panel. I then adhered it to the back with liquid adhesive.

To create my garden, I die cut out a hill piece and a grass piece. With the grass piece, I blended it with Mowed Lawn and Twisted Citron Distress Oxides. I then splattered it with white watercolor.

For the hill piece, I blended it with Gathered Twigs and Tea Dye Distress Oxides. I splattered this piece with white and brown watercolors.

I had a paper punch that create half a circle slits. I took that and punched it a few times across the hill piece. This is how I was able to put in the carrots.


To complete my card, I added the carrots into the soil. I then added the bunnies using liquid adhesive and foam tape.

I have been making more and more Thank You cards lately to have on hand to be able to say thank you with a homemade card. All of the products are linked above. Don't forget to use the code T4TRANDY10 at checkout for extra savings.

Friday 22 March 2024

I'm a Sucker For You


Happy Friday, everyone. DT Annalisa sharing a sweet pink card featuring the Sweet On You stamp set and the coordinating die set. I love the adorable critters holding all the sweets in this set.

I ink-blended kitsch flamingo, picked raspberry distress oxide onto white cardstock and added white watercolour splatter with a paintbrush. I die-cut this with the A2 Stitched Hearts Cover Die.


With my Beautiful Blender Brush, I ink-blended squeezed lemonade Distress Ink onto the upper half of an A2 card base. I used the small heart from You’re Engaged and the twirl and xo tiny stamps in Sweet On You and stamped them onto the top section with squeezed lemonade Distress Oxide. I ink-blended to the bottom section with lost shadow Distress Oxide. 

I die-cut a piece of Pretty Pastels 6x6 Paper Pad with the edge die in the Sweet Scalloped Dies collection. I ink-blended spun sugar Distress Oxide to the edges of the patterned paper and used liquid glue to adhere it to the inked A2 card base. 


I stamped and coloured (with Copics) several images from Sweet On You and Sweet Cart Critters and cut them out with their coordinating dies. I added white gel pen accents with a Gelly Roll Pen

I added double-sided tape to the back of the stitched hearts frame and pressed it onto the card base. Next, I used double-sided tape to adhere the mouse and sentiment to the card base. The remainder of the elements were adhered to the card using liquid glue.


Thank you so much for visiting my blog post, be sure to use my discount code T4TANNALISA10 when you visit the Time For Tea Designs shop to get 10% off your order.

Wednesday 20 March 2024

Easter wishes!

Hey Tea-timer friends

DT Ashlee here with a new card to share with you and this one is an Easter themed card ready for the Easter weekend coming very soon!


I used these T4T products :

- Easter wishes large sentiment die

- Eggstra special layering stencil

- Eggstra special birthday stamp and co-ordinating die


To create this card I started with a pink card stock base that I added the cute egg design to with the T4T stencil and Distress oxide inks Worn lipstick and Picked Raspberry. I blended it out so it faded into the bottom of the card....

Using a piece of white card with ink blended.spritzed on it I die cut the easter wishes sentiment before die cutting it again from a pink card stock and backing it off centre to create a shadowed sentiment. This was adhered to the card base with foam tape to start adding dimension!


I stamped, coloured and die cut the images before adhering those to the card also with foam tape. To complete the card I added a touch of pretty pink sequins....

I hope you enjoyed my pink easter themed card. Thankyou for stopping by the blog! Happy crafting, hugs Ashlee. 

Tuesday 19 March 2024

Bonjour, hello, hola, hallo, ciao!


Bonjour mes amis!

That's about as much french as I remember from school, a loooong time ago πŸ˜‰ I think it would be wise for me to continue this blog in english, and tell you all about the card I made this week.

I'm really getting in the mood for spring, and have noticed I'm constantly leaning towards bright skies and grassy hills when crafting. I guess the few sunrays we have been catching here in the Netherlands have that effect on me. So I'm opting to dwell in it, and made another spring themed card for you, saying HI to the season to come!
The Hey there critters stamp set are perfect for saying HI, they all have their little paws up in the air, waving at you πŸ’› Ofcourse you could also give them one of the accessories from the stamp set, such as a balloon or a sunflower, to hold - like I did on the bunny.

I started off by stamping all the images, and colored with Copic markers. After that I ran the sheet through my Scan 'n Cut machine to cut them out. Set those aside and then focused on the background.
Using the Simple Nesting Dies - A6 I die cut a panel from white cardstock. Then I took a strip of 1,5 cm masking tape and adhered it onto the panel, approx 1,5 cm from the bottom. This creates the white area for the stamped sentiment.
I started with the pink sky, using Distress Oxides spun sugar and kitsch flamingo. Then I took my 6x6 Scene Builder Stencil out, and used the grass edge together with Distress Oxides mowed lawn and rustic wilderness. Keeping the masking tape and stencil on, I added dark green and white paint splatters to the grass.
After waiting until the ink and paint had dried, I removed the masking tape. Took my stamping tool and layed out the sentiment in the middle of the white area. I like how this black & white in the middle of the card emphasizes the sentiment! Draws your attention straight in. Lastly, I added the stamped and colored images, using foam tape 0,5 mm and 1 mm to create a little depth.

Adhered the completed panel to an A6 white folded card with double sided tape and that finished my card! Now let's all give a warm welcome to spring and hope it's going to give us lots of real bright skies and grassy hills!

Ilona ~


Monday 18 March 2024

HOORAY... Hoppy Easter!

Hi Tea Timers, welcome back to the blog. Easter is next weekend and I am continuing the inspiration with another Easter card. This time I wanted to create a shaker card as I have not made one in a while.


Sets used:
(coordinating die set available here)

I first stamped out my images and fussy cut the two bunnies out. I then used Copic Markers to color them.

Then I started on my shaker frame. I first die cut out the cover plate from white cardstock. With the stencil, I blended it with Worn Lipstick, Scattered Straw, Mowed Lawn and Peacock Feathers Distress Oxides. I moved the stencil a little over to blend the stencil on the entire card.


I then took the 'HOORAY' die and die cut it out of the frame. I trimmed a piece of acetate to fit the and adhered it with tape runner. I then added the center pieces to the Os, R and A with glue.

With a piece of gold cardstock, I trimmed it down to fit the back of the frame and set it to the side to work on assembling my shaker.

With foam strips, I added it to the back of the frame. Using anti-static powder, I brushed it over the edghes of the foam tape. I then poured in my shaker mix. I added the gold back to the frame.


I then heat embossed the sentiments onto pink cardstock using white embossing powder and embossing ink. I trimmed it down to add underneath the HOORAY.

To assemble my card, I added the two sentiments in the middle using foam strips. I then added the two bunnies using foam tape. 

I hope you enjoyed this blog post and are having fun getting ready for Easter. All the products I used are linked above. Don't forget to use the code T4TRANDY10 at checkout for extra savings.

Saturday 16 March 2024

Birthday llama with Kaja

Hi all,

It's Kaja from Kajcyika crafts and today I am showcasing a cute and simple card that features an adorable little llame.

Take a look:


First thing I did when making this card, was to cut out a piece of kraft cardstock and stamp background images of mountains and clouds. I used brown ink to try to blend the images a bit better with the cardstock. 

Next, I stamped out the llama from the same stamp set called Llama tell you, but this time I used white cardstock and black ink. 

I colored the llama in using alcohol markers and since I wanted to have a bit of a contrast, I used orange tones for it.


Next, I cut down a piece of green paper with clouds from the Brighter days paper pad. I trimmed it down to be slightly bigger than the kraft cardstock piece.

I stamped out the sentiment in the same brown ink and this time I decided to go with a simple 'happy birthday'.

I glued everything on the square card base using double sided foam squares and liquid glue.

Hugs,
Kaja

Friday 15 March 2024

X0XO

Hi y’all! Another friday and this beautiful day I created a squared shaped card for my weekly blog. It was a quickie, this tim, which means in less then 30 minutes I made this rainbow card -something that would happen very often-.

For the background I rolled a piece of with cardstock with a squared shaped die trough my Bigshot. I picked out the XOXO stencil, from the latest release and blend some distress oxides in rainbow into the paper. For the colors I used:Barn door, Carved pumpkin, fossilized amber, mowed lawn, mermaid lagoon and seedless preserves. 

While I letting our background dry, I colored one of the moles from the I really dig you stampset and gave it some highlights. I also put some glossy accents into the glasses. 

I cut the Hi twice in orange and in a black glittery foam scheet (spellbinders). I glued these two together leaving a bit of orange visible. After I was sure everything was dried very well I put everything together and cut an red piece of paper in a slightly bigger square and placed it as background.

Hoppy Easter Shaker


Happy Friday! DT Annalisa here to share an Easter shaker card I created using the Eggstra Special Birthday stamp set and their coordinating dies from Time For Tea Designs.  

I die-cut Distress Watercolor Cardstock by Ranger with the Slimline Scalloped Trio Circle Nesting Dies and the Eggstra Special Slimline Add-On Horizontal Die. I pressed peacock feathers, picked raspberry Distress Ink onto my glass matt, and sprayed water onto the inks. I pressed the die-cut watercolour panel into the ink several times and heat-set it.


I trimmed purple cardstock to go behind the watercoloured panel and glued it down to a slimline card base. I used liquid glue to adhere a trimmed piece of acetate over the egg panel holes.

Next, I added two layers of double-sided tape on the back of the egg panel and added pink, purple, blue and clear sequins. I then pressed the card base onto the double-sided tape to seal in the sequins.


I stamped and coloured (with Copics) several images from Eggstra Special Birthday and cut them out with their coordinating dies. I added white gel pen accents with a Gelly Roll Pen

I used liquid glue to adhere the stamped elements to the card. 


Thank you so much for reading my blog post. Remember to use my discount code T4TANNALISA10 when you visit the Time For Tea Designs shop to get 10% off your order.

Wednesday 13 March 2024

Hi, hello

Hello Tea-timers...

DT Ashlee here with you today sharing some new Time for Tea designs inspiration to get your crafty mojo rolling! 

This card uses one die set along with one sentiment stamp. An easy but nice CAS card. The die I used is the Hey, Hello, Hi set and the sentiment is from the Simple sentiments clear stamp set.


I started by cutting a pink card base for my card which I then placed and die cut the shadows to both of the hi, hello sentiment. I then backed this with a black piece of card where I went on to die cutting the wording 4 times per word. These were all glued together to create a raised sentiment effect on the card!


Using the sentiment stamp I stamped that directly onto the card base with black ink before completing the card with a touchy of pretty sequins adhered with micro glue dots. An easy but sweet card to send to someone with a little note inside.


That's my card for today, I hope you like it. Until next post happy crafting, hugs Ashlee.

Tuesday 12 March 2024

You've got mail!


Hello! Ilona coming your way with some Snailmail 🐌 

The sun was actually shining over here in the Netherlands last weekend, birds were chirping and it felt like spring was in the air. I just had to make a card this week that would capture the feeling! So I took out my You got mail stampset and decided I'd make a little garden scene. After stamping the cute critters and mailbox, I colored them using my Copic alcohol markers and cut them out with the help of the coordinating die set.

The 6x6 Scene Builder Stencil has the perfect edges to create a garden scene. Using the Simple nesting dies A6 I die-cut a panel from white cardstock as a background. I took the grass edge of the stencil and 2 colors of Distress oxide (twisted citron and mowed lawn) and stenciled 2 layers of grass at the bottom of the panel. After that I used the sky edge of the stencil and made several cloud lines to form a sky with Distress oxide (tumbled glass). 


I splattered some paint onto this background and waited until it dried. Again, using the simple nesting dies I die-cut another panel, one size up, from teal cardstock. Adhered the garden background onto the teal panel with tape, and adhered the teal panel on top of an A6 white folded card. 

Time to add my colored stamped images! I like to use foam tape to adhere images, to create a little depth. The mailbox in the back was adhered with 0,5mm tape and the snails with 1mm tape.


I stamped on the sentiment from the same clear stamp set with my stamping tool (Misti) and black stamping ink. Then I decided to add highlights to the stamped images with a white gel pen Γ‘nd add a couple of glitters to the shells with my biggest glittery friend: Stickles (star burst). All to insinuate the sun is shining in this garden! 


Ofcourse it's raining cats and dogs while writing this blog, but at least I have this card to look at and remind me spring is on it's way!! 

Wishing you all a sunny day ☀️

Monday 11 March 2024

Have an EGGSTRA Special Easter!

 Hi Tea Timers, welcome back to the blog. Did you know that Easter is in March this year? It's on March 31st and we are almost 3 weeks away from the big day! I wanted to start creating Easter cards as I know this month is going to fly by.

I wanted to create an egg-centric card for our sweet bunny friend to pair the perfect "eggstra" sentiment.


Sets used:

I first stamped out my images and used the coordinating dies to cut them out. I then used Copic Markers to color them. 

To create my background, I took an A2 panel and blended the eggs using Saltwater Taffy, Scattered Straw, Twisted Citron and Salvaged Patina Distress Oxides. I then blended the designs stencil over the eggs with Worn Lipstick, Fossilized Amber, Mowed Lawn and Peacock Feathers Distress Oxides.


I then die cut out the large eggs using the slimline die from white cardstock several times. The perfect way to mass produce the egg diecuts. I then used the same Distress Oxide blends as above for my eggs.

For the sentiments, I heat embossed them onto purple cardstock with embossing ink and embossing powder. I then used the coordinating dies to cut out the sentiments.

To assemble my card, I took the A2 panel and then adhered the eggs on the lower half, making sure to overlap them. I trimmed off any excess pieces. 


I then adhered my bunny holding the egg using foam tape. For the sentiments, I adhered them onto my panel with foam tape to complete my card.

I hope you enjoyed this blog post. Are you ready for Easter? All of the products I used today are linked above. Don't forget to use the code T4TRANDY10 at checkout for extra savings. Happy Crafting!

Other Posts You Might Like