Pages

Monday 30 November 2020

Catmas Crackers


Hi everyone,

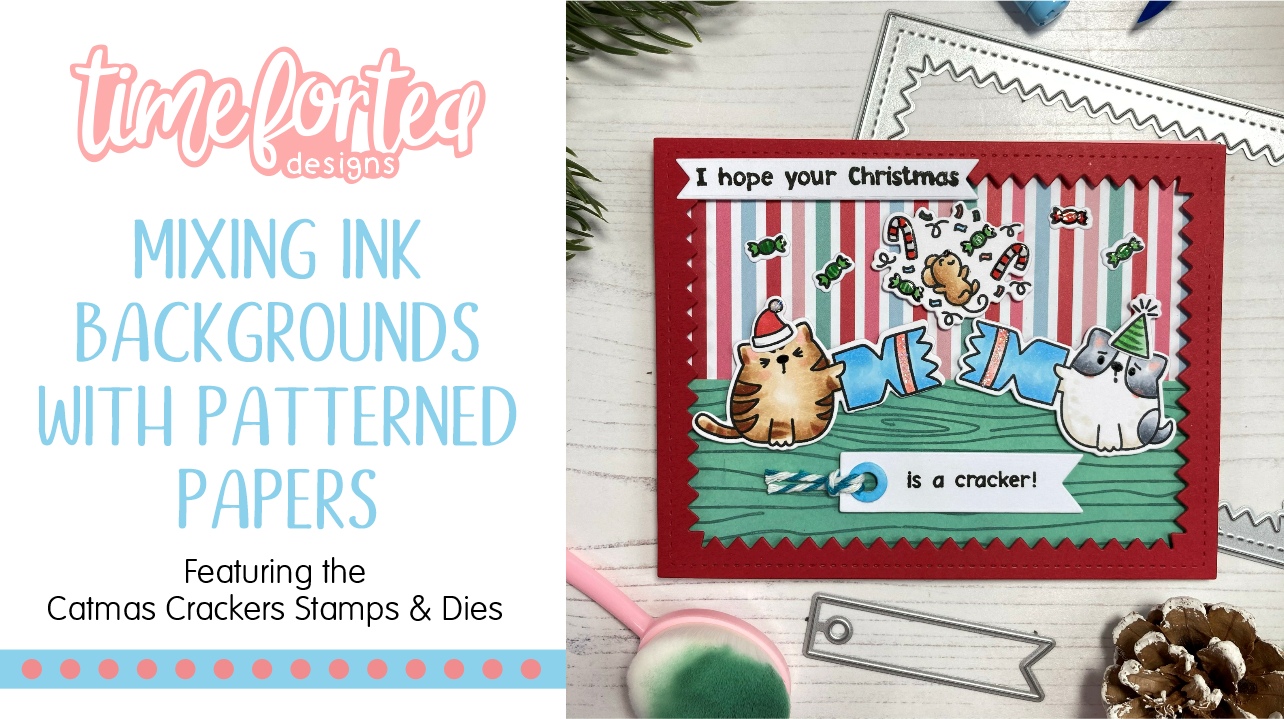
I hope you are all well and staying safe. I am having a mad couple of weeks trying to get moved but wanted to pop in here and share my card using the Catmas Crackers stamp set and the great Zig Zag Frame and Tag die set  They were just calling out for me to use them together :)

I also used one of the papers from the Winter Wonderland paper pad. If you haven't seen these papers yet they are well worth a look as they are beautiful and can be used for more than just Christmas makes.

To finish it off I used one of the sentiments from the sentiment cards which I inked around the edges of and added some glitter to :)

There is a great giveaway at the moment on the Kit and Clowder face book page. Where you can be in with a chance to win this stamp and die set as well as other yummy Time for Tea goodies so why not check it out. Also there is the black Friday sale still on at the Time for Tea Designs shop until midnight tonight (BST 30th of Nov) So there is still time to grab yourself a bargain! On top of that you can use my code (T4TAMY10) to get 10% off your order at the Time for Tea Designs Shop so even if you have missed the black Friday deals you can still get some money off :) 

Huge hugs to you all

Amy xx

Saturday 28 November 2020

Let it Snow!


Happy Saturday everyone hope your all well. Have you managed to pick up any crafty bargains this weekend? There are some fantastic offers on in the shop which run until the 30th Nov. 
Today I have another Display card for you let me tell you I absolutely love this die so much I'm not usually one for fancy designs. I don't know whether you have noticed but my cards are always just a simple fold one but I cant stop creating with this. I find it so much less fiddly than the box ones and so easy to put together. 
I started out measuring round the die to figure out how big my card would need to be as I wanted to ink blend before I cut it out and I didn't want to waste my ink by blending a bigger area than needed. I also felt when it embossed the folds it might not blend smoothly over the top of them. Once it was all blended I spritzed some clear water on to add some texture and put it aside to dry.
I used a mix of stamps for the images the tree log and trees at the back are from the Beavering Around, the Elephant and Hippo are from Life's Up's and Downs and the bird is from Skating By Penguins I stamped these out and coloured them up with Copic markers and Die Cut them out. 
The next step was to die cut the Display card and snow hills, the snowflakes which are from the Falalala Scalloped Slimline Die set and the Let it Snow Sentiment Die. It was really easy to stick together, I found it was easier to pop in the two back snow hills before adding the front as it isn't so fiddly then. Once these were in I could pop on the front hill and add my sentiment. Placing the sentiment first helped with figuring out the rest of the layout in the scene. I just love how it turned out those snowflakes really pop against the blue.
I was so happy to be able to finally use the Hippo and the Elephant stamp set too. It is more of an Autumn theme but it works so well for winter too. I love to stretch my stamps to get the most out of them it helps keep your ideas fresh and its just super fun to do!
I hope you like my card for today and have a great weekend! Don't forget you can get 10% off in the shop using code T4TNATALIE10


Friday 27 November 2020

Falalalala


Happy Friday everyone, DT Annalisa here, have you seen the great sale going on over at Time For Tea Designs right now?! If not, be sure to take a look at the 2020 Black Friday Collection, there are some great bundles up for grabs at terrific prices. The sale will end at midnight November 30th BST.

Today I am sharing a Christmas card featuring several new T4T products from the latest release, including the Carolling Critters Clear Stamp Set, Falalala Scalloped Slimline Dies, Layering Dies Imperial Sized- (USA sized) and paper from the Winter Wonderland Paper Pad 6x6". This is such a beautiful collection of papers. I usually struggle with using patterned paper but this collection has inspired me!

To start I stamped the critters and coloured them with my copics and added some highlights with my white gel pen. I added some foam tape to the back of them and set them aside to work on the rest of the card.

I die cut out the falalalala sentiment three times, twice from white card stock and once from some silver foil paper. I stuck them all together with liquid glue. Next, I die cut out a snowy hill and glued it down to the beautiful patterned paper which I had die cut out using my A2 layering dies. For the border around the card, I used the largest frame in the A2 Nesting Frame Dies (this is part of the Black Friday Sale and I use it all the time!) and coloured it using my BG copics. I used liquid glue to adhere this down on top of the snowy hill and patterned paper.

I stuck the critters down on top of the snow and then glued down the sentiment and music notes which I stamped on some white card stock.

To finish the card, I die cut several snowflakes from the Falalalala Slimline Dies. I just love how this card turned out.

Don't forget I have a 10% discount code for the T4T store which can be used on anything, anytime (including sales!!) and has no time limit - T4TANNALISA10. I so appreciate it when you use my code as it helps me to continue to be on the design team that I love so much.


Thursday 26 November 2020

It's A Penguin Party!

 Hello Vic here today sharing a cute slimline card I made. I am so in love with the new release and wanted to make a fun Christmas card using the Skating By Penguins Stamp Set.


To start with I used the Falalala Scalloped Slimline Die Set and using a pink piece of card I die cut a frame. I then used the Falalala die and die cut this using some silver sparkle card. I then used a piece of white card and made my slimline card base and I started to ink blend some blue distress ink onto my card using my Beautiful Blender Brush. I started to ink blend the top of the card in blue and then I switched to a light purple foe the bottom of the card. I then added some hills using the Landscape Edge Die and some more white card. 


I wanted to add some details to my sky and I used the Carolling Critters Stamp Set that have snowflakes in the stamp set. I used my inks that I used to make the sky and stamped the snowflakes onto my card. I then adhered the hills down using some double sided tape. 


I then stamped out my images using Memento Black Ink and the Skating By Penguins Stamp Set. I coloured the penguins in with my copic markers then I used the Coordinating Dies and run them through my die cutting machine. I always secure the dies with some washi tape so that they they don't slip while being die cut. I then adhered the frame, Penguins and greeting onto my card using some Foam Pads.


To finish my card off I added some sparkle using some Stickles onto their hats and the hills. 

I hope this card inspires you to make a fun penguin scene. Don't forget you can save 10% off your Time For Tea Designs purchases using the code: T4TVICKI10 at the checkout. 

Thanks for stopping by today!

You can watch Jo live tonight at 8pm on our Time For Tea Designs Facebook page.

See you there!

Vic

Wednesday 25 November 2020

Catmas Cracker Tutorial

Happy Wednesday!

It's DT Shabneez here with a tutorial to make a very quick Christmas cracker using the Mini Gift Box Die Set.  I think you'll agree it looks so pretty and you can decorate it in so many ways.


To begin, die cut the template 4 times from card of your choice and cut off the bottom tabs from two sets of templates as shown.  Make sure you burnish all the score lines so it makes it easier to fold.


Adhere the templates together using the large tabs.  I used strong PVA glue but you can use red liner tape if you prefer.


Stick both parts together using the smaller tabs on the sides.


Finally add glue to the remaining tabs to form the cracker.


Here you have your cracker ready to decorate!


I have used a sheet of paper from the Winter Wonderland Paper Pad to cover the centre panels so that the join isn't shown.  I then stamped and die cut images using the Catmas Crackers Stamp & Die Set and coloured in with my Chameleon pens.  I stuck them on the top.  All that remains is to fill your cracker then add ribbon to close.

The other positive point of the Catmas Crackers Stamp set is that it even has a joke insert for your cracker!  What will you fill yours with?  Tag me on social media so I can see your creations!

As ever you can get 10% off anything in store using my code T4TSHABNEEZ10.

Happy Crafting!


Saturday 21 November 2020

Falalala, you make me so happy!


Hi all Design Team Member Natalie here to share my adorable snowy reindeer card. The reindeers are from the new release in the Happy New Year Critters stamp set. It's such a fun versatile set that can be used for many occasions and as always mixes well with the other stamp sets. These Chubby cheeked reindeers are definitely one of my favourites from the new sets so I had to make a Christmas card with them.
I began by cutting out the new Falalala Scalloped  Slimline Dies I cut two of these out of white cardstock. I blended  Spun Sugar and Worn Lipstick Distress Oxides on one of them spritzing some water on to add some added texture. The other I created a snowbank on using the standalone Landscape Dies which I added the sentiment to. I made sure to keep the frames aside to use for later.
I cut out the Falalala out of white cardstock and fun foam and layered them so it popped out more. The snowflakes again are cut from white cardstock but I just kept them one layer. 
The reindeers are coloured with copic markers I used the same colours on both and like always batch coloured and die cut a lot whilst I had my pens out it just saves so much time in the long run. 
To pop my card on my card base I temporarily stuck the frame and pink base together with washi tape so it didn't move and I could make sure it was lined up correctly. I added doubled sided tape after just taking off one side at a time and popped it on my card base. Then the other frame I popped aside I layered it on top so the snowbank wasn't higher than the frame.
I hope you liked my card today I really enjoyed making this one and the pink sky was so fun to make. 
Don't forget you can get 10% off in the shop using code T4TNATALIE10
Happy Saturday everyone hope you have a great weekend!


Friday 20 November 2020

Mixing Ink Blended Backgrounds with Patterned Papers


Happy Friday everyone!! I hope you are all safe and well!
I am super excited to share this new card with you that I made during our last FB Live.

The edited version of this tutorial is now available on YouTube. Check out the link below to see how we made this card without all the waffling I do while I'm trying to make a decision :)


This card mixes an ink blended and stamped pattern with patterned papers. 

In the video I am attempting to match my ink blending to the patterned papers. Some bits were successful like my flooring which was ink blended and then stamped with the awesome A5 Woodgrain stamp.


You will see in the video that I attempted to match the frame with the blue in my patterned paper using Distress Oxides but in the end we decided not to use that element. Instead we cut the frame from Red cardstock and that really brought the scene together.


In the Live you would've seen just how I deliberated over each colour and combination of papers before settling on this. I cut this down for the YouTube video in the interests of time, however, I thought it was great to show how our crafting thought process works in real time and when you don't really have a plan, which I didn't. :)


The super cute cats were already coloured with my Copic Markers. This also added a further challenge as I wanted to make sure my whole project looked coordinated and like it had been planned this way.


I love this little mouse popping out of the cracker. I added some Glossy Accents and Stickles to the final images to add that special finishing touch.


On the inside of our card, which incidentally, is one our new A2 card bases, I added the joke sentiment strip and stamped our little mouse again using Distress Oxide Ink in Candied Apple.


Before I go today I did just want to let you all know that we have the brand new colour of Distress Oxide Ink & Spray in the shop. Its called Rustic Wilderness and its perfect for your winter woodland projects. I used  this to create the Woodgrain pattern for my floor in the card today.


I should also let you know that you can get 10% off your order by using my code T4TJO10.

Thank you so much for joining me today.
Enjoy the rest of your Friday.
XOXO

You will find a list of the products I used to make my project below.


Sending Crafty Hugs


Hello and happy Friday! DT Annalisa here and today I am sharing a card shaped like an easel with adorable stamps from the Crafty Cats clear stamp set. This is such a cute set that can be used for any occasion. I just love all the little crafty elements that come with this set.

I recently bought a Brother Scan N Cut SDX125e and I am learning how to use it. This card base was one of the first things I made using it! I don't think it will ever replace having coordinating dies as they cut so closely and smoothly which I love but it is a cool machine and is expanding my toolset when making cards.


Once the card base was assembled and colour added using distress inks and oxides I got to work on adding the Time For Tea cuteness! I stamped and coloured the images with my Copics and then die cut them out with the coordinating dies. I love how the die cuts around the droplets of ink on the paintbrush in the kitties hand. This set is perfect for a crafty friend who is going through a rough time.

If you are interested in purchasing any of the T4T products used in my project, use T4TANNALISA10 at checkout for a 10% discount which can be used on anything, anytime and has no time limit.

I hope you have a great weekend!

Thursday 19 November 2020

Die-namic Display Card Die Video

 Hi Vic here today, and I'm so excited to be bringing you a video tutorial. I have used the Die-namic Display Card Die for my video today along with the adorable Skating By Penguins Stamp & Die Set for my critters. I have also used the Let It Snow Die and some gorgeous snowflakes using the Falalala Slimline Die.


I first started by putting the card together. I die cut all the pieces using my die cutting machine and the Die-namic Display Card Die. In the video I will also show you how to create a curved line at the top of your card. I then adhered the card together using PVA glue. 


I then stamped and coloured in the adorable penguins. I used my copic markers to colour them in and used the coordinating dies to cut them out. Next I die cut the sentiment using the  Let It Snow Die and adhered this onto the back of my card. I also added some white paint to my card so that it looks like snow.


Using the Falalala Slimline Die I die cut out some snowflakes and adhered them onto my card. These snowflakes are so delicate and pretty. Your card is now complete. 


Don't forget you can save 10% off your purchase using the code: T4TVICKI10 at the checkout.

Thanks so much for stopping by today!

vic


Wednesday 18 November 2020

A Cracker of A Card

Happy Wednesday!

It's DT Shabneez sharing a cracker of a card! Ha!!!  It's using elements from the new release: the Catmas Crackers Stamp & Die Set, the Zig Zag Frame & Tag Set together with the Winter Wonderland Paper Pad.


I had a lot of fun making this card into a shaker so it looks like the cracker has exploded with sequins.  I used a sheet from the new paper pad as a background and cut out the zig zag frame from glitter card for that added sparkle.  After all, you can't have too much sparkle on a Christmas card can you?


My images were coloured in with my Chameleon pens and then die cut with the co-ordinating dies and stuck on top of the acetate.

Don't forget you can get 10% off anything in store using my code T4TSHABNEEZ10.

Happy Crafting!


Monday 16 November 2020

Have you picked up these penguins?


I can not tell you how much fun I am having with these adorable little Skating By Penguins. They just make me smile so much. This little car was so quick to make as I used the Winter Background stamp and then trimmed it to fit on this little 4x4 card. I put the penguin on an action wobble so he can be dancing for joy and then added sparkle with some nuvo drops. Who else has gone for these penguins? What are your plans for them? If you haven't brought them or if you want anything else from the Time For Tea Designs shop you can get 10% off if you use my code T4TAMY10

Huge hugs to you all 

Amy xx

Saturday 14 November 2020

This new release is Snow Much Fun!

 Happy Saturday everyone! 

Wow! What a week this has been and I promise this is my last post of the week for you (I will be back Monday though haha). 

Have you enjoyed seeing all the new release?? What are your favourites? And who got their orders in yesterday? I am so excited to see what you all create :D

Lets be honest, if you have seen all the new items you would know that I was never going to be able to resist these cute little Skating By Penguins for long and they work so well with the new Display Card Die I had to team them up :) 

I started by die cutting the card base and then decided which layers I wanted to use with it. I love that this looks so 3D but folds flat to fit perfectly in a C6 (6"x 4") envelope. 

I used a beautiful blender brush and a mix of Blueprint Sketch, Mermaid Lagoon and tumbled glass distress oxides to do the sky in the background and add some depth to the snow.

 
I coloured all my little penguins and the up with Copic markers and then stamped out coloured up some of the little trees from the winter background stamp set to go with them. The sentiments are from the new Sentiment Cards. To finish it off I added some Nuvo drops around it to give it some sparkle and texture. 
 
I hope this has made you smile and that you all have a great weekend. Don't forget if you want to grab these little guys or anything else from the Time for Tea Designs store you can use my code T4TAMY10 to get 10% off your order.
 
Huge hugs
 
Amy xx


Friday 13 November 2020

Christmas Cracker Slider


DT Annalisa here today wishing you a happy release day! What a better way to celebrate this new release than sharing a sliding cracker card?! I created this card using the Catmus Cracker stamp set and the Slimline Scalloped Trio Circle Nesting Dies.

Crackers are not typically a tradition in Canada but they have always been in my house thanks to my mum. She gets them for us each year and at our Christmas dinner at my sisters we all get to open several of them - I just love the BANG they make when we crack them open. We always read out the jokes and put on the hats (if only temporarily!) and see what surprise is waiting inside for us.

To start, I stamped the base scene on some Neenah Solar White 80 lb card stock and coloured the critters and crackers with my copic markers. I then stamped the sentiment and coloured in the background. I also stamped, coloured and die cut the kitty and cracker on the right. I used my slimline dies to cut out the scene as well as some red cardstock. 

I used a slider die to create the opening for my interactive element. I had to make sure it was the right size so that when the kitty was in its' leftmost position it covered the "is a cracker" text and when it was in the rightmost position it no longer covered the text. I added a bunch of double-sided foam tape (which I doubled up) to the back of the scene making sure to leave space for the slider element to function properly.


I added foam tape to a penny (also doubled up) and placed it underneath the scene in the slider opening and added the kitty on top. I then removed the backer tape and adhered the scene to the red background.

To finish the card I placed the card on some Neenah Solar White 110 lb card stock.

Be sure to use T4TANNALISA10 for 10% off your order including on new releases!


Thursday 12 November 2020

Sneak Peek Day 3!


 Hi everyone it's Design Team member Natalie here sharing some more cute peeks. Todays set is the Happy New Year Critters and has to be one of my favourites alongside those adorable penguins. The reindeer with his chubby little cheeks just had me sold, I cant stop colouring him up so be prepared to see quite a few cards with him. 
I used the new Fa La La Slimline card die to create my card base and added some pretty pink distress oxides to it. I started out darker at the edges and lighter in the middle then spritzed some water for extra texture and added some gold paint flicks to look like confetti.
The critters are coloured up with Copic markers I used the same mix of colours for each one to add some uniformity and added a dark and light one at each side for some balance. The dog is meant to be laying on a balloon but I just thought it was super fun with him popping open the champagne. I die cut all the critters and instead of stamping and colouring my balloons I used the coordinating die to cut it out of some glitter cardstock. I like the pop of red for some contrast. 
For the sentiment I used the new Happy New Year Sentiment Die I cut it out twice once out of white cardstock and then again out of Gold cardstock then off set the gold over the top of the white. Then it was just time to stick everything together and pop it on my card base and my card was finished. 
I hope you love the new release as much as us don't forget you can tune into the live tonight for more inspiration and the release will be in the shop tomorrow morning. You can even get 10% using code T4TNATALIE10


Reveal Day 2 - New Year Critter Card

  Hello Vic popping in today to share some of the exciting new release! You are going to absolutely love the New Year Critters! 


I can't pick a favourite critter as they are all so cute. I loved colouring these cuties in. 

For my card today I ink blended a piece of card using some red, Pink and Orange distress ink using the Beautiful Blender Brush.I wanted to add some stars to my background and I used the star from the Mew Are The Best Stamp Set. I used some Versamark ink and Wow Gold Embossing Powder and heat set this.I then used the brand new Die-namic Display Card Die and I just used the small die with tabs on which I die cut twice, I then used the grass edge die from the Landscape Edge Die and ran this through my die cutting machine again. I then inked up the card sing some green distress ink and adhered the grass panels to my card. 

Next I stamped and coloured in the critters. I then die cut the letters 2021 and adhered them to my card using foam pads. Once these were adhered down I then adhered the critters down.


I had so much fun creating this card!! I hope you are all enjoying the previews of the exciting new release! There are so many fun products in this release you will be spoilt for choice. 

Don't forget you can use the code: T4TVICKI10 at the checkout to save 10% off your orders.

Thank you so much for stopping by today! 

Vic

Other Posts You Might Like