Pages

Friday 30 September 2022

Halloween Haunted House


Happy Friday! DT Annalisa is here today sharing a Halloween scene featuring the brand new Haunted House Clear Stamp Set.

I love the large size of this haunted house, it is so fun to colour and takes up most of the card! I stamped the house and coloured it with my Copics. I then used a circle die that I had in my collection but one of the T4T Simple Circle Dies fits this stamp perfectly! I added some accents with a white Gelly Roll Pen.

I used the Square Label Dies to cut out two pieces of patterned paper from the new Halloween 2022 Digital Paper Collection. I used a dot runner to adhere the two pieces together and then to a card base. I used double-sided foam tape to adhere the haunted house circle and the sentiment to the card. 


Thank you so much for reading my blog post, you can use my discount code T4TANNALISA10 when you visit the Time For Tea Designs shop to get 10% off your order.


Thursday 29 September 2022

2 for 1 Cards with Amanda - Part 1


Happy Thursday, Tea Timers!  It's Amanda here!  Today, I am showing you Part 1 of my 2 for 1 Cards!

For my 2 for 1, I'm using one sheet from the Pawsome Rainbows Paper Pad and the Stitched Window Cover Die. Once I cut my paper with the die, I'm saving all the pieces!  I am going to use the frame on this Part 1 card and I'm going to save my insides for Part 2 (coming Oct 6th right here on the Time for Tea Blog!)

Next, I'm grabbing my Pawsome Prints Stencil, a black piece of cardstock, and Deco Foil Transfer Gel DUO.  Using a spatula, I have put the DUO gel through the stencil.  Next, is to wait an hour before we can add the foil!
After the DUO gel has gone clear and is now tacky, I can place my foil on top of my gel (shiny side up) and run it through my die cutting machine.  I'm also using the Hey, Hello, Hi Dies to create a sentiment and white shadow.
Now that I know where I'm going to place my stamps, I'm stamping my images from the Kitty Capers Stamp Set.  I'm coloring them with OLO Markers and then I can cut them out with the coordinating die set.

The next step is to attach the frame to the black background with 3D foam tape. I've also used 3D foam squares to prop up and adhere my stamped images and sentiments to the card. 


Make sure to come back next week to see Part 2!
Crafty Hugs,


Wednesday 28 September 2022

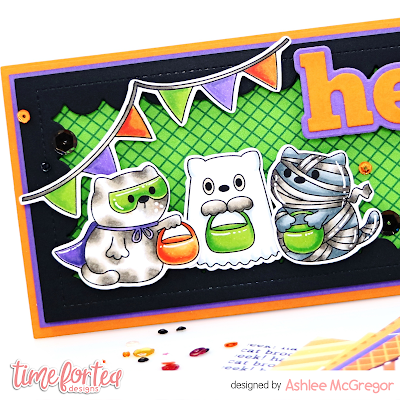
Hey halloween....!!

Hey there tea-timers...

Who's excited for Halloween?! If you said yes then you totally need to check out the Halloween mini release at Time for Tea designs!! 

It's such a fun release, I couldn't wait to get crafty with it...

This one consists of mainly digital products so that means you can print it out and create with it in a matter of minutes...


To make this card I used these T4T products...


To create my card I first started by printing out the digital images and coloured them all up with alcohol markers. I also printed out all the digital papers so I could select which one I wanted to use and save all the rest for a future project. 

My card base was done using different colours of cardstock along with the mini slimline scallop die. I love this die for my card bases , it's such a great size and perfect to create little scenes on!!


I fussy cut all the images and adhered them to the card using different levels of foam tape creating varying dimension. 

Using the hey sentiment die I die cut the shadow from purple card and the letters from orange then adhered them together with liquid glue before adding to the top right corner. 

To complete the card I finished it off with a touch of pretty sequins...


I had so much fun making this card with all these cute images and popping colour combo.
I hope you enjoyed it and it inspires you to create some halloween cards.

Till next post, happy crafting. Hugs Ashlee. 

Monday 26 September 2022

Hang In There... It's Almost Halloween!

Hi Tea Timers and Happy Monday. Today I am excited to share a card I made using the new Halloween Mini Release. Jo has amazingly released the new Halloween sets in 2 different mediums! The Trick or Treaters are a digital set that will be sent you immediately after you purchase them. The Haunted House is a Clear Stamp set.


Sets Used:

I used the digi stamp set for my cards by printing out the images using a laser printer and 100lb cardstock. I find that laser printers work best when working with digi stamps, especially if you are using alcohol markers. I printed out the Trick of Treaters by selecting "Actual Size" on the print menu prompt. 

I then fussy cut the cat on the broomstick image and used the following Copic markers to color the cat:

  • Cat: YR00, YR01, YR12, YR14, YR16, YR18
  • Hat: C-4, C-5, C-6
  • Broom: Y21, Y23, Y26, E11, E13


I took the Haunted House image and cut it down as an A2 background. I used the following Copic markers to color the scene:

  • House: C-6, C7, C-8, C-9, W-3, W-4, W-5, W6, W-7, W-8, B93, B95, B97, B99, Y13, Y15, Y17
  • Grass: YG11, YG13, YG17


At first, I used Copic markers to color the sky as well but I did not like how it turned out. To save the background, I fussy cut the top portion around the sky and took another A2c card panel and blended Uncharted Mariner, Seedless Preserves and Picked Raspberry to create my sky. I used white watercolor to splatter across it. 

To complete my card, I stamped the sentiment from the Up, Up & Away stamp set onto pink cardstock and heat embossed it with white embossing powder. I adhered the cat image using foam tape and the sentiment with liquid adhesive.

I hope you will check out the new Halloween mini release. If there are any sets that you purchase, don't forget to use the code T4TRANDY10 at checkout for some savings.


Saturday 24 September 2022

Get Whale Soon!


Hello Teatimer's I have another Whale card for you today. This time its a sweet Get Whale Soon card, for which I went for a bright and colourful colour scheme. 
I began by cutting out the largest frame from the Metric Layering Frame Dies three times so I had one for the base layer and the other two I cut out the sand bottom and the waves. I ink blended these with distress oxides and layered them altogether. 
For my images I combined the Get Whale Soon stamp set with an older discontinued mermaid set. You could use the weed from Fintastic Friends too though if you have that. I coloured those up with Copic markers and added some finishing touches using Black and White Gelly Roll pens. 
I also heat embossed the sentiment onto black card and cut that out with the coordinating dies. I love that Time for Tea stamps have the coordinating dies to cut out the sentiments too. It just adds something extra to your card. 
After adding adhering everything together I added some birds in the top left corner and some pink dots using a gelly roll pen and that was my card finished up for today. 
I hope you like it and be sure to check back for some more inspiration from the design team. 
Also a nice added bonus if you want to purchase anything in the Time for Tea Shop you can get 10% off your order using code T4TNATALIE10. 


Friday 23 September 2022

Coffee First


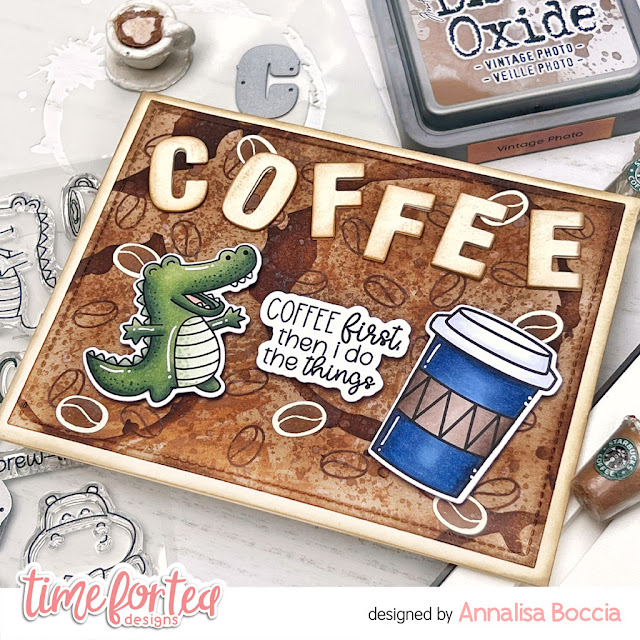
Hello everyone, DT Annalisa here today. I have a coffee-themed card that I created using stamps, stencils and dies. I love how giant the coffee cup is next to the alligator! I have to thank my niece Tonya for the adorable miniature frappuccino and coffee cup creations seen in this photo - she knows just how much I love Starbucks! 

I ink blended Vintage Photo Distress Oxide ink onto some white cardstock through the Coffee Stains 6 x6" Stencil using my Beautiful Blender Brush. I removed the stencil and ink blended some more to cover the white areas. I then stamped on coffee beans from the Snappy Before Coffee stamp set using the same distress oxide ink. I cut the panel using a 4-inch x 5 1/4-inch stitched rectangle die.


I created a cream A2 card base and ink blended the edges with Simon Says Stamp Khaki Ink. I used Anthony's Alpha Dies to cut out the letters for 'Coffee' three times and ink blended the edges with the same ink. 

I stamped the alligator from the Snappy Before Coffee stamp set and cut it out with the coordinating die set after colouring it with my Copics. The large coffee cup is from Coffee Lover - I also used the coordinating die set to cut it out. I added some white gel pen accents with a Gelly Roll Pen.


I assembled the card by using liquid glue to adhere the stencilled panel to the card base. I used foam tape to adhere the alligator, coffee cup and sentiment to the card. I used liquid glue for the letters. I threw caution to the wind and put them on NOT STRAIGHT! As a perfectionist, this was HARD but I like how it turned out. 

Thank you so much for reading my blog post, you can use my discount code T4TANNALISA10 when you visit the Time For Tea Designs shop to get 10% off your order.


Halloween Mini Release Is Here!!

 Hey there Tea Timers!!


We are soooo excited to bring you our Spooktacular Halloween Mini Release!

This release is full of not so scary fun surprises and faboolous deals on some of your favourite T4TD products.

We are also really excited to bring to you some exciting Digital Products. Check out our new Trick or Treaters Digital Stamp Set and the coordinating Digital Paper Pad. We love our digital products here at T4TD. It's how we started as company, and we love how instantly accessible it is.


We've also put together some of your favourite dies, that we know will work so well with the Halloween Release. To celebrate the launch, we have reduced the prices on these special bundles so you can stock up!


We really hope you love our Mini Halloween Release. Look out for more spooky inspiration from the DT over the weeks leading up to Halloween itself! 


Head to the T4TD website New Arrivals page to see all of the crafty goodies. 
Happy Haunting!!

Thursday 22 September 2022

How to Use Patterned Paper Scraps

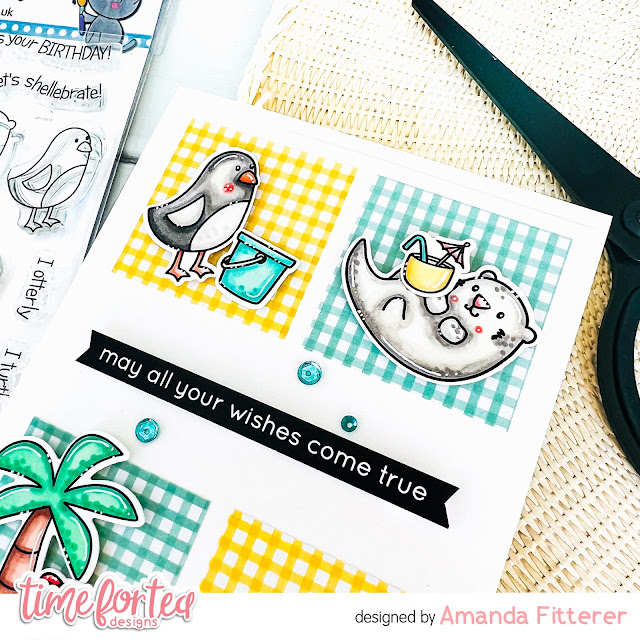
Happy Thursday, Tea Timers!  It's Amanda here!  Today, I am showing you a way to use your patterned paper scraps!  For this card, I'm using the Gorgeous Gingham Paper.

I'm going to start by trimming down a piece of white cardstock to 4"x5.25".  This will be my card front that will leave a white border around the edge of my card base.  My card base is 5.5"x8.5", scored in half.

Next, I'm taking my paper scraps and trimming them to 1.75"x1.75".  I'm going to glue those in the corners of my card front.

Next, I'm going to stamp, color, and die cut my images from the Beach Buds Stamp Set.  I'm using OLO markers to color my cuties.  I've adhered and propped them all up with 3D foam squares.
 
For my sentiment, I've trimmed one of the Brighter Days Sentiments and propped it up with 3D foam squares.

For my final touch, I'm adding just 3 sequins.


That's all I have to share with you today!  I can't wait to be here again next week and share another project with you!

Crafty hugs,
Amanda!


Wednesday 21 September 2022

Get well mini slimline with Ashlee

 Hey Tea-timers...

It's DT Ashlee here today, I hope you are all well and getting some beautiful weather like we had here in Tasmania today!! 

I've got a new mini slimline card to share with you all and I must say I think this mini slimline scallop die set by T4T would have to be one of my most favourites to use, its such a great size and so fun to create with...


For this card I've gone with a get well whale scene...


To create this card I started by die cutting the base of the mini slimline die from a green cardstock. I then adhered a piece of patterned paper to it from the Pawsome rainbows paper pad before adding the mini scalloped frame I die cut from a yellow cardstock over the top adhered with foam tape to add dimension. This completed the base and it was now onto the decorating...


I stamped, coloured and die cut a couple of the super cute whales and accessories from the Get whale soon set and then adhered them into place on the card base using foam tape because I love lots of dimension on my cards...

To complete the card I added a heat embossed sentiment and a touch of pretty sequins!!

What do you think about this one? it's always handy to have some get well soon cards on hand for any of those moments that a friend or loved one might need a little pick me up...


Thanks for stopping by the blog today, happy crafting. Hugs Ashlee. 

(Don't forget if you want to do some T4T shopping you can use my code T4TASHLEE10 for a discount off your order)

Monday 19 September 2022

I'm Just a Phone Call Away (CAS Card)

Hello Tea Timers and Happy Monday. I am back on the blog showcasing a set I have not created with yet but now love to use for Clean and Simple cards. I love this Retro Phone Builder since it can easily help create a card a minutes and it's perfect for a card just to say "Hello!"


Sets used:
I first diecut my card panel using the largest die from the Autumn Scene Cover Plate die. I then took the Slimline Scene Builder Stencil and used the cloud part to blend clouds onto the panel with Scattered Straw Distress Oxide. 

I then took the Retro Phone Builder Die set and cut it out of light blue, teal, and green cardstock. For the cord I decided to go with a gold cardstock. 


I then die cut the Hey and Hello from pink cardstock. I heat embossed the sentiment from the Let's Chat Stamp set and die cut it using the coordinating die. 

I wanted to make it look like the Hey and Hello were coming out of the phone so I used adhesive tape to adhered the dialer and then the handset which I left upright. I then took the Hello and Hey diecuts and adhered them with liquid adhesive.


I then adhered the sentiment using liquid adhesive inbetween the Hello and Hey. To complete my card, I used a white gel pen to add the numbers to the dialers.

I hope you enjoyed this blog post. If you liked any of the products that I used in today's post, I linked them above. If you decided to purchase any of the sets, use the code T4TRANDY10 at checkout for extra savings. Have a crafty week!

Friday 16 September 2022

You Had Me At Meow


Happy Friday, DT Annalisa here! My card today features the awesomely large You Had Me At Meow Sentiment Dies. I love how this die takes up a whole A2 card!


I found some adhesive sheets with wood print at my local dollar store and decided to try them in my cardmaking. I used a stitched rectangle die (4 by 5 1/4 inches) to cut out one of the wood patterns. I also ran this through my die-cutting machine with the You Had Me At Meow die. It helped me with the placement of the letters and provided me with wood-looking letters that I could use in another project. I removed the backer sheet of the die-cut wood panel and placed it on a white A2 card base. 


I ink blended Walnut Stain Distress Ink using my Beautiful Blender Brush onto some white card stock through the Pawsome Prints 6 x6" Stencil. I used the You Had Me At Meow sentiment again to cut the stencilled paper. I used the same die to cut out the letters two more times (it got a workout on this card!). I glued all the letters together and then onto the card.  


I used the 
Purrfect DayKitty Capers and Café Critters stamp sets and their coordinating dies. I coloured the images with Copic markers and added white Gelly Roll pen accents. I used liquid glue to adhere the elements to the card.


Thank you so much for reading my blog post, you can use my discount code
T4TANNALISA10 when you visit the Time For Tea Designs shop to get 10% off your order.


Thursday 15 September 2022

How to Create a Peek-a-boo Porthole

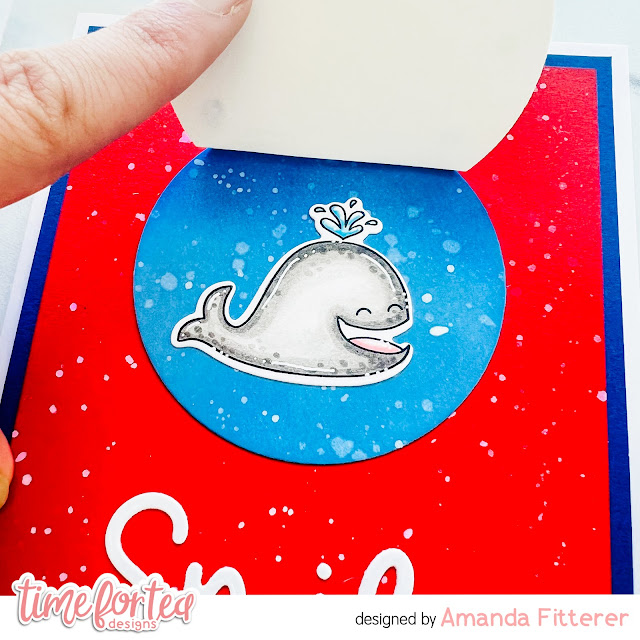
Happy Thursday, Tea Timers!  It's Amanda here!  Today, I get to share with you how to make a Porthole Lift the Flap Dies card!

To create this card, I'm starting with the dies and cutting the solid circle die (the one that is blue below), the porthole circle die (with the holes), and the trimmed circle die from the Porthole Lift the Flap Dies.  I've also trimmed a dark blue piece of cardstock and red piece of cardstock down.

I have glued the red cardstock to the blue cardstock.  Then, I'm gluing the blue circle to the red cardstock.  The trimmed circle goes behind the porthole.  Now, I'm adding Nuvo drops in the porthole circles.  Then I glue the porthole over top of the blue circle.

For my sentiment, I'm using the "smile" from the Smile Inverted Scallop Frame Dies.
I've also stamped the whale from the Fintastic Friends Stamp Set and colored it with Copic markers.


That's all I have to share with you today!  I can't wait to be here again next week and share another project with you!

Crafty hugs,
Amanda!

Other Posts You Might Like