Pages

Sunday 27 February 2022

Fairy Happy Birthday

 Good afternoon Teatimers,

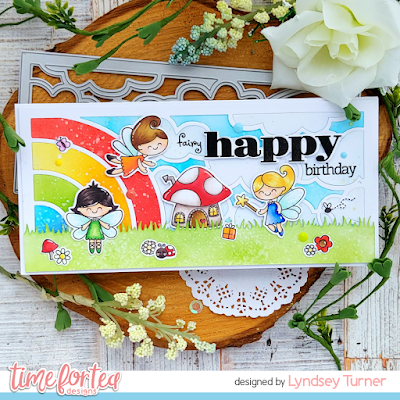
The sun shining through my window this morning has inspired me to share the bright and cheery card with you today. I've had these adorable Fairy's in my stash for a while and never seemed to get around to using them. Once I saw the fabulous Sky's the Limit background die from the latest release I knew they would be a perfect match.


To start I stamped and coloured my images using my Spectrum Noir Markers (colours listed below in order of lightest to darkest)

Toadstool - CR7, CR11, DR3 - BG1, BG3, BG5, BG6 

Skin - FS2, FS4, FS7, TN2

Blonde Hair - LY2, LY1,LY3, GB1, GB3

Brown Hair - GB8, GB10, EB4

Drk Brown Hair  - BG6, BG8, BG9, BG10

Orange - OR1, OR2, OR3 

Blue - TB2, TB3, TB4, TB5 

Wings - IB1, BT2

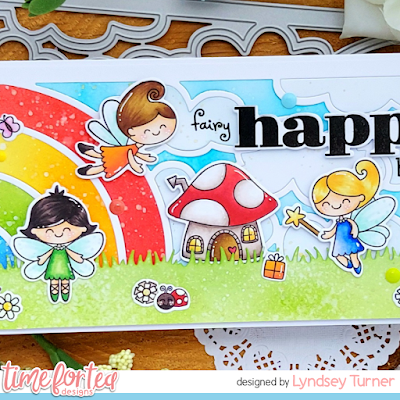
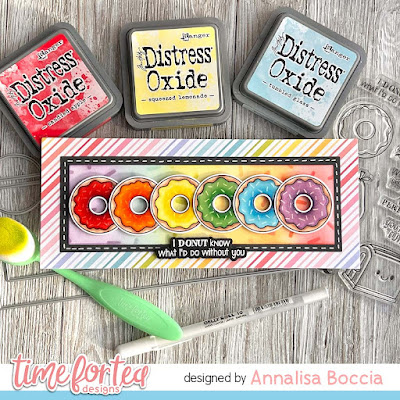
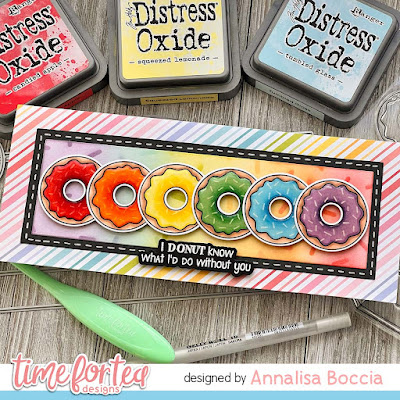
I die cut the background die from white card, removed the outline part and added colour to the inner sections using distress inks in the colours- Abandoned Coral, Candied Apple, Squeezed Lemonade, Spiced Marmalade, Twisted Citron, Mowed Lawn, Salty Ocean, Blueprint Sketch, Mermaid Lagoon and Speckled Egg.

I adhered the outline onto white card and pieced back in the inked sections. I cut a piece of white card using the grass die from the Slimline Hillside Die, again added colour with the green inks and and added this to the bottom of the die.

I added my images to the card to create the scene and stamped the sentiment I the top RH side of the card. The 'Happy' was stamped and die cut using the matching die from the Bold Sentiments set, this was added to the card using foam pads for dimension.

I created a slimline card blank from white card cut to size to leave a small border around the panel.

I finished off the card with a few randomly placed Enamel Dots.

Thanks for joining me here on the blog today, don't forget you can use my code T4TLYNDSEY10 for 10% off your order in store. 

Enjoy the rest of your weekend 

Lyndsey x


Saturday 26 February 2022

Time for Tea Designs and Heffy Doodle Collaboration Blog Hop

 Welcome to the Time For Tea Designs and Heffy Doodle Collaboration Blog Hop!


We are so excited to be collaborating with our friends at Heffy Doodle in this fabulous Hop!
Design Team members from both companies are sharing inspiration using products from both companies!

To be entered to win the giveaway, all you need to do is comment at each stop along the Blog Hop!
Time for Tea will be giving away £25 and Heffy Doodle will be giving away £25 to their respective stores!  Be sure to comment before 11:59 PM EST on Mar 2nd to be entered to win!

Each company will post their random winner on Mar 3rd at 10AM EST!  Make sure to check the Heffy Doodle Blog and Time for Tea Designs Blog to see if you’re a winner!


Blog Hop Line-up:

Claudia Cubas 

Carrie Rhoades

Lyndsey Turner

Amanda Stevens

Jayne Vaughan

Tallie Clewley

Silvia Galloni

Amanda Fitterer

Heffy Doodle Blog


Friday 25 February 2022

Donut Rainbow


Hello, everyone DT Annalisa here, on this last Friday in February. This cheerful rainbow of donuts was created using the We Go Together stamp set and coordinating dies. The center of the donut hole was created using the Dog Gone Mutts coordinating die set, as the tennis ball die just happens to be the perfect size for this!


I stamped the donuts and coloured them with my Copics and added some sprinkles using my White Gelly Roll Pen. I die cut the donuts out and added some Glossy Accents and set them aside to dry.

For the panel behind the donuts, I ink blended six Distress Oxides onto the Confetti 6 x6" Stencil. I then removed the stencil and ink blended lightly, using my Beautiful Rainbow Blender Brushes, to create a rainbow background. The Oxides I used were Candied Apple, Spiced Marmalade, Squeezed Lemonade, Twisted Citron, Tumbled Glass and Dusty Concord.


I used the Simple Slimline Nesting Dies to die-cut black cardstock and some patterned paper, to create panels on which to place the donuts panel.

I created a slimline card base (8.5 by 3.5 inches) and used a tape runner to adhere the patterned paper, black cardstock and stencilled panel on top of it. I used a White Gelly Roll pen to add a stitched line to the black cardstock. I then used a combination of foam tape and liquid glue to adhere the donuts to the card.


To complete the card, I heat embossed the "I donut know what I'd do without you" sentiment using VersaMark and white embossing powder and an embossing heat gun.

Thank you so much for visiting my blog, you can use my discount code T4TANNALISA10 when you visit the Time For Tea Designs shop to get 10% off your order.


Thursday 24 February 2022

Awesome Friend

Hello fellow crafters! Today is my last post for Time For Tea Designs. I have had such fun being on the team and I can't believe it has already been a whole year, where has that time gone?! Here is my last card using some cuties...

For this card I used Stinkin' Cute Stamps. I coloured them with copics then used the Coordinating Dies to cut them out. I created the background using the Scene It Stencil along with some Peacock Feathers Distress Ink. I added a little Lucky Clover onto some green card it and die cut it using the Grass Die from the Slimline Hillside Scene Dies. I used the sentiments from the Bold Sentiments Stamp Set and cut them out with the Coordinating Dies. I assembled everything onto the card with foam pads. I finished by adding some clear drops.


Don't forget you can use my discount code T4TKITTY10 for 10% off your order at Time For Tea Designs. I would also like to take the opportunity to say thank you for all the team at Time For Tea Designs for letting me design for them and join in with all the new releases. It's been fab being part of such a great team.


Kitty xx

Enjoy the little things!

 Hello Tea Timers! Silvia's here today sharing with you my last blog post. It has been a big pleasure being part of this amazing team for this term and I'm so grateful to Jo for this opportunity.

For today's card I started inking a white panel with some drops of kitsch flamingo Distress spray stain and oxide spray. I then added a bit of texture with picked raspberry Distress Oxide ink and "Boho Tile" stencil.

I stamped images from "Blooming Bunnies", "Fairy Garden" and "Jumping with Joy" stamp sets, I colored them with Spectrum Noir alcohol markers and I cut them with coordinating dies (you can find them here, here and here).

I also die cut a tree from kraft carstock with the "Winter Trees" die set and a grassy border with the "Slimline Hillside Scene" die set. I ink blended this last one with twisted citron and mowed lawn Distress Oxide inks.

I put everything together using a mix of liquid glue and foam tape and that's all.


I hope you'll enjoy the card and don't forget you can get a 10% off your Time for Tea orders with the code T4TSILVIA10.

I wish you an amazing day.

Big, big hugs, Silvia.


Wednesday 23 February 2022

Box Clever Scene

Hello!

Today is my last post as a member of the T4TD DT so I decided it was time to break open the Box Clever dies that have been lurking unused in my stash.


I cut all the shapes from the Box Clever die set from white card and then set about colouring and creating my background scene. 

I used the Slimline Scene Builder stencil to create some clouds on the back panel and adhered the sun and clouds which are part of the Box Clever set on top.


I then chose my most favourite of all the T4TD stamp sets - You're Elephantastic - and enjoyed colouring them in bright happy shades. I always seem to reach for You're Elephantastic and adore the sweet ellies.

I attached the little bird onto a thin strip of acetate so that it could fly over the coconut shy and it wobbles and bobs adorably in real life.

I hope you like my card using the awesome products from T4TD. If you'd like to purchase any items you can get 10% off until the end of February using my code - T4TJANE10.

Thanks for looking today. 
Stay safe and keep crafting!

Jane
x

Tuesday 22 February 2022

Love You Lots - alcohol inks on vellum


Hello Tea Timers!

It's Miki here and today I'm back with new inspiration! I made this card while I was at Natalia's house and it was so much fun, we tried a lot of alcohol ink techniques.

Firstly, I used the Smile inverted scallop die for the frame. I cut it 3 times from white cardstock and glued them together. Next, for the background I used alcohol inks on vellum. The colours that I chose are:

  • Gumball
  • Sunset Orange
  • Dandellion
  • Clover
  • Glacier
  • Boysenberry
I glued the frame on top of the vellum and then added a piece of white cardstock at the back for extra support. 

Next, for the sentiment I used the Love You Lots Large Sentiment Die. I cut it 3 times from white cardstock. To add some interest I embossed one of the die cuts in WOW! Halo embossing powder and then glued all 3 layers together. I added the sentiment to the middle of my card panel.

For the images I used the Bearing Gifts Stamp Set. I stamped the little bear and coloured him in. I then used the matching dies to cut him out. For the speech bubble I used the Concord & 9th Oceanside ink to stamp and the matching die to cut it out. 

I added them to my card panel using foam tape. I then created a matching card base and glued the panel on top.

This card was so much fun to create. I'm no expert in alcohol inks so I don't play with mine often enough, but they're always fun to experiment with. Do you have any technique you'd like to use more?

Please remember to use my code T4TMIKI10 for 10% off your order in the shop.

Hugs,
Miki

Have a howling good day!


Hello dear Tea Timers, today I'm telling you about my love for dogs. I have two at home that I love, but I also have a cat that is mischievous. In this card I imagined them together with their neighborhood friends.  


For the background I used the stencil Dancing Dandelions  with the Distress  and these little dogs are from the set Dog Gone

Hope you like it!!!

I wish you a fantastic week, and remember to use the code T4TCLAUDIA10  for your purchases in the shop, you will get a 10% discount! 

Design Team Call


Hello Tea Timers! We have some exciting news for you!

We are looking for new, creative, self-motivated, design team members who love Time For Tea Designs products!

Here are the deets of how you can apply!!


Applicants should:

·         Love Time For Tea Designs products!

·         Have a blog and social media presence

·         Be able to produce a minimum of 1 card project a week in addition to extra projects during new release time, for the term of 1 year

·         Be a reliable and conscientious team player

·         Be open to taking part in Hops & other marketing activity such as Magazine Features or projects for TV appearances

·         Take clear, bright and well-staged photos of your projects

·         Be willing to actively participate in both the Facebook and Facebook Friends page community as well as our Design Team group

·         We are particularly interested in individuals who are open to creating in video format via, Facebook, YouTube, Instagram Reels etc.

If you think you fit the bill then please get in touch. Send us 3 photos of different projects, along with links to your Blog and social media accounts to admin@timeforteadesigns.co.uk.

The closing date for applications is March 21st 2022.

Good Luck

Monday 21 February 2022

The sky's the limit

Hello, crafty friends! 

Today's CAS card features the paper plane pals stamp and coordinating dies set which is so much fun! I love that it is packed with little stamps to complete your card.

For my background, I used the Starry Heart 6x6" stencil on white cardstock with tumbled glass, salty ocean and chipped sapphire distress oxides.  


I don't use craft card anywhere near enough - it's so pretty and it provides a nice change to the white (which is what I usually reach out for the most!). Does this happen to you too? I feel like I have a favourite set of colour combinations and sometimes it's not easy to use different ones! So it's great to try and leave that comfort zone sometimes. 

I hope you like this CAS card and it inspires you to try something different!

You can use the code T4TNEILA10 for a 10% off your shop. 

See you next week,

Natalia

Sunday 20 February 2022

I donut know

 Good afternoon Teatimers,

Hope you all survived the storm that blew through without too much destruction? We had a few trees blown down on our estate, but luckily nothing too major to our own house.

So on this dreary rainy Sunday afternoon I thought I'd share this bright cheery card with you using these fabulous donut images from the We Go Together stamp and die set. I mean who doesn't love a sprinkle donut?

To start I coloured my donuts and added glossy accents to give them a glazed look. Whilst the glossy accents was still wet I added a mixture of clay sprinkles to the top.

For the background I die cut the Lots of Love hearts cover plate from white card and added strips of colour the back the match in with the colours of the sprinkles. The whole panel was then matted o to a piece of black card leaving a small border, before adding onto a 5x7 card blank trimed down to size.

I stamped the cute sentiment onto black card using a clear embossing ink and covered with white embossing powder. I used the matching die from the set to cut it out.

I grouped the donuts and sentiment together on the card towards the bottom left and added a few clear drops scattered across the card to finish.

Thank you for joining me here on the blog today,  don't forget to use my code T4TLYNDSEY10 for 10% off your order in store. 

Enjoy the rest of your Sunday 

Lyndsey x


Saturday 19 February 2022

Happy Mail, Hugs Enclosed!


Happy Saturday Teatimer’s, have you had a good week? You might have seen this cute card during the blog hop last week, so I thought I’d share with you all how I made it. 

I finally got to use the Happy Mail Gift Card Holder Die Set. I didn’t use it as a gift cardholder though, I just used it to create a fun shaped card base. I wanted some texture on my card so cut out the Dotty Hearts Cover Plate Die and ink blended Abandoned Coral, Picked Raspberry, Kitsch Flamingo and Spun Sugar Distress Oxides over the top to give and ombré look. Finishing off with a few splatters of water to give some texture and some splatters of gold water colour paint.

 Setting that aside to dry I stamped cut out and coloured up the skunks from the Stinkin’ Cute Stamp Set. I coloured them up with COPIC markers and added some finishing touches with white gelly roll pen. The letters are from the Happy Mail Critters Stamp Set and the Be Kind Be You Stamp Set which also contains the hugs enclosed sentiment (which I stamped and heat embossed in gold) then the balloons are from the Smitten Kitten stamp set. I really do love to mix and match my sets! Once all the colouring was done I could began adhering my card together.

I cut out the biggest of the two mail box dies the larger rectangle and the letter box die out of hot pink card. Then taking the Dotty Hearts panel I cut the smaller mail box out of that and to save my card being bulky and time I cut out the smaller rectangle in the middle. Then layered everything on top of each other as you can see the larger pink rectangle covered the hole.

Before adding my critters I needed to make the rest of my sentiments I used the Happy Mail die from the Happy Mail Gift Card Holder Add on Die Set which cut out in gold and white and layered on top of each other to create a shadow and used the same hot pink for the happy bigger shadow. 

Then I just adhered everything together using foam tape on the critters to give some added depth and dimension. To make the card base I just cut out the bigger of the two mail box dies from white 360gsm card twice and scored one of across the top about 2cm down and added double sided tape above the line and attached my card together. Then all was left to do was adhere the top and that's my card finished up. I hope you like my card for today it's super fun and great for just sending happy mail to a friend. You can find all the products in the Time for Tea Shop and get 10% off any orders using code T4TNATALIE10. Have a great weekend and I will see you all next week. 

Friday 18 February 2022

Thank You Penguin


Happy Friday! DT Annalisa here today sharing a thank you card using the adorable Skating By Penguins Clear Stamp Set and some Time For Tea Designs dies.

To start, I applied Spun Sugar and Picked Raspberry Distress Oxide using my Beautiful Blender Brush, I then added white splatter with a paintbrush. Once the panel was dry, I dry embossed it with the Scattered Hearts Cover Plate


I then used three dies to die cut some white card stock: Thank You Sentiment Die Set, Small Heart XOXO Die Set and Falalala Scalloped Slimline Dies. For the scalloped frame, I cut off the bottom and top and kept two scalloped strips of 5 5/8 inches. I used liquid glue to adhere the border, sentiment and heart to the pink panel.

I stamped, coloured and cut out the penguin and used some foam tape to attach it to the middle of the heart.


To complete the card, I added the decorated panel to a white card base made of heavy white cardstock. 

Thank you so much for reading my blog post, you can use my discount code T4TANNALISA10 when you visit the Time For Tea Designs shop to get 10% off your order.

Thursday 17 February 2022

Treat Yourself

Hello, DT Kitty here. It's Thursday afternoon and time for my latest Time For Tea DT card. With Valentine's over that means Spring is on the way! I decided to create a slimline scene featuring some gorgeous bears...

For this card I used the Bears Picnic Stamp & Hillside Village Stamps (for the trees). I coloured them all with Copics and cut them out. I created the background by using the Scene It Stencil with some Mermaid Lagoon Distress Oxide Ink. I blended Twisted Citron & Mowed Lawn onto a strip of card and die cut it using the stitched border die from the Slimline Hillside Scene Dies. I used the Bold Sentiments Stamps for all the sentiments and used the coordinating Bold Sentiments Die to cut them out. I assembled everything onto the card with foam pads and added some heart embellishments to finish.


You can get 10% off your order on the website using the code T4TKITTY10


Kitty xx

Enjoy the little things!

Hi there and welcome back to Time for Tea's blog. Silvia's here today.

I started cutting a white rectangle and I ink blended it with mermaid lagoon, prize ribbon and villainous potion Distress Oxide inks. I spalttered with clean water and tone on tone inks.

I then cut a grassy border and I ink bleded it with lucky clover and rustic wilderness Distress Oxide inks and I splattered with clean water and tone on tone inks.

I stamped images from the new "Enjoy the Little Things" and "Sweet Village" stamp sets with black ink, I colored them with alcohol markers and I cut them with coordinating dies (you can find them here and here).

I put everything together with a mix of liquid glue and foam tape, I added two white puffy clouds that I cut with the "Windmill Add On" die set, I stamped one of the sentiment from the "Enjoy the Little Things" stamp set and that's all.


I hope you'll enjoy the card and don't forget you can get a 10% off your Time for Tea orders with the code T4TSILVIA10.

I wish you an amazing day and thank you so much for stopping by.

Big hugs, Silvia.

Wednesday 16 February 2022

Honey Bee Mine

 Hello!

Today I'm sharing a card using the Love Intertwined Sentiment die from the recent release combined with the adorable bees from Bee Happy. 


Once I'd cut the Love Intertwined I popped the outline back into the aperture and chose a sky coloured paper from the Brighter Days pad to place behind it. I really liked how it looked as a frame around the white card so I decided to leave it before matting it onto a white card base. 


Next I had fun colouring up the sweet images from Bee Happy. I placed them around the Love Intertwined and popped one up onto foam pads.


I finished off my card with a sentiment and three tiny pink hearts picking up on the hive door colour.

I hope you like my card using the awesome products from T4TD. If you'd like to purchase any items you can get 10% off by using my code - T4TJANE10.


Thanks for looking today. 
Stay safe and keep crafting!

Jane
x

Tuesday 15 February 2022

Valentine's Day Hop Winners


Thank you so much to everyone who joined in with the Valentine's day sale blog and Instagram hops over the weekend. 

We are SO EXCITED to announce the winners.

Instagram - @fawnie_mina

Blog - Meghan Kennihan

Huge CONGRATULATIONS to you both!

Please email Jo - admin@timeforteadesigns.co.uk - to claim your gift card.

Keep your eyes opened for future hops and chances to win!

Hugs,

Time For Tea Designs

Sweet friends!


Hello Tea Timers, today I'm showing you my latest creation, an outdoor skit and one of my yummy friend stories.  

I took a few sets from my stash to create the scene, the landscape in the background from set Sweet Villagge Stamp the little stores from  Sweet Villagge Stamp the little dog from  Enjoy the little things . I love to mix and match sets. I hope you enjoy!!! 

Have a great creative  week , and remember to use the code  T4TCLAUDIA10 To get 10% off at the shop!!!

Sending Paper Hugs


Hello Tea Timers! 

It's Miki here and today I share with you my hop card. I hope you had fun hopping along with us for the V'day sale and most of all I hope you managed to get your hands on some discounted goodies!

For the card I used the Happy Mail Critters & coordinating dies and the Scattered Hearts stencil – all of which are included in the sale! I started by stamping the images and colouring them in using my Spectrum Noir Illustrator markers. I then die cut them using the matching dies and added some white highlights.

Next, I focused on the background. I used the stencil and ink blended an A2 panel in Shaded Lilac and Kitsch Flamingo distress oxides. I applied a more ink with the stencil on and then went in with a light hand over the whole background to soften it. I then used the Landscape Edge Dies to cut 2 small panels of grass. I ink blended those in Twisted Citron oxide and added them to my panel using foam tape.

For the sentiments, I embossed them in WOW White Embossing Powder and cut them with a die – I believe the one I used is from the All Occasion Critters dies set. I added the critters and the sentiments to the panel with foam tape and mounted it on an A2 card base.

I hope you like this card! Please remember to use the code T4TMIKI10 for 10% off your order!

Hugs,
Miki

Monday 14 February 2022

Valentine's card and sale!

Hello and Happy Valentine's Day!

Have you seen the awesome sale at Time for Tea Designs shop

For my card, I chose a selection of item which you will find in the Valentine's sale today, so make sure to check them out! The adorable skunks are from the the Stinkin' Cute stamp set which I coloured with my Ohuhu alcohol markers. For the background, I chose to use abandoned coral distress oxide and the Scattered Hearts 6x6" stencil.


Of course I had to make the card into a shaker, didn't I? So I used the Oval Scalloped Nesting Dies for this. I built 5 layers of the frame to ensure my shaker elements could move freely. I then used the 'you' die cut from the Happy Mail Gift Card Holder Add On die set - I love it when word dies come with shadows!

I will post later on my Instagram account later, so keep an eye out for that if you want to see the process!

Sending hugs,

Natalia

Other Posts You Might Like