Pages

Friday 30 June 2023

Birthday on the Farm


Hello, and happy Friday! DT Annalisa is here sharing a fun slimline farm scene created using several stamp sets and dies from Time For Tea Designs. I love being able to mix and match stamp sets to create fun scenes like this summer on the farm one.

The following supplies were used to create the card:

Ewe Are Moovellous
Love Is In the Air
Just Married
Ewe Are The Best
Ewe are the best coordinating dies
Darling Daffodils


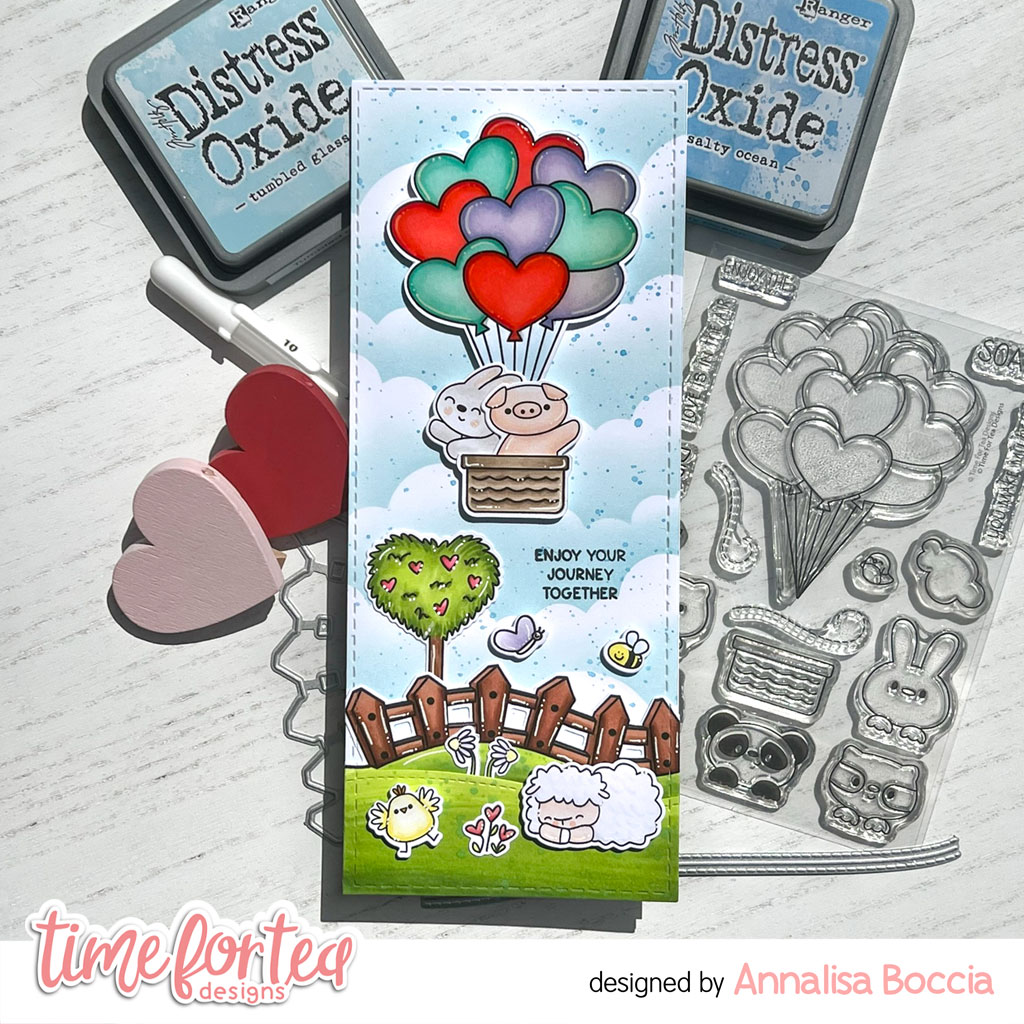
I cut Distress White Heavy cardstock by Ranger using the largest die in the Simple Slimline Nesting Dies and ink blended Salty Ocean and Tumbled Glass Distress Oxide Ink using my Beautiful Rainbow Blender Brushes. I added splatter with a paintbrush, water and Prize Ribbon Distress Oxide Ink. I placed this panel onto a slimline card base.

I used the same paper and ink blended Twisted Citron and Mowed Lawn Distress Oxide Inks with Rustic Wilderness splatter for the grass. I die-cut the ink-blended panel using the same large Slimeline Nesting Die and again with two dies from the Slimline Hillside Scene dies. I used liquid glue to stick the hilly grass to the card base. 

I die-cut woodgrain cardstock with the Fenced in Dies and glued them to the hilly grass. I then used double-sided foam tape on the other grass section and stuck it to the bottom of the card. Before doing this, I stamped the 'from the whole herd' sentiment onto the grassy panel with Versafine Onyx Black. 


I stamped, and coloured (with Copics) several images from the stamp sets listed above and cut them out with their coordinating dies. I added white gel pen accents with a Gelly Roll Pen

I stuck the images to the card base using a combination of liquid glue and double-sided foam tape for dimension. I stamped the ‘Happy Birthday' sentiment and cut it out with its' coordinating die, I die-cut two more pieces of paper using the die and glued them all together for added dimension.


Thank you so much for visiting my blog. Remember to use my discount code 
T4TANNALISA10 when you visit the Time For Tea Designs shop to get 10% off your order.


Thursday 29 June 2023

Have a MOOVELLOUS Birthday! From the Whole Herd!


Hey there, Tea Timers!!  It's Amanda here with a MOOVELLOUS birthday card!  To make this card, I am using:
Ewe are Moovellous stamp and die set
Scene Builder Stencil
Slimline Hillside Scene Dies

First, I'm using Catherine Pooler's Cummerbund and All That Jazz with the Scene Builder Stencil to create a cloudy background.  I'm using Melon Ice and Garden Party with the Slimline Hillside Scene Dies for my hills.
For my images, I'm using the Ewe are Moovellous stamp and die set. I have used Copic markers to color them in.

Next, I'm using 3D foam squares to assemble my card.


That's it for me today, friends!  I hope you find some time to get crafty!
XX, Amanda


Wednesday 28 June 2023

A pizza my heart

 Hey there Tea-timer friends...

It's DT Ashlee here. Do you like pizza?! If you answered yes then you are in for a pizza treat with this card!


I used these Time for Tea designs products :


To create this card I started with a teal blue card stock base that I added scattered hearts stencilling to using Catherine Pooler ink in the colour Cummerbund. 

Using black paint mixed with water I gave the base a splatter of paint! 

Using the wide stitched frame dies I die cut a frame from light grey card and backed it with a darker grey. I then adhered that angled onto the card base using foam tape to start adding in some dimension. 


I stamped, coloured and die cut three of the pizzas from the lets spoon set then adhered them onto the frame. 

Now it was time for a sentiment so I stamped and die cut the 'you stole a pizza my' and adhered it below the pizzas. Using the Anthonys alpha set I die cut the word HEART to finish the sentiment. I die cut it from grey cardstock and also from pink card so that I could offset it creating a shadow. Once that was all done I adhered it in place and finished it all off with a touch of sequins and 
embellishments!


Thanks for checking out my card today, I hope you enjoyed it. Happy crafting, Hugs Ashlee.

Tuesday 27 June 2023

Hello


Hello, Hola, Ciao, Hey crafty friends, DT Miri here with another crafty project that I hope may inspire you. I was keen to use the Wonky Window Cover Die since I received it and what better to add than a few friendly little critters from the Hey There Critters stamp set. 


I started off by getting the card base cut and scored from 110lb white cardstock and die cutting the Wonky Window Cover Die in a pale blue cardstock. I then die cut a cloud stencil using the cloud die from the Landscape Edge Standalone Die.


On a panel of white cardstock, I stenciled a cloud background using my newly created stencil and Salty Ocean Distress Oxide Ink. I then moved on to stamping all of the images using a Copic friendly die ink. I coloured all of the images and then added white gel pen highlights. I then fussy cut all of the images, although there is a coordinating die available.


For the images I have used the following Copic markers - 

Y18, 15, 13, 11
E44, 43, 42, 41
W5, 3, 1, 0, 00
RV06, 04, 02
YG05
T5, 3
E57, 55, 53, 51
R30


I lined up the images in place, so I could work out where to stamp the sentiments. Once I was happy, I stamped all of the sentiments in royal blue dye ink. I then glued the cloud panel to the card base and then added the cover die panel, making sure not to add too much glue to the centre area, so that I can tuck the images in place.


I then arranged all of the images in place and adhered to the card with liquid glue. This completes the card for today. I hope this card might encourage to fit a bit of time to get creative this week.

Don't forget to use my code - T4TMIRI10 - to get 10% off at the Time For Tea Designs online shop. 

Have a great week, see you next Tuesday xxx


Monday 26 June 2023

Queen for the Day

Hi Tea Timers, welcome back to the blog. DT Randy here with a new scene mixing new and older sets. I really like the new Queen for the Day stamp set and wanted to use build a scene around the cat on the pillow with the crown. 


I took a look at the other sets with cats and thought the ones in the Kitty Capers stamp set would pair perfectly. I especially love the image of the cat in a pounce position. Is this cat bowing down or ready to take the crown?

Sets used:
(Queen for the Day stamp and die bundle available here)


I first stamped the images and used the coordinating dies to cut them out. For the cats, I used C-0, C-2, C-4, C-6 Copic markers to color them. For the other images I used RV21, RV23, RV25, Y21, Y23, Y26, Y28, YR21, YG23.

I then took an A2 panel and blended Cracked Pistachio and Salvaged Patina Distress Oxides. With the Pawsome Prints stencil, I blended it over the background with Mowed Lawn and Peacock Feathers. 


With the Alpha dies, I cut the word 'QUEEN' out of gold cardstock. I took the sentiment and heat embossed it onto pink cardstock with white embossing powder and trimmed it down.

To create the floor, I took the wood die piece and cut it out 15 times. With the size of my panel, three the wood pieces fit in one row. The floor itself is 5 rows wide. I then adhered it onto another panel and trimmed off the excess piece. I blended it with Antique Linen and Tea Dye Distress Oxides. 


I assembled my card using liquid adhesive and foam tape.

I hope you enjoyed this blog post and the scene I created. All the sets that I used today are linked above. If you want to purchase any of the sets, use the code T4TRANDY10 at checkout. Happy Crafting!


Saturday 24 June 2023

From the whole herd!!


Hi everyone! It's DT Emma here to share how I made this weeks card. I love these cows from the Ewe are Moovellous stamp set and also love the polaroid die from the Memory Keeping Essentials die set. 

This card measures 4.25inch by 5.5inch. I made the background first, from a 4 inch by 5.25inch piece of which card stock I ink blended Distress Oxide Tea Dye over the Dig It Background stencil then going over the whole piece again without the stencil. I replaced the stencil and inked over with Distress Oxide Vintage Photo. I splattered some dark brown ink and gold ink to finish the background. 

I die cut the polaroid frame from white cardstock and then cut separately a background piece to sit behind. On that piece I ink blended blue and green hues from each end. I also used the tab die from the Memory Keeping Essential set to create a tab with "From the Whole" stamped on. 

I cut "H" "E" "R" "D" from stitched alpha die set from my stash and coloured them with three shades of Spectrum Noir Tri Blend. 


I stamped and die cut the images and coloured them using Spectrum Noir Tri Blends, carefully placing them in the photo section so they are looking out to the recipient. Using the chicken and chick to frame the word Herd. Once I had put the polaroid together I used foam squares to prop it up on the card background.  Stamping Happy Birthday from Darling Daffodils stamp set at the top of the background using Archival ink. 


I hope you love this card as much as I do, I loved making it. Have a great weekend! 


Friday 23 June 2023

Slimline Anniversary Card

Hello and happy Friday. DT Annalisa here sharing a slimline anniversary card I made for some friends celebrating their 59th wedding anniversary using several stamp and die sets from Time For Tea Designs. How amazing to be celebrating so many years together! 

To create this card, I used the following stamp sets:

Love Is In the Air (hot air balloons and basket)
Just Married (sentiment)
Ewe Are Moovellous (flower)
Oops a Daisy (flower)
Eggstra Special Birthday (chick)
I Really Dig You (bee and butterfly)
Paper Plane Pals (pig and bunny)
Ewe Are The Best (sheep, fence and tree)

I die-cut Distress White Heavy cardstock by Ranger using the largest die in the Slimline Scalloped Trio Circle Nesting Dies. I ink-blended Tumbled Glass over the cloud stencil area on the 6x6 Scene Builder stencil and added Broken China Distress Oxide Ink splatter with a paintbrush. Once the ink was dry, I stamped the sentiment using Versafine Onyx Black. 

For the grass, I die-cut white cardstock with the Landscape Edge Standalone Die and coloured it with my Copics, added ink splatter using Lucky Clover Distress Oxide, water and a paintbrush. I die-cut the grass area with the same stitched rectangle as the background so they would match.

I stamped and coloured (with Copics) several images from the stamp sets listed and cut them out with their coordinating dies. I added white gel pen accents with a Gelly Roll Pen. I used liquid glue to stick several images and double-sided foam tape for the rest. I added Glossy Accents to the hot air balloons to complete the card

Thank you so much for reading my blog post. Remember to use my discount code T4TANNALISA10 when you visit the Time For Tea Designs shop to get 10% off your order.


Thursday 22 June 2023

A New Way to Use Your Patterned Paper!

Hey there, Tea Timers!!  It's Amanda back with a fun way to use your patterned papers!

First, we're going to grab a 6x6 sheet of patterned paper and cut it up into 4 different sized widths.  Adhere them directly to your card front with glue.

Then, cut out any circle die that's large enough to hold a mini-scene, but not too big so you still have room for your sentiment.  Ink blend a very light color in the center of your circle.  Prop it up with 3D foam tape or squares.

Stamp your images from the Ewe Are The Best Stamp Set.  Color the images with Copic markers.  Die cut them with the coordinating die set.  Attach your images to you circle with 3D foam squares.


Trim down a coordinating piece of patterned paper into a banner flag.  Glue that behind your circle and onto your card base.

Stamp your sentiment on black cardstock with a Wow! Embossing Glue pad and apply white embossing powder.  Heat the powder with a heat tool to melt it.  Trim your sentiment down into a small banner flag. Attach your sentiment to the card with 3D foam tape.

Add some sequins with liquid glue.

That's all for me today, friends!  I hope you find some time to get crafty today!!  Enjoy!
Xx, Amanda

Wednesday 21 June 2023

I'm here for you

 Hey there Tea-timer friends...

It's DT Ashlee here and today I've got some simple easy to re create inspiration for you that would be perfect if you need to mass produce some cards!


I used these Time for Tea designs products :

- Pawsome dies

 - Hey, Hello, Hi dies

- Simple sentiments stamp set

- T4T Enamel dots clear bubbles


To create this card I started with a teal blue card stock base that I die cut the largest pawsome die paw from and then in laid the pieces back in. (The in lay pieces were die cut from a light grey card stock). 

I stamped a sentiment directly onto the card stock base from the simple sentiments set. This was a sub sentiment for the large hi die cut that I added just above the stamped sentiment and then completed it all with two clear bubble enamel dots!

A simple but sweet card that's easy to re-create. May be you might want to case this one and create a batch of cards too...


Thanks for stopping by T4T today, I hope you feel inspired by my card. Happy crafting, hugs Ashlee.

Tuesday 20 June 2023

Bee Happy


Hi crafty friends, DT Miri. It's Tuesday again ( doesn't the week fly by!!) and that means I am back with another card project to share with you all. Today I going to be using the adorable Bee Happy stamp set, I couldn't resist those cute little bees. So let's get started on the card.......


I started off by creating the card base and panel, for this I used 80lb white cardstock. The card base I have made measures 4.25 x 5.5 inches and the panel measures 2.5 x 5.5 inches. I then die cut a cloud stencil using the cloud die from the Landscape Edge Stand Alone Die. I then stencil the whole panel to create the cloud background using Squeezed Lemonade Distress Oxide Ink.


I then stamped all of the images from the Bee Happy stamp set using a black dye ink that is Copic friendly. I then coloured all of the images using a very simple colour palette of Copic markers. For today's card I have used - 

BV13, BV02, BV00, Y19, Y17, Y15, Y13, Y11, R83, W0, E57, E55, E53.


I then fussy cut all of the images, although there is a coordinating die available. I trimmed two thin pieces of purple cardstock and glued them to to the back of the cloud panel. I then stamped the sentiment in purple dye ink. Once the ink was dry, I arranged the images on the panel and secured with liquid glue. Lastly I glued the panel to the card base.


That completes the card for today. I hope you like this cute, quick and easy card and may be inspired to get crafty sometime soon. Don't forget, if you are shopping on the Time Fore Tea Designs online store, use my code - T4TMIRI10 - to get 10% off your purchaes.

Have a great week, see you next Tuesday xx


Monday 19 June 2023

Hello... from our home to yours!

 Hello Tea Timers, welcome back to the blog! DT Randy here with a new way to feature the adorable critters from the Love Is In The Air stamp set. I love the look of critters peaking over a brick wall and wanted to recreate the look with items right in the T4T shop!


Sets used:
(coordinating die set available here)
(stamp and die bundle available here)

I first stamped out the images of the critters and fussy cut them out. I used the following Copic Markers to color them: E00, E01, E11, E13, YR00, YR12, YR14, YR18, W-0, W-2, W-4 and W-6. I set them to the side.

I then took a A2 panel and blended Salvaged Patina Distress Oxide with a cloud stencil. I then took another A2 panel and die cut out a grass piece. I blended it with Twisted Citron and Mowed Lawn Distress Oxides.


I took another panel and trimmed it down to the height I wanted the brick wall to be. I trimmed a small strip as well to adhered at the top of the wall. To create the brick wall, I blended Lumberjack Plaid and Abandoned Coral Distress Oxides with the Tiled Wall Stencil.

For the sentiment, I die cut the Hello die from gold cardstock. I then took the sentiment and heat embossed it on a teal sentiment strip with white embossing powder.

I arranged where I wanted all of my components to go. I then adhered them all with liquid adhesive.


I think these critters look cute inside the hot air balloon AND also peaking over a wall to say a nice hello to their new neighbors!

I hope you enjoyed this blog today. Check out the products that I used today and use the code T4TRANDY10 at checkout for some savings. Happy Crafting!

Saturday 17 June 2023

Welcome home to the mole hill!


Hi everyone, DT Emma here sharing how I made this adorable welcome home card. I love the idea of the moles in the garden and I thought they would make a cute welcome home card. 

To start I created the base from 6 x 4.75 inch sized solar white cardstock, I cut that three times for each layer then using the Landscape Edge Die Set I cut one piece with the hill die and one piece with the grass border. 

I used Lucky Clover distress oxide (with Rustic Wilderness for the splatters) to ink blend the grass then Gathered Twigs distress oxide (Black Soot for the splatters) to ink blend the underground soil, finally I used a mix of Tumbled Glass and Broken China distress oxide to ink blend the sky. 

I adhered each piece together to create the background. Next for the images. 

I stamped and die cut the images I wanted to use and used the following Copic Sketch markers to colour them in:

Soil: E37 & E33
Moles: W7, W5, W3 (R30 for their noses)
Rocks: T2
Grass: YG17
Glasses: B000
Flowers: RV34 & RV11
Trowel & Fork: G97 & T2
Bee: Y35
Worm: R30 (RV34 and Y35 for the flower)


I die cut H, M and E using a stitch alphabet die set in my stash and coloured those with a mixture of YG09 and E37 then covered them with glossy accents. Once dry I used foam tape to adhere them to the card either side of the moles head to create HOME. I then stamped out the word WELCOME. 


That is my card done! Hope you all love it as much as I do and I will see you again next week. 
If you are shopping on the site this weekend don't forget to use my code T4TEMMA10.

Friday 16 June 2023

Sunrise Daffodils


Happy Friday! DT Annalisa is here sharing a spring sunrise card with beautiful daffodils and butterflies from Time For Tea Designs. The Darling Daffodils stamp set also has some great sentiments like miss you, thank you and happy birthday that cut out beautifully with their coordinating dies.

I ink-blended white cardstock with Fired Brick, Abandoned Coral, Spiced Marmalade and Mustard Seed Distress Oxide Inks using my Beautiful Rainbow Blender Brushes. I added white splatter with a paintbrush, water and Copic opaque white. I used double-sided tape to adhere this panel to an A2 card base. 


I stamped and coloured (with Copics) several images from the Darling Daffodils and cut them out with their coordinating dies. I added white gel pen accents with a Gelly Roll Pen. The bee, worm and smaller butterfly are from I Really Dig You.

I used liquid glue to stick the grass and daffodils to the ink-blended panel. I then glued down a stitched frame from the Wide Stitched Frame Dies on top of this.

I used double-sided foam tape to stick the remaining elements and sentiment to the card.


Thank you so much for reading my blog post. Remember to use my discount code T4TANNALISA10 when you visit the Time For Tea Designs shop to get 10% off your order.


Thursday 15 June 2023

How to Make a Multicolored Cloudy Skies Background


Hey there, Tea Timers!!  It's Amanda back with how to create a cloudy skies background!

First, we're going to grab our Scene Builder Stencil.  Although this stencil only has one side of clouds, you can still use it to create a complex sky!
For my sky, I'm using Catherine Pooler inks.  Starting at the top, and working my way down, I'm starting with Sangria, then Flirty Fuchsia, then Polished, then Bellini, then Glitz, and finally Limoncello.  

I start at the top and blend my first color.  I clean my stencil thoroughly, move it over either left or right, and then do my next color.  Sometimes, I blend 2 of the colors together to create an even smoother transition.
Next, we're going to stamp our images from the Love is in the Air Stamp Set.  Once I've colored these little guys with Copic markers, I cut them out with the coordinating die set.  I love that the sentiments also come with matching dies!
Now, I'm ready to assemble my card.  I prop up my stamped images with 3D foam squares and use liquid glue to adhere my card front to my card base.

The last step is to add some Clear Bubbles Enamel Dots using liquid glue.


Thank you so much for stopping by the Time for Tea Designs blog today!  I hope you find some time to get crafty today!
Xx, Amanda


Other Posts You Might Like