Pages

Friday 31 March 2023

Holy Moley Birthday

 
Happy Friday! DT Annalisa here sharing my first card using the I Really Dig You stamp set that is part of the brand-new release! It is one of my favourite sets from the new release. I LOVE to garden so, the little garden tools and the little critters in the set stole my heart as soon as I saw them. 

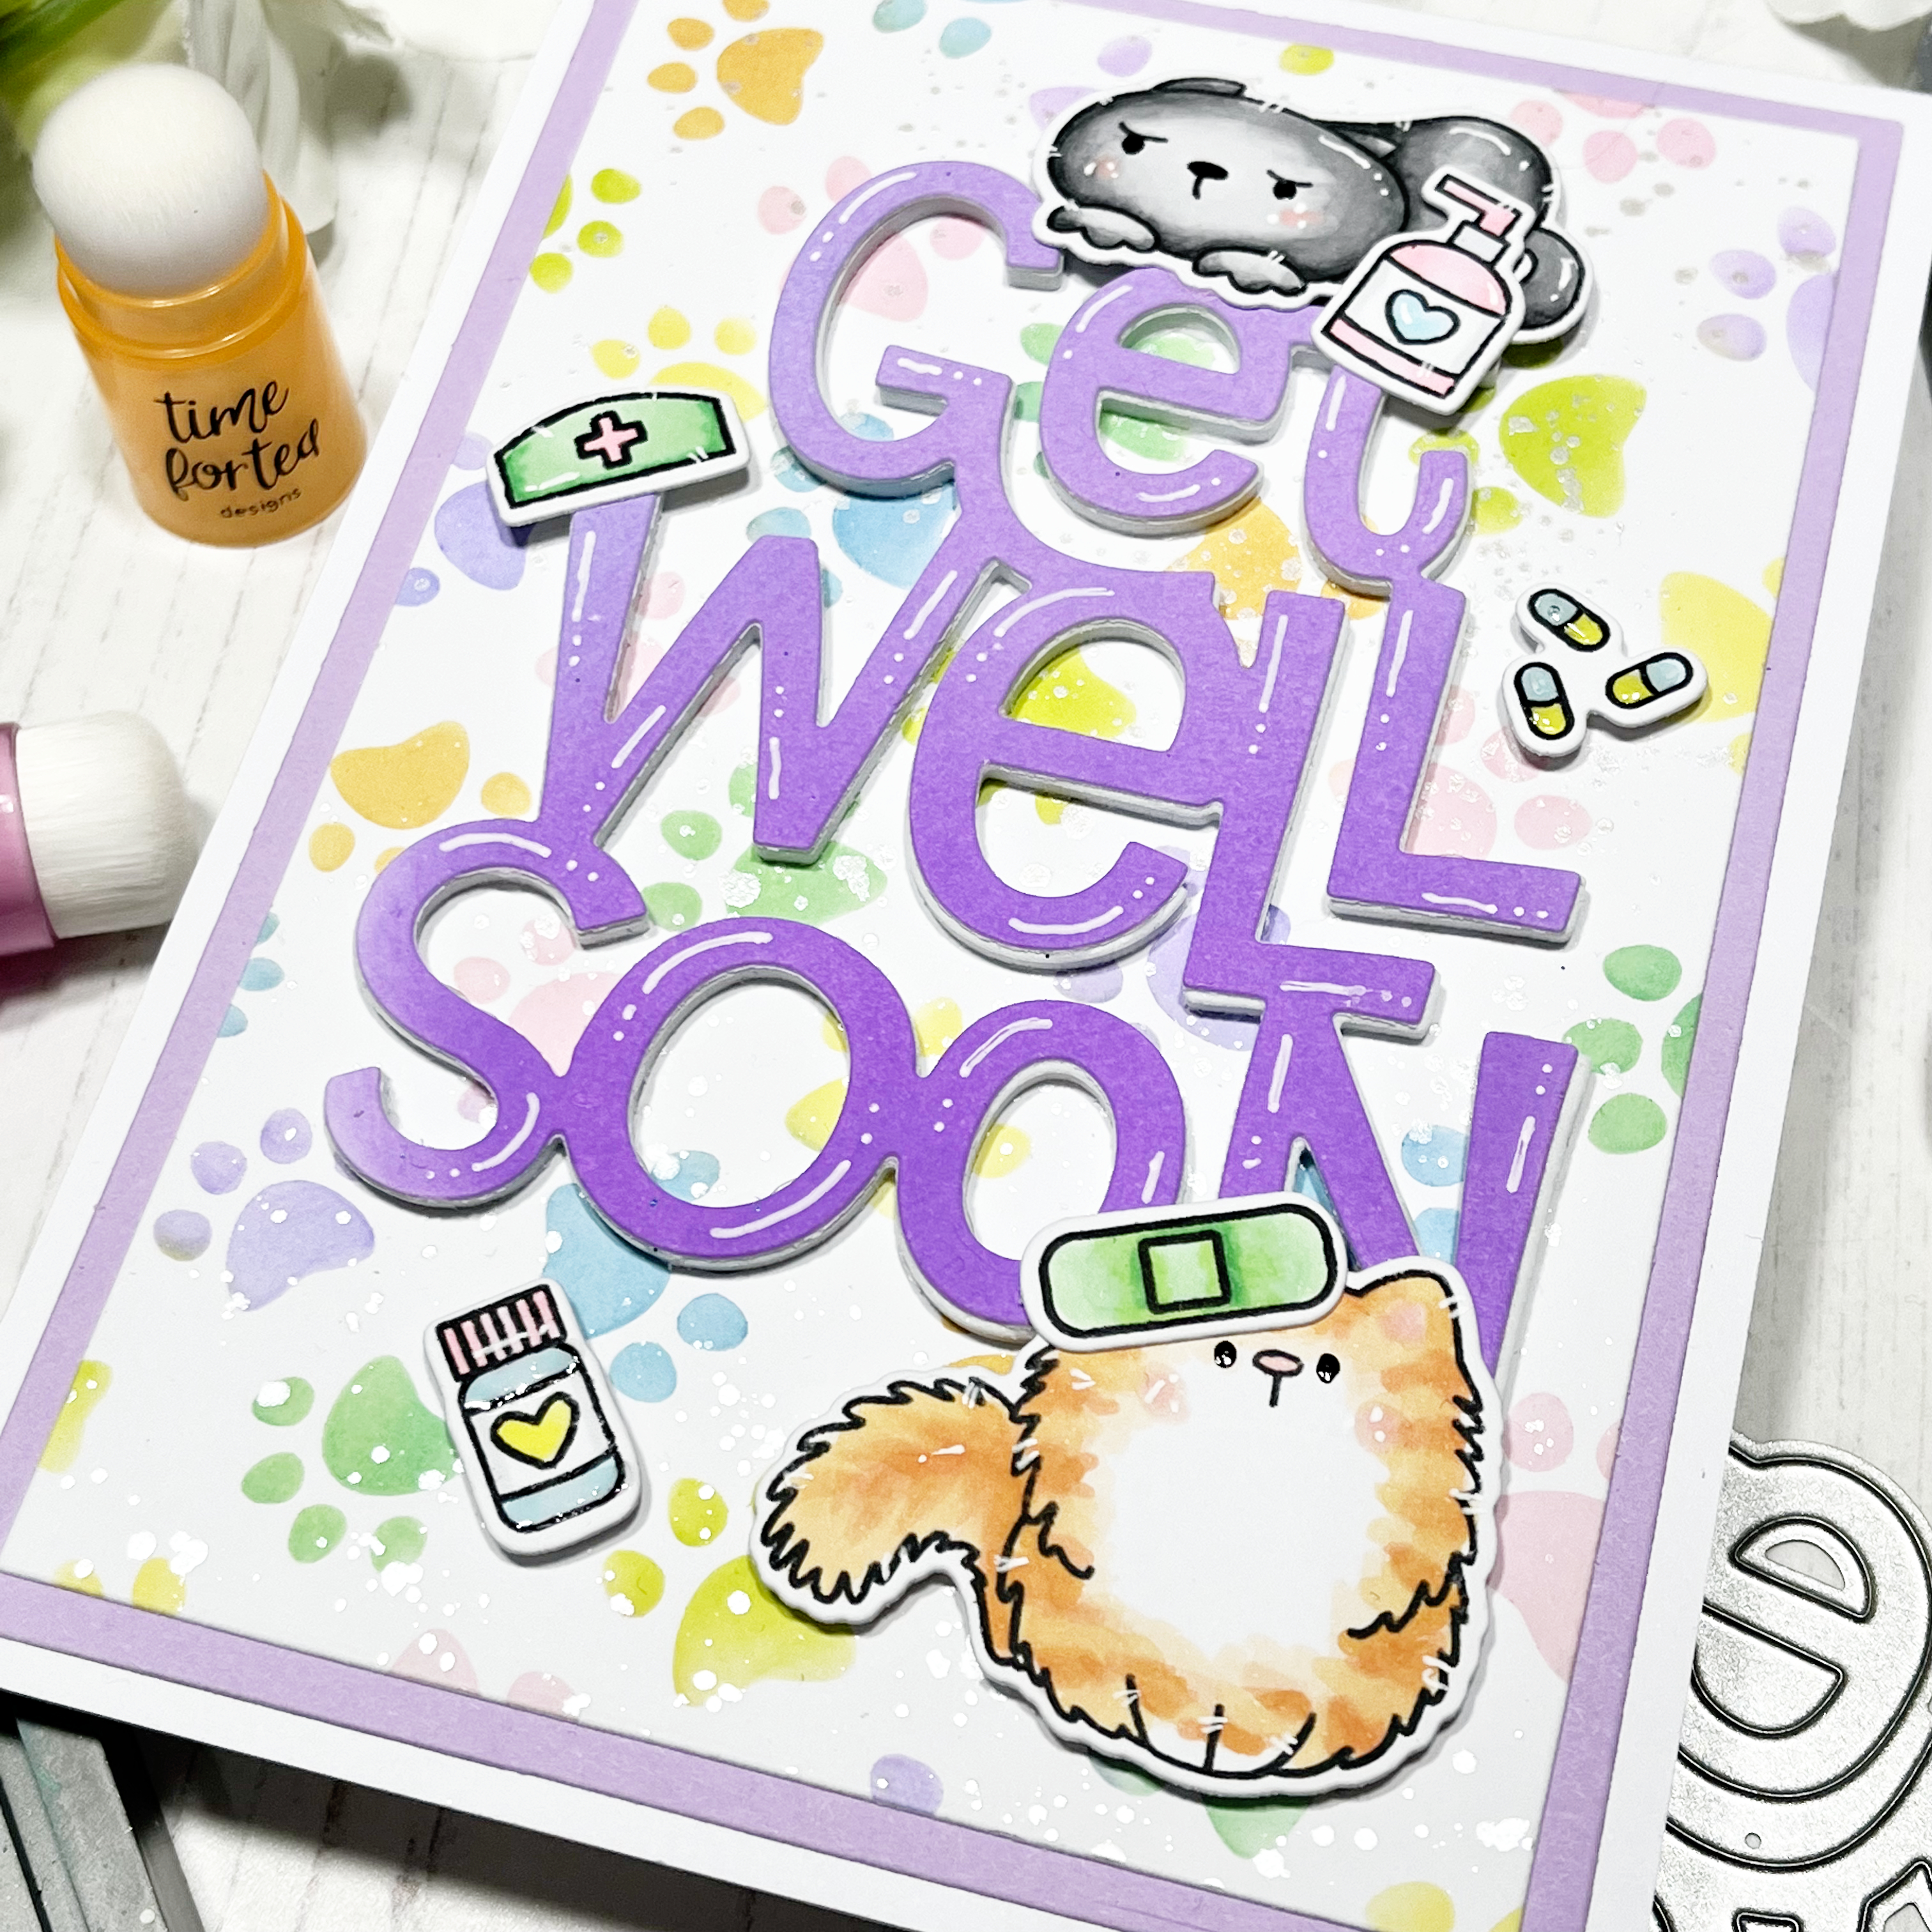
I created the background using Distress Watercolor Cardstock by Ranger that I cut to a 5.5 by 4.25-inch piece using dies from the Landscape Edge Standalone Die Set. I ink-blended Distress Oxide Inks onto the different sections using Beautiful Rainbow Blender Brushes

Soil: Tea Die, Antique Linen; Vintage Photo splatter
Grass: Twisted Citron, Mowed Lawn; Rustic Wilderness splatter
Sky: Tumbled Glass, Salty Ocean; Uncharted Mariner splatter
Clouds: Weathered Wood


I also added splatters of water to create texture for the scene. I used liquid glue to adhere the sections onto an A2 card base. It was fun puzzle-piecing them all together.

I stamped the sentiment using my MISIT to get a crisp impression.

I stamped the characters and accessories (how cute are the bee and the worm!) with Lawn Fawn Jet Black Ink. I coloured them with Copics and added white gel pen accents with a Gelly Roll Pen. I used my Brother Scan N Cut SDX125e to cut out the images. 

I used liquid glue to adhere the planter, mole in a hole and tulip to the card. I used double-sided foam tape on the remainder of the images. I added Glossy Accents to some of the flowers, the bee, the butterfly and gardening tools to complete the card.


Thank you so much for reading my blog post, you can use my discount code T4TANNALISA10 when you visit the Time For Tea Designs shop to get 10% off your order.

Thursday 30 March 2023

Queen for the Day!


 Hi crafty friends!!  It's Amanda here sharing the most adorable BRAND NEW Queen for the Day Stamp and Die Set!  This release is ALL amazing, but come on!  Check out these sweet kitties!  They've stolen my heart!

Creating this card was super fun!  I started by masking off the bottom of my panel with a light-hold tape.  Then, I blended some Catherine Pooler Cummerbund ink through my Tiled Wall Stencil.  I removed my mask and blended the bottom of the panel with gray ink.

I stamped my images with black ink and then colored them in with alcohol markers.  I die cut them out using the coordinating dies.  Then, I stamped my sentiment on a piece of black cardstock with Wow! Embossing Glue, added white embossing powder, and then melted the powder with my heat tool.  I added everything to my card front using 3D foam squares.


Here are some up close-ups so you can really enjoy how cute these little kitties are!


I hope you have enjoyed this super adorable card!  What's your favorite new release product?!  Comment below to let us know!
Crafty hugs, Amanda

Wednesday 29 March 2023

Easter wishes

Hey there Tea-timer friends...

It's DT Ashlee and I've got a card to share that I made using products from the brand new Time for Tea designs release!!


I used these new goodies :


To create this card I started with die cutting the cover die from pink cardstock which I then ink blended a darker pink on the bottom portion. 

I die cut the easter wishes sentiment from blue and black cardstock and adhered them together off centre to create a shadow type look. Using foam tape I adhered it to the top portion of the card base....


I die cut the eggs from green cardstock and added some stencilled details/inking to them using the mini egg pattern before arranging them on the bottom of the card so I could create a fun little scene...

I stamped, coloured and die cut a bunch of images from the Eggstra special birthday set then adhered those all in place. To complete the card a touch of yellow sequins!! 


Isn't it a bit cute...?! I just adore this new release and I can't wait to use all the rest of the new products so keep an eye out for more inspiration using the release!! 

Thanks for stopping by today, happy crafting. Hugs Ashlee. 

Monday 27 March 2023

You Are So SWEET!

 Hi Tea Timers, welcome back to the blog and Happy Monday! The new release is now live in the shop but I wanted to share one more card using a stamp set from a previous release in case you wanted to mix some of the older and newer sets in in your order. Today I am showcasing the Sundae Sweeties set as another counter top scene to continue my counter top series!

Sets Used:


I first stamped out my images and used the coordinating die set to cut out the images. I used the following Copic Marker Color Combos to color the images

Y00, Y12, Y14, Y16, Y18
RV21, RV23, RV5
BG11, BG13, BG15, BG18
YG21, YG23, YG26
E00, E01, E11, E13
E21, E23, E25, E27
C-0, C-1, C-3, C-5, C-7


I then took the rectangle die from the Autumn Scene Cover Plate set (which is retiring!) to use as my panel. I took the Tiled Wall stencil and blended it with Worn Lipstick and Saltwater Taffy Distress Oxides. 

I then wanted it to look like the ice cream already melted on the counter so I took the Beach Scene Builder stencil and blended it with Salvaged Patina. To create the chocolate stain, I blended Gathered Twigs with the Coffee Stains Stencil.


With the images, I arranged it onto the panel to see where I would stamp my sentiments. Once I figured out where I wanted them to go, I stamped them directly onto the panel. I used liquid adhesive to adhere my images onto the panel.

When you are checking out the new release, don't forget to check out the previous releases to see what would pair well. Don't forget to use the code T4TRANDY10 at checkout for a discount on your order!

Friday 24 March 2023

Birthday Camels

Happy Friday! Today is another fabulous release day over at Time For Tea Designs so be sure to check out all the new goodies! 

For my card today, I am sharing a birthday card using the adorable camels in the Happy Hump Day stamp set and their coordinating dies. I love the camel sticking out his tongue! So funny.

I used the Stitched Window Cover Die to die-cut white card stock. I ink-blended Tumbled Glass Distress Oxide onto white cardstock using my Beautiful Blender Brush. I added Salty Ocean Distress Oxide splatter using water and a paintbrush. I used double-sided tape to adhere the stitched frame to the ink-blended panel. I then adhered this to a card base.

I used a wavy hill die from the Landscape Edge Die Set to die-cut the negative pieces of white card stock that resulted from using the Stitched Window Cover Die. I ink blended Tea Dye and Antique Linen Distress Oxide onto the paper and added Vintage Photo Distress Oxide splatter. I used liquid glue to adhere these to the openings.


I stamped, and coloured (with Copics) several images from Happy Hump Day and cut them out with their coordinating dies. I added white gel pen accents with a Gelly Roll Pen. The balloon is from Hooray Hamsters (on sale!), and the gift is from Mew Are the Best Gift Clear Stamp Set.  

I added sparkles to the edges of some images with a Quickie Glue Pen and Lawn Fawn Prisma Glitter.

I used liquid glue and/or double-sided foam tape to adhere the images and sentiment to the card. 


Thank you so much for reading my blog post, you can use my discount code T4TANNALISA10 when you visit the Time For Tea Designs shop to get 10% off your order.


New Release Day is Here!!

  Woop woop!!

It's here! Our New Release is now available in the T4TD shop!


The New Release goes live on Friday 24th March at 6am (GMT).

If you missed any of the reveal videos this week you can watch the full reveal on YouTube here.

Happy Shopping!!

Thursday 23 March 2023

Guess The Character Competition Winners!!

 Our competition is now closed and we have selected our winners!!


Blog winner - Madebtmeghank
Facebook Winner - Karen Price
Friebds page Winner - Samantha Cook
Instagram Winner - @mumsie1976

Congratulations to you all!!

I have sent you all a private message but just in case please so send me your addresses via DM so I can send you your prizes.

None of our entries guessed correctly though 😜so if you want to find out who our new characters are you will have to watch our final reveal show, tonight on Facebook and YouTube at 7.30pm.

Good Food, Good Friends, Good Times


It's Amanda here!

Did you see that there's a NEW RELEASE coming tomorrow?!  I am so excited about this whole release!  You're going to LOVE it!  There's a brand new little critter friend that I am obsessed with!!  I'll be back next Thursday with a card showcasing this adorable little guy!

For now, though, I get to share the classic Baked with More Love Stamp Set in this lovely card!  Do you love the layout of this card?  I love the peeking black and white stripes, don't you?!

I've also used the Winter Wonderland Paper Pad for this card.  I know, I know, it's not a winter card!  But this pink striped paper is just gorgeous on ANY card!  

For my background, I'm using the Tiled Wall Stencil.

For my sentiments, I stamped them on black cardstock with Wow! Embossing Glue and then applied white embossing powder.  I love that Time for Tea Designs sentiments come with their own coordinating dies!  I cut these out using those dies and LOOK how perfect!  Ahh!

I colored my little cute critters in with alcohol markers and then added highlights and dots with a white Gelly Roll pen.

I used 3D foam tape to prop up my tiled wall.  I glued my pink patterned paper and black and white stripe paper directly to my white A2 card base.  I used 3D foam squares to adhere my stamped images and sentiments.  I added a few enamel dots as a finishing touch!

That's all for me today, friends!  I can't wait for you to see the whole new release tomorrow!  Have fun going gaga over the goodies!!
Xx, Amanda


New Release - Full Reveal Day!!

  Hurray! It's almost release day and today we have the final day of our reveal videos!!

We will also be sharing with your our two new characters! We can't wait to share all the crafty goodness with you.


The New Release goes live on Friday 24th March at 6am (GMT).

Watch all the reveal videos this week to start making your shopping list. You can find the link to tonight's Live here.

Today's Live is at 7.30PM (GMT).


Wednesday 22 March 2023

Happy hump day ....!!

 Hey there Tea-timer friends...

It's DT Ashlee here with a new card to share. This one is a desert themed birthday card and the critters are ready to party!!


For this card I used these Time for Tea designs products....

- Waves cover die

- Happy hump day stamp/co-ordinating die collection


I created the card base using the waves cover die and to add some interest I adhered all the wave pieces using different levels of foam tape...

(The outside frame was done by blending and splattering distress oxide inks)

I then stamped, coloured and die cut a bunch of the images from the Happy hump day set before adding some white highlights and adhering in a fun little scene on the card base!


A sentiment and a few sequins completed the card...

What do you think of this one, are you ready to party with the critters?!


Thanks for checking out my card, happy crafting. Hugs Ashlee.


P.S there is a brand new release coming very soon at T4T so keep an eye out for all the sneak peeks because it is SUPER AWESOME!!

Sneak Peek Day Two!

              Hurray! It's the second day of sneaky peeks of our new release!


The New Release goes live on Friday 24th March at 6am (GMT).

Watch the reveal videos this week to start making your shopping list.

Today's Live is at 8PM (GMT).


Tuesday 21 March 2023

Sneak Peek Day One! It's here!! 😊

 Hurray! Today is the first day of sneaky peeks of our new release!

The New Release goes live on Friday 24th March at 6am (GMT).

Watch the reveal videos this week to start making your shopping list.

Today's Live is at 4PM (GMT).


Competition Time! - Can you guess our new character?


 Its' almost time for our New Release for Spring to go live and we are so excited to share it with you!!

We are eggstra 😂 excited because we have two new characters to share with you. 😊

CAN YOU GUESS WHAT OUR NEW CHARACTERS MIGHT BE??

Add your guesses below, or to our Instagram, or Facebook page to be entered into our prize draw.
I will pick 1 winner from each platform to win the stamps and coordinating dies for one of the new characters!!
You can enter on all 3 platforms if you want, to increase your chance of winning.

The winner will be drawn at 12pm March 23rd 2023. 

*International entries welcome.
You must be 13 yrs + to enter. This competition is not affiliated with Instagram, Facebook or Blogger. Only genuine entries will be considered. Winners selected at random. Entries posted after 12pm on the 23rd March will not be included.

Good Luck!!

And don't forget that our sneak peeks of our other goodies starts today! You can see Day 1 of our sneaks on YouTube via this link.


Monday 20 March 2023

I DONUT Know What I Would Do Without You!

Hi Tea Timers, welcome back to the blog! Today, I wanted to create a card using just one image and decided on the donut image from the We Go Together Clear stamp set.


Sets used:
Coordinating dies available here
Stamp and die combo here

I first stamped the donut image out 8 times. I decided to fussycut the images out instead of using the coordinating dies but it should work either way. I used the following Copic Marker combos to color the donuts:

E00, E11, E13
RV21, RV23, RV25
YG21, YG23, YG25
BG11, BG13, BG15, BG18
Y11, Y13, Y15, Y17


I wanted to have the donuts to have a bite mark so I took a scalloped circle punch I had in my stash and punched bite marks into several donuts. I then took a white gel pen to add some icing to the donuts. On some of the other donuts, I used the squeeze paint to add icing. 

I then assembled my donuts onto an A2 panel and adhered it with liquid adhesive. To complete my card, I heat embossed my sentiment onto cardstock and trimmed it down. I adhered it with liquid adhesive as well.


I hope you enjoyed this blog post today and feel inspired to create a fun background or card centered around 1 image. If you like the set that I used today, check out the shop and use the code T4TRANDY10 at checkout!

Happy Crafting!

New Design Team Member Announcement


Please give a big warm crafty welcome to our new Design Team members!!

Miriam - @miriams.card.corner
Emma - @emmalovescardmaking
Lorena - @sweet.coloring


Miriam, Emma and Lorena join the existing team and you will see their fabulous crafty creations from the 1st of April.

Thank you to everyone who applied this year. It really was so tough to choose. 

I can't wait to see what Miriam, Emma & Lorena create! 

Please give them a big Tea Timer Hello!! 👋👋👋


Saturday 18 March 2023

Life is Not a Fairytale - Quick and simple card.


Anyone's Friday night end up like this?😝😍
I love this fun stamp set and its an absolute bargain right now in our Retiring Collection.


After yesterday's Live I ended up playing with our retiring Fairytale A7 stamp set and our Brighter Days Paper Pad to make this sweet card!

This was such a quick and simple card to put together. I stamped and coloured my images, then fussy cut them out, which was super easy.
The card base is an A2 size and I layered a slightly smaller piece of patterned paper over the top. I used my A2 layering dies to cut my paper to the perfect size.


I stamped my sentiment onto a circle that I die cut using the Simple Circles dies. I then placed my images onto the die cut circle.

I really love this sentiment LOL. So funny, and so true! 😝👡👡👡


I finished the card with some Clear Bubbles Enamel Dots. Easy! :)

I hope you enjoyed today's project. 

Happy Crafting
Jo xoxo


Friday 17 March 2023

Making a Get Well Card for my Dad and his cat! :) Live Video Tutorial


Hi & happy Friday all!

This week's Live video was such a lot of fun to do & I loved how it turned out.


My mission was to create a get well soon card for my mum & dad's cat. I then realised my pops had also been ill so I decided to make this card for them both.
 

I used the Kitty Capers Stamps to make the two kitty characters. The ginger kitty is Alfie and he has been fighting with local moggies and got an injury on his head. 


I just had to add the plaster from the Get Whale Soon Stamp set to cover his little wound. :)


The black grumpy kitty is for my dad and he has his sanitiser and pain killers to help him through his flu!

I also used the large Get Well Soon Sentiment Die and the Pawsome Patten stencil. I created the rainbow background with the stencil and my stackable blender brushes. I loved how this background turned out too.


I really hope you like today's card. 
If you missed it you can watch the replay below. 

Happy Crafting 
Jo 
XOXO


Other Posts You Might Like