Pages

Tuesday 31 January 2023

February Spotlight Competition!


Hi Tea Timers!

Do you post the cards you make on Social Media?
If so, we would really like to encourage you to craft your stash and take part in our fun competition.

Tag @timeforteadesigns throughout February in all your crafty T4TD projects & you could be featured on our Facebook & Instagram pages. Plus everyone will go in a draw to win £25.00 to spend in store!!

What a great excuse to get crafting your T4TD stash!! 🤩🥳
#T4TDspotlight #craftyourstash

Good Luck xoxo

Monday 30 January 2023

Baked with Love

Hi Tea Timers, welcome back to the blog. Today I am sharing another Valentine inspired card, this time with the Baked with Love stamp set! 

I wanted to revisit my first ever card shared on the blog and make a sequel to it. This time the two mice are getting ready for a cake testing.


Sets used:
I first stamped out my images and used the following Copic marker colors for them:
  • Mice: C00, C0, C02, C04, C06
  • Cake stand: BG10, BG11, BG13
  • Cake: RV21, RV23, RV25


I then die cut the mice out using coordinating dies and set them to the side. I then diecut out 2 mini slimline card panels. With the first one, I blended Mustard Seed, Squeezed Lemonade and Scattered Straw. I then took the second panel and cut a 1/3 of it to use as my counter piece.

I stamped the sentiment directly onto the cardstock and assembled all my elements using liquid adhesive and foam tape.


To complete my card, I took the scent image stamp and stamped it across the top of the card.

I hope you enjoyed this quick and easy card today. If don't have the Baked with Love stamp set, it's a definite must have! Check out the shop today and use the code T4TRANDY10 for savings.


Sunday 29 January 2023

Design Team Call Now Open!!

 Hello Tea Timers! We have some exciting news for you!

We are looking for creative, self-motivated, design team members who love Time For Tea Designs products and inspiring others!

Here are the deets of what the role requirements are and how you can apply!!
 
Applicants should:


• Love Time For Tea Designs products!
• Have a blog and social media presence. A blog and at least one social media account is essential.
• Be able to produce a minimum of 1 card project a week in addition to extra projects during new release time, for the term of 1 year
• Be a reliable and conscientious team player
• Be open to taking part in Hops & other marketing activity such as Magazine Features or projects for TV appearances
• Take clear, bright and well-staged photos of your projects
• Be willing to actively participate in both the Facebook and Facebook Friends page, Lives, events, as well as our Design Team group
• We are particularly interested in individuals who are open to creating in video format via, Facebook, YouTube, Instagram Reels etc.


If you think you fit the bill then please get in touch telling us why you would like to join our team. Send us 3 photos of different projects, along with links to your Blog and social media accounts to admin@timeforteadesigns.co.uk.
The closing date for applications is February 28th 2023.

Good Luck xoxo

Saturday 28 January 2023

Llama tell you, love you lots!


Happy Saturday Teatimer's I have a cute llama card for you today for the Valentines inspiration week. It's a pretty quick card to make, with not much colouring so great when time is short.  
I began by cutting out the largest rectangle die from the Metric Sized Layering Dies and inked it up with Kitsch Flamingo, Worn Lipstick and Wilted Violet Distress Oxide inks. Then I layered the Scattered Hearts Stencil over the top and used the Wilted Violet to create the hearts. 


The adorable llamas are from the Llama Tell You clear stamp set which is full of cute stamps. I chose just to use the llamas today but there loads of images to create a full scene. I coloured them up with copic markers and tried to create a fluffy coat on them by adding dark little U's and blending them out a little. 
Setting them aside I created my sentiment by cutting out the Love You Lots Large Sentiment Die three times out of white card and layering it together to create some extra depth. Then added the smaller sentiment from the llama stamp set which I heat embossed in white onto black card so it stood out more with it being so small. 
I adhered everything together and added some extra details using a black and white gelli roll pen. I like these as they work well over the top of the oxide inks you just have to be careful not to smudge them whilst still wet. 
That was my last official Time for Tea card as I step down after having a wonderful couple of years on the team. I hope you have liked all the cards I've made you know I love the products though so I will still be creating with them so be sure to check back on my instagram for more inspiration. 
Thanks so much to Jo for keeping me around so long and thanks to all the Teatimer's for your love and support. 
Lllama Tell You, love you lots Natalie!

Valentines Week Inspiration - Donut know what I'd do without you

Hey Tea-Timers! I hope you're enjoying Valentine's inspiration week! Will you be joining the live class this afternoon? 

Today, I'm sharing another cute and punny card (I love a good pun on a card) which is destined to be my husband's Valentines card.


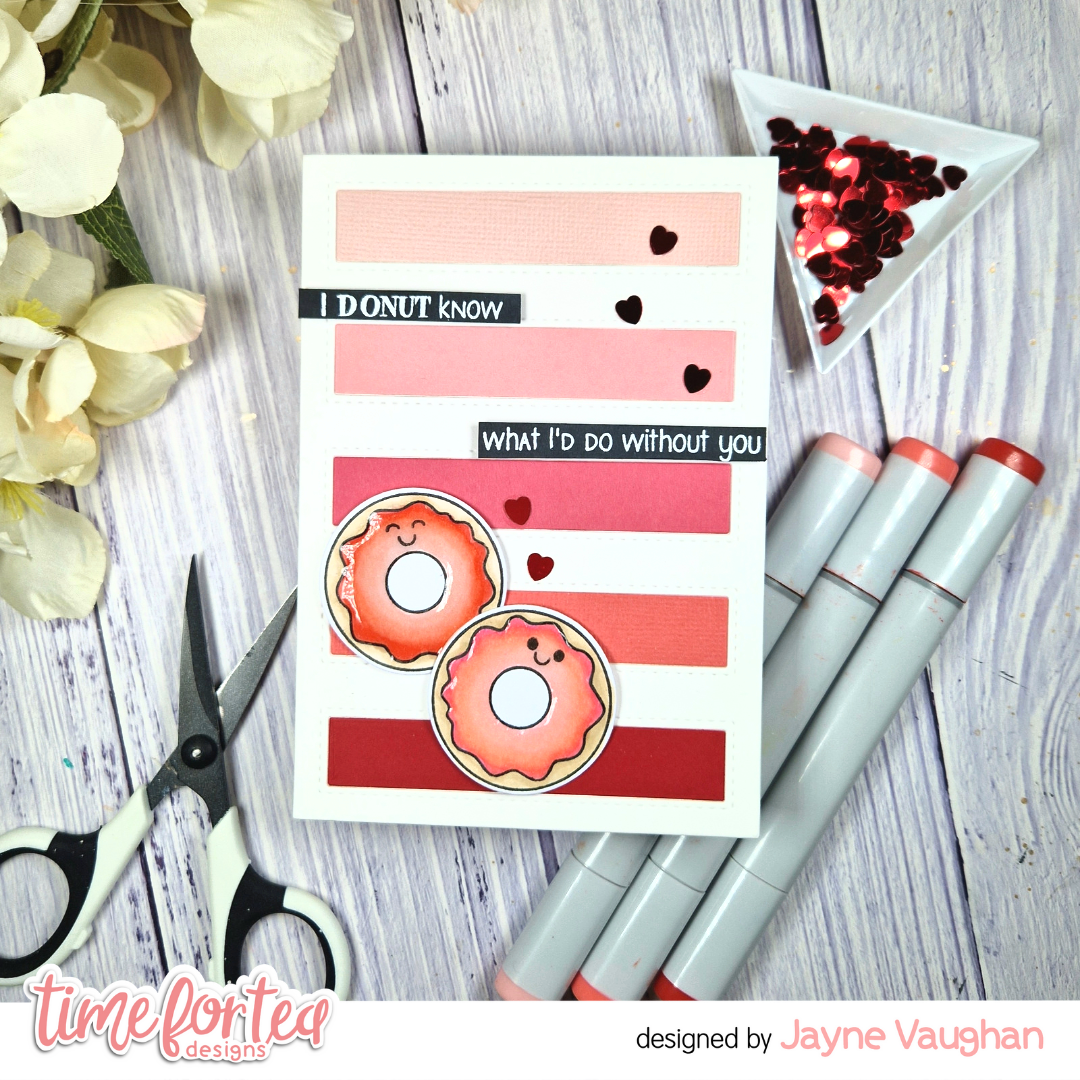
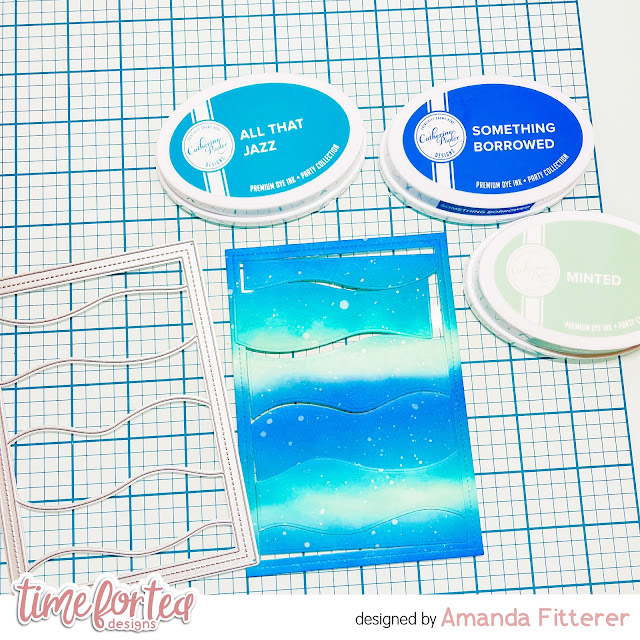
As a total bonus, this card was pretty quick and simple to make. I die cut two of the striped cover plate die from white card and stuck them together for a bit of sturdiness and dimension. I then used the same die to die cut scraps of various pink and red shades of card stock from my stash. 

I glued the background to a card base, then inlaid the scraps into the gaps. 


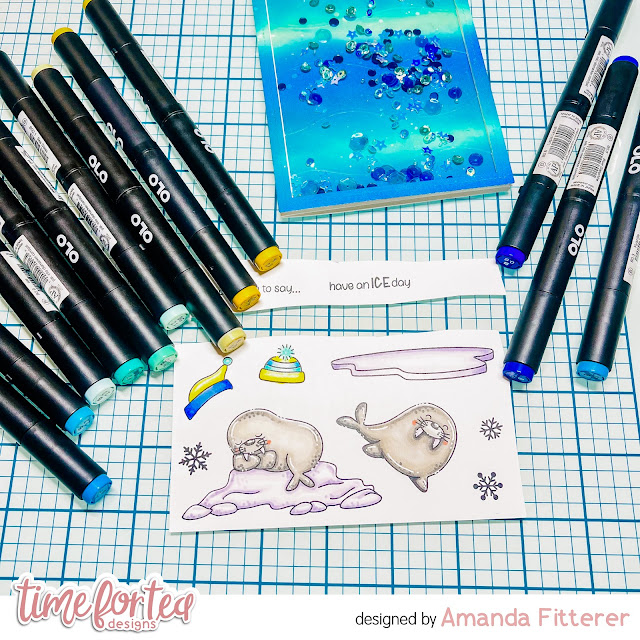
Next, I stamped two of the donuts from the We Go Together stamp set with Copic-friendly black ink, and added two of the little faces from the set. I coloured them in the following Copic shades: 

E31 / E51 (donut), RV17, RV14, RV13 (pink icing), R24, R22, R20 (red icing)

I added the donuts to the card with foam tape, then finished them by adding glossy accents to the icing for a nice shine!


I then created my sentiment by heat embossing the "I donut what I'd do without you" sentiment on to black card. I dusted it with anti-static powder to make sure I got a nice crisp sentiment, and used Wow! Embossing super fine white powder. I then trimmed the sentiment down using scissors so that it was in two parts, and attached it to the card with thin foam strips. 

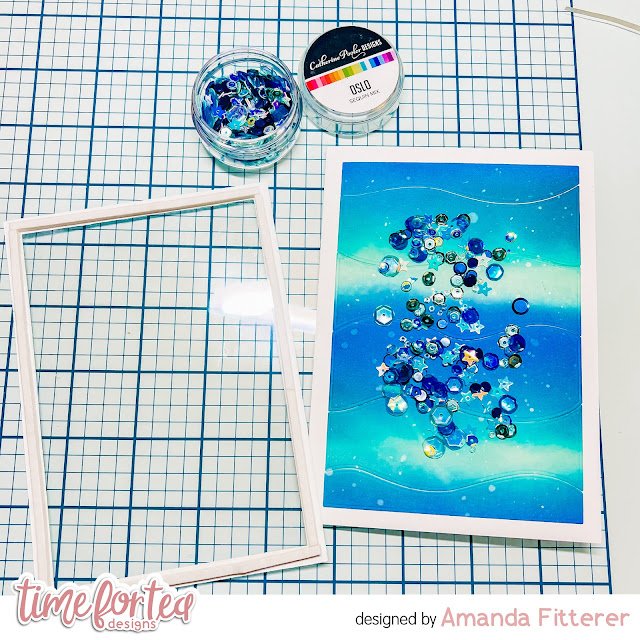
Finally, I added a few red heart sequins I had in my stash, and that finished up today's card!

I hope you've managed to get some Valentine's crafting in - don't forget to take advantage of the Valentines sale while you can!


Friday 27 January 2023

New Live Crafting Video with Jo - Movie Night Valentine Card

 Hello Tea Timers!

Today's card was made during our Facebook & YouTube Live Craft Along with Jo!

Find out below how this adorable card came together!


I used the Movie Night stamp set and the Home Is Where The Heart Is stamps to make this fun scene.


I also demonstrated some beautiful ombre ink blending and die cutting with our Lots of Love Cover Die.


During the Live I coloured all the images with my Copic Markers. I also gave a quick view of how I store my markers. 


If you like to see some of the techniques I used, some real time colouring and how I store my markers then you can watch the replay below. :)


This was so much fun to make, and I hope you give this idea a try! Thank you for joining me and happy crafting!

Don't forget to tag @timeforteadesigns in any of your cards this week to be in with a chance of winning a £25 Gift Card for the #T4TD store.


Love You Lots Penguins


Happy Friday, everyone! Have you enjoyed Time For Tea Designs' Valentine's Week so far? There has been so much inspiration from the DT and a great sale (20% off the Valentine's collection). Don't forget, there is a Valentine Themed Facebook/YouTube Live this afternoon at 4 PM, followed by the Stinkin' Cute Virtual/Live Class at 3 PM on Saturday. I hope you can join in and create with us. 
 
I am sharing a card with a vibrant and bold sentiment; the Love You Lots Large Sentiment Die is perfect for your Valentine's Day cards. Create a pretty ink-blended background and pair it with some cute critters, and there you go!

I ink-blended white cardstock with Picked Raspberry, Abandoned Coral and Wild Honey Distress Oxide Inks using my Beautiful Rainbow Blender Brushes. I added white splatter with a paintbrush and Copic opaque white.

I die-cut the ink-blended panel with A2 Stitched Hearts Cover Dies and used double-sided tape to adhere it to an A2 card base.


I sprayed Distress Mica Stain in Shiny Bauble to Distress Watercolor Cardstock by Ranger and added water colour metallic silver splatter once it was dry. I cut this panel with the Love You Lots Large Sentiment Die once, cut out three more of this large sentiment from white card stock and glued them together for added dimension. I also used the large heart die from Slimline Postage Stamp Frame Dies on the sprayed cardstock. I cut the heart three more times and glued them all together. 

For the sub sentiment, I stamped the 'you mocha me crazy' from The Perfect Blend stamp set with Versafine Onyx Black for a crisp impression. I used liquid glue to adhere the large sentiment and the heart to the card base. 


 The cute penguins are from the Mistletoe Kisses Digital Stamp Collection. I coloured them with my Copics, fussy cut them out and used a utility knife to cut around the arm of the penguin with the hat on so I could slip in the small coffee cup. It is from Bearing Gifts and fits perfectly in the arm of the penguin! I used foam tape to adhere the penguins to the card. 

I added Designer Enamel Dots, the pink ones are from Sweet Summer, and the pink ones are from Festive Fun.

Thank you so much for reading my blog post, you can use my discount code T4TANNALISA10 when you visit the Time For Tea Designs shop to get 10% off your order.


Thursday 26 January 2023

Sealed with a Kiss - Northern Lights Sky!


 It's Valentine's Week at Time for Tea Designs which means we have inspiration for you ALL WEEK of some amazing LOVE cards!

In case you're not following me on Instagram yet, you can follow me @craftyandcreativevibes.

Today, I'm sharing this Sealed with a Kiss card that has a lovely ink blended Northern Lights sky!!

I created this sky by masking off the bottom portion of my card front with Heffy Memo Tape. 

Then, I ink blended Catherine Pooler's Melon Ice ink in the center, creating the shape of a flame.  Next, I blended Suede Shoes, then Drive-In and lastly, I blended Black Jack.  

I spritzed it with some water and then flicked on some white paint.

After removing my Heffy Memo tape, I blended a bit of Melon Ice on the white background to make it look like the snow was reflecting the lights.


For my stamped images, I used the Sealed with a Kiss Stamp Set.  I love how adorable these little seals are!  I colored my images in with OLO markers and then die cut them out with the coordinating dies.
I stamped my sentiment directly onto the card front.


Well, that's all for me today, friends!  I hope you enjoy all the Valentine's cards this week!  Xx, Amanda


Wednesday 25 January 2023

FREE PRE-RECORDED CLASS - You Quac My World

 I'm so excited to introduce the

You Quac My World FREE Pre-recorded Class.


In this FREE class you will learn how to make a super cute shaker card with these adorable Avocado's.

What’s Included:

Pre-recorded Tutorial -This is a 'quick class' and runs under 20 minutes. You can pause the video at any time if needed. Full explanations of each step are given and demonstrated by Jo.

To get the FREE Downloadable Supply List and Pre- Class Prep Instructions go to the link below.


Grab your list, collect your crafty supplies and enjoy this fun and quick card making class.

Hugs

Jo xoxo

L O V E mini slimline shaker with Ashlee

Hey there Tea-timers...

It's Valentine's week at Time for Tea designs which means daily inspiration full of Love. So for today I have a shaker card to share with you all that I made inspired by the candy heart lollies that you can get....


To create this card I started by die cutting the card base/shaker frame from the Mini slimline scallop die. I then die cut a bunch of hearts using the Stitched hearts cover die from shades of pink and grey cardstock before adhering them to the card base. 

Now that those steps were complete it was time to fill the shaker with a whole bunch of gorgeous embellishments before adhering to the base to seal it all in!

It's always so much fun to fill a shaker with a bunch of pretty things and then give it a good ol shake don't you think?!


I wanted a big bold sentiment so I die cut the letters L O V E using Anthony's alpha die set from grey and black cardstock. The two layers were adhered together with liquid glue slightly off set to create a shadow....

The sub sentiment I heat embossed with WOW! Opaque bright white embossing powder on black cardstock. 

All the sentiments were then adhered on the top of the shaker along with the cute penguin that was stamped, coloured and die cut from the It's penguin-ing to look a lot like Christmas set. (Coloured using Spectrum noir tri-blend alcohol markers)


That complete's the Valentines shaker card and now it's ready to shake, shake, shake!

Have you made a valentine's card or planning to create some?! 
Be sure to check out all the design team's inspiration this week because they sure have some fabulous cards to shared and inspire you with...

Happy crafting, hugs Ashlee.

Tuesday 24 January 2023

You Had me at Meow

Valentines Day is coming up fast, but what if your special someone is a four-legged friend?! We all know how special our pets are, so why not make a card celebrating your own fur baby?


To make this card, I started out by die cutting the Dotty Hearts Cover Plate die from soft pink cardstock (I used Ballet Slipper from Concord & 9th). I then die cut the shadow from the You Had Me at Meow sentiment die from a warm grey, and the sentiment in white. 


I used liquid glue to add the sentiment to the shadow, then added the completed sentiment with foam tape to the card panel.


I stamped one of the kitties from the Kitty Capers stamp set using a Copic-friendly ink, then coloured with the following Copics:


W6, W5, W3, W1, W0 / R32, RV11


I die cut the kitty with the co-ordinating dies, then popped it on to the sentiment with foam tape. Finally, I added a few pink sequins to finish the card off. Simple and sweet, but I really love it!


Make sure to check out the week-long Valentines event going on at Time for Tea Designs this week, with loads of inspiration from the design team, discounts and other events. 


And if you’re placing an order, discount code T4TJAYNE10 will get you 10% off your purchase!

Monday 23 January 2023

Love YOU - Valentine's Week Day 1

Hi Tea Timers, welcome to Valentine's Week! For this whole week, the DT have created Valentine inspired projects to get you ready for next month!

Today I created projects using critters from two separate sets that you would not think to use for Valentine projects. I remember buying the boxed Valentine cards at store that came in a group of four and you tore them off to hand to classmates. I decided to create mini cards inspired by those using the dies from the Polaroid dies.


Sets used:
  • Bunny: E00, E01, E11, E13
  • Bear: E00, E01, E11, E13, E23, E25
  • Walruses: W-0, W-1, W-2, W-3, W-4, W-5, W-6
I then diecut them out and set them to the side. With the polaroid die, I die cut it out of white cardstock twice. I then took the Love word die and die cut it out twice from gold cardstock. With the You Had Me at Meow die, I positioned it on the diecutting machine to only cut out the YOU part from gold cardstock.


For my first background, I took the XOXO cover plate die cut it out of white cardstock. I then blended Abandoned Coral and Candied Apple. I took the larger heart die and blended Lumberjack Plaid. 

For the next background, I trimmed down cardstock to match the side of the polaroid and blended Tattered Rose and Saltwater Taffy. I then die cut out the two smaller hearts and blended Worn Lipstick. I adhered the hearts in different positions. 


To complete my cards, I adhered the elements with liquid adhesive. You can write a sweet message on the back or create a small card base to fit and add that to the back.

Don't forget to checkout the blog all week for more Valentine inspirations! If you like any of the products I highlighted today, use the code T4TRANDY10 at checkout.

Have a crafty day!

Sunday 22 January 2023

New Valentine Themed Virtual Class


I'm so excited to introduce the Stinkin Cute Online Class! 

SATURDAY 28 JANUARY 2023 - 3PM GMT

The class will be held in an exclusive Facebook Group that you will be invited to join following your purchase. You will also be sent details of the class, what you need beforehand and the course content, and the printable sheets we will use during the workshop. In order to participate in the class, you must have a Facebook account. If you are not on Facebook then you will be unable to join the class group.


Stinkin’ Cute is an opportunity to create 3 unique cards from start to finish! Jo will have dedicated time to go over the Copic colouring of all the images as well as for instructions for building scenes with your cards. During the class Jo will break down all of the basics and each technique in detail to help you understand and apply to your other Time For Tea Designs images after the class. Tons of inspiration for you to use with your crafty supplies!

All the class information is on our website via the link here.

I hope you can come craft along with us!
XOXO

Valentine Week - Loved Up Event!!


Hi tea timers!

Our Valentine's Week starts tomorrow and we are so excited to share the love with you all!

The week is packed with fun activities, plus there is a chance to win a £25 Gift Card to spend in store. 
We really hope you can join us.

WHAT'S HAPPENING!

Monday
New Valentine Section on the Website
First of our daily dose of DT Inspo!

Tuesday
Valentine Themed Treat Yourself Tuesday

Wednesday
New pre-recorded free class

Thursday
More Daily Inspo

Friday
Valentine Themed Facebook/YouTube Live with Jo - 4pm

Saturday
The Stinkin' Cute Virtual/Live Class - 3pm

Sunday
Lots of Love for our Tea Timers Showcase! 
We will highlight a selection of Tea Timers who tag us in their Loved Up creations on Instagram or Facebook. One randomly selected entry will win a £25 Gift Card for the store.

If you'd like to sign up for our first Virtual Class of the year check out the link below for all the details.


xoxo
Jo & Ant


Friday 20 January 2023

Let's Seal-ebrate


Happy Friday! DT Annalisa here, today's project is a wintery slim-line card featuring the Sealed With A Kiss stamp set from Time For Tea Designs.

I sprayed Distress Mica Stain in Shiny Bauble to Distress Watercolor Cardstock by Ranger. This stain has a beautiful shine, and I love the light blue colour.


I used the Falalala Scalloped Slimline Dies to die-cut a scalloped border. I created a snowy hill using the Slimline Hillside Scene Dies, and ink blended this very lightly with Salvaged Patina Distress Ink before adhering it to the bottom left of the scene with liquid glue. I added the scalloped frame on top of this with liquid glue. I used double-sided tape to stick this panel to a slim-line card base.

I stamped and coloured the seals, fish and fishing pole from the Sealed With A Kiss stamp set and die-cut them with the coordinating dies. The winter hats and chunks of ice are from the Walrus Be Friends stamp set. I stamped, coloured and die-cut these with the coordinating die set. I added highlights with a White Gelly Roll Pen and sparkles with a Quickie Glue Pen and Lawn Fawn Prisma Glitter.


I used double-sided foam tape to adhere some elements (including the sentiment) and liquid glue for the rest. I love the overall shine on this card when you pick it up and move it around in the light. If you have never tried Distress Mica Stain I highly recommend it.


Thank you so much for reading my blog post, you can use my discount code T4TANNALISA10 when you visit the Time For Tea Designs shop to get 10% off your order.


Thursday 19 January 2023

Creating a Shaker Card using the Walrus Be Friends Stamp Set


Happy Thursday, Tea Timers!  It's Amanda here!  Do you LOVE making shaker cards?!  I just think they're SO much fun and worth the amount of time that it takes to make them!

To create this card, I first ink blended a piece of white cardstock with Minted, All That Jazz, and Something Borrowed Catherine Pooler inks.  Then, I used the Waves Cover Die to cut it out.

Next, I glued my waves directly onto my white card base.  I added some sequins to the center.  I used double sided tape to adhere my acetate sheet to the die cut frame.  Then, I placed Deep Foam Tape around the entire edge of the frame.  Then, I could place my frame on my card base.

I then stamped my images from the Walrus Be Friends Stamp Set and colored them with OLO markers.  Then I die cut them with the coordinating dies.

The last step is to adhere my stamped images and sentiments to the card using 3D foam squares!

That's it for me today, friends!  I'll be back next Thursday for some more inspiration!  Xx, Amanda


Other Posts You Might Like