Pages

Monday 27 February 2023

Have A COSY Night!

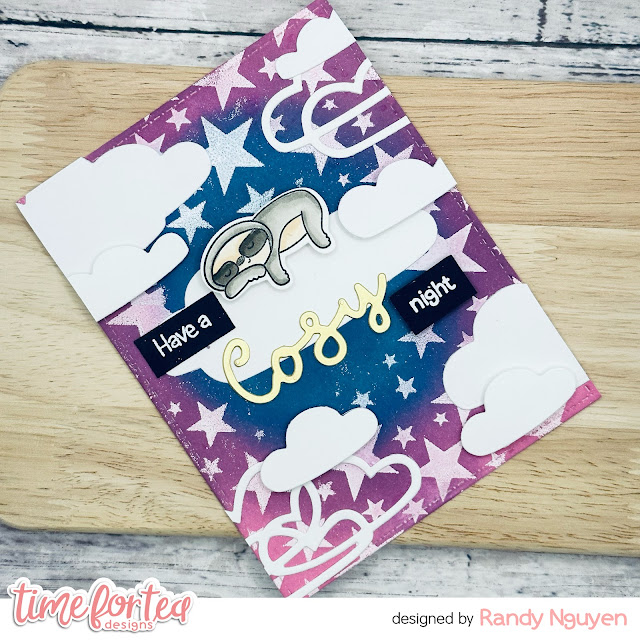
Hi Tea Timers and welcome back to the blog! DT Randy here with a scene I built around my favorite image of the sloth from the Movie Night stamp set. I was wanting to create a Sweet Dreams type card for my niece who has been having some trouble sleeping through the night.


Sets used:

I first stamped out the image of the sloth and used E01, E11, E70, E71, E74 and E77 Copic markers to color the critter. I then fussy cut him out and set him to the side. 

I then took an A2 Panel and blended embossing ink over the Movie Star stencil. I only blended the ink over the border of the card leaving a circle in the middle. I wanted it to look like the stars were circle the sloth. Once I blended the embossing ink, I heat embossed the stars with white embossing powder. After letting the card cool down, I blended Faded Jeans, Uncharted Mariner, Seedless Preserves and Picked Raspberry over the panel. 


With the cloud dies, I cut them out of white cardstock several times. I had to build my sentiment and used different stamps to complete my phrase. I love that you can stretch your stamps by just masking off certain portions of a sentiment to use just a couple of the words that you need. Instead of masking off the stamp, could also trim off the sentiment, but I prefer to keep them intact.

For my sentiment, I used the sentiment from the Fintastic Friends stamp set for the "Have A" portion and the "night" sentiment from the Movie Night stamp set and heat embossed them with white embossing powder over black cardstock. I trimmed them down to size. With the Cosy sentiment die, I cut it out of gold cardstock. 

To assemble my card, I decided how I wanted my sloth to lay on top of the cloud. I glued the large cloud down first and then decided on how I wanted the  other clouds to surround the sloth. To give the card more dimension, I used a mixture of liquid adhesive for the bigger clouds and then foam dots for the smaller clouds.

Once I had all of my clouds adhered, I glued on the sloth with liquid adhesive and then my sentiment underneath.

I hope you enjoyed this card today. I feel like this image of the sloth is so versatile and can be used for any scene really. If you love this set, check it out in the shop and use the code T4TRANDY10 for savings.

I hope you have a wonderful day and week!

Friday 24 February 2023

New Video - How to Make a Card with Secret Gift Card Flip Up!


I absolutely love how this card turned out!

As usual I didn't really know what I intended to do during the Live. I just knew that I wanted to make a Gift Card holder for my Mum's birthday to go with the birthday card I had already made.


I used the Happy Mail Gift Card Holder Die set which is now on sale in our Retiring Collection.
This die set has the die mechanism to cut the gift card holder and the flip up panel that I used in this card.


I decorated the front with the Purrfect Day Stamps and the Pawsome Rainbows Pattern Paper.


Here is the gift card holder element in action. This is a really fun project to try and such a simple way to make a gift card look more personalised.

I hope you give it a try!

You can watch the Live replay below.


Happy Crafting
Jo XOXO


You're A Reel Star

 
Happy Friday! DT Annalisa is here today sharing a fun interactive card featuring the adorable Movie Night stamp set from Time For Tea Designs. When I first saw this stamp set, I knew I had to make an interactive gift card scene with it. 


To create the interactive element, I used the Flippy Flappy dies from Lawn Fawn and followed several of their instructional videos on YouTube. I adhered a piece of teal patterned paper from the Gorgeous Gingham 6x6' Paper Pad using double-sided tape to an A2 card. I then created the interactive portion using white card stock and used double-sided foam tape to stick it to the card base. 


For the panel on top of the interactive mechanism, I used the Popping Popcorn and Tiled Wall 6 x 6 stencils on two panels of white card stock; for the popcorn, I used Squeezed Lemonade Distress Oxide and Weathered Wood for the wall. After ink blending with my Beautiful Rainbow Blender Brushes, I used liquid glue to adhere the panels down. I also ink-blended another tile panel for the gift card holder panel to which I adhered a movie gift card.

I stamped the critters and other elements from Movie Night and coloured them with my Copics. I cut them out with the coordinating die set and added white gel pen accents with my Gelly Roll Pen. I glued down the seats and sloth with liquid glue and the rest with double-sided foam. 


For the 'you're a reel star' sentiment, I used the coordinated die to cut out three extra pieces of white cardstock and glued them to the back of the sentiment for added dimension. I then used liquid glue to add them to the card.

Thank you so much for reading my blog post, you can use my discount code T4TANNALISA10 when you visit the Time For Tea Designs shop to get 10% off your order.


Thursday 23 February 2023

Have a SWEET Birthday!


 Hello, Tea Timers!  How cute are these little penguins from the It's Penguin-ing to Look A Lot Like Christmas stamp set?


In case you're not following me on Instagram yet, you can follow me @craftyandcreativevibes.

I love stretching my supplies, so I decided to create a birthday card using these Christmas stamps and the Christmas Candy Layering Stencil!  For my "floor", I used Heffy Memo Tape to mask off the top of the card and then I ink blended Be Mine and Party Dress.
For my candy background, I used Chiffon and Glitz and Party Dress.


I stamped my images from the It's Penguin-ing to Look A Lot Like Christmas and Gingerbread Family stamp sets.  I colored them in with OLO alcohol markers and then die cut them using the coordinating dies.


For my "birthday", I grabbed a generic birthday die.  Then, I attached everything to my card using 3D foam squares and glue.


That's all for me today, friends!  Come back tomorrow for more inspiration from another Design Team member!!  Xx, Amanda


Wednesday 22 February 2023

Retro shaker

Hey there Tea-timers...

It's DT Ashlee here and I'm sharing a Retro shaker card featuring the awesome Retro phone builder die!!


To create this card I started by making a shaker card base. I used the wide stitched frame dies to create the frame, adhered acetate to the open space and then added foam tape around the edges. I filled the shaker portion with a bunch of pretty sequins and then backed it with a piece of cardstock. 


I then went on to create the retro phone by die cutting all my pieces from cardstock and adhering together with foam tape and liquid glue....

I adhered it to the card base and then added a super cute little teddy from the Let's chat stamp set  (Coloured using Spectrum noir tri-blend markers and die cut using the co-ordinating dies)

To complete the card a little sentimen and now it's time to shake, shake, shake!!


That's all from me for today, I hope you enjoyed this shaker card inspiration...
Happy crafting, hugs Ashlee.

Introducing Huge Discounts in our Retiring Collection!!

We are super excited to launch our new Retiring Collection in the 

Time For Tea Designs shop.


These crafty goodies are really low in stock and won't be returning, so once they're gone, they're gone!!

You'll find some great discounts, with up to 50% off some items!

Grab yours quick or miss out!!


You'll find many of our favourite products in this collection and it makes us so sad to say goodbye, but we really need to make room for some new goodies!!


This is a great chance to buy a bargain but be quick! 
These cuties won't last long!!


Happy Shopping!

XOXO


Monday 20 February 2023

Balloon Numbers Birthday Card

Hi Tea Timers and Happy Monday! I wanted to create a cute birthday card and thought it would be fun to use the "Happy New Year Critters Balloon Numbers Add On Digital Stamp Collection" that is currently still free on the website! I love the digital stamp sets, especially this one as it come with PNG files that will allow you resize each image that will work best for your project. I really love those big number balloons that you will sometimes see at parties and wanted to recreate that same size with this card.


Sets used:

To resize my number balloons, I added them into a Word document and enlarged them to the desired size. I then printed them out on Copic friendly cardstock using a laser printer. After fussycutting them out, I used RV21, RV23, RV25 and RV29 to color the balloons. 


I then stamped out the two critters and used the following Copic markers to color them: E50, E51, E53, E55, E57, T-0, T-1, T-2, T-4 and T-6. I used the coordinating dies to cut them out and set them to the side.


With the largest slimline die, I cut it out of white cardstock twice. I then took the fence die and the cloud dies and cut them out of white cardstock as well. With one of the slimline panels, I used the Grass die to cut out the grass piece. I blended it with Twisted Citron and Mowed Lawn Distress Oxides.

For my second slimline panel, I blended, Peacock Feathers, Salvaged Patina and Tumbled Glass. To assemble my card, I first adhered the grass and fence pieces. I then took the clouds and arranged them on the panel. I used liquid adhesive to secure them. With each balloon, I cut out two pieces of gold twine and adhered them to the back of the balloon with foam tape. 


I added the critters to the bottom using adhesive tape as well and secured the twine onto them using liquid adhesive to complete my card. 

Don't forget to head to the site to get this free digital stamp and don't forget to look at the products I used in this tutorial. If you plan on purchasing any of the items, use the code T4TRANDY10 at checkout for savings. 

Friday 17 February 2023

Big Bunny Hello


Happy Friday! DT Annalisa here today sharing a no-line coloured card featuring several Time For Tea Designs products. I don't often use this technique with my Copics as it is out of my comfort zone, but I am glad I did.

For the background, I added Saltwater Taffy, Abandoned Coral and Picked Raspberry Distress Oxide ink to watercolour paper with a paintbrush. I added some splatter and spots with a paintbrush for added interest.

Once the panel was dry, I used the Dotty Hearts Panel Die to add the pretty stitched hearts. I adhered this to an A2 card base (8.5 by 4 1/4 inches) with double-sided tape. I die-cut the frame from the Zig Zag Frame & Tag Dies and glued it to the panel.


I stamped the bunny and phone from Let's Chat with pale Fadeout ink from Ink on 3, which works well for no-line colouring. I used my Copics, adding darker tones near the edges of the images; this helped to ensure that the lines were no longer visible once the image was coloured in. I added white gel pen accents before using double-sided foam tape to adhere the images to the card base.

I stamped the sentiments from Let's Chat with Versafine Onyx Black and cut them out with the coordinating die set.


I used the large heart die from the Slimline Postage Stamp Frame Dies to die-cut three hearts. I ink-blended them with Salvaged Patina, Stormy Sky and Faded Jeans Distress Ink using my Beautiful Blender Brushes. I added white splatter using a paintbrush and Copic opaque white.

I used liquid glue to adhere the three coloured hearts to the card. I then used double-sided foam tape to stick the sentiments to the card. I add three blue Festive Fun Designer Enamel Dots for the final touch.


Thank you so much for reading my blog post, you can use my discount code T4TANNALISA10 when you visit the Time For Tea Designs shop to get 10% off your order.

Thursday 16 February 2023

Happy Trails to You!


 Hey friends!  Today, I am sharing this card I made using the Happy Trails Stamp Set!


In case you're not following me on Instagram yet, you can follow me @craftyandcreativevibes.

To create this card, I ink blended my background with Catherine Pooler's Catching Rays and Limoncello inks, using a sun rays stencil to create some darker areas.  I ink blended a piece of another piece of cardstock with Sage.  I gave both pieces a spritz of water and flicked on some white acrylic paint.  Then I cut my green piece into grass using the Landscape Edge Standalone Dies.  I also cut a little road using the Slimline Hillside Scene Dies.


I stamped my images from the 
Happy Trails Stamp Set and then I colored my little images with OLO alcohol markers and then die cut them out with the coordinating dies.  To get the little bear inside the car, I masked off the car and stamped him in the inside!  Because the die cuts out that window, I used scissors to fussy cut this image.

I adhered everything to the card base using liquid glue and 3D foam squares.

I added a few sequins at the end too!
That's it for me today, friends!  I hope you find some time to get crafty today!  See you next week!  Xx, Amanda

Wednesday 15 February 2023

Happy anniversary Hammy's

 Hey there Tea timer friends...

Who's ready for some new T4T inspiration? This one is Pink and full of cute little Hammy's that are ready to celebrate!....


I used these Time for Tea designs products :

- Hooray hamster stamps

- Hooray hamster co-ordinating dies

- Flirty flowers cover die

- Fishtail banner die

- Simple sentiments stamps


To create this card I started by inking a light pink cardstock base with Pucker up ink from Catherine Pooler ink. I then die cut this panel from the flirty flowers cover die. I added a shiny pink paper underneath to fill the flower design (unfortunately the shine doesn't show in the photo but its pretty cool IRL). 

A couple of banners were then die cut from black cardstock that I heat embossed sentiments on using WOW! Opaque bright white embossing powder. I adhered both those using foam tape for dimension. 

Four hammy's were stamped, coloured and die cut (I used Spectrum noir tri-blend markers to colour them) before adhering to the card base also with foam tape. 

The card was completed by adding a touch of pretty sequins!!


I hope you enjoyed todays card, thanks for stopping by and happy crafting. Hugs Ashlee. 

Monday 13 February 2023

Love You (Part 2)

Hi Tea Timers and Happy Valentine's Day Eve! We are just one more day away from Valentine's Day and I have one more card to share before the big day!

I was going through my stash and realized I have not used the Pawsome dies for quite some time and wanted to use it again with two of my favorite cat images.


Sets used:


I first took an A2 panel and blended Abandoned Coral, Kitsch Flamingo and Saltwater Taffy Distress Oxides over the panel. I then took Candied Apple, Picked Rapsberry and Worn Lipstick and blended it over the stencil. I took the large paw print die and ran the blended panel through a die cut machine and set the panel to the side.


With the 2 cat images, I stamped it onto cardstock with black ink and used the following Copic marker colors to color them: C-00, C-0, C-1, C-2, C-3, C-4, C-5, C-6, E00, E50, E51, E53, E55, E57. I then used the coordinating dies to die cut them out and set them to the side.

I only needed the word 'You' to complete my sentiment so I positioned the sentiment onto gold cardstock where it only cut out the word. I took the Love sentiment die and cut it from the same gold cardstock.


For the back of the card, I trimmed down a magenta cardstock to adhere to the back of the panel. I assembled my sentiments using liquid adhesive and the images using foam tape.

I hope you enjoyed the blog post today and are ready for Valentine's Day tomorrow! If you like any of the products that I used today and want to purchase them, use the code T4TRANDY10 at checkout for savings!

I hope you have a wonderful day and week!
Sunday 12 February 2023

February Step-by-Step Tutorial - 2 for 1 slimline cards

Hey guys, have you finished your Valentines crafting yet? If not, don't worry - I've got a last minute dose of inspiration for you, whether you're celebrating Valentines or Galentines Day! And even better - these cards can be sent year round to your loved one, not just on February 14th. AND you get 2 backgrounds for the price of 1! Ready to craft? OK, let's go!


Supplies used:


Instructions:

1. We're going to create an ink smooshed background to start, so grab some inks in different shades of pink, and smush them onto a slick surface like a glass craft mat. Spray the inks with water (or you can use shimmer spray like I did, for some extra shine).

2. Dab a piece of white cardstock into the inks. Repeat until you're happy with the effect. You can dry the panel with a heat gun and add more layers if you want to!

3. Once the panel is dry, place the Lots of Love die on to it, and run it through your die cutting machine. Make sure to save all of the little die cut hearts and put them to one side.


4. Take the die cut frame and glue it to a slimline card base. Die cut a circle from pink card using the circle dies and add it to the card panel, about 1/3 of the way down.

5. Stamp the seagull from the Beach Buds stamp set. To make the other seagull, we need to do some mirror stamping. The way I do this is to remove the mat from my MISTI and place a solid stamp in its place (you could also maybe use a gel press or even some acetate). Stamp the seagull image on to the solid stamp. Then, place your paper down over the solid stamp and press into it. When you lift the paper away, you will have a mirrored image of the original stamp.

6. Colour the seagulls with your preferred medium (I used Copics) and fussy cut them out. Add to the pink circle with foam tape.

7. Stamp the "love you" and "you go gull" sentiments from the Beach Buds set, and trim the latter sentiment down to just say "gull". Add them to the card with foam tape.


8. From your remaining ink smooshed background, die cut the "friend" word die, and the shadow die from white cardstock. Layer them together with liquid glue, and add to the card front.

9. To finish the first card, add some gems in co-ordinating colours. 

10. For the second card, we need to cut another panel using the Lots of Love die, but this time, out of white cardstock. Glue the frame on to a white slimline card base.


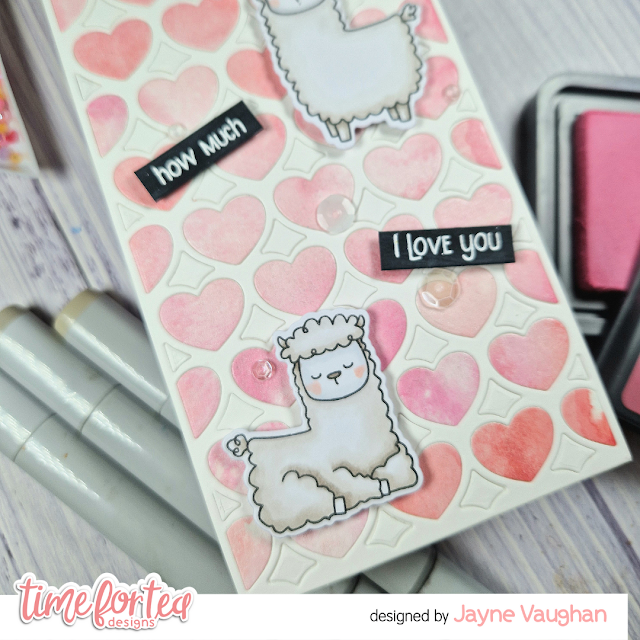
11. Now for the fun part - we're going to do some "die-cut inlay" - i.e., we're going to glue all of the little hearts that we saved earlier into the negative spaces in the white die-cut we just made. Is it time consuming? Yes. Worth it? Definitely. I actually find it quite relaxing, like a jigsaw puzzle.

12. Next, stamp, colour and die cut three of the llamas from the Llama Tell you stamp set. Again, I used Copics here, but you can use whatever you want! I added the llamas to my card with foam tape.


13. Stamp the sentiments "llama tell you" "how much" and "I love you" onto some black card using embossing ink. Heat emboss in white, then trim down the sentiments into three thin strips. Again, add these with foam tape to the card front.

14. I finished with some clear sequins dotted around.


I really love these cards! It's a shame that the photos don't capture the shimmer from the spray - if you check out my Instagram, I'll upload a reel which will hopefully show it better! (@card_days_night).

Thanks for joining me again for another step-by-step tutorial - see you in March!

*Discount code* - use T4TJAYNE10 for 10% off your purchase!

Saturday 11 February 2023

New Video - Bee Happy Clean and Simple Card Making


We have a new video for you on our YouTube channel today!
In it I make this cute Clean and simple card.


I used the Bee Happy Stamp & Die set with the Sweet Honeycomb stencil to make a bright and fresh card to give to couple celebrating an engagement or wedding.


I created an aperture with our Heart nesting dies and heat set my sentiment on a pop of pink!


If you'd like to see how I put this whole card together and hear my tips on creating Clean and Simple cards you can watch the replay below.


Happy Crafting
XOXO


Other Posts You Might Like