Pages

Friday 26 July 2024

My Favourite Bookworm


Happy Friday, DT Annalisa here, for my card, I wanted it to look like the kitty was so absorbed in his reading that he was IN the book he was reading. I like how it turned out and hope you do.

For the background, I used the Tall Alpha Clear Stamp Set. I inked it up with Cornflower Blue Hero arts shadow Ink and stamped it on white cardstock with my MISTI. I reapplied the ink and stamped again a few times for a crisp impression. Next, I ink-blend the Cornflower Blue from the cardstock's edges with my Beautiful Blender Brushes.


I used double-sided tape to stick the inked panel to a blue 4 1/8 by 5 3/4 inch card base.

I die-cut vellum using the new Stitched Circle Dies. I used double-sided vellum tape to stick the circle to the card base.

I stamped and coloured (with Copics) images from the Book Buddies stamp set and cut them out with their coordinating dies. I added white gel pen accents with a Gelly Roll Pen. The butterfly is from Squeeze the Day - I coloured it and die-cut it with the coordinating dies.


I used 1mm double-sided foam tape to stick the critters and sentiment to the card. I added Glossy Accents by Ranger to the glasses and butterfly.

I added the Clear Bubbles Designer Enamel Dots to the card to complete it.


Thank you so much for reading my blog post. Remember to use my discount code T4TANNALISA10 when you visit the Time For Tea Designs shop to get 10% off your order.

Tuesday 23 July 2024

Relax, read, repeat

Hello everybody!

Summer has arrived and I'm here for it! Well, at least my crafting is πŸ˜‰
I've got a card to show you which oozes the summer vibe. I can hear the waves crashing onto the beach whilst looking at this one!

Started off with stamping and coloring my critter from the Book Buddies A6 Stamps. Just love how he's peeping over the book! I used the Book Buddies Coord Dies to die cut my image, and set it aside to use later on.


Next step I took, was die cutting a circle, using the Stitched Circle Dies out of white cardstock. With the help of masking tape I divided the circle and blended sand with Distress oxides antique linen and walnut stain. I added some dots with a brown alcohol marker. For the sea I used salty ocean and uncharted mariner. For the sunset sky I used mustard seed, worn lipstick and wilted violet. I stenciled on a palm tree using black soot.

I then die cut a Scalloped Circle from white cardstock and adhered my beach scene on top. I added the colored critter on top with 3D foam tape and stamped the sentiment onto black cardstock with watermark ink. I used white embossing powder and my heating tool after which I used the coordinating die set again to cut the sentiment out. Again using 3D foam tape, I adhered it onto the circle.

With the Simple Square Nesting Dies I die cut a yellow square and with a stitched square I die cut 2 pieces patterned paper, choosing nice summery colors, but making sure my blended beach scene would still pop out on brightness. I layered those pieces and used a small strip of glittered pink washi tape on the breakline. I adhered this entire stack onto a white card base using double sided tape.


Added Ranger glossy accents to the critters glasses and some enamel dots to finish the card. There's nothing more that says 'vacation' to me then catching the last sunrays on the beach with a good book to accompany me. That's the feeling I wanted to catch in this card. I hope I succeeded!

I hope you all are having a relaxing summer!


Monday 22 July 2024

"Squeeze the Day!" - DIY Shaker Drink

 Hi Tea Timers, welcome back to the blog. Today I wanted to create my own shaker drink using the fruit in the 'Squeeze the Day' stamp set and the Takeout Coffee Cups dies.

This is a fun way to stretch your dies and recreate some of your favorite beverages, such as any lime or orange drinks.

Sets used:

I first stamped out my images and use Copic Markers to color them. I then fussy cut the image out and set it to the side.

I started to create my drink by first cutting out the cup twice out of white cardstock and once out of acetate. 

On one of the cup diecuts, I drew a border around the cup using a pencil and then cut out the middle. This was going to be my frame. I then blended this piece with Salvaged Patina and Peacock Feathers Distress Oxides. 

On my second piece, I blended it with Worn Lipstick, Abandoned Coral and Festive Berries to create my fruit drink.

With my image, I cut a slit into the orange and then added it to the top of the frame so it looked like I had a piece of orange sticking out of the cup.

On my frame, I adhered the acetate using tape runner. I then took foam tape to add to the border of the frame. With an anti-static tool, I rubbed it on the edge of the foam tape and on the piece of acetate so the sequins would not stick to it. 

I then added the sequins into the frame. I diecut out the straw from gold cardstock and adhered it to the back piece. I then adhered the two drink pieces together. 

To create my background, I took an A2 Panel and blended it with the Sunburst Stencil and Scattered Straw and Mustard Seed. 

I then took another A2 panel and die cut out 2 hill pieces from it. On the first hill piece, I blended it with Salvaged Patina and Peacock Feathers to create the ocean piece.

On my second hill piece, I blended it with Antique Linen and Tea Dye. On this piece, I splattered it with brown watercolor and on both pieces, I splattered it with white watercolor.

I took the sentiment and heat embossed it on pink cardstock with white embossng powder and embossing Ink.

To assemble my card, I adhered the ocean and sand pieces using liquid adhesive. I then adhered my drink using tape runner and added my sentiment using foam tape. I then added my lime and strawberry using liquid adhesive and foam tape.

I hope you enjoyed this tutorial today. All the items I used are linked above. Don't forget to use the code T4TRANDY10 at checkout for extra savings. Happy Crafting!

Tuesday 16 July 2024

You can't buy happiness...

 ... but you can buy books! And craft supplies!! The perfect combo if you ask me 😁

The Book Buddies Stamps make me happy. I love cats, I love books, I love sleep Γ‘nd I love to craft. All my favourite themes combined! Not very fond of worms in real life, but this one is cute and made out of paper, so I'll live.


As usual, I started by colouring in the stamped images and die cutting them with the help of the coordinating dies. Set those aside to work on the frame and background. For the frame I used plain white cardstock and the new Five Windows Cover Die. Took the largest size out of my Simple Nesting Dies - A6 set, which fits beautifully behind the panel, and die cut a panel out of, again, white cardstock.

With distress oxides salvaged patina, kitsch flamingo and carved pumpkin I blended an ombre background. After that dried, I used the X Marks the Spot Stencil and distress oxides peacock feathers, picked raspberry and spiced marmalade to make 'ton sur ton' x's.


Added some white splatters with plain acrylic paint and water. I then added 3d foam tape to the frame, and adhered it on top of the background panel to create depth which helps creating the illusion of a book cabinet or shelve.

With white embossing powder on black cardstock, I created the sentiment, and ofcourse used the coordinating die to cut it out. 


With slightly less thick 3D foam tape, I adhered all the images onto the panel. For some extra dimension, I added Ranger glossy accents to the critters wearing glasses. This takes A LOT of time to dry, so I always make sure this is the last step to take as I do not have enough patience to wait this process out in the middle of making my card πŸ˜…

I hope you enjoy this one, I sure did creating it!


Have a nice day!

~Ilona~


Monday 15 July 2024

"You're One In a Melon... Berry, Berry Sweet!"

 Hi Tea Timers, welcome back to the blog. As you all may know, one of the many techniques I like to do when creating a card is taking some of the smaller images in a stamp set to create a background. I really like the fruit images in the Fruitful Friends stamp set and wanted to create a card specifically for them.

It all so happens that the color palette for the fruits are very similar so it was nice to use different shade combos to color the images to keep it consistent.

Sets used:

(Coordinating die set available here)
(Stamp and die bundle available here)

I took an A2 Panel and arranged my images on an acrylic stamp block. I then inked up the images and stamped them around the panel several times until the entire background was covered.


I then took the follow Copic Marker color combos to color the images: 
Strawberries: R22, R24, R27, R29, YG61, YG63
Cherries: R56, R59, YG97, YG99 
Watermelon: RV11, RV13, RV14, YG21, YG23, YG25

I then took one of the scalloped circle dies and cut it out of light blue cardstock. I took the die cut and then heat embossed the two sentiments using embossing ink and white embossing powder.

I wanted to add a little texture to the card so I took a piece of bakers twine and wrapped it around the card several times. 


I then placed foam tape onto the back of the scalloped circle and adhered it on top of the twine. 

To complete my card, I took a piece of lime cardstock and trimmed it down to fit behind the A2 panel, so that the panel was framed. Once I trimmed it down, I took more foam tape and adhered the two panels together.

All the items I used are linked above. Don't forget to use the code T4TRANDY10 at checkout for extra savings. Happy Crafting!

Friday 12 July 2024

Simply the Zest


Happy Friday, DT Annalisa here. The Time For Tea Designs new release is perfect for cards in the heat of the summer. I loved colouring the fruit with bright colours! These cute critters are about to squeeze the fruits to make a deliciously refreshing summer drink - like the ones I have been drinking as it is super humid. 

I used the A6 Simple Nesting Dies to die-cut a piece of patterned paper from Brighter Days 6x6' Paper Pad. I used double-sided tape to stick it to an A6 card base.

Next, I ink-blended ALTENEW Sunkissed Crisp Dye Ink through the new Diagonal Stripes Stencil. I removed the stencil and ink blended lightly using the leftover ink on my blender brush to fill in the white areas. I added splatter using the ink, water and a paintbrush.

I stuck the striped panel to the card base with liquid glue and used double-sided tape to stick a white stitched frame that I die cut with the Wide Stitched Frame Dies on top of it.


I stamped and coloured (with Copics) the limes, lemons and oranges from Squeeze the Day and cut them out with their coordinating dies. I added white gel pen accents with a Gelly Roll Pen. The critters are from Sweet Cart Critters, I cut them out with their coordinating dies.

I stuck the stamped elements to the card with double-sided tape, including the sentiment. I added Summer Haze Designer Enamel Dots in orange to complete the card.


Thank you so much for reading my blog post. Remember to use my discount code T4TANNALISA10 when you visit the Time For Tea Designs shop to get 10% off your order.


Wednesday 10 July 2024

The ZEST!

Hey Tea-timers...

DT Ashlee here to share some new Time for Tea designs inspiration with you to get your creative juices rolling...


T4T products used for this card :


I used lots of bright coloured card stocks to die cut the card base and sentiment tag. These were all adhered together with liquid glue or foam tape to start adding dimension...

I then stamped, coloured and die cut a bunch of the super cute images before arranging them in a fun fruity scene!! 

To complete the card I finished it off with a touch of sequins....


I love the bright and cheery colours on this card, I hope you enjoyed it also. Thankyou for stopping by the blog, Happy crafting, hugs Ashlee.

Tuesday 9 July 2024

One in a πŸ‰

Goodday Tea Timers!

Hope you are enjoying summer and all the joys this season brings! Such as summer fruits. There's nothing more delicious than a piece of cold and sweet watermelon πŸ‰ on a sunny day (and I am not talking about Harry Styles' version!).

Besides eating a juicy watermelon, you can also make a themed card out of it! πŸ˜‰ Which is exactly what I did for this weeks card. Inspired by the sentiment on the Fruitful Friends A6 Stamp set, I decided to work with the watermelon color pallette. So I started by coloring the critters and the fruits using Copic alcohol markers. After coloring, I used the coordinating dies to cut the images out.


To create a background, I took the largest die out of the Simple Nesting Dies - A6 and cut out a panel from white cardstock. With distress oxides mowed lawn, twisted citron for the grass, and spun sugar for the sky, I created a scene with the help of the 6x6 Scene Builder Stencil. I splattered acrylic paint onto the sky, staying within the watermelon color scheme. After it dried, I added the frame made with the Five Windows Cover Die and adhered it with 2mm double sided foam tape. 


For the sentiment, I used the first part of the stamp onto a strip of black cardstock, and heat embossed with white embossing powder. Now for the second part, I took out the Anthony's Alpha Dies and die cut each letter twice, once out of black cardstock, and once out of white cardstock. I used distress oxides twisted citron and abandoned coral to color in the white letters, leaving a little white at the top.


Last but not least I added some Stickles (star dust) onto the little bees' wings!
Thank you for visiting this blog and please leave a comment if you liked this post!

All the best,


Monday 8 July 2024

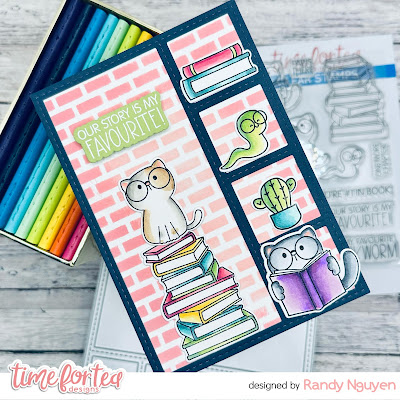
"Our Story is My Favourite!"

Hi Tea Timers, welcome back to the blog. I am finally sharing a card I created using the 'Book Buddies' stamp set. I love all things books so this set was definitely one of my all time favorites from the release.

I wanted to pair the set with the new Five Windows Cover die to highlight the images in the set.


Sets used:

Book Buddies stamp and die bundle available here

I first stamped out my images and used Copic Markers to color the images. I then used the coordinating dies to cut them out and set them to the side.

I then took the cover die and die cut it out of navy cardstock. I then took a piece of white cardstock and trimmed it down to fit behind the window diecut.

With this white cardstock, I took the Tiled Wall Stencil and blended it with Worn Lipstick and Saltwater Taffy.


I then took the stencil and heat embossed it onto green cardstock with embossing ink and white embossing powder. I die cut out the sentiment using the coordinating die set.

To assemble my card, I first adhered the window onto the background using liquid adhesive.

I then laid out where I wanted the images to go and used foam tape to adhered them to the card using foam tape. I wanted to make it look like the side window were shelves.


I then completed my card by adhering the sentiment onto the card with foam tape behind it.

All the items I used are linked above. Don't forget to check out the new release now in the shop and use the code T4TRANDY10 at checkout for extra savings. Happy Crafting!


Friday 5 July 2024

You're Simply The Zest


Happy Friday, DT Annalisa here, my card today features the brand new Squeeze the Day stamp set. I absolutely loved colouring this set's limes, lemons and oranges.

I started by adding several drops of twisted citron Distress Paint onto my glass matt and spraying it with water. I pressed water-coloured cardstock into the paint several times to create a bright green background.


I die-cut white cardstock with the Mini Slimline Scallop Dies to create a frame for the scene. I glued the green panel to a mini slimline card and used 1mm double-sided foam tape to stick the scalloped frame around it.


I stamped and coloured (with Copics) several images from Squeeze the Day and cut them out with their coordinating dies. I added white gel pen accents with a Gelly Roll Pen. The bee and watermelon are from Fruitful Friends, I stamped and coloured them and cut them out with the coordinating dies.

I adhered the images and the sentiment to the card with double-sided foam tape for dimension.


Thank you so much for reading my blog post, be sure to use my discount code T4TANNALISA10 when you visit the Time For Tea Designs shop to get 10% off your order.

Wednesday 3 July 2024

My favourite!

Hey there Tea-timers...

DT Ashlee here with some new Time for Tea designs inspiration for you.


I used these T4T products from the latest release for this card....


To create this card I started by die cutting the window die from pink card stock. I then filled in the windows with the pink card and some white before going on to die curt the bookmark die. this was adhered with foam tape to start adding dimension....

I stamped and die cut then sentiment from book buddies and adhered that in place. I then went on to stamp, colour and die cut a bunch of the cute book buddies images!! These were also adhered with varying levels of foam tape. 


To complete the card my usual touch of sequins!

I hope you like my book themed card for today. Happy crafting, Hugs Ashlee. 

Tuesday 2 July 2024

Simply the zest!

Hello everybody!

Summer has finally started over here in the Netherlands, and although it's still wet from time to time, it's not as cold anymore 🌞 So I'm moving on to summery and zesty cards!

Squeeze the Day is the perfect stamp set to get the summer vibe going on your card. I took the two largest stamps from the set and colored them with my Copic markers. I used the coordinating dies to cut the images out. 

For the sentiment I applied clear ink onto black cardstock and heat embossed with white heat embossing powder.


All I needed now, was a colourful background, so I took out the new Diagonal Stripe Cover Die and spent quite some time searching through my cardstock inventory, to obtain the perfect match for a rainbow-like gradient. The strawberry in the bottom right corner was placed on purpose to start off with red πŸ˜‰


I adhered the images and sentiment with foam tape (1mm) and added white glittery enamel dots for some zest!


Have a lovely summer everybody πŸŒžπŸŒ΄πŸ–πŸŠπŸΈ

~Ilona~


Monday 1 July 2024

A BERRY Sweet 'Thank You' Card

 Hi Tea Timers, welcome back to the blog. Today, I am sharing another card I created using a set from the latest releases. The 'Fruitful Friends' stamp set not only features out favorite critters but also some fresh fruit we love so much. 

I really wanted to highlight each critter individually and decided to DIY my own frame again. I've used the same technique for a DT project in the past and wanted to do the same here with the newest 'Stitched Circle' dies.

Sets Used:

(Fruitful Friends stamp and die bundle available here)

I first stamped out my images and used the coordinating dies to cut them out. I then used Copic Markers to color them and set them to the side.


To create my frame, I took an A2 panel and one of the circle dies and die cut it out of the panel in the three spots. On this frame, I took some of the fruit images and stamped it onto the frame using grey ink.


I then took another A2 panel that fits behind the frame and marked where the circles were. I then blended in each spot Scattered Straw, Saltwater Taffy and Salvaged Patina Distress Oxides.

I then took the Sunburst Stencil and blended over each spot with Mustard Seed, Worn Lipstick and Peacock Feathers Distress Oxides.

To assemble my card, I adhered the frame onto the background with liquid adhesive. Before I added the critters, I took the sentiment and stamped it directly onto the frame using black ink.


I then took each critter and added one to each circle using foam tape. For the second bunny that was not holding a fruit, I adhered the cherry using liquid adhesive.

I hope you enjoyed this tutorial today. All of the items I used are linked above. Don't forget to use the code T4TRANDY10 at checkout. Happy Crafting!

Friday 28 June 2024

Thank You Berry Much Sweet Friend


Happy Friday! DT Annalisa here sharing my second card that features the new release. I used the Five Windows Cover Die; a terrific stand-alone die with many possibilities! I also used two of the latest fruit-themed stamp sets.

I made an A6 card base out of heavy white card stock. I blended wild honey Distress Oxide ink onto the card base through the Dancing Dandelions 6 x6″ Stencil, once I removed the stencil, I ink-blended squeezed lemonade Distress Oxide with my Beautiful Blender Brush. I added splatter with a paintbrush, water and squeezed lemonade Distress Ink.

I die-cut the Five Windows Cover Die from white card stock and used double-sided tape to stick it down to the card base.

I stamped and coloured (with Copics) several images from Fruitful Friends and Squeeze the Day and cut them out with their coordinating dies. I added white gel pen accents with a Gelly Roll Pen.


The sentiments are from Fruitful Friends and I die-cut them with their coordinating dies. I used 1mm double-sided foam tape to stick most elements to the card base. I used liquid glue to stick down the cherries and the large strawberry. 


Thank you so much for reading my blog post. Remember to use my discount code T4TANNALISA10 when you visit the Time For Tea Designs shop to get 10% off your order.


Other Posts You Might Like