Pages

Thursday 30 June 2022

Let's stay in and watch MOVIES!


Hello friends!  It's Amanda back to share a bright and happy card with you today!  I love creating cheery cards that make people smile!  I hope this card puts a smile on your face today! :)

Let me share how I put this card together!
First, I'm going to cut a piece of white cardstock down to 3.75" x 5.5".  I'm using Catherine Pooler's Flirty Fuchsia ink to cover the entire panel.  Then, using the Pawsome Prints Stencil, I'm going to add even more ink to create a subtle, monotone background. 

I'm layering my panel onto a piece of black and white patterned paper cut to 4.25" x 5.5".


Next, I'm going to stamp and color my cuties from the Movie Night Stamp Set.  I've stamped them with Maker Forte reMarkable Eclipse Black Ink and then I'm coloring them with Copic markers.  Next, I'm going to die cut the images out with the coordinating die set.


The last step is to adhere my stamped images and sentiments to the front panel with 3D foam squares.  I'm also adding some gems with liquid glue.


That's it for me today!
Don't forget, you can use code T4TAMANDA10 to get 10% off your purchase!
Until next week.... Xx, Amanda 


Wednesday 29 June 2022

Mew are pawsome....!!

 Hey there tea-timer friends...

It's DT Ashlee and I'm excited to be sharing a new card with you that's ready to tell someone just how awesome they are or should I say PAWSOME!!  

To create this card I used these goodies from Time for Tea designs...

Kitty capers stamp and die collection

Pawsome dies

Hey, Hello, Hi dies

Hooray sentiment and cover plate die


Making this card I started with a grey cardstock that I die cut the Hooray cover plate from. I then used two of the Pawsome dies to die cut paws so I could layer a blue cardstock underneath. I coloured up a cute kitty with alcohol markers from the kitty capers set and die cut it with the co-ordinating dies before adhering to the card with foam tape. To complete the card a hi die cut word and sub sentiment along with a touch of sequins!!

Thanks for stopping by the blog today, I hope you enjoyed this kitty card...

Happy crafting, hugs Ashlee 


(Want 10% discount off your order at the Time for Tea designs store? Use my code T4TASHLEE10)

Tuesday 28 June 2022

Oval shaped card - using paper pads

Hi Tea Timers,

Welcome back to the T4TD blog! As promised last week, I am back with a new design idea for using pattern paper in your cards. 

I started today's card by die cutting the largest oval die in the Oval Scalloped Nesting Die set twice. I then scored one of them close to the top to make a fold and glued it on the back of the other oval. This created my card base. 

Next, I used the oval frame from the same set and die cut the frame twice in white and glued them together for extra dimension. For the background I used one of the designs in the Pawsome Rainbows paper pad and cut it a bit smaller than the outside of my oval frame. I also cut a piece of vellum to the same size and glued them at the back of the frame. By adding the vellum the of the colours on the pattern paper get a bit muted. For the grass I picked a green design from the Gorgeous Gingham paper pad and cut it using the oval frame die. This time I used the negative and cut it with the Landscape Edge Die and glued it on the inside of the frame. 

I chose to use the Hey there critters stamp set for my critters. I stamped the cute animals and some of the accessories and coloured them in with the Spectrum Noir Illustrator markers. I then used the matching dies to cut them out and added some white highlights for details. For the clouds I used the small dies from the Clouds Die set. I lightly ink blended the edges with Tumbled Glass and stamped the hello sentiment on one of them.

I arranged the images on the background and glued them down. Next, I glued the frame on the card front and that's it!

Thanks for tuning in! I hope you like today's card, it was a lot of fun to create. Remember, you can use T4TMIKI10 for 10% off your orders store-wide.

Hugs,

Miki

Monday 27 June 2022

Hit the PAWse Button!

Hi everyone and happy Monday! I am back on the blog today and this time with a tutorial on how to create a card using mainly diecuts! I wanted to create a scene that included silhouettes and thought the Stitched Window Cover die would help make the perfect scene of a cat looking outside at the starry night sky. 


Sets Used:
I first cut out the Window from navy cardstock. I took white cardstock and trimmed it down to the size of the window. I then took the Movie Star Stencil and blended embossing ink over it, making sure to go over it a couple times so that the embossing powder will stick. I added white embossing powder and heat embossed the panel.

I then took Faded Jeans, Seedless Preserves, Picked Raspberry, Kitsch Flamingo and Dried Marigold and blended it over the panel. I love how the embossed images shines through once you blend ink over it. I took a circle die from the Simple Circle Dies set and cut it out of white cardstock for the moon.


I took the stack of books, plant and cat dies from the Purrfect Die Coordinating die set from black cardstock for my silhouettes. I took the Hello die and cut it out of gold cardstock. For my sentiment, I decided on "Hit the Pawse Button" as it reminds me to take a little break and relax every now and then. I heat embossed it onto red cardstock and trimmed it down.


To assemble the card, I put the moon piece near the top of the card. I then adhered the window using liquid adhesive. I added the remaining pieces using liquid adhesive as well.

I hope you enjoyed this tutorial. I've been making cards with more diecuts recently as it can help create some beautiful scenes! If you want to get any of the sets I used today, don't forget to use the code T4TRANDY10 for extra savings!

Sunday 26 June 2022

Hello, lets hang out!

Good afternoon Teatimers,

I'm back with another Hello card today. This little cutie has been making a call as he just wants to hang out with his bestie!

To start I stamped my images from the Lets Chat stamp set and coloured using my Ohuhu Markers (colours listed below in order of lightest to darkest)

Bear - E280, YR30, E440

Telephone - RV260, RV270, R12 - CG020, CG050, NG03, CG070,  NG06, NG07 

To create my background I cut the Flirty Flowers Cover Plate from white card and backed with pink to show through the cut outs. This was then matted onto a slightly larger panel of black card.

I die cut the Hello from the Hey, Hello, Hi Die set twice from white card and once from black stacking together for dimension. I then cut the backing die from vellum to just give it that lift away from the background. The Lets hang out sentiment is from the Brighter Days Sentiments.

I added my sentime about a 3rd of the way down on the panel and placed my cute little phone and adorable Bear underneath, finishing off with a few enamel dots.

The whole panel was added to a 5x7 card blank trimed down to size.

Thank you for joining me here on the blog today,  don't forget you can use my code T4TLYNDSEY10 for 10% off your order in store.

Enjoy the rest of your weekend 

Lyndsey x

Friday 24 June 2022

Kitty Hugs

 
Hello and happy Friday! DT Annalisa here. For my weekly project, I am sharing a kitty hugs card using some items from the new release and some older ones. It is always good to use crafting supplies you haven't shown some love to in a while.

I did some ink blending over the heart inserts of the Heart Grid Masking stencil with Spun Sugar and Kitsch Flamingo Distress Oxides and my Beautiful Blender Brushes. I added some white splatter with a paintbrush and some white acrylic paint. I trimmed the panel down to 5 1/2 by 4 1/4 inches and glued it down to a card base of the same size.


I ink blended Salvaged Patina Distress Oxide onto white cardstock and then used the Hugs Stitched Sentiment Die. I cut the outline of the die into some vellum paper and then used liquid glue to adhere the letters to it.

I stamped, coloured (with Copics), die-cut elements from the Kitty CapersPurrfect Day and Home Is Where The Heart Is stamp sets. The small heart stamp is from Hogs & Kisses, the heart die cuts are the pieces that were die-cut out of the Flirty Flowers Cover Die. I coloured some of them in BG10. I used the Cloud Dies on some vellum paper. 


To assemble the card, I used a combination of liquid glue and foam tape for some added dimension. I finished up the card with some Sweet Summer Designer Enamel Dots.

Thank you so much for reading my blog post, you can use my discount code T4TANNALISA10 when you visit the Time For Tea Designs shop to get 10% off your order.

Using Pattern Paper for Backgrounds - Hey there critters


Hi friends,

Welcome back to the T4TD blog! I hope you loved the warm weather in the last week! It's Miki here and today I'm back with a new card using pattern paper. I love the new pads released in May so I had to come up with some ideas on how to use them. Stay tuned for another design coming next week!


For today's card I started by picking one of the Gorgeous Gingham designs and cut it to 3.25" x 4.5". I then glued it on top of an A2 card base. 

Next, I used the smaller frame in the Smile Inverted Scallop Frame Dies, cut it from white cardstock twice and glued them together for some dimension. I then cut the cloudy design from the Pawsome Rainbows pad and attached it to the back of my white frames. Pattern paper is perfect for quick and easy backgrounds!

I then used one of the negatives from the frame and cut a while hill using the Landscape Edge Dies and attached it on top of the clouds. When my framed background was complete I glued it on my card panel.

For the critters I used the Hey There Critters stamp set. I coloured them in using my Spectrum Noir Illustrator markers, added some white highlights and used the matching dies to cut them out. I wanted this to represent a summer scene so I arranged them on top of my frame using some foam tape. For the sentiment I used the Bonjour greeting from the same stamp set and white embossed it on black cardstock. I cut it using the matching dies and attached it to my card. 

I hope you like today's card, it's making me think of going for a picnic hehe! 

You can get 10% off on the website by using the T4TMIKI10 discount code. 

See you soon!

Miki

Thursday 23 June 2022

Interactive Shaker Card


Hello friends!  It's Amanda back with another fun project using items from the NEWEST RELEASE!  

Today, I'm sharing how I have created this interactive shaker card!
First, I'm starting with a piece of teal cardstock cut down to 4" x 5.25".  Next, I'm going to blend All That Jazz Ink through the Flirty Flowers Stencil.  Once I've removed the stencil, I'm also going to blend the ink on the edges.

For my shaker, I'm going to cut a few circles.  I'm layering 2 circles to create a circle border out of a lighter yellow.  I'm also cutting out an orange circle and using the Tiger Stripes Stencil on it.  Lastly, I'm cutting a piece of acetate with the larger circle.

I'm stamping out my images from the Hey There Critters Stamp Set and the "hello" sentiment from the Let's Chat Stamp Set.  I've also grabbed another sentiment from the Brighter Days Sentiment Cards.  I'm coloring my images with Copic markers and then will die cut them with the coordinating dies.

Now, I'm ready to assemble my shaker element using 3D foam tape and some sequins.

Once my shaker is ready, I'm going to wrap some twine around my card front and then adhere my shaker, stamped images, and sentiments to my card front using 3D foam squares.

Now, I can attach my card front to an A2 sized card base!


That's it for me today!
Don't forget, you can use code T4TAMANDA10 to get 10% off your purchase!
Until next week.... Xx, Amanda 


Wednesday 22 June 2022

Hey....!!

Hey Tea-timers....

DT Ashlee here with you today with some new T4T inspiration for you all!!

This card is to say hey, these types of cards are always so handy to have in the card stash because you don't need an exact occasion to send them. Write a little note and send to a friend because everyone loves a handmade happy mail right?!


Time for tea products used to make this card are : 


To create this card I started with a nice teal blue cardstock that I die cut the A2 Stitched hearts coverplate from. I then die cut a bunch of the little x's & o's (included in the coverplate die set) from a dark grey cardstock and adhered them with liquid glue in to each stitched love heart!!

The inner frame I die cut from a light grey cardstock and adhered to the centre of the background using foam tape. The hey sentiment I die cut from some of the same cardstock colours I had used on the card base and I also adhered that with foam tape so it pops up off the card...

Time to add some cuties!! The telephone and bear were stamped, die cut, coloured and finished off with a touch of white pen before adding to the card creating a fun little phone scene!!


To complete the card I of course added a tiny touch of sequins because I just can't help myself, I just have to add a bit of sequin bling hehe!!

I hope you all enjoy this new card and maybe it gets you inspired to create a card to send just because...
Happy crafting, hugs Ashlee.


(Want to do some shopping at the T4T store? You can use my code T4TASHLEE10 for discount)


Monday 20 June 2022

You Had Me At Meow... Twice!

Hello everyone and welcome back to the blog. I absolutely love big sentiment dies especially when I am in a time crunch and need to make several cards. I wanted to show how you can make two cards using the negative and positive space of the cutout sentiment. 


Sets used:

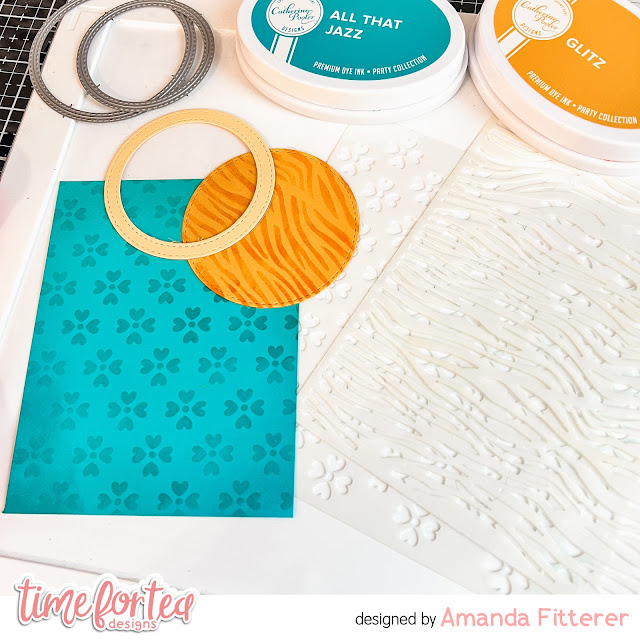
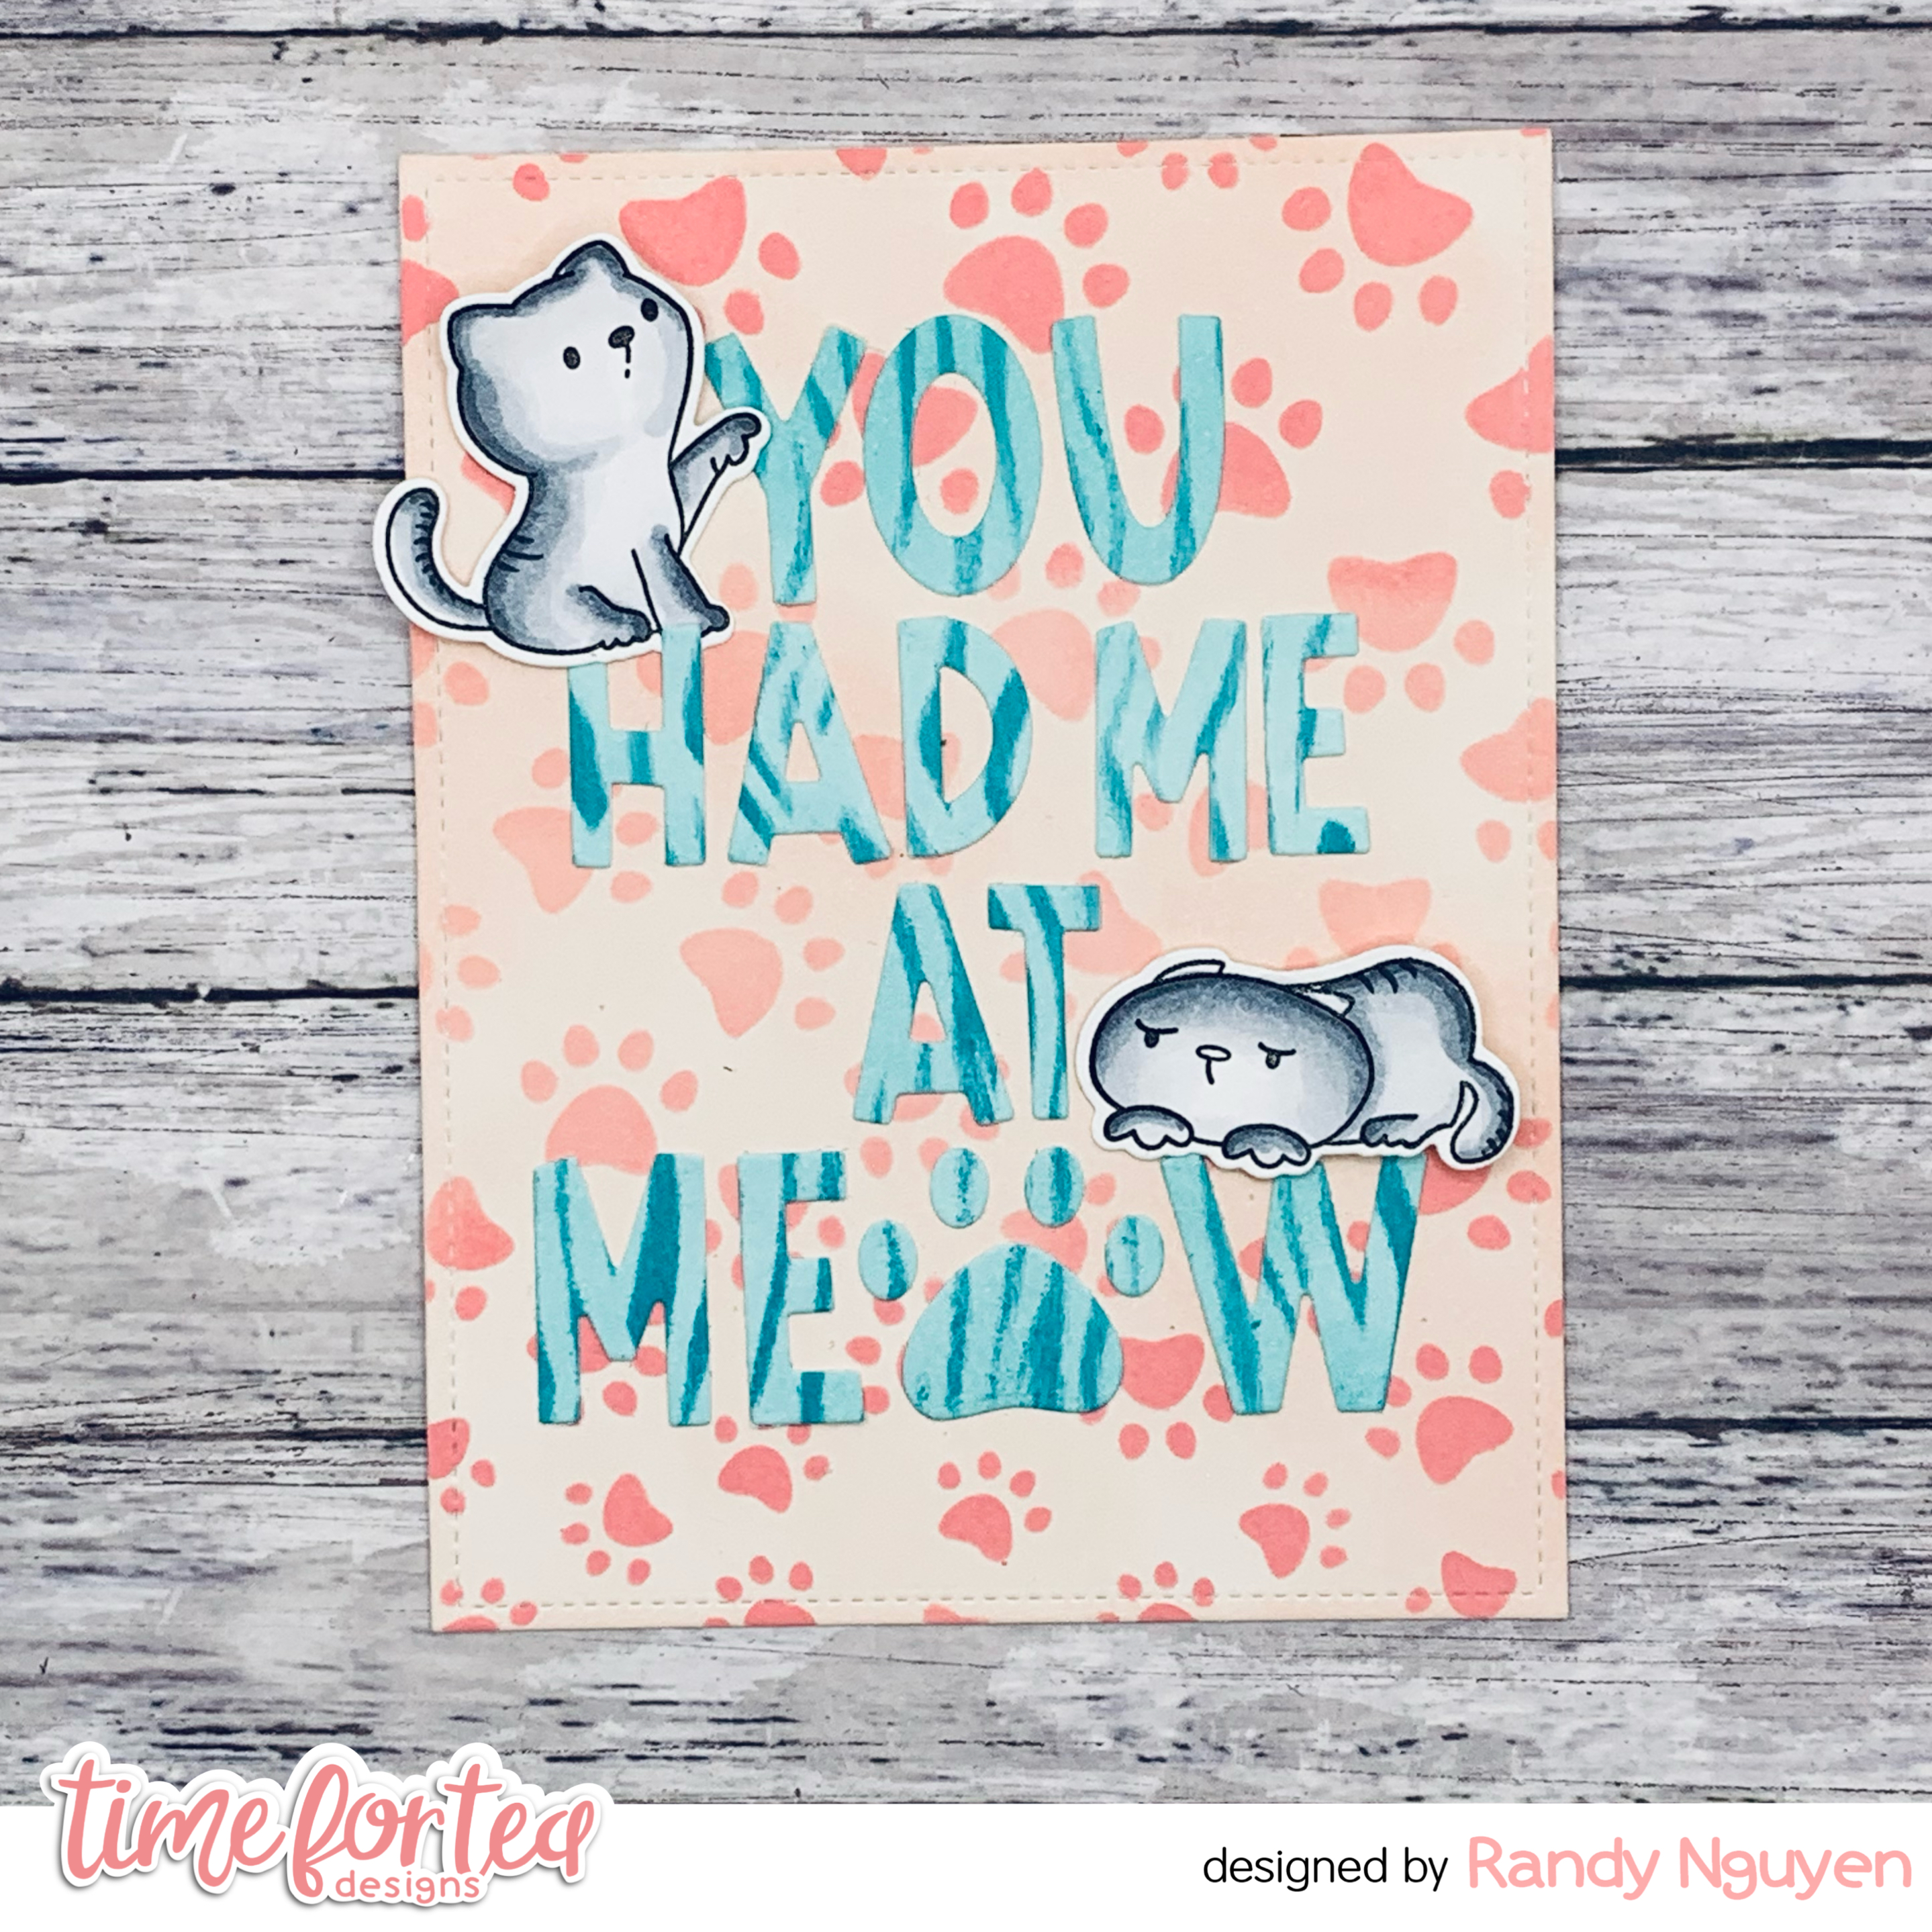
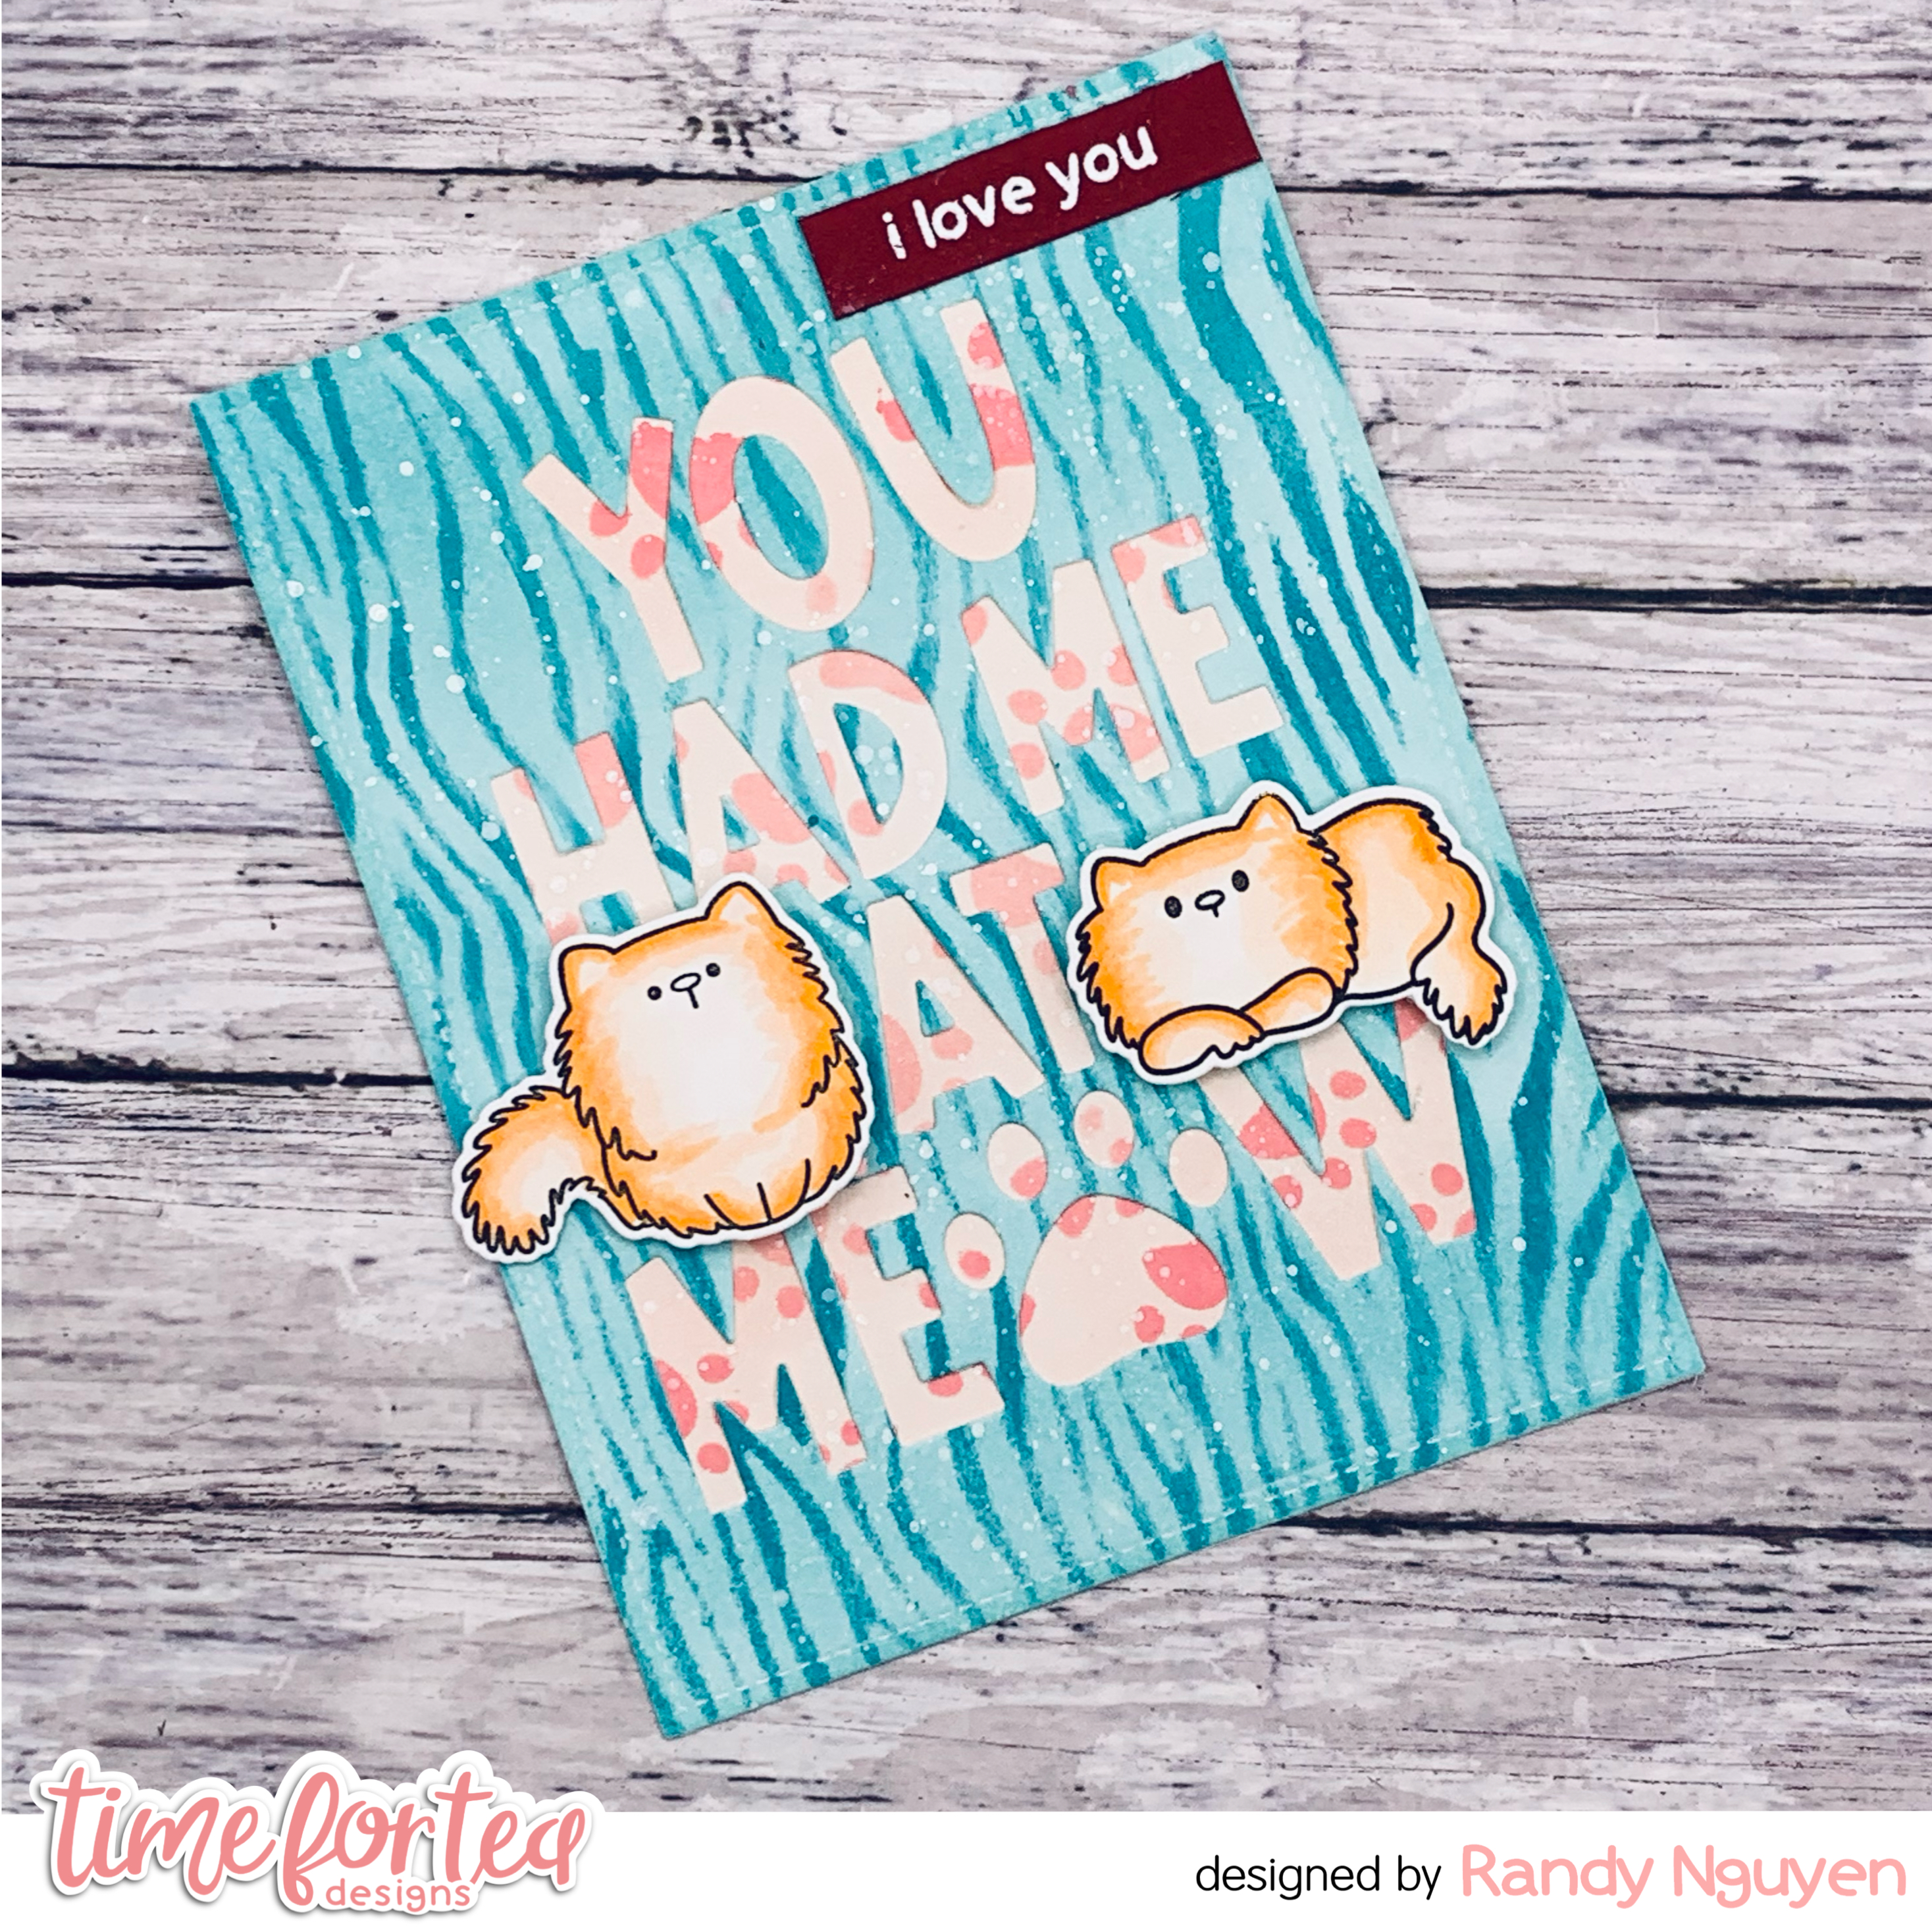
I cut out 3 card panels using the larges die from the Autumn Scene Cover Plate die set. For my sentiment, I wanted to use a blue blend and first blended Salvaged Patina over the panel. I then took the Tiger Stripes stencil and blended Peacock Feathers. I placed the sentiment die in the middle of the panel and cut out  the sentiment. 


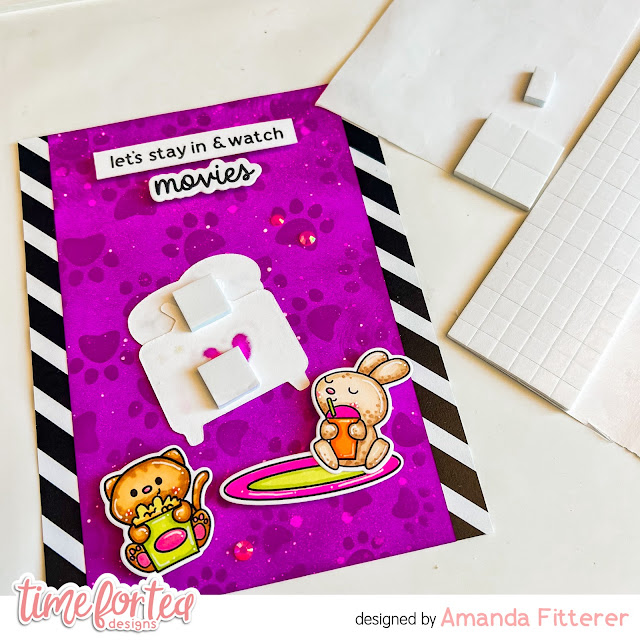
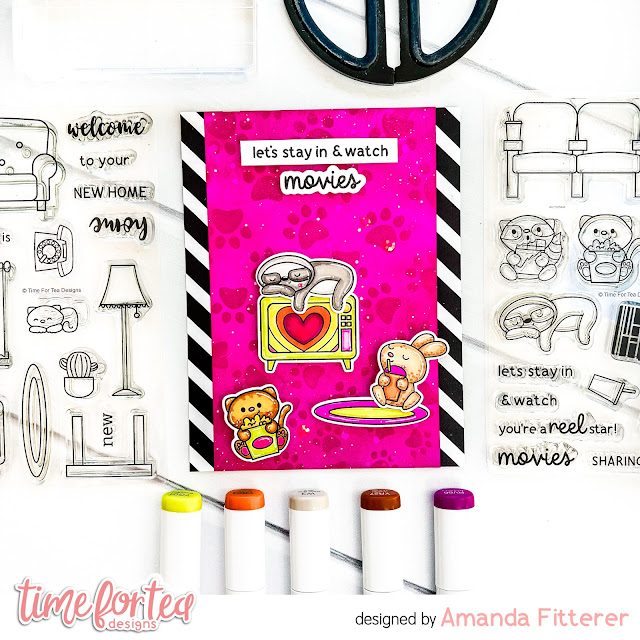
For my background, I blended Tattered Rose over both panels. I then took the Pawsome Prints stencil and blended Worn Lipstick and Saltwater Taffy.


To line up the letters in my sentiment, I took the negative piece and placed it over one of the panels. I used that along with liquid adhesive to help me glue down each letter to make sure they were even.


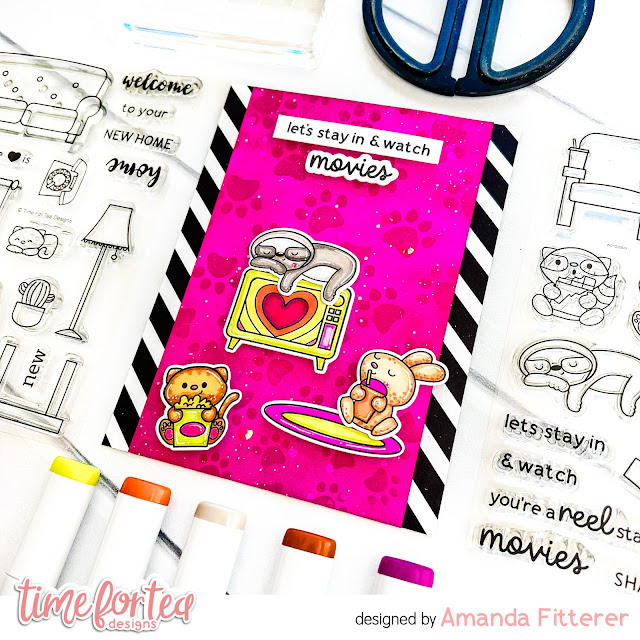
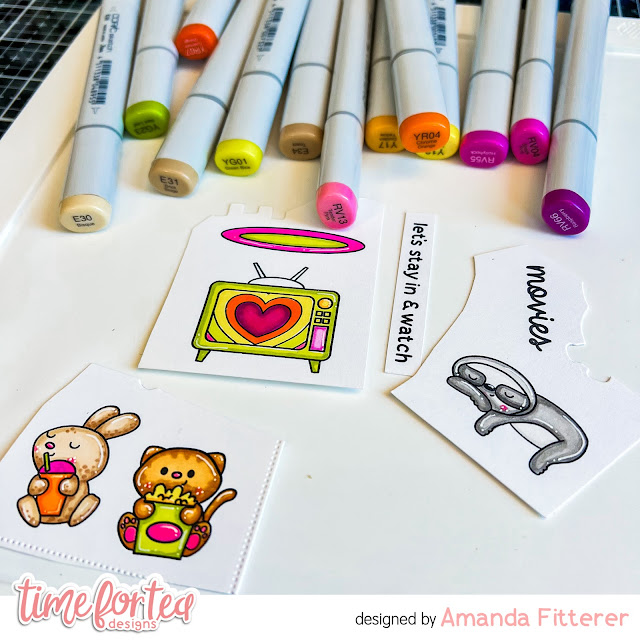
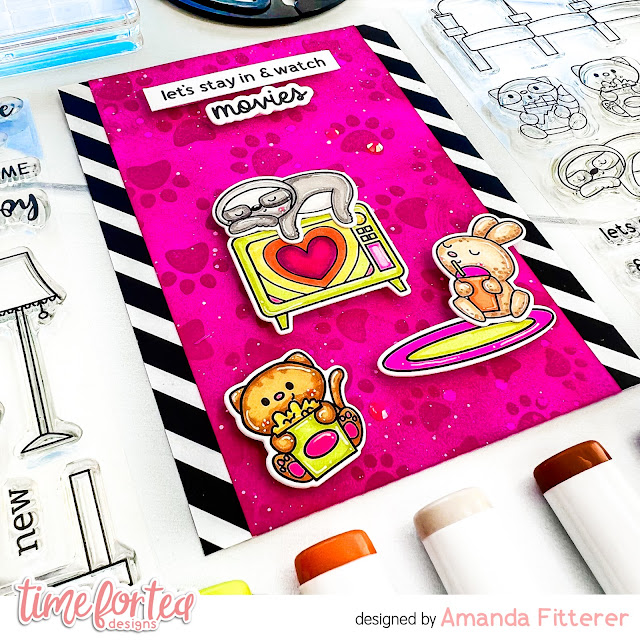
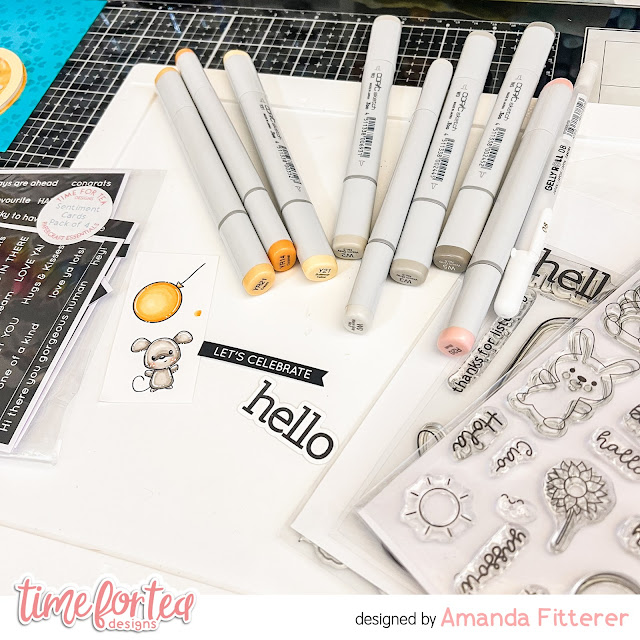
You can always leave the card as is with just the sentiment but I decided to add two cats since the images are so adorable. I stamped out the two cats from the Kitty Capers set and used the following Copic colors:
N0, N1. N2. N3. N4. N5. and N6. 


I die cut them out using the coordinating dies and used liquid adhesive to adhere it onto the card panel.


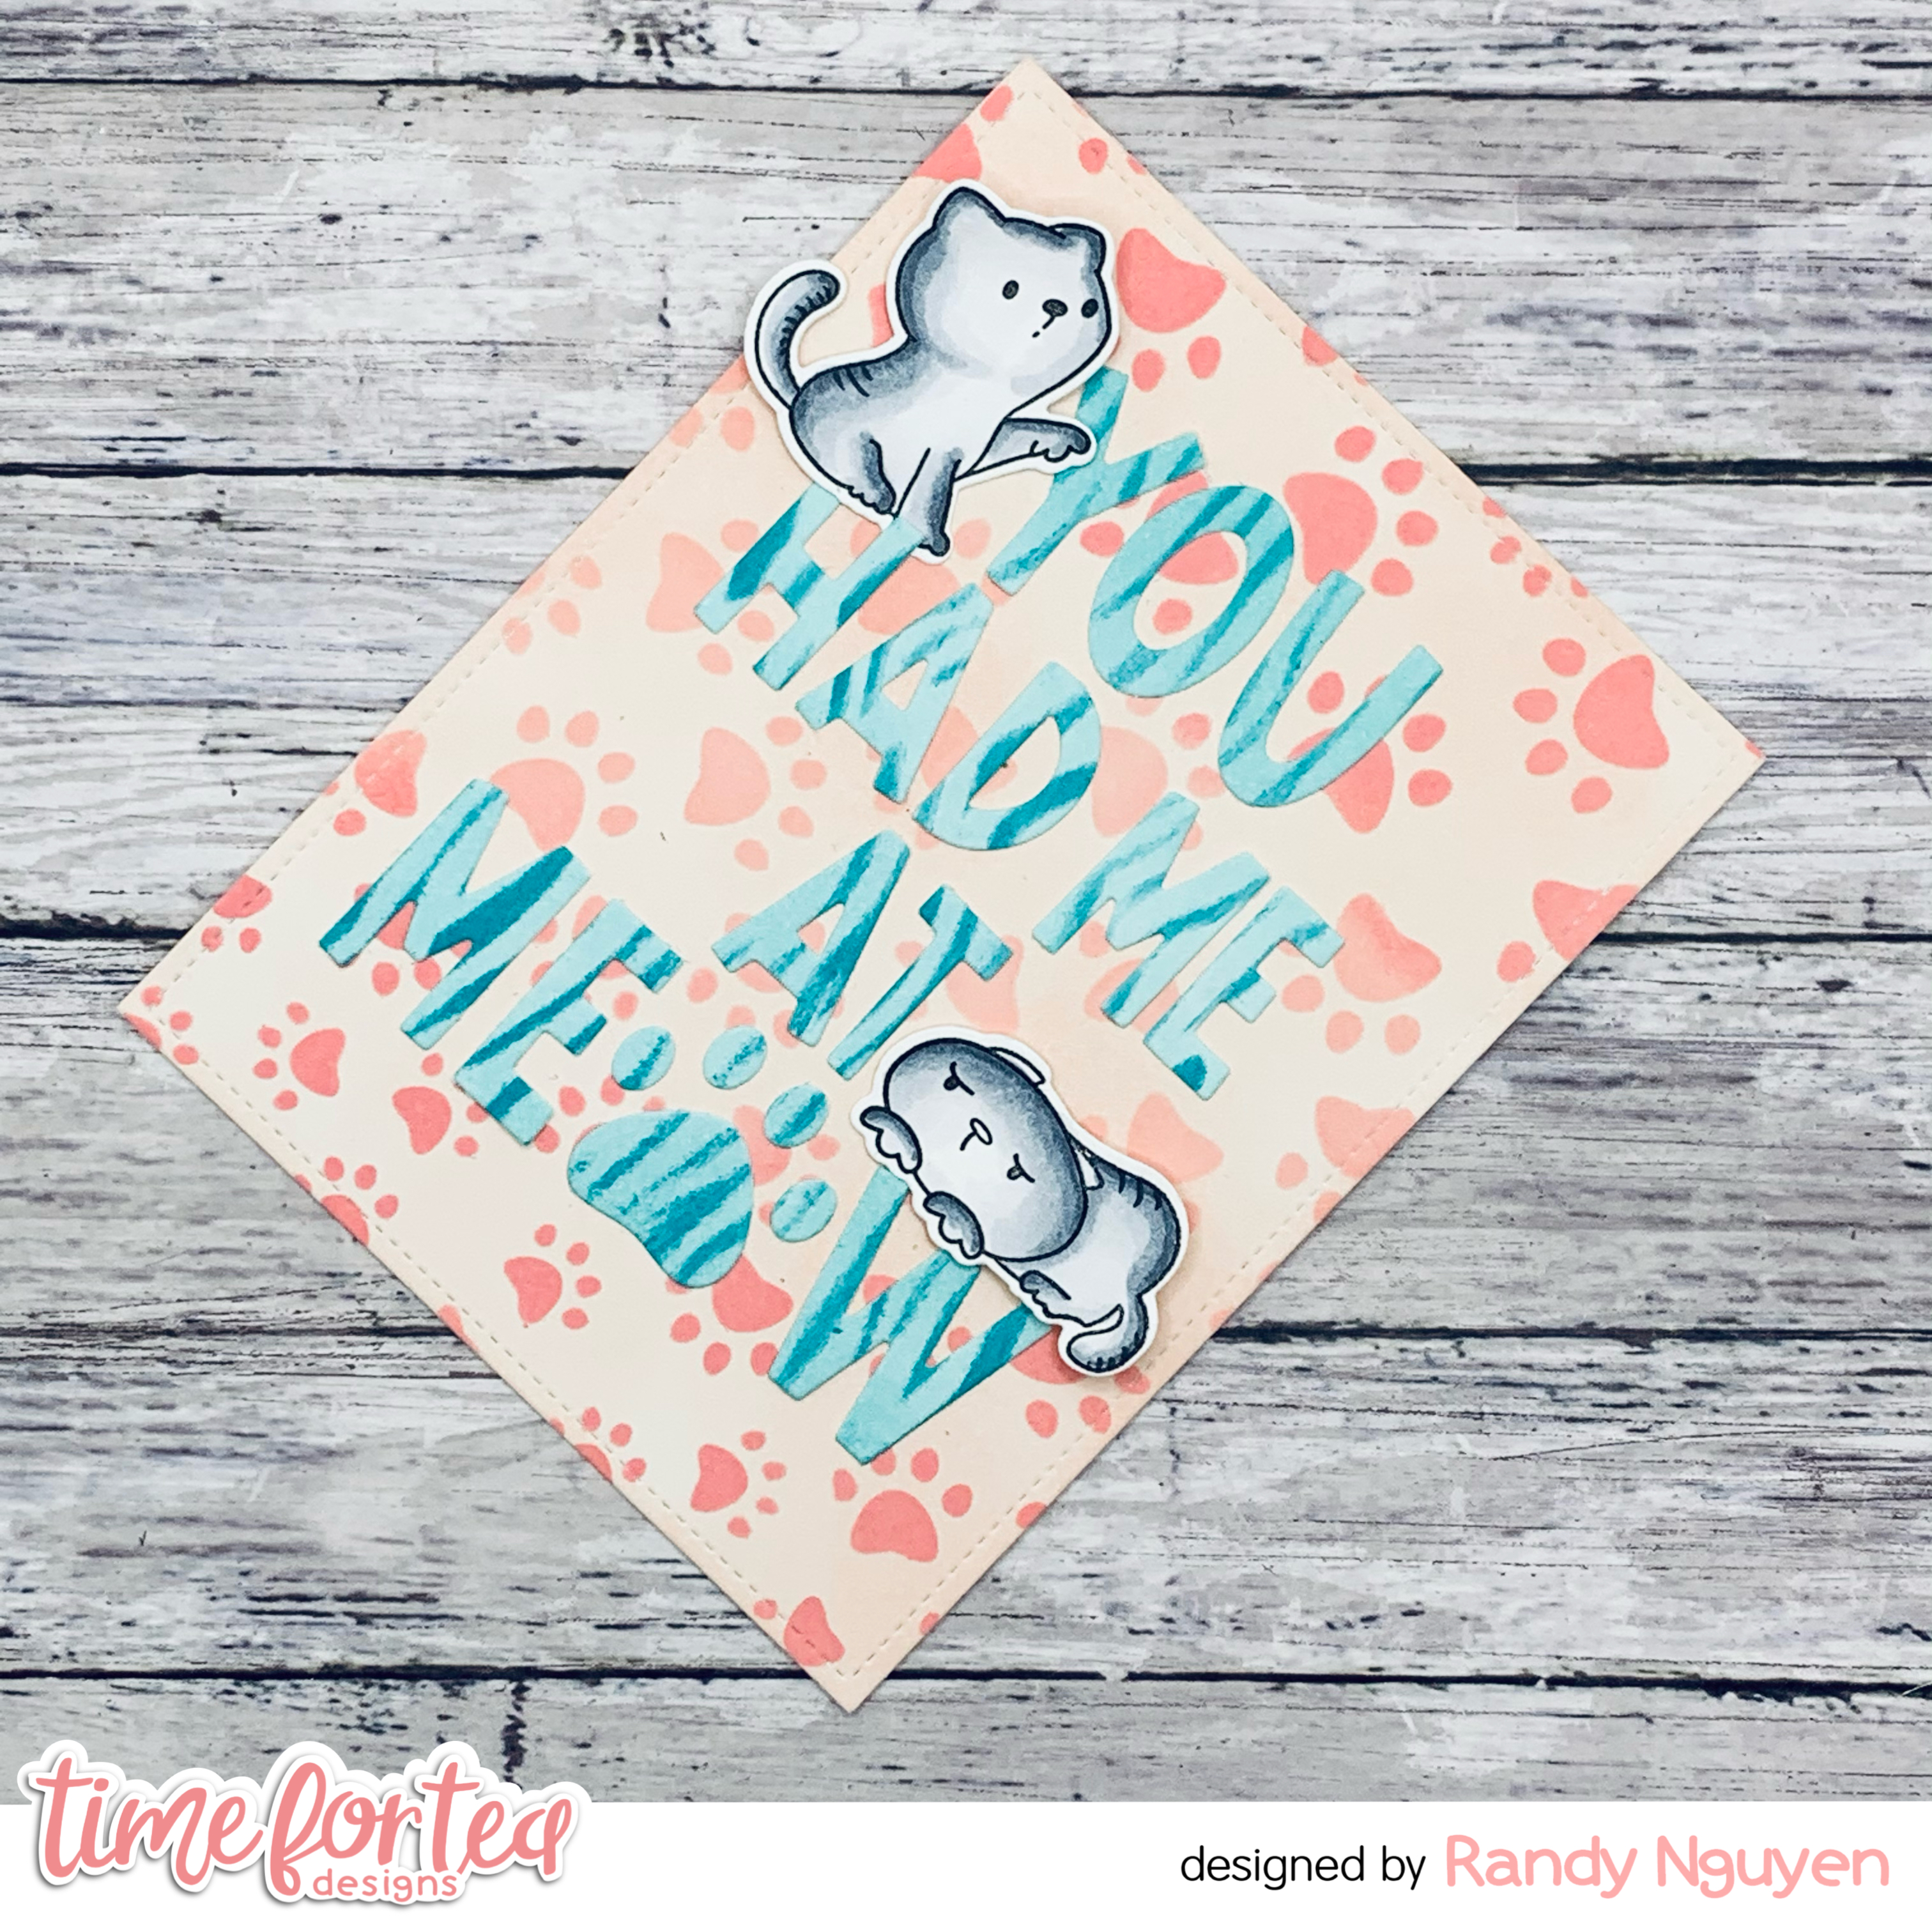
For my second card, I took the negative piece and splattered white water color over it to give it some interest. I then adhered it directly onto my second card panel with liquid adhesive. I made sure to save the little pieces that are cutout inside the letters and adhered them onto the panel as well.

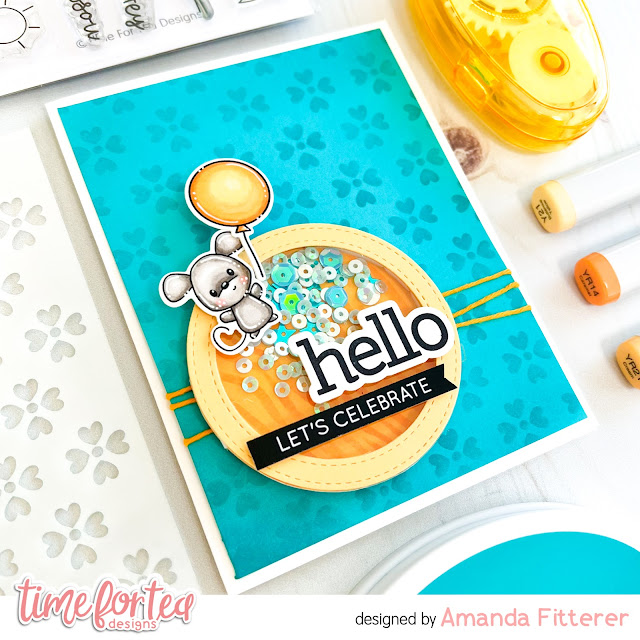
I wanted to add 2 more images onto this card and stamped out an image from the Kitty Capers set and one from the Purrfect Day stamp set and used YR00, YR02, YR12, YR14, and. YR16 to color them. I die cut them out using the coordinating dies and adhered them onto the panel with liquid adhesive.


I wanted to make this card just a little bit different from the first card so I added a sentiment from the Let's Chat Clear stamp set that I heat embossed onto red cardstock.

I hope you enjoyed my blog post for today. I love being able to use all elements from a die cut and making these two cards helps with using every single piece cut out. Time for Tea has lots of different sentiment dies that can be used for the same technique. Don't forget to use the code T4TRANDY10 for some savings on your next purchase. 


Sunday 19 June 2022

Hello

Good afternoon Teatimers

Just calling to say a quick Hello! How cool is this retro phone die from the latest release? I absolutely remember my nan having one of these when I was younger and loved to play with the dial.

Taking a 6x6 card blank I die cut the largest of the Square Label Dies making sure the edge of my die when slightly past the fold of the card. I then took yellow patterned paper from the 6x6 Sweet Summer pad and cut out using the next die down.

I wanted a simple background design so that the funky yellow phone would stand out. Using the sentiments from the Hey There Critters stamp set and taking inspiration from a fellow DT colleague, I stamped a background of 'hellos' onto white card. I used the 3rd largest die from the set to cut out this layer.

I die cut the Retro Phone Builder Die from yellow card and added colour around the edges with Squeezed Lemonade and Spiced Marmalade. I cut the dial out twice from white card (including the holes) and once from black card (without holes) adding the black to the back of the white pieces to give some dimension.

I used the HELLO from the Hey, Hi, Hello dies cut 3 times from white card and the background from black and added underneath the phone.

I love the way the striking yellow phone stands our against the simple black and white background.

Thank you for joining me here on the blog today. You can use my code T4TLYNDSEY10 for 10% off your order in store.

Enjoy the rest of your weekend 

Lyndsey x

Saturday 18 June 2022


Happy Saturday Teatimer’s it's DT member Natalie here, have you have had a good week? It’s been so hot here in the UK this week so it had to be a bright sunny card for today's blog post. 
I used the Hey There Critters Stamp and Die set to create this fun scene at the park and combined it with the new Cloud Dies and the Hey, Hello, Hi Dies. I began by cutting out the largest of the Simple Slimline Nesting Dies to cut out my base and inked it up with some Tumbled Glass and Salty Ocean Distress Oxide ink to create my sky. I cut out another rectangle the same size and cut out some grass using the Landscape Edge Standalone Die. Then inking it up with Twisted Citron and Mowed Lawn Distress Oxides. As you can see below I also added some splatters of mowed lawn and added some tiny pink dots using a gelly roll pen.


For the clouds I used the new Cloud Dies, I love how fun they look. I cut mine out of white card and then layered it over velum for a softer feel. I had to trim these with my scissors but it was easy to do.


The cute critters are all coloured up with copic markers and finished up with some white and black gelly roll to add some final details. I added pops of colour too with the balloons and little bees. I managed to loose the little dot off the I in the mess of my desk too. Please tell me its not just me lol! So I used a little bee for that and I think it was a happy accident! 
I love how bright and colourful it turned out. You can find all the products in the Time for Tea Shop and get 10% off any orders using code T4TNATALIE10. 


Friday 17 June 2022

Welcome To Your New Home


Hello and happy Friday, DT Annalisa here. Moving has got to be one of the most stressful things to do. This card is for someone who has just moved to help bring them joy after a long day of unpacking.

To start, I ink blended on some Salvaged Patina Distress Ink to an A6 (4 1/8 inch by 5 13/16 inch) card base through the Flirty Flowers Stencil with my aqua Beautiful Blender Brush. I removed the stencil and lightly blended the ink left on my brush on the card base to avoid stark white areas. I then added some ink splatter. 


Next, I die-cut the Stitched Window Cover Die (Sized to fit an A6 EU-sized card base) and glued it to the stencilled card base. I stamped the critters and elements from the Home Is Where The Heart Is Clear Stamp Set and used the coordinating dies. I also stamped the kitty with a coffee from the CafĂ© Critters and die-cut her with the coordinating dies. I coloured everything with Copic markers and added white Gelly Roll Pen accents.


I stamped the sentiment in the top right-hand square using Versafine Onyx Black and then used liquid glue or 3D foam tape to adhere the elements to the card to finish it up.

Thank you so much for reading my blog post, you can use my discount code T4TANNALISA10 when you visit the Time For Tea Designs shop to get 10% off your order.


Thursday 16 June 2022

Congrats Smarty Cat!


Happy Thursday, Tea Timers!  It's Amanda back with another fun project using items from the NEW RELEASE!  

Today, I'm sharing this Congrats card I made altering the Stitched Window Cover Die.  Don't you just love when a die is versatile and can be used many ways?!

For this card, I needed 2 larger windows instead of 1 large window and 4 smaller windows.  I simply cut out the small strip dividing 2 of the smaller windows!
I've also grabbed my favorite Tiled Wall Stencil to create my background.


The images I have stamped are from the Purrfect Day Stamp Set. I've colored them with Copic markers and will die cut them using the coordinating dies!


To create dimension, I've propped up my window frame with 3D foam tape.  I've also propped up my images and sentiments with 3D foam squares.


That's it for me today!
Don't forget, you can use code T4TAMANDA10 to get 10% off your purchase!
Until next week.... Xx, Amanda 


Other Posts You Might Like