Pages

Monday 31 October 2022

Happy Halloween!

Happy Halloween Tea Timers! I had to do one last Halloween card to post on this fun holiday. There is currently a Halloween on the site and it includes thee new Haunted House and Trick or Treaters stamp set.

There's always something spooky going on during Halloween and I wanted to create a fun scene with the adorable cats and the frightening house across the street. I love the look of the kitty pointing up at the floating ghost cat.


Sets used:
I first stamped and printed out my images and used the following Copic Marker colors to color them;
  • Cats: C-00, C-1, C-3, C-5, E93, E95
  • Pumpkins: YR00, YR01, YR12, YR14, YR16, YR18
  • House: W-00, W-0, W-1, W-3, W-5, W-7, N-0, N-1, N-3, N-5, N-7. Y11, Y13, Y15, B95, B97, B99
I then fussy cut my images but there are coordinating dies available for the Kitty Capers and Purrfect Day Stamp set. I took an A2 Panel and blended Aged Mahogany, Abandoned Coral and Picked Raspberry. I splattered white water color over the panel. 


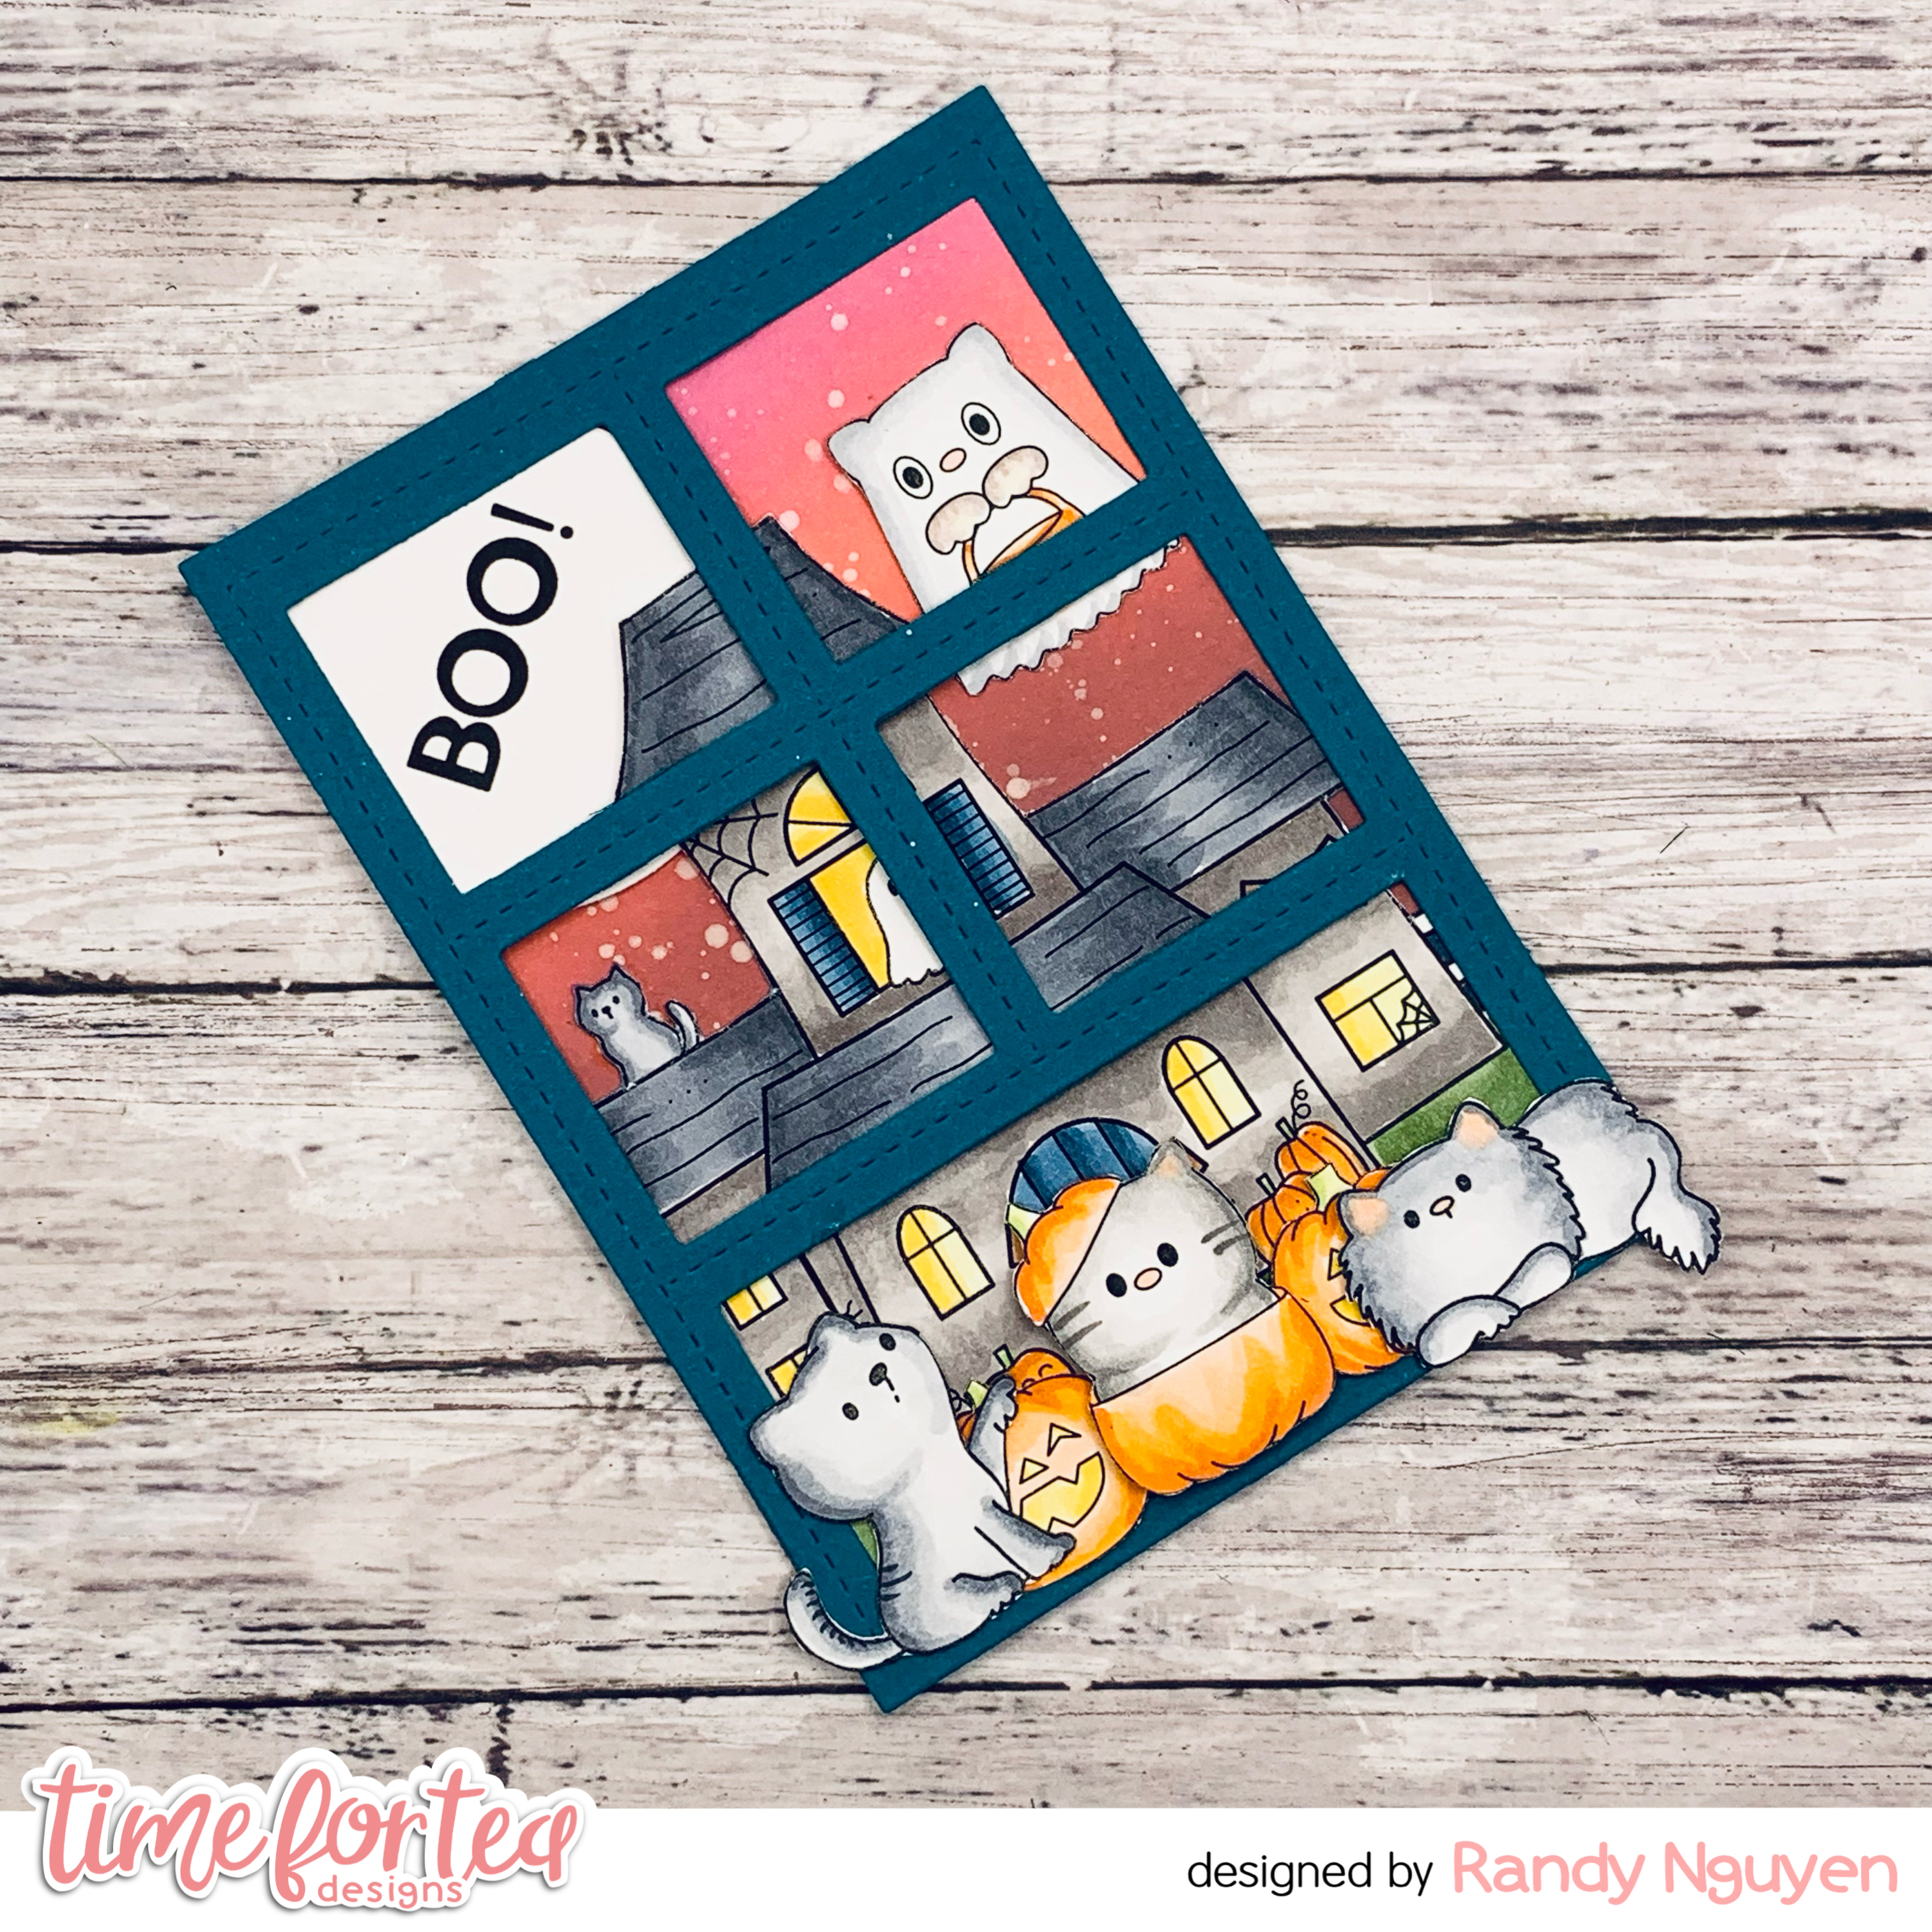
I then stamped out the Boo! sentiment to match the floating cat ghost and used a circle die to cut it out and to act as the moon.

I first used liquid adhesive to adhere the house, moon and floating cat onto the panel. I then die cut the window using teal cardstock and adhered that with more liquid adhesive. I then adhered the pumpkins and the cats using the same glue.


I hope everyones has a safe and fun Halloween! Enjoy as much candy as possible!

If you are in a time crunch and need to make quick Halloween cards or tags. The Trick or Treaters digital stamp set is delivered to you within seconds of purchasing it. Don't forget to use the code T4TRANDY10 at checkout for extra savings.

Saturday 29 October 2022

Trick or Treat!


Happy Saturday Teatimer's I have another Halloween card for today using the Hello Cupcake Stamp Set by masking out the strawberry and drawing in an eyeball it gives out a whole different feel to my card. 
I coloured in the image using copic markers and then added some dripping blood using a red gelly roll pen. I love how it turned out. Since the eyeball was smaller than the strawberry I could also cut it out using the coordinating die and then  fussy cut around the eyeball. 
For the base of my card I used the Geometric Snowflakes Die and cut out two and layered them over the top of each other to add some depth. I then used this as a template to cut out a rectangle a bit bigger than that one and inked it up with yellow and green distress oxide ink and splattered some purple over the top. 
I let this dry and then adhered them together alongside the cupcake in the middle. Then all that was left was the lettering for which I used Anthony's Alpha Dies and coloured it in using purple distress oxide inks. After adhering these together I felt like it was missing something so used the coordinating dies from the Spooktacular Stamp Set to cut out some bats from black card and just added some little eyes using white gelly roll pen and that was my card finished up. 
I hope you like it and don't forget to keep checking back for more inspiration from the rest of the team. Also if you would like to purchase any of the items in the Time for Tea Shop you can get 10% off your order using code T4TNATALIE10.  


Halloween Pumpkin Kitty


Happy Friday! DT Annalisa here, I have a cute slimline Halloween card featuring the Trick or Treaters Digital Stamp Collection and Haunted House Clear Stamp Set from Time For Tea Designs.

I used coloured paper from my stash and die-cut them with the Simple Slimline Nesting Dies. I added Shaded Lilac and Dusty Concord Distress Oxide to the edges of the purple paper using my Beautiful Rainbow Blender Brushesand Villainous Potion Distress Oxide splatter with a paintbrush.

 For the grass, I used the Slimline Hillside Scene Dies and added Cracked Pistachio to the edges and Mowed Lawn Distress Oxide splatter. I used liquid glue to adhere these to an 8.5 by 3.5-inch slimline card base.

I printed the digis and stamped the sentiment from the Haunted House Clear Stamp Set. The other stamps I used were  Kitty Capers (cat pointing) Life's Ups & Downs (hedgehog) Warm Winter Wishes (mouse). I coloured everything with my Copics and then added white gel pen accents. 

To cut out the images, I used the coordinating dies for the ones I had and my Brother Scan N Cut SDX125e for the others. To adhere the images to the card, I used liquid glue or double-sided foam tape.

Thank you so much for reading my blog post, you can use my discount code T4TANNALISA10 when you visit the Time For Tea Designs shop to get 10% off your order.


Thursday 27 October 2022

Sending You Virtual Hugs!

Happy Thursday, Tea Timers!  It's Amanda here!  I'm sharing this very happy card today!  I love creating cards that have bright contrast and bright colors - especially when they're rainbow!


To create this card, I stamped my cutie from the Let's Chat Stamp Set and then colored him with OLO markers.
 For my "hi", I used the Hey, Hello, Hi Dies.  The rainbow flag behind it is from the It's Your Day Sentiment Dies.  The other sentiment strip if from the Brighter Days Sentiment Cards.

One of my favorite rainbow ink blends is the one I created on this card!  It's a blend of Pitstop Pink, Yellowstone, and Vegas Strip Color Hive Inks.  I also spritzed my ink blend with water and created some black splatters with black paint.

Thank you so much for stopping by the blog today!  I hope you're feeling inspired by this post!  Come back next week for another happy card!
Xx, Amanda


Wednesday 26 October 2022

Happy times village

 Hey there Tea-timer friends...

DT Ashlee here with some new T4T inspiration for you!!


For this card I used these Time for tea designs products :


To create this card I started by die cutting all my base pieces from the Mini scallop slimline die set from different colours of cardstock. Once I had those all adhered to make my card base I started to bring my scene together by stamping, colouring and die cutting images from both the Sweet village and Hey there critters sets.  

I coloured up all the images with Spectrum noir tri-blend markers.... 


I love dimension on my cards so I used different levels of foam tape to adhere the scene.

A small sentiment "Happy times" from the Simple sentiments set was stamped on white cardstock using black ink and then mounted in green cardstock and then the whole card was completed by adding a touch of sequins!!


Do you like this mini happy times village card? I'm so happy with how cute it turned out...

Thanks for stopping by the blog today, I hope you feel inspired to get creative!!
Happy crafting, Hugs Ashlee.


Want to do some shopping at the T4T store? You can use my code 
"T4TASHLEE10" for a discount off your order.

Monday 24 October 2022

Jump Into Fall with SQUIRREL!

Hi Tea Timers! Welcome back to the blog. Today I am creating a fun fall scene using an older stamp set. I've had the Jump With Joy set in my stash and wanted to create a quick fall card before we head into winter.

I love the image of the squirrel flying in the air as it jumps and decided to create a scene surrounding this sweet critter.


Sets Used:
I first stamped out the squirrel image and used C-00, C-1, C-2, C-3, C-4, C-5, C-6 Copic Marker colors to color the critter. I then fussy cut the image out and set him to the side. 

I then took the pile of leaves image and stamped it three times onto masking tape. I fussy cut the masking tape and created my pile of leaves, make sure to mask of certain portions to layer the piles. I fussy cut my pile and used YG21, YG23, Y11, Y13, Y15, R21, R22, YR00, YR02 to color the pile of leaves.


I then die cut out the tree and flipped it so that it would look like the squirrel was jumping off of the tree. I used Antique Linen, Tea Dye and Gathered Twigs Distress Oxides to blend onto the tree. I took another A2 panel and the cloud portion of the stencil and blended Salvaged Patina. 


I then assembled my card by adhering the tree first and then the pile of leaves. I then stamped my sentiment directly onto the card first and then the remaining leave images and acorn. I used the colors referenced above for the leaves. 

To complete my card, I added the squirrel images with foam tape.

I hope you will jump into fall with me by creating fun fall cards as well. If you like any of the products that I used today and plan to make a purchase, don't forget to the use the code T4TRANDY10 at checkout!

Saturday 22 October 2022

Jumping for Joy!


Happy Saturday Teatimer's well Autumn is definitely here so it only felt right to pull out these cuties from the Jumping for Joy stamp set again. 
I went for a fun shaker card with them so I could use sequins behind to give the look of leaves dancing in the wind. I used the A2 Stitched Hearts Cover Dies to create the frame and layered acetate underneath. I then cut out a panel to fit behind which I inked up with Squeezed Lemonade and Dried Marigold and added some thick foam tape behind. Filling this with gold and orange sequins I added the frame on top. 
Then for the rest of the card I coloured up the critters from the Jumping with Joy stamp set using copic markers and die cut them out. As usual adding cute little dots to their cheeks and black shiny noses using a black and white gelly roll pen.
I adhered them using foam tape then it was just time to add the sentiment which I stamped out the jumping and heat embossed it in white on black. I didn't want the joy part though so when I die cut the sentiment I chopped that part off.  Then all that was left was the big Joy which I used the Joy Stitched Sentiment Die and cut out of dark green to carry on with the Autumn colours. 
That's my shaker card finished up, it was really quick and easy to make. You can find all the products in the Time for Tea shop and get 10% off your orders using code T4TNATALIE10.
Have a great weekend and keep checking back for more inspiration from the team. 

Friday 21 October 2022

Hocus Pocus Tree


Happy Friday! DT Annalisa here with a Halloween card for you today that I made using the Tree of Love Cover Plate Die and the new Trick or Treaters Digital Stamp Collection.

I ink blended several Distress Oxide Inks (Villainous Potion, Wilted Violet, Seedless Preserves, Spiced Marmalade and Mustard Seed) onto Distress White Heavy cardstock by Ranger using my Beautiful Rainbow Blender Brushes. I added white, silver and black paint splatter with a paintbrush and set it aside to dry.


I used the Tree of Love die on black card stock and glued the cut-out onto the coloured background. I then added some white gel pen accents to the tree.

The kitty on a broom and pumpkins are from the Trick or Treaters Digital Stamp Collection; the sentiment is from Haunted House; the kitty on the ground is from Kitty Capers. I cut the images out and coloured them with my Copic markers. I added White Gelly Roll Pen accents before adhering them down to the card panel with liquid glue (pumpkins) and double-sided foam tape.


I added the panel to a white heavy stock card base to complete the card.

Thank you so much for reading my blog post, you can use my discount code T4TANNALISA10 when you visit the Time For Tea Designs shop to get 10% off your order.

Thursday 20 October 2022

Retro Phone Builder

Happy Thursday, Tea Timers!  It's Amanda here!  Today I'm sharing a "hello" card using the Retro Phone Builder Die Set!

To make this card, I cut my card base to 5.5"x8.5" and then folded it in half.  I trimmed a piece of Pawsome Rainbows Paper to 4"x5.25".  I glued the paper to my card base.  Next, I cut the pieces of my phone out using black and white cardstock. I also cut the "hello" out of the Hey, Hello, Hi Dies. For the white pieces that I wanted to be purple, I used Blueberry Cheesecake Color Hive Ink to ink blend those pieces.  I added some white highlights with a white gel pen.

I adhered my phone and sentiment together with liquid glue.  Then, I used 3D foam squares to pop them up and adhere them to my card front.


Wednesday 19 October 2022

Movie star

 Hey there Tea-timers....

DT Ashlee here to share a new Time for Tea designs creation with you!!

Do you love having all the treats when you go to the movies?! Because I know I do and this little bunny from the Movie night set is certainly enjoying all his!! 


For this card I used these T4T products :


To make this card I started with a purple card stock base and then used Wilted Violet Distress oxide ink to add some stars using the Movie star stencil!!


I stamped, coloured and die cut the cinema seats, bunny and two buckets of popcorn before adhering them all together into a little scene with varying levels of foam tape for dimension....


A sentiment stamped directly onto the card base and a touch of sequins completed the card.

Does this make you want to go to the movies now?! I love going to the cinema. 
Maybe you might want to create a movie themes card of your own...

Thanks for stopping by the blog today, I hope you enjoyed my post. Happy crafting, Hugs Ashlee. 

Monday 17 October 2022

Boo! (Mini Slimline Card)

Hi Tea Timers! Welcome back to the blog. I am back with one more Halloween card using the new Halloween mini release. This time I created a mini pumpkin patch using the Trick or Treat Digital stamp set.


Sets used:

I first printed out the Trick or Treat digital stamp set using a laser printer and Copic friendly cardstock. I then used the following Copic markers to color the images:

  • Pumpkins: YR00, YR12, YR14, YR16, YR18
  • Cat: W-00, W-1, W-2, W-3, W-4, W-5, W-6


I then fussy cut the images and set them to the side. I then cut 2 mini slimline panels. Using one of the panels, I took the grass die and die cut it out. I blended Evergreen Bough and Pine Needles over the grass piece.

On the second panel, I had the Boo! sentiment on the panel. I then masked it off by die cutting the half circle piece from the Scene Builder set and using that  as a half moon shape. I blended Twisted Citron, Peacock Feathers and Uncharted Mariner. I then splattered white watercolor over it.


I took the fence die and cut it out of black cardstock twice in order to fit the mini slimline panels. To complete my card, I used liquid adhesive to adhere all the images.

I hope you enjoyed my post today. If you like any of the products that I used today and plan to purchase them, use the code T4TRANDY10 at checkout for some savings!

Friday 14 October 2022

Trick Or Treat Slimline


Happy Friday! DT Annalisa here today with a spooky slimline card featuring the Trick or Treaters Digital Stamp Collection from Time For Tea Designs.

I die-cut some white cardstock with the Mini Slimline Scallop Dies. I created a panel using Distress Oxides (Peacock Feathers, Wilted Violet, Villainous Potion, Black Soot) and my Beautiful Blender Brushes. I added white and black splatter to add interest. I used liquid glue to stick the scalloped frame to the panel.


I sized and printed the masked kitty and ghost kitty from the Trick or Treaters Digital Stamp Collection and stamped the sentiment from the Haunted House Clear Stamp Set. I coloured these with my Copics and cut them out with my Scan N Cut SDX125. I added white gel pen accents.

I then used double-sided foam tape to adhere them to the panel. For the bottom of the frame, I used smaller stamps in the following sets Stinkin' Cute (mushrooms), Jumping With Joy (leaves) and Life's Ups & Downs (hedgehog). It is so great to give these adorable smaller stamps some love!


I die-cut the striped black and white patterned paper from the Halloween 2022 Digital Paper Collection with the rectangle die in the Mini Slimline Scallop Dies. I adhered this to a mini slimline card base.

I added double-sided foam tape to the back of the scalloped frame panel and adhered it to the card base to complete the card. 

Thank you so much for reading my blog post. Don't forget to use my discount code T4TANNALISA10 when you visit the Time For Tea Designs shop to get 10% off your order.

New Video & How to Colour Pumpkins!

 We have a fun new video on our YouTube Channel today showing how I made this adorable Autumn themed card.


DT Annalisa suggested using some Pumpkin colouring tips from @sandyallnock. These were amazing! Watch the video to find out how I got on.


You can find more tips from Sandy on her social media pages and on YouTube.


I also added some autumn leaves after the Live ended so look out for a reel later on Facebook & Instagram showing you the final process.


You can watch the Live replay below.


Also, if you're a Time For Tea Designs newsletter subscriber, check your inbox a little later for a VIP exclusive!

Happy Crafting
Hugs Jo xx


Thursday 13 October 2022

Purrfect Day Bookmark Tag


Happy Thursday, Tea Timers!  It's Amanda here!  Are you a book lover or know a book lover?  These tags make the perfect bookmark!

I started with a Manilla Kraft Tag and stamped a Dictionary Page image onto the background.  Next, I distressed the tag by adding Flat White Ink around the edges and a little bit in the center.
I've die cut some tables and shelves from the Purrfect Day Scene Builder Dies.

Next, I've stamped some images from the Purrfect Day Stamp Set.  I've colored them in with OLO markers and then die cut them using the coordinating die set.
I've adhered my images to the card using liquid glue.  I also added a few sequins with some adhesive and added a black ribbon.


Creating this tag was so much fun!  I hope you are feeling inspired to create one of your own!

See you back here next week!
Crafty Hugs,


Wednesday 12 October 2022

Stretch your supplies – Sending You Tons of Love slimline card

Hey Tea-Timers! I know we’re all tightening our purse strings at the moment, so I thought I’d look at a simple way of stretching your supplies! For today’s card, I’ve used just one stamp set and one die set, and also made use of my card scraps!


Here’s what you’ll need:

  • ·       Ocean Waves dies (but you could also use the Landscape Edge Standalone dies)
  • ·       Get Whale Soon stamp set 
  • ·       Scraps of coloured card in different shades of blue (or if you don’t have much coloured cardstock, use white cardstock and ink blend over it with blue shades to create your own)
  • ·       Pale blue ink (I think I used tumbled glass distress oxide) and a blender brush or other ink blending tool
  • ·       White embossing powder, embossing ink and a heat tool (if you don’t have these, you could just stamp your sentiment in white ink)
  • ·       Copic markers (you can use whatever your preferred colouring medium is)
  • ·       Shimmer spray (the Silver Sparkle colour that I used is currently sold out but you could use Aquatini or Winter Frost instead) (optional)
  • ·       Slimline card base
  • ·       White gel pen and silver pen (optional)


 Instructions:

  • 1.      Stamp, colour and die-cut (or fussy cut) three of the whales from the Get Whale Soon stamp set. I used a white gel pen for highlights, and a silver pen for the horn on the narwhal, but you can skip this step if you want to!
  • 2.       The Copic colours I used for the whales were:
  • a.       Narwhal: BG57, BG13, BG10. Horn: BG13, BG18, silver pen
  • b.       Whale 1: B02, B01, B00, B000
  • c.       Whale 2: B28, B24, B21
  • 3.       Use the die that looks a bit like fluffy clouds from the Ocean Waves die set to die cut a piece of scrap card. Using the die cut as a stencil, place it along the top of your slimline card, and ink blend some light blue over the edge of the stencil on to the card. Shift the stencil down, and repeat, two or three times.
  • 4.       Using some of the other dies from the set, die cut various scraps of card that are the same width as your slimline card (this is usually around 3.5”). You want to die cut them along the top edge, creating lots of waves that we’ll layer up to make our sea.
  • 5.       Layer your wavey die-cuts together – use liquid glue or tape runner so we’re not adding too much bulk to the card. I started with my darkest colour at the bottom and trimmed it to be around 2 inches tall, then worked my way up to the lightest colour at the top. Each time, I would glue the next colour behind the previous one, so that around an inch of each colour showed. I used five colours in total, so my waves were around 6 inches tall – leaving enough space for our stencilled sky to show above the top.
  • 6.       Prep your card for embossing by dusting over some embossing powder. I laid out my sentiments in the bottom left corner, then stamped them in embossing ink, added Super Bright White embossing powder (from Wow! Embossing) and heat set.
  • 7.       Glue the waves on to the card base, and spray with shimmer spray.
  • 8.       Add the whales with foam tape.


I love how fun and sparkly this card is (and it’s also perfect for male recipients, too!).

Hope you have a wonderful, crafty day!

Jayne

Other Posts You Might Like