Pages

Showing posts with label Winter Wishes Wreath Stamp. Show all posts

Friday, 22 July 2022

Circle Monotone Wreath


Hello everyone, DT Annalisa here sharing another holiday card featured in Papercraft Essentials Magazine in the UK in October 2021. For this circle card, I used the A5 Winter Wishes Wreath Stamp coordinating dies from Time For Tea Designs. I love the beautiful wreath in this set and decided to use them as the main design element.


Materials:

  • Circle Of Love Nesting Dies (these are no longer available but you could use the Simple Circle Dies)
  • Beautiful Blender Brush
  • Low tack Mint Tape from Scrapbook.com for creating a mask
  • Ranger Distress White Heavystock
  • Distress Oxide Inks  – Salvaged Patina and Peacock Feathers
  • Salvaged Patina Distress Spray stain
  • Heat tool and anti-static powder tool
  • Brutus Monroe Sterling embossing powder
  • VersaMark by Tsukineko embossing ink
  • Stickles Stardust and Ranger Inkssentials Enamel Accents White
  • Art Glitter liquid glue
  • Stamping platform - MISIT from My Sweet Petunia

Instructions:

  1. Dust cardstock with an anti-static powder tool, stamp the large wreath in embossing ink and cover it with white embossing powder and heat set.
  2. Use blender brushes to Distress Oxides and die-cut wreath with the coordinating die.
  3. Die cut a 5 ¼ diameter circle from white cardstock and dust with an anti-static powder tool. Use a stamping platform to stamp ‘warm winter wishes’ in embossing ink, cover with silver embossing powder and heat set.
  4. Use low tack tape to protect the sentiment and add a splatter of distress ink spray stain.
  5. Adhere wreath around the sentiment using liquid glue and add some Stickles and white accents.
  6. Create a card base by partial die cutting using the same circle die used to make the front panel.
  7. Adhere the decorated front panel to the card base with liquid glue.

TIP:  for a bolder/more intense splatter use a distress ink rather than an Oxide, even better use a spray stain!

Thank you so much for reading my blog post. Don't forget to use my discount code T4TANNALISA10 when you visit the Time For Tea Designs shop to get 10% off your order.


Friday, 15 July 2022

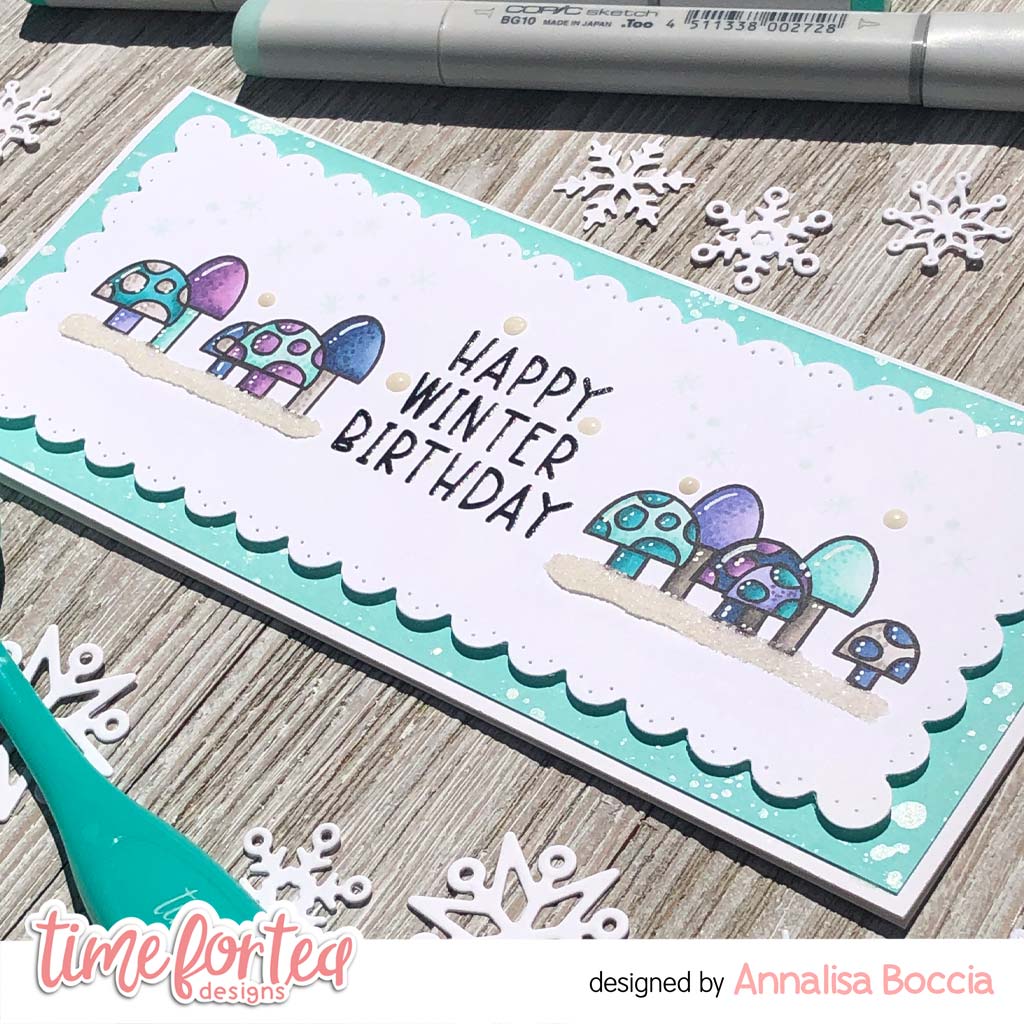
Mini Scalloped Slimline Winter Birthday Card


Hello everyone, DT Annalisa here sharing another holiday card that was featured in Papercraft Essentials Magazine in the UK in October 2021. For this card, (along with the other five I created) I used the A5 Winter Wishes Wreath Stamp Set. I just love the adorable mushrooms in this set and decided to use them as the main design element.


Materials Used:

  • T4T Slimline Scallop Nesting Dies - Lovely Friend
  • T4T Blender Brushes
  • Neenah 80lb card stock
  • Distress Oxide Ink  – Salvaged Patina
  • Soft Pool Hero Arts Shadow Ink.
  • Shimmer Spray - Silver Sparkle and a small paint brush
  • Heat tool and anti-static powder tool
  • Brutus Monroe Ultra Fine embossing powder in Icicle (clear)
  • Versafine Onyx Black
  • White Gelly Roll Pen10 by Sakura
  • Ink On 3 Blackout Detail Ink (alcohol ink friendly)
  • Inkadinkado Stamping mask paper
  • Copic Sketch Markers
  • Stamping platform - MISIT from My Sweet Petunia
  • Ranger Inkssentials Glossy Accents
  • Double-sided tape (3/8 inch)
  • Double-Sided Adhesive Foam Roll (1/4 inch)

Instructions:

  1. From white card stock, die-cut the smallest scalloped T4T die from the Slimline Scallop Nesting Dies - Lovely Friend.
  2. Dust this panel with an anti-static powder tool, stamp “happy winter birthday” in Versafine Onyx Black, and cover with clear embossing powder and heat set.
  3. Using the stamping platform, stamp the three mushrooms onto the panel to the right of the sentiment.
  4. Stamp mushrooms onto masking paper and cut them out right along the line. Place the mask on top of the mushrooms, the smallest mushroom needs its’ own mask.
  5. Stamp the mushrooms on top of the mask on both sides of the sentiment, after stamping down the initial mushrooms.
  6. Remove masks and colour mushrooms using Copic markers, then add highlights/dots using a gelly roll pen.
  7.  Stamp the small snowflakes above the mushrooms with shadow ink.
  8.  Add dots of white enamel accents.
  9. Apply a thick line of glossy accents and add glitter, tap off excess and leave to dry.
  10. Trim white cardstock to 2 15/16 by 6 7/8 inches and add Salvaged Patina Distress Oxide with blender brushes.
  11. Use a small paintbrush to add a splatter of Shimmer Spray - Silver Sparkle to this panel.
  12. Cut a card base from white cardstock to 3 1/8 by 7 inches and adhere the teal panel to this using double-sided tape.
  13. Use foam tape to adhere the scalloped panel to the rest of the card.

TIP: use a high-quality masking paper for best results, the mask can be used several times.


Thank you so much for reading my blog post. Don't forget to use my discount code T4TANNALISA10 when you visit the Time For Tea Designs shop to get 10% off your order.


Friday, 19 March 2021

Happy Winter Birthday


Hello everyone, thanks for visiting my blog. I know that spring is just around the corner, but today I am sharing a wintery 3D card scene - great for those winter birthdays. I have used several different stamp sets from Time For Tea Designs as they all go so well together.

The card base is a step-card design from Lori Whitlock's SVG Shop that I cut with my Brother Scan N Cut SDX125e. I added some snowy hills that I die-cut using the Stitched Hillside Border dies from Lawn Fawn (you could also use the Landscape Edge Standalone Die from T4T) and coloured them with Speckled Egg Distress Oxide to give them the look of snow. I used the Sandy Beach Accents dies from Lawn Fawn to die cut the smaller snowbanks to slip the fire pit and trees into.

The mountains are from a die set in my stash, but you could also use the Mountain Scene Builder Dies from T4T. 


I used several clear stamp sets to create this card: Skating By Penguins (bird with scarf - I had to do some mirror stamping on this one!), Beavering Away, Life's Ups & Downs (hedgehog and smore), Winter Wishes Wreath (sentiment and snowflakes around it). I stamped, coloured and cut out the elements and adhered them to the card base with liquid glue. I stamped the sentiment and snowflakes to the hill before adhering it down the card so that it would be crisp.

If you are interested in purchasing any of the T4T products used in my project, use T4TANNALISA10 at checkout for a 10% discount which can be used on anything, anytime and has no time limit.


Wednesday, 13 January 2021

Happy Winter Birthday

Happy Wednesday!

It's DT Shabneez sharing a Winter Birthday card made with the Winter Wishes Wreath Set.  This stamp set has a number of very useful sentiments suitable for use throughout the winter.


I think it's a great idea to send season specific birthday cards as they are unique.  For my card I stamped out the image and coloured it in using my Chameleon pens.  Next,  I die cut around the wreath using the Circle of Love Nesting Die and matted it on to a gold circle base with a striped strip of card running through the middle.  This was placed on a stitched square burgundy card base cut using the Quilted Squares Nesting Dies.


To finish the card I added some gold glitter drops to the small circles within the wreath.  They add a subtle shimmer which ties in with the gold matt.

You can get 10% off anything in store using my code T4TSHABNEEZ10.

Enjoy crafting!


Other Posts You Might Like