Pages

Showing posts with label Happy Trails. Show all posts

Sunday, 14 December 2025

A Snowy Globe of Cheer!

Hello Tea Timers!

Design team member Michelle here and for today’s inspiration, it is a classic Christmas look with this sweet snow globe card. Inside the globe is an adorable snowman all bundled up in a red scarf and top hat, surrounded by snowy fir trees. 

Supplies used:

Snow Much Fun

Trees - Happy Trails 

Foliage - Season’s Tweetings

Simple Circle Dies

A5 Woodgrain Stamp

Joyful Winter Paper Pad


As usual, all the images were stamped and coloured in with alcohol markers. I used a black fine liner to create the snow on the trees and added highlights to all the images with a white gel pen.


To make the snow globe, I nested 2 of the Simple Circle dies together and die cut them out 4 times from white card stock. I then layered and glued them together to it give dimension. 


The background of the snow globe is a blend of Salvaged Patina, Peacock Feathers and Salty Ocean Distress Oxides making white acrylic paint snow splatters really pop! 


I used the extra inner part of the circles leftover from the snow globe to die cut some hillsides to ground the snowman and trees.

The base of the snow globe has a warm woodgrain feel and this was created with my favour texture stamp at the moment - the A5 Woodgrain stamp on Kraft card stock using Vintage Photo Distress Oxide. It is finished with festive foliage and a bright red “Merry Christmas” sentiment banner. 

The background panel is a pattern from the Joyful Winter Paper Pad cut slightly smaller than a standard card base giving a thin white border. Snowflakes die cut from glitter card stock were scattered throughout for a magical finishing touch.


This card just makes me smile and I hope it brings a little joy to your day too!

Michelle


Friday, 12 December 2025

Sweet Christmas


Happy Friday, DT Annalisa here! Today I’m sharing a sweet Christmas scene I created using the Gingerbread Family - Our House to Yours stamp set from Time For Tea Designs.

To build the background, I started with watercolour paper and layered Picked Raspberry, Salvaged Patina, and Mermaid Lagoon Distress Sprays. I applied the colours, heat-setting between layers to add depth and texture. For a touch of shimmer, I added a spritz of Peacock Feathers Distress Spritz, which gives the background a beautiful sparkle. I finished it off with splatters of Picket Fence Distress Spray Stain for extra interest.

Once the panel was dry, I added a frame that I created using the Rounded Corner Stitched Rectangle Dies and white card stock. I used liquid glue to stick it to the panel and then to a card base.


Next, I stamped several images from the Gingerbread Family – Our House to Yours set, coloured them with Copics, and cut them out using the coordinating dies (which are currently on sale!). I added white gel pen details using a Gelly Roll Pen and added sparkles to some images with a Quickie Glue Pen and Lawn Fawn Prisma Glitter.

The stars come from the Happy Trails clear stamp set, and I cut them using the coordinating dies.


To create texture in the snowy area, I added Ranger Translucent Grit-Paste. I love the dimension this paste provides. It works perfectly for mimicking realistic snow on a card.

I adhered the images to the card base using a mix of liquid glue and foam tape to give the scene depth and dimension.


To complete the card, I added three white enamel dots from the Sweet Summer Designer Enamel Dots collection.

Thank you so much for reading my blog post! Don’t forget to use my discount code T4TANNALISA10 when you shop at Time For Tea Designs to receive 10% off your order.


Sunday, 24 August 2025

Fishing Fun!

Hello Everyone!

Design Team member Michelle here with a splashy little card full of sunshine, trees, and some seriously cute fishing fun. This sweet mouse is having a relaxing day by the water while their fluffy sheep friend cheers them on from the shore.

Supplies used:

Boat Buddies

Ewe Are Moovellous

Fintastic Friends

Trees - Happy Trails

Dock - Table from Home Where The Heart Is

Bucket - Beach Buds


For the sky, I ink blended soft yellows and oranges. For the water, I die cut waves, ink blended with a mix of blues before layering them together with foam tape. I also added a few splatters and sparkles to make everything feel extra fresh. 

The dock, trees, and critters were stamped or printed, coloured with alcohol markers and pieced together to build this peaceful outdoor scene. I hand drew and coloured some rocks to add to the water's edge as I felt something was missing. 

For the sentiment, I used white heat embossing powder on dark blue cardstock and it makes me smile every time - may all your fishes come true!

This is a fun card for a birthday, encouragement, or just because.

Hope your day is fin-tastic!

Michelle

Friday, 15 August 2025

New Driver Congrats


Happy Friday. DT Annalisa here! Today’s card celebrates my youngest niece, who just received her driver’s license! This exciting milestone definitely calls for a congratulations card, and the Adventure Awaits stamp set was perfect for the occasion.

To create the background, I painted a light wash of blue, purple, and pink watercolors on watercolor paper. Once it was dry, I used a stitched rectangle die to cut it out and glued it to a grey card base.


I stamped the car and compass images from the Adventure Awaits stamp set, colored them with Copic markers, and cut them out using the coordinating dies. To add some extra flair, I used a white gel pen to create accents with a Gelly Roll Pen. The map, which I stamped from the Happy Trails set and die cut using its coordinating dies, added a nice touch. I adhered all the images to the card using double-sided foam tape.


The sentiment is from a card I had in my stash. To finish the card, I added three white Sweet Summer Designer Enamel Dots for some extra detail.

Thank you so much for reading my blog post. Don’t forget to use my discount code T4TANNALISA10 when you shop at Time For Tea Designs to receive 10% off your order.


Sunday, 15 June 2025

Out of this World!

 Hello Tea Timers!

Michelle from the Design Team and today’s card is something out of this world using a stamp set from the new release. We have two kitties off on a galactic space adventure with a little mouse stowaway in tow!

Supplies used:

When I saw this stamp set, I had a million and one ideas in my head! I knew I wanted to do something different and I had also been wanting to do something space themed and so this was the perfect opportunity to combine the two together.

To make the card, the background is an ink blend of Wilted Violet, Chipped Sapphire, Twisted Citron and Black Soot Distress Oxides - when ink blending, it looks like a mess but trust the process! I then added an abundance of metallic silver water colour splatters to give it the outer space feel.


As usual, all the images where stamped, coloured with alcohol markers and highlighted with a white gel pen. To give some details on how I created the planets, they were done by tracing the inner circles of the 2 smallest Simple Circle Dies with a black finer and then adding 'planet' details. For the rings around the planets, they are are actually the rug from the Home Is Where The Heart Is stamp set with the middle part cut out - shop your stash as sometimes the most unlikely stamp is just the one you need!

As there was already a lot going on in the card, I kept the sentiment simple but still visible by using white heat embossing powder on black cardstock.


Everything was glued down with liquid glue and the main car image was propped up with some foam tape. A finishing touch of glitter was added to the stars and the rings around the planets to give it the extra shimmer.

I loved how the card turned out and I can only imagine what new things that these 2 explorers have seen! I hope you enjoyed this adventure too.


Thanks for reading,

Michelle
Sunday, 1 June 2025

Rain or Shine With You!

Hello Everyone!

Michelle from the Design Team here and today’s inspiration uses the Rain or Shine Mice stamp set from the NEW release. We have two friends in their adorable raincoats and boots splashing through the rain under a beautiful rainbow!

Here are the supplies used:

To make the card, I did my usual first step of stamping the images on white cardstock, coloured them with alcohol markers and highlighted with a white gel pen.

For the main base pieces of the sky and ground, I ink blended a cloud background using a cloud stencil, soft blue ink and splatters. I then die cut a panel of white cardstock with a grass die, ink blended with 2 shades of green ink (a light and dark) and then splattered with the darker green ink.

To create the rainbow, I used the Simple Circles dies and white cardstock. The cut circles were blended with pink, yellow, green and blue ink before being glued together liquid glue and given a light splattering of white ink. Once the layered circles were dry, it was cut into half and I saved the other part for another project. Whilst this may take a bit more effort, it gives you flexibility to make a rainbow however big or small you need.

I curved the stamps of the sentiment and stamped directly onto the top of the rainbow using black ink. Next, all the coloured images were then arranged and adhered with liquid glue to create the cute scene in the woods where one little mouse is stopping in a puddle with glee and the other standing by with an umbrella.

Finishing touches of glitter glue was added to the clouds, the rain drops, the puddle and the flowers to give them the extra sparkle!

The sentiment says it’s best, “Rain or Shine, life is better with you”. 


Happy Crafting,

Michelle

Friday, 12 January 2024

Pink Birthday Party Bunny


Happy Friday. DT Annalisa here sharing a sparkly pink birthday card, because who doesn't love pink and sparkly! I used a stencil, dies and stamps from Time For Tea Designs

I used the Simple Square Nesting Dies to die-cut Neenah Metallic cardstock for the back panel. I glued this onto a white cardstock card base. 

Next, I sprayed Distress Mica Stain Cocktail Party onto watercolour cardstock through the Diamond Burst 6 x 6" stencil. I heat set the ink and then spritzed water mist to create the light pink background in the white areas left behind. I stuck this to the card base with double-sided tape.

I ink blended peacock feathers, salvaged patina and tumbled glass Distress Ink to white cardstock. I scooped some white Perfect Pearls into a mini mister and added water, spritzed this onto the inked panel and then heat set it. 

I used the Square Label Dies to die-cut the teal-inked panel and a piece of vellum. I used liquid glue to stick the teal panel to the vellum one. I then glued this to the card base.

I used the Let’s Party Large Sentiment Die to die-cut silver metallic paper and paper from a Christmas cracker; I love being able to repurpose paper! I created a text shadow using silver paper by offsetting the text slightly when I glued the sentiments on top of each other. I glued these to the centre of the blue panel on the card base and added three pink Summer Haze Enamel Dots around them. 


I stamped and coloured (with Copics) several images from the Let’s Party stamp set and the stars from Happy Trails and cut them out with their coordinating dies. I added white gel pen accents with a Gelly Roll Pen. I used double-sided foam tape to stick these to the card base to complete the card.

Thank you so much for reading my blog post. Remember to use my discount code T4TANNALISA10 when you visit the Time For Tea Designs shop to get 10% off your order.

Wednesday, 18 October 2023

Lost....

Hey Tea-timer friends..

It's DT Ashlee here with you today!

Who's ready for some more Time for Tea designs inspiration using the super cute set Happy trails?! This would have to be one of my most favourite T4T stamp sets, It's just so cute!


I used these T4T products to create this card :


To create this card I started with a blue card stock base (this would fill in the sky area) I then die cut the large sized frame from yellow card and went ahead and die cut al my pieces for the grass and road from the slimline set. 

Once all my pieces were die cut I adhered them all together using liquid glue and foam tape for the frame which created the scene. 

I stamped, coloured and die cut a bunch of images from the happy trails set and arranged them onto the card base. These were coloured using Spectrum noir tri-blend markers with added white pen highlights.

To complete the card a stamped sentiment and a small touch of pretty sequins!


That's all for my card today, have you got someone that you would be lost without that you could send a card like this too?!


Thanks for stopping by, happy crafting. Hugs Ashlee.

Thursday, 2 March 2023

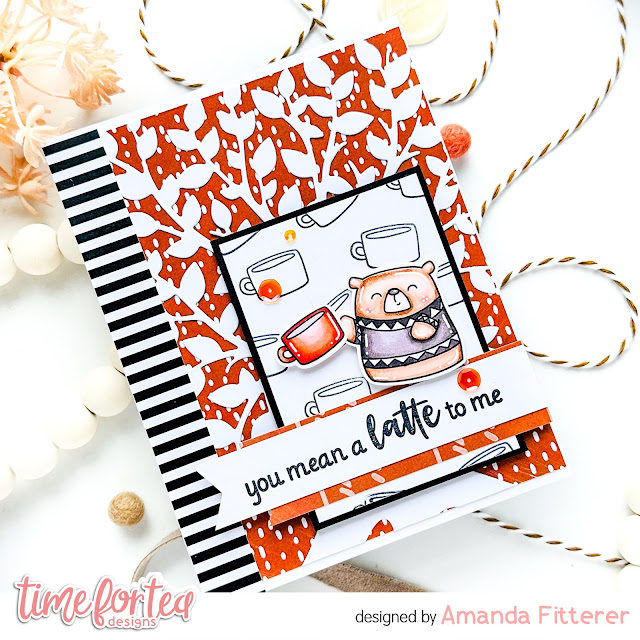
You Mean a LATTE to Me


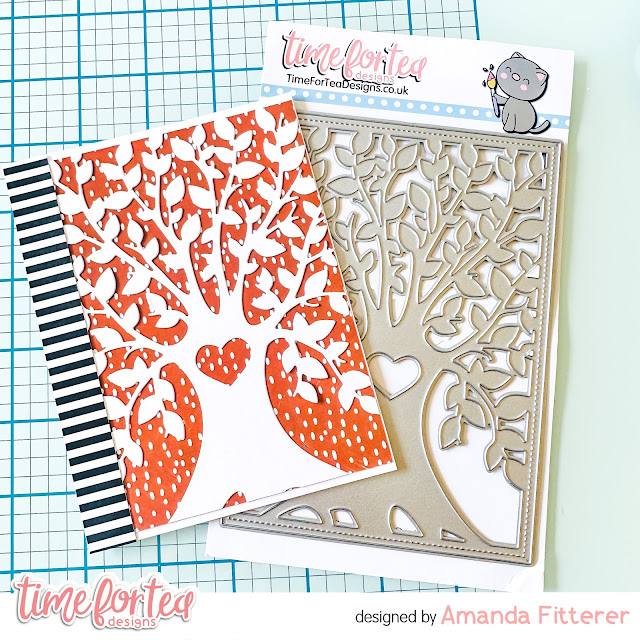
Hello, Tea Timers!  I'm excited to be here today to share this gorgeous card with you!  I created this card by cutting out the Tree of Love Cover Die in white cardstock.  I adhered some patterned paper directly onto my A2 card base using liquid glue.  Then, I used my Bearly Arts precision glue to adhere my tree.

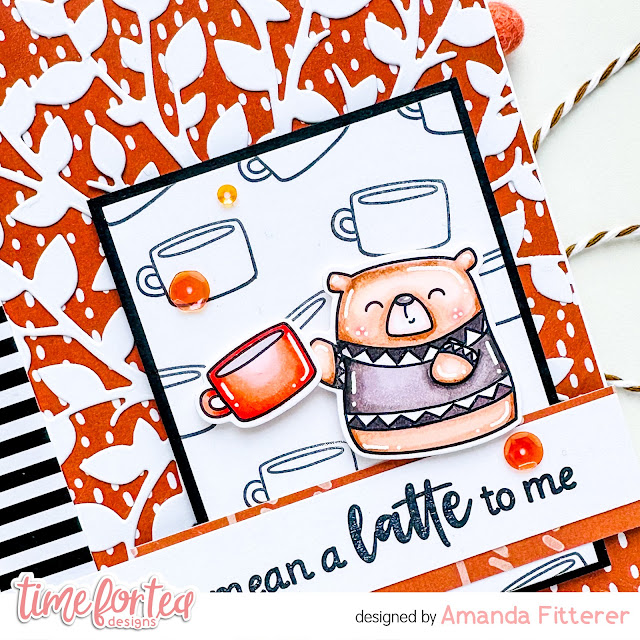
Next,  I stamped my images from the Happy Trails Stamp Set.  Once colored with alcohol markers, I cut them out using the coordinating die set.  I also trimmed a small white panel down and stamped the mugs directly onto it, evenly spacing them out, using a small acrylic block.


I trimmed down a piece of black cardstock that was just .25" bigger than my white panel.  I glued my white panel to the black panel.  I propped that up onto my card base using strips of 3D foam tape.


I trimmed down another piece of patterned paper and glued that to my white panel.  I grabbed my sentiment from the Perfect Blend Stamp Set and stamped that onto a piece of white cardstock in black ink.  I trimmed that down with my scissors and created a little flag/banner at the end.  I glued that onto my patterned strip.

The last thing to do is add on my stamped images with 3D foam squares and glue a few sequins down!


I hope you enjoyed this card and are feeling inspired by my post!  Have fun getting crafty today or whenever you can!  Xx, Amanda


Thursday, 5 January 2023

Happy Trails! Love Our Adventures Together!


 Happy Thursday, Tea Timers!  It's Amanda here!  Today I'm sharing a Happy Trails card!  

To create this card, I first blended a background using Sixteen Candles and Grape Crush inks.  I spritzed the background with water and white paint flecks.  I then cut out some of the Winter Trees Dies and glued them to my background.

Next, I stamped my images from the Happy Trails Stamp Set, colored them in with OLO markers, and then cut them out using the coordinating dies.

I adhered my images to the background using 3D foam squares.

Here are some more images closer up!


Thank you so much for stopping by the Time for Tea Designs blog today!  I hope you've enjoyed this post and are feeling inspired to create something fun today!
Xx, Amanda


Other Posts You Might Like