Pages

Showing posts with label Slimline Hillside Scene Dies. Show all posts

Friday, 18 October 2024

Halloween Kitties


Happy Friday! DT Annalisa here with a cute kitty Halloween card to share using the Trick or Treaters Digital Stamp Collection and Haunted House (which is on sale right now!) Clear Stamp Set.

I created the background by spraying spiced marmalade and candied apple Distress Oxide spray onto watercolour cardstock and heat setting it. I used double-sided tape to stick it to a white card base.  

Next, I used black glitter cardstock and die-cut the frame from Smile Inverted Scallop Frame Dies. I used double-sided tape to stick it to the card base.  

For the grass area, I ink blended mowed lawn, rustic wilderness and black soot Distress Oxides using my Beautiful Blender Brushes. I added splatter with water, silvery green watercolour and a paintbrush.


I die-cut the grass with the Slimline Hillside Scene Dies and Smile Inverted Scallop Frame dies. This allowed me to use liquid and snap it into place along the base of the card.

I stamped the 'Happy Halloween' sentiment from the Haunted House clear stamp set, along with leaves, an acorn and a pine cone from Jumping With Joy and Stinkin' Cute. I printed the kitties and pumpkin from the Trick or Treaters Digital Stamp Collection and cut out the images with my Brother Scan N Cut SDX125e.

I coloured the images with Copic markers and added white gel pen accents. I stuck the images down to complete the card with either liquid glue or 1mm thick double-sided foam tape.

Thank you so much for reading my blog post. Remember to use my discount code T4TANNALISA10 when you visit the Time For Tea Designs shop to get 10% off your order.


Friday, 19 April 2024

Thanks for Everything


Happy Friday, DT Annalisa here! Today, I share a bright spring thank you card that features the Darling Daffodils and Bold Sentiments stamp sets from Time For Tea Designs.

For the background, I ink-blended black soot, chipped sapphire, picked raspberry, spiced marmalade and squeezed lemonade Distress Oxides with my Beautiful Blender Brushes. I added white splatter with a paintbrush, water and white watercolour paint.


Once the panel was dry, I die-cut it with the Sweet Scalloped Dies. I adhered this panel to a 5 3/4-inch by 4 1/16-inch white card base.

I ink-blended twisted citron and rustic wilderness onto white cardstock. I die-cut this panel with the largest Sweet Scalloped die and the Slimline Hillside Scene Dies. I added white splatter with a paintbrush, water and white watercolour paint. I used liquid glue to stick down the grass border to the card base. 


I stamped and coloured (with Copics) several images from Darling Daffodils and cut them out with their coordinating dies. I added white gel pen accents with a Gelly Roll Pen

I stamped 'thanks for everything' from the Bold Sentiments stamp set and die-cut it with the coordinating die set.

I used liquid glue to stick the images and sentiments to the card base to complete the card. 


Thank you so much for reading my blog post. Remember to use my discount code T4TANNALISA10 when you visit the Time For Tea Designs shop to get 10% off your order.

Friday, 27 October 2023

Time to Trick-Or-Treat


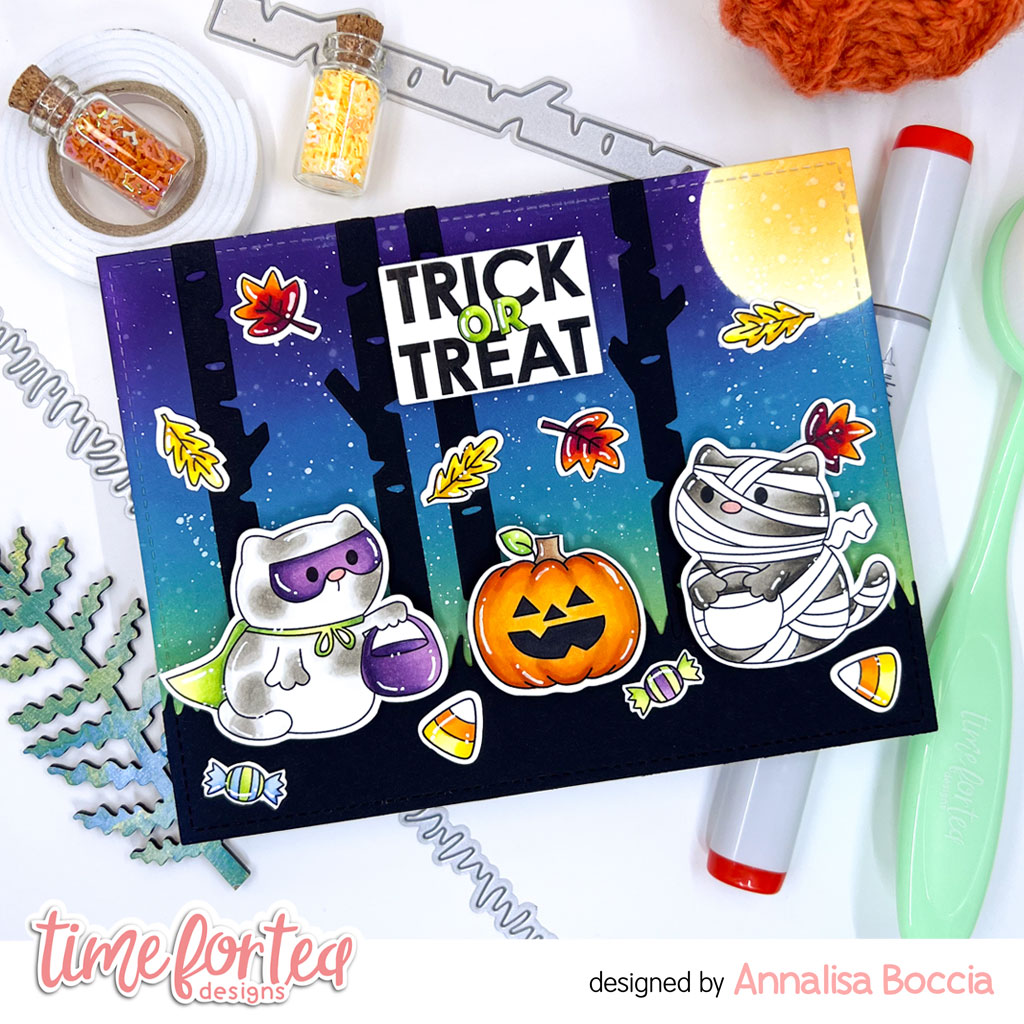
DT Annalisa here today! The kids will be trick-or-treating on Halloween in my area in just a few days! I created this nighttime trick-or-treat scene using the Trick or Treaters Digital Stamp Collection with the Haunted House clear stamp set. I love the ability to re-size digi stamps to what I need for my cards.

I ink-blended villainous potion, peacock feathers and twisted citron Distress Oxides onto Distress White Heavy cardstock by Ranger with my Beautiful Rainbow Blender Brushes. I splattered on water and Copic opaque white with a paintbrush. 


To mask the moon area for this scene, I added temporary adhesive to the back of the negative portion of one of the circles in the 
Circle Grid Masking Stencil. To colour the moon area, I used the outer section of the stencil for the mask and ink-blended squeezed lemonade and rusty hinge Distress Inks. 

I used the Winter Trees and Slimline Hillside Scene Dies to die-cut black cardstock. I used liquid glue to stick the trees and the grassy area to the ink-blended panel and glued this panel down to an A2 white card base.


I stamped and coloured (with Copics) several leaves from 
Jumping With Joy. I resized and printed several Trick or Treaters Digital Stamp Collection images and coloured them with my Copics. I added white gel pen accents with a Gelly Roll Pen to the coloured images. I cut out all the stamps with my Brother Scan N Cut SDX125e.

I stamped 'Trick or Treat' and die-cut it with one of the smaller A2 Layering dies. I adhered the images to the card base using liquid glue or double-sided foam tape for dimension. 


Thank you so much for reading my blog post, be sure to use my discount code 
T4TANNALISA10 when you visit the Time For Tea Designs shop to get 10% off your order.

Friday, 20 October 2023

Halloween Night Sky


Happy Friday, DT Annalisa here today. Halloween is quickly approaching, so I am sharing a spooky night scene card. This time of year it is always fun to create bold scenes with colours I rarely use for backgrounds like purple! I created this nighttime scene using the Trick or Treaters Digital Stamp Collection with the Haunted House clear stamp set. 

For the background, I used a circle mask in my stash and sprayed temporary adhesive to attach it to watercolour paper. I spritzed the paper with water and sprayed uncharted mariner Distress Spray Stain, I used my Ranger Heat It tool to dry the panel. Next, I added snow flurries Distress Mica Stain spray and once again dried this with my heat tool. I removed the moon mask and gently spritzed the side of the moon with water to create that 'spooky' moon look. I dried the panel with my heat tool, I find it is vital to dry the panel after spraying it with stains or water. I just love how mica stains really make things pop!


For the ground, I ink-blended villainous potion and black soot Distress Oxides. I then used a silver shimmer spray on top of this and dried it with my heat tool. I die-cut it using the Slimline Hillside Scene Dies. I created a 5-inch by 6 3/4-inch card base and used liquid glue to adhere the panels. I ink-blended squeezed lemonade and scattered straw Distress Ink onto the moon area. 

I resized the cat on the broom digi in Photoshop and printed it on Neenah Solar White 80 lb card stock. I stamped the sentiment and haunted house (I masked certain areas of the stamps to get the look I wanted). I used my Brother Scan N Cut SDX125e to cut out the images, coloured everything with my Copics and added white gel pen accents with a Gelly Roll Pen. I also used the Gelly Roll Pen to add stars to the sky.


I used liquid glue to stick everything down to the card base. I ink-blended black soot Distress Oxide to the edges of the card to complete it.  

Thank you so much for reading my blog post. Remember to use my discount code T4TANNALISA10 when you visit the Time For Tea Designs shop to get 10% off your order.


Wednesday, 18 October 2023

Lost....

Hey Tea-timer friends..

It's DT Ashlee here with you today!

Who's ready for some more Time for Tea designs inspiration using the super cute set Happy trails?! This would have to be one of my most favourite T4T stamp sets, It's just so cute!


I used these T4T products to create this card :


To create this card I started with a blue card stock base (this would fill in the sky area) I then die cut the large sized frame from yellow card and went ahead and die cut al my pieces for the grass and road from the slimline set. 

Once all my pieces were die cut I adhered them all together using liquid glue and foam tape for the frame which created the scene. 

I stamped, coloured and die cut a bunch of images from the happy trails set and arranged them onto the card base. These were coloured using Spectrum noir tri-blend markers with added white pen highlights.

To complete the card a stamped sentiment and a small touch of pretty sequins!


That's all for my card today, have you got someone that you would be lost without that you could send a card like this too?!


Thanks for stopping by, happy crafting. Hugs Ashlee.

Friday, 22 September 2023

Hey, Congrats


 Happy Friday, DT Annalisa here! The first day of Fall, or autumnal equinox, arrives tomorrow, so I am sharing a card with a fall feel. It features the Birthday Fox clear stamp set from Time For Tea Designs.

For the background, I ink-blended tumbled glass and salty ocean Distress Oxides with my Beautiful Blender Brush onto Distress White Heavy cardstock by Ranger. Using a paintbrush, I added splatters of water and uncharted mariner Distress Oxide. For the grass, I ink-blended twisted citron, mowed lawn Distress Oxides and added water splatters. 

I die-cut the grass with the Slimline Hillside Scene Dies and stuck this to the sky panel with liquid glue. I then added this panel to an A2 card base.

I stamped and coloured (with Copics) the foxes from the Birthday Fox clear stamp set and cut them out with my Brother Scan N Cut SDX125e. I added white gel pen accents with a Gelly Roll Pen. I did the same process with the leaves from Jumping With Joy and Bee and Butterfly from I Really Dig You.

I used liquid glue to stick the leaves to the card and double-sided foam tape for the rest of the critters. 

The hey letters were die cut from black cardstock using the Hey, Hello, Hi Dies. I die cut vellum using the word shadow die in this set. I used liquid glue to adhere the letters to the shadow area and then behind the letters and stuck this to the sky area on the card. 

I stamped congrats from the You’re Engaged stamp set with VersaMark ink and heat embossed using white Ultra Fine Embossing Powder by Brutus Monroe. I die-cut the sentiment using the coordinating die set. I used liquid glue to stick the congrats to the bottom of the card. 

Thank you so much for reading my blog post. Remember to use my discount code T4TANNALISA10 when you visit the Time For Tea Designs shop to get 10% off your order.

Friday, 18 August 2023

Rainy Day Hugs


Happy Friday, Annalisa here! I am sharing a cheerful 'hugs' card that features the Memory Keeping Essential Dies and Hogs & Kisses stamp set, both of these are part of the retiring collection - now is a great time to grab them as they are on sale!  

I used a stitched rectangle die to cut a beautiful piece of paper from the Pawsome Rainbows 6x6' Paper Pad. I added this to an A2 card base with double-sided tape. I used the same patterned paper to die-cut the Hugs Stitched Sentiment Die.


I cut the polaroid frame from the Memory Keeping Essential Dies into dark navy cardstock. I added a stitched border using a white Gelly Roll Pen. I used liquid glue to stick the 'hugs' sentiment to the frame.

I cut a white backer for the polaroid frame, to which I glued blue-coloured cardstock. I used the grass die from the Slimline Hillside Scene Dies to cut green cardstock and then glued it to the blue area. I then used liquid glue to stick the polaroid frame down on the backer area.

I stamped and coloured (with Copics) the adorable pig with his umbrella from Hogs & Kisses and cut them out with their coordinating dies (also on sale!) I added white gel pen accents with a Gelly Roll Pen. I glued the pig to the frame and its' backer sheet and then adhered this to the card base to complete the card.

Thank you so much for reading my blog post. Remember to use my discount code T4TANNALISA10 when you visit the Time For Tea Designs shop to get 10% off your order.

Wednesday, 9 August 2023

You make my heart....SOAR!

 Hey there Tea-timers 

It's DT Ashlee here today with a new card to share and this one features the Love is in the air stamp and co-ordinating die collection that was released in the latest Time for tea designs release....


To create this card I started with a light blue card stock base. I then die cut the sun ray cover plate from a yellow card stock and added some ink blending and splattering to it. I adhered the cover die cut over the blue base and then went on to add all the elements to the card. 

Using green card stock that I had inked and splattered I die cut in into grass using one of the dies from the slimline hillside scene die set and adhered that to the bottom of the card!


I stamped, coloured and die cut a bunch of images from the love is in the air set and adhered them using foam tape so the panda was in the balloon basket flying into the air! (The images were coloured using Ohuhu alcohol markers)....

To finish off the card a die cut sentiment "you make my heart soar", white pen highlights and a touch of sequins! 


I hope you enjoyed this card, I always enjoy getting creative with my T4T supplies. Thanks for stopping by and happy crafting, hugs Ashlee. 

Wednesday, 26 July 2023

Here's the scoop....!

 Hey there Tea-timer friends...

DT Ashlee here and today I've got a box card to share using the box clever die set. This was so much fun to make and I really can't wait to make another one! You can create such cool little scenes inside them and it flattens perfectly to send in an envelope.


Other Time for Tea designs products I used to make this box card :


To create this card I die cut the box base from blue card stock and then went on to die cut all the pieces to create the scene. I added green splatters to the green card stock for the trees/grass before die cutting those pieces. I adhered the background pieces along with the grass in place first before adding the panels to hold all the elements. Once the panels were in I created the scene and added a kitty from cool critters with yummy ice creams. These were coloured with Spectrum noir tri-blend markers. Once the scene was complete and the box was all adhered together I finished it off with a cloud, sentiment and bush on the front of the box along with a touch of sequins! 

Isn't it just the cutest?! I hope you enjoyed this box card, I will definitely be making another one soon!

Thanks for stopping by, Happy crafting. Hugs Ashlee.

Friday, 30 June 2023

Birthday on the Farm


Hello, and happy Friday! DT Annalisa is here sharing a fun slimline farm scene created using several stamp sets and dies from Time For Tea Designs. I love being able to mix and match stamp sets to create fun scenes like this summer on the farm one.

The following supplies were used to create the card:

Ewe Are Moovellous
Love Is In the Air
Just Married
Ewe Are The Best
Ewe are the best coordinating dies
Darling Daffodils


I cut Distress White Heavy cardstock by Ranger using the largest die in the Simple Slimline Nesting Dies and ink blended Salty Ocean and Tumbled Glass Distress Oxide Ink using my Beautiful Rainbow Blender Brushes. I added splatter with a paintbrush, water and Prize Ribbon Distress Oxide Ink. I placed this panel onto a slimline card base.

I used the same paper and ink blended Twisted Citron and Mowed Lawn Distress Oxide Inks with Rustic Wilderness splatter for the grass. I die-cut the ink-blended panel using the same large Slimeline Nesting Die and again with two dies from the Slimline Hillside Scene dies. I used liquid glue to stick the hilly grass to the card base. 

I die-cut woodgrain cardstock with the Fenced in Dies and glued them to the hilly grass. I then used double-sided foam tape on the other grass section and stuck it to the bottom of the card. Before doing this, I stamped the 'from the whole herd' sentiment onto the grassy panel with Versafine Onyx Black. 


I stamped, and coloured (with Copics) several images from the stamp sets listed above and cut them out with their coordinating dies. I added white gel pen accents with a Gelly Roll Pen

I stuck the images to the card base using a combination of liquid glue and double-sided foam tape for dimension. I stamped the ‘Happy Birthday' sentiment and cut it out with its' coordinating die, I die-cut two more pieces of paper using the die and glued them all together for added dimension.


Thank you so much for visiting my blog. Remember to use my discount code 
T4TANNALISA10 when you visit the Time For Tea Designs shop to get 10% off your order.


Friday, 28 April 2023

Thank Ewe


Happy Friday, everyone! DT Annalisa is here today sharing a thank 'ewe' card featuring the adorable sheep from the Ewe Are The Best clear stamp set from Time For Tea Designs.

A heads up the latest T4T mini release goes on sale Saturday 29th April at 8am BST. If you would like to see all the new goodies before the release goes live then please join Jo today, Friday 28th April, on Facebook or YouTube at 7pm BST.

I used the Simple Slimline Nesting Dies to die-cut a slimline card panel (8.5 by 3.5 inches) from Fabriano Bristol cardstock. I ink blended Prize Ribbon, Wilted Violet, Picked Rasberry and Squeezed Lemonade Distress Oxide using my Beautiful Rainbow Blender Brushes. I added silver splatter with a paintbrush, water and silver watercolour. I used double-sided tape to adhere this to a slimline card base. 


For the grass, I used the Slimline Hillside Scene Dies. I ink-blended Twisted Citron and Mowed Lawn and added Lucky Clover Distress Oxide splatter. I used the Landscape Edge Standalone Die Set to die-cut the clouds and ink blended with Weathered Wood Distress Oxide and added some splatter in the same colour. I added silver splatter to the clouds and grassy sections to match the sky.

I stamped, and coloured (with Copics) several images from Ewe Are The Best and cut them out with their coordinating dies. I added white gel pen accents with a Gelly Roll Pen. The tulip, butterfly and bee are from I Really Dig You, I coloured them and cut them out with their coordinating dies.

To assemble the scene, I used liquid glue on the clouds, hillside and some of the images. I used double-sided foam tape on two of the sheep, the butterfly and the bee to pop them up.

I stamped the 'thank EWE' sentiment and cut it out with its' coordinating die, I die cut two more pieces of paper using the die and glued them all together for added dimension.

Thank you so much for reading my blog post, you can use my discount code T4TANNALISA10 when you visit the Time For Tea Designs shop to get 10% off your order.


Friday, 20 January 2023

Let's Seal-ebrate


Happy Friday! DT Annalisa here, today's project is a wintery slim-line card featuring the Sealed With A Kiss stamp set from Time For Tea Designs.

I sprayed Distress Mica Stain in Shiny Bauble to Distress Watercolor Cardstock by Ranger. This stain has a beautiful shine, and I love the light blue colour.


I used the Falalala Scalloped Slimline Dies to die-cut a scalloped border. I created a snowy hill using the Slimline Hillside Scene Dies, and ink blended this very lightly with Salvaged Patina Distress Ink before adhering it to the bottom left of the scene with liquid glue. I added the scalloped frame on top of this with liquid glue. I used double-sided tape to stick this panel to a slim-line card base.

I stamped and coloured the seals, fish and fishing pole from the Sealed With A Kiss stamp set and die-cut them with the coordinating dies. The winter hats and chunks of ice are from the Walrus Be Friends stamp set. I stamped, coloured and die-cut these with the coordinating die set. I added highlights with a White Gelly Roll Pen and sparkles with a Quickie Glue Pen and Lawn Fawn Prisma Glitter.


I used double-sided foam tape to adhere some elements (including the sentiment) and liquid glue for the rest. I love the overall shine on this card when you pick it up and move it around in the light. If you have never tried Distress Mica Stain I highly recommend it.


Thank you so much for reading my blog post, you can use my discount code T4TANNALISA10 when you visit the Time For Tea Designs shop to get 10% off your order.


Friday, 25 November 2022

Floating By to say Hey


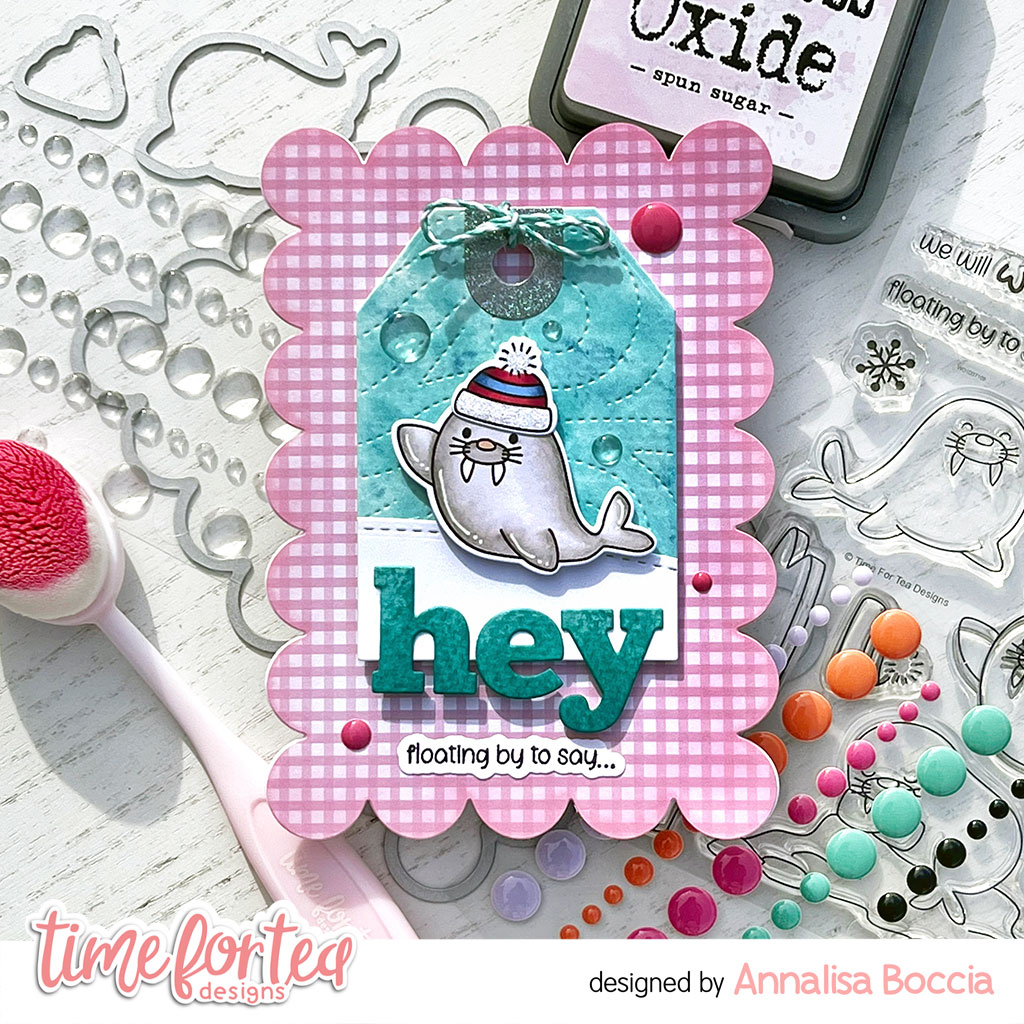
Hello and happy Friday. DT Annalisa here sharing a fun scalloped card featuring the new Walrus Be Friends stamp set by Time For Tea Designs. I love how the Walrus is waving hello.

To start, I die-cut a piece of Gorgeous Gingham 6x6' Paper Pad with the Large Scallop Celebrate Frame Dies. I ink-blended Spun Sugar Distress Oxide ink to the sides of the paper with my Beautiful Blender Brush. I then adhered this to a card base that I created using the same die. 


I sprayed Distress Mica Stain in Shiny Bauble onto watercolour paper. I love the shine mica stain has. Once it was dry, I die-cut it first with the Snow Flurry Cover Die and then with the tag die found in the Memory Keeping Essential Dies. I also used some of this paper to die-cut the hey sentiment from the Hey, Hello, Hi Dies. I ink blended on Peacock Feathers Distress Ink to the letters to darken them up. 

I cut some white card stock with the Slimline Hillside Scene Dies to create a snowy hill for the Walrus to sit on. I cut it again with the tag die and then glued it on top of the tag. I glued the 'hey' to the base of the tag with liquid glue. I tied a bow onto the tag with some Lawn Fawn teal Lawn Trimmings. 


I stamped the seal and hat from the Walrus Be Friends and coloured them with my Copic markers. I die-cut them with the coordinating dies and added some white gel pen accents. I used liquid glue to adhere the hat to the Walrus and then used double-sided foam tape to stick them to the tag. I then added double-sided foam tape to the back of the tag and placed it on the scalloped card base. 

I stamped and die-cut the sentiment and glued it to the bottom of the card base below the tag. To complete the card, I added "Summer Haze" and "Clear Bubbles" Designer Enamel Dots.


Thank you so much for reading my blog post, you can use my discount code T4TANNALISA10 when you visit the Time For Tea Designs shop to get 10% off your order.


Saturday, 29 October 2022

Halloween Pumpkin Kitty


Happy Friday! DT Annalisa here, I have a cute slimline Halloween card featuring the Trick or Treaters Digital Stamp Collection and Haunted House Clear Stamp Set from Time For Tea Designs.

I used coloured paper from my stash and die-cut them with the Simple Slimline Nesting Dies. I added Shaded Lilac and Dusty Concord Distress Oxide to the edges of the purple paper using my Beautiful Rainbow Blender Brushesand Villainous Potion Distress Oxide splatter with a paintbrush.

 For the grass, I used the Slimline Hillside Scene Dies and added Cracked Pistachio to the edges and Mowed Lawn Distress Oxide splatter. I used liquid glue to adhere these to an 8.5 by 3.5-inch slimline card base.

I printed the digis and stamped the sentiment from the Haunted House Clear Stamp Set. The other stamps I used were  Kitty Capers (cat pointing) Life's Ups & Downs (hedgehog) Warm Winter Wishes (mouse). I coloured everything with my Copics and then added white gel pen accents. 

To cut out the images, I used the coordinating dies for the ones I had and my Brother Scan N Cut SDX125e for the others. To adhere the images to the card, I used liquid glue or double-sided foam tape.

Thank you so much for reading my blog post, you can use my discount code T4TANNALISA10 when you visit the Time For Tea Designs shop to get 10% off your order.


Other Posts You Might Like