Pages

Showing posts with label coffee stains stencil. Show all posts

Friday, 10 April 2026

Coffee Hugs

Happy Friday! DT Annalisa here today, sharing a mixed-media, coffee-themed card I created using several products from Time For Tea Designs. I absolutely love the rich texture achieved with crackle paste and Distress Watercolour Pencils.


To start, I used a palette knife to apply Opaque Distress Crackle Paste through the Coffee Stains 6 x 6" Stencil onto Distress Watercolour paper. Once the paste was completely dry, I added colour using Distress Watercolour Pencils in Seedless Preserves, Stormy Sky, and Ground Espresso. The way the pigment settles into the grooves of the crackle paste creates such a beautiful, dimensional effect.


Next, I used a Crop-A-Dile Corner Chomper to round a 1/4" corner on all four edges of the inked panel. I then adhered the panel to an A2 card base using liquid glue.

For the focal elements, I used the coordinating die set to cut the cups from Pumpkin Spice A4 Printed Cardstock and attached them to the card with 1 mm foam tape for added dimension. The coffee beans and spoon are from the Warm Hugs stamp set; I coloured them with Copic markers, die cut them with the coordinating dies, and finished them with white gel pen accents. These elements were adhered with liquid glue.


Finally, the sentiment is from the Be Kind Be You clear stamp set. I die cut it using the coordinating dies and adhered it with 1 mm double-sided foam tape to complete the card.

Thank you so much for reading my blog post! Don’t forget to use my discount code T4TANNALISA10 when you shop at Time For Tea Designs to receive 10% off your order.


Friday, 17 January 2025

Watercolour Thank you


Happy Friday, everyone, from DT Annalisa! Today, I’d like to share a watercolored thank you card I created using the Pumpkin Spice stamp set from Time For Tea Designs.

To create the background, I started with Ranger's Distress Watercolor Cardstock and used Scorched Timber and Salvaged Patina Distress Watercolor Pencils. I soaked the pencils in water, scribbled them onto acetate, and spritzed the acetate with water. Then, I pressed the acetate onto the watercolour paper repeatedly, heat setting and spritzing it with water as needed.


Once the background was dry, I used a Beautiful Blender Brush to apply Walnut Stain Distress Ink through the Coffee Stains 6 x6" Stencil. I die-cut the panel with a stitched rectangle die and used a paintbrush and my finger to apply translucent Distress Grit Paste to the edges. 

I created an A2 card base using brown cardstock, which I inked with Walnut Stain Distress Ink to match the background. I adhered the background to the card base using double-sided foam tape.

Next, I stamped images from the Pumpkin Spice stamp set onto watercolour cardstock using Versafine Onyx Black ink. I coloured the images with Distress Watercolor Pencils, as I am much more comfortable using Copics, but I am trying to practice with watercolours more this year. Once the images were dry, I die-cut them using their coordinating dies.


For the sentiment, I stamped the word "thanks" using the Bold Sentiments stamp set and die-cut it with the matching die set. I used double-sided foam tape to adhere all the elements (except for the coffee beans) to the card base.

Finally, I added translucent Distress Grit Paste to the whipped cream for dimension to complete the card.

Thank you so much for reading my blog post! Be sure to use my discount code T4TANNALISA10 when you visit the Time For Tea Designs shop to get 10% off your order.
Friday, 10 November 2023

I Love Brew Bookmark


Happy Friday, it is Annalisa here with my Friday project! Fall is a great time to stay in with a cup of tea and a good book, isn't it?! Today, I am sharing a tea-themed bookmark I created using several stamp sets and a stencil from Time For Tea Designs.


Now is a great time to grab the Tearrific Pals stamp set as it is on sale! Check out the 'Retiring Collection' section of the website for some great deals.

I added colour to the 3 1/8 inch by 6 1/4 inch tag (Dina Wakley Media White Tags-#8) by spraying tea-dye Distress Oxide Spray over the Coffee Stains 6 x 6" Stencil. I removed the stencil, sprayed on water (using a Distress Sprayer) and more tea-dye colour, and heat set this using the Tim Holtz Heat It Craft Tool. I find it essential to dry each time you apply colour/spray so you can build up the layers.


Next, I did some ink-smooshing onto the tag with ground espresso Distress Ink and a piece of acetate. For added detail and contrast, I added some splatter with a paintbrush and ink blended extra ink on the edges of the tag.  

I stamped 'I love brew' from The Perfect Blend stamp set with Vintage Sepia VersaFine ink. I then applied Icicle ultra fine embossing powder by Brutus Monroe (clear) and heat set it.

I stamped and coloured (with Copics) several images from Tearrific Pals, and the cup from Coffee Lover and cut them out with their coordinating dies. I added white gel pen accents with a Gelly Roll Pen. I used liquid glue to stick all of the elements to the tag. I tied some twine from Lawn Fawn through the opening in the bookmark to complete this project.

Thank you so much for reading my blog post, be sure to use my discount code T4TANNALISA10 when you visit the Time For Tea Designs shop to get 10% off your order.


Friday, 3 November 2023

Let's Do Coffee


Happy Friday, Annalisa here today. The days are getting shorter, and the temperatures are becoming chilly and as such, I thought it would be fitting to share a warm coffee-themed card. The Pumpkin Spice stamp set from Time For Tea Designs is perfect for this time of year.

I placed the Coffee Stains 6 x 6" stencil onto my glass matt and sprayed it with Tea dye Oxide Spray. I then took watercolour paper and pressed it on the inked stencil with a paper towel for a few moments to ensure the ink sunk in. I then carefully lifted off the stencil and set the panel aside to dry.

Once the panel was dry, I die-cut it with a stitched rectangle from my stash and ink-blended walnut stain and ground espresso Distress Inks with my Beautiful Blender Brush. I stuck this panel to an A2 card base of cream cardstock.

I die-cut vellum with the Landscape Edge Standalone Die to form a wavy shape that I ink-blended with peacock feathers Distress Oxide. I then glued this to the card base. 

I stamped and coloured (with Copics) images from the Pumpkin Spice and Happy New Year Critters stamp sets and cut them out with their coordinating dies. I added white gel pen accents with a Gelly Roll Pen. Next, I used liquid glue to adhere the stamped images to the card base. 

I ink-blended prize ribbon Distress Oxide onto watercolour cardstock and die cut it with the Hey, Hello, Hi Dies. I die-cut the frame into vellum and used it to back the 'hey' sentiment. I stuck the sentiment and frame backer to the card with liquid glue. 

I stamped 'let's do coffee' from The Perfect Blend stamp set to the card base with Versafine Onyx Black. I sprinkled on Alabaster Ultra Fine Embossing Powder and heat set it to complete the card.

Thank you so much for reading my blog post. Remember to use my discount code T4TANNALISA10 when you visit the Time For Tea Designs shop to get 10% off your order.
Friday, 23 September 2022

Coffee First


Hello everyone, DT Annalisa here today. I have a coffee-themed card that I created using stamps, stencils and dies. I love how giant the coffee cup is next to the alligator! I have to thank my niece Tonya for the adorable miniature frappuccino and coffee cup creations seen in this photo - she knows just how much I love Starbucks! 

I ink blended Vintage Photo Distress Oxide ink onto some white cardstock through the Coffee Stains 6 x6" Stencil using my Beautiful Blender Brush. I removed the stencil and ink blended some more to cover the white areas. I then stamped on coffee beans from the Snappy Before Coffee stamp set using the same distress oxide ink. I cut the panel using a 4-inch x 5 1/4-inch stitched rectangle die.


I created a cream A2 card base and ink blended the edges with Simon Says Stamp Khaki Ink. I used Anthony's Alpha Dies to cut out the letters for 'Coffee' three times and ink blended the edges with the same ink. 

I stamped the alligator from the Snappy Before Coffee stamp set and cut it out with the coordinating die set after colouring it with my Copics. The large coffee cup is from Coffee Lover - I also used the coordinating die set to cut it out. I added some white gel pen accents with a Gelly Roll Pen.


I assembled the card by using liquid glue to adhere the stencilled panel to the card base. I used foam tape to adhere the alligator, coffee cup and sentiment to the card. I used liquid glue for the letters. I threw caution to the wind and put them on NOT STRAIGHT! As a perfectionist, this was HARD but I like how it turned out. 

Thank you so much for reading my blog post, you can use my discount code T4TANNALISA10 when you visit the Time For Tea Designs shop to get 10% off your order.


Thursday, 6 January 2022

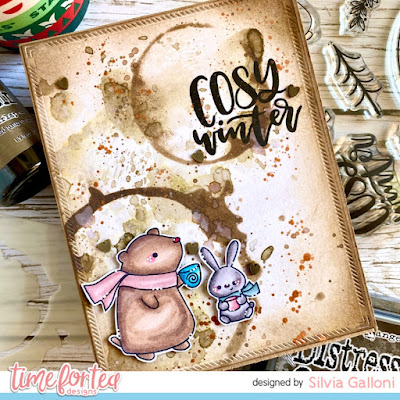
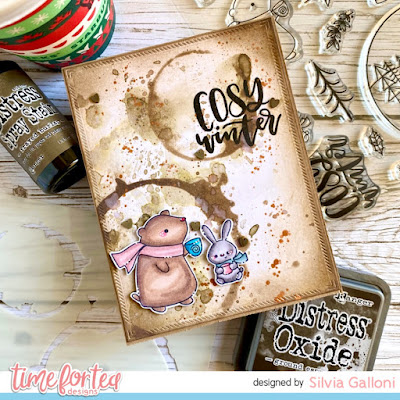
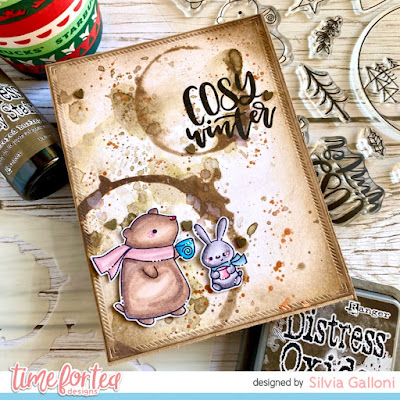
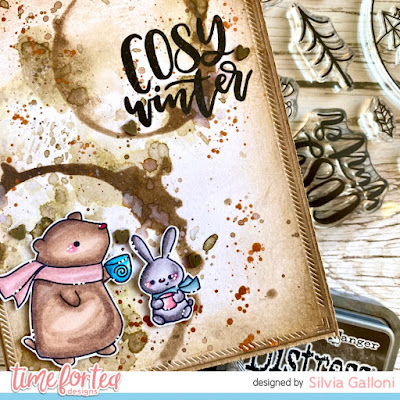
Cosy Winter


 Hello Tea Timers and happy New Year!!!! Silvia’s here with you today with a cute card!


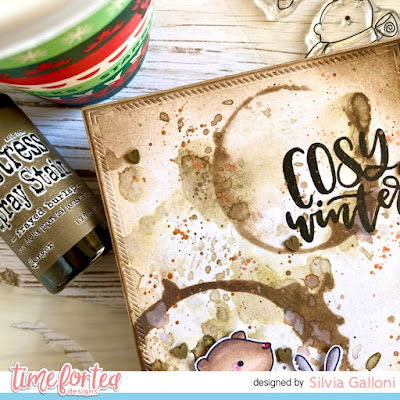
I started cutting a 5,5"x4,25" panel from white cardstock and I created some stais on it with frayed burlap Distress spray stain. I then create a texture on it ink blending some ground espresso Distress Oxide ink through one of my favorite stencil, the one called "Coffee Stains".


I then splattered with clean water, brown ink and white and bronze acrylic paint.


I stamped images from the "Cosy Winter" stamp set, I colored them with Spectrum Noir alcohol markers and I cut them out with coordinating dies. I put everything together with foam tape, I stamped a sentiment from the same stamp set and that's all.


Thursday, 23 September 2021

Coffee Duo

Hello Tea Timers, DT Kitty here with my latest card. For this card I decided to go with a coffee theme - a very popular one at the moment in crafting! I used lots of the new release products and had so much fun creating this one...


I started by creating my simple background first. I blended a little Gathered Twigs & Tea Die Distress Oxide in the centre of the card. I then used the Coffee Stains Stencil and more ink to create the rings. I also added some splats of water and brown ink. I used the Coffee Lover Stamp & Die Set to create the images and sentiments. I coloured all the images with Copic Pens and fixed them all onto the card with foam pads for some extra dimension.


Thank you ever so much for stopping by today. Don't forget you can use my code T4TKITTY10 to get 10% off your next order over on the Time For Tea Designs Shop.

Kitty xx

Thursday, 16 September 2021

Coffee first then I do the things

Hello Tea Timers!!! Silvia's here with you today and  I'm so excited about our latest release....it's soooooo adorable, isn't it?!

I'm totally in love with the new amazing  coffee stencils and today I'd like to share with you a cute background I made with the "Coffee Stains" one.

I started cutting a 5,5"x 4,24" panel from kraft cardstock and I ink blended some tea dye, vintage photo and ground espresso Distress Oxide inks through the stencil in a random way.


I also added some heat embossed stains with vintage photo Distress embossing glaze because I love the translucent effect of this powder. I spalttered with water, brown inks and white and gold acrylic paints loosened with water.


Next I stamped two coffee cups from the "Coffee Lover" stamp set, I colored them with Spectrum Noir alcohol markers, I added a white embossed heart on them and I cut them with coordinating dies.


I put everything together, I added an embossed sentiment and that's all.


Thank you so much for stopping by today and don't forget that you can get a 10% off your Time 4 Tea order with the code T4TSILVIA10.

I wish you an amazing day. Hugs, Silvia.

Other Posts You Might Like