Pages

Showing posts with label Hey Hello Hi Dies. Show all posts

Monday, 22 September 2025

Hey

Hi. Design team member Koren Wiskman here. I hope that I can inspire you to create something fun with all of these awesome T4TD supplies. Today, I am using the Hey, Hi, Hello Die Set as well as both the Fruitiful Friends Stamp Set and the Squeeze the Day Stamp Set to create this project. 

The card size is A2 (4.25in x5.5in.) The front panel is cut to 3.25in x 4.75in. This is my favorite size card to create. I have tried so many others but this size is the one that keeps my heart happy. My card bases are typically made using a neutral gray cardstock. These two details about my cards rarely change. 

Background

I started by stamping some of the images from both the Time for Tea Designs Fruitiful Friends Stamp Set and the Squeeze the Day Stamp Set onto the white background panel. I focused on stamping the images toward the bottom third of the panel because I knew that I was going to be layering additional panels on top of it. They images are stamped with black pigment ink. If you wanted to add a bit more shine to your card, you could also heat emboss them with clear embossing powder. I DID NOT take that extra step. I was happy with the black and white contrast. 

The pink layer is simply a hot pink cardstock ripped to give it an imperfect textured element to the card, with a pop of color. I popped this layer up using foam tape. 

The top layer is heavyweight white card stock cut long enough to show enough of the pink panel and also give a nice place for my sentiment to live. I was NOT measuring much on any of these layers. I was winging it. This panel is also popped up with foam tape. 

Sentiment

The sentiment on this card is cut from the T4TD Hey, Hi, Hello Die Set. The shadow layer is black cardstock and the "hey" is cut from heavyweight white cardstock and layered four times using liquid adhesive. I then used the same liquid adhesive to stick it to the top panel. 

I hope that I've inspired you to create something today. Check out the Hey, Hi, Hello Die Set as well as the Fruitiful Friends and Squeeze the Day Stamp Sets over in the T4TD shop. 

KOREN

Monday, 15 September 2025

Not Another Vintage Phone Card

Hi. Design team member Koren Wiskman here. I hope that I can inspire you to create something fun with all of these awesome T4TD supplies. I had to make more phone cards, I love it and I have more planned. Today I am using the Hey, Hello, Hi Dies as well as the Let's Chat Stamp Set and Coordinating Dies to create this project. 

The card size is A2 (4.25in x5.5in.) The front panel is cut to 3.25in x 4.75in. This is my favorite size card to create. I have tried so many others but this size is the one that keeps my heart happy. My card bases are typically made using a neutral gray cardstock. These two details about my cards rarely change. 

Background

Today's background is actually just a piece of patterned paper cut down to about 3 x 4 3/4 inches and then a added some fringe to make the panel 3 1/2 x 4 3/4 with the 1/2 inch fringe added. This panel was put onto the card base using craft foam and tear tape adhesive. 

Focal Image

The only image on the card that isn't patterned paper is from the Time for Tea Designs Let's Chat Stamp Set. I love this phone. I used coordinating dark green cardstock. I heat embossed it using clear sticky ink and white embossing powder. Once heated and completely cooled I used the Let's Chat Coordinating Dies to cut out the phone image. 

Sentiment

I used the T4TD Hey, Hello, Hi Dies to cut out the "hello" using both the hello die from the set and it's shadow. The "hello" was cut out of patterned paper that I thought coordinated well with the background. The shadow was cut from a coordinating piece of mustard cardstock. The sub-sentiment "i'm only a phone call away" is also from the Let's Chat Stamp Set. I also heat embossed this onto coordinating dark blue cardstock. The coordinating dies for this set are so fun because it comes with sentiment dies. 

Embellishments

To add to the fun, I added a pink and white speech bubble from my scrapbooking stash. The phone cord was made using dark green twine and liquid adhesive. I coated the twine in adhesive and wrapped it around a thin plastic micro-brush. Once dry, it was curled like the phone cords of old. I used large glue dots to adhere the phone cord. Everything else was popped up using foam squares. 

I hope that I've inspired you to create something today. Check out the Hey, Hello, Hi Dies as well as the Let's Chat Stamp Set and Coordinating Dies in the T4TD shop


KOREN

Friday, 1 November 2024

Caffeinated Hugs


DT Annalisa here, happy first day of November! The days are getting cooler and shorter, and many of us need caffeine to help keep us energized. For me, an afternoon cappuccino does the trick!

I created a card using the Stitched Quilted Cover Die to die-cut teal cardstock. I then inked it with Peacock Feathers Distress Oxide using my Beautiful Blender Brush and adhered it to a card base with double-sided tape.


Next, I ink-blended another piece of teal cardstock and used the Hey, Hello, Hi Dies to die-cut the word “hi.” I also die-cut “hi” from black cardstock and glued the two pieces together, slightly offset, to create a shadow effect.

After that, I die-cut some Distress White Heavy Cardstock by Ranger using the Sweet Scalloped Dies. I applied tea dye through the  Coffee Beans 6 x6" stencil, and after removing the stencil, I used the leftover ink on my brush to fill in the white areas of the cardstock. I then ink-blended the edges with Vintage Photo Distress Oxide and added a spritz of Tea Dye Distress Oxide spray.

I used double-sided tape to attach the coffee bean panel to the card base and applied liquid glue to secure the letters "hi" to the card.

Next, I stamped and coloured several images from the Warm Hugs set with Copics, then cut them out using their coordinating dies. I added white gel pen accents with a Gelly Roll Pen. Additionally, I stamped the sentiment "sending warm hugs in a mug" and die-cut it using its corresponding die. I adhered the images to the card base using either liquid glue or double-sided foam tape for added dimension.


I added three Designer Enamel Dots from the Summer Haze collection to complete the card.

Thank you so much for reading my blog post! Be sure to use my discount code T4TANNALISA10 when you shop at Time For Tea Designs to get 10% off your order.

Wednesday, 19 June 2024

Hello hearts

Hey there Tea-timers...

DT Ashlee here with some new weekly inspiration featuring Time for Tea designs products of course! 


To create this card I started with a pink card stock base and added some cute hearts using the Scattered hearts stencil and pink ink partially over the base....


I then die cut the Hello sentiment from the Hey, hello hi die set from glitter card stock and adhered it to the card base with foam tape so it added some dimension to the card. I then stamped the thank you sentiment from the Simple sentiments stamp set using black ink directly under the focal sentiment and finished off the card with a touch of pretty sequins!

I hope you like this sweet pink card with a touch of sparkle I made for today. Thankyou for stopping by and happy crafting. Hugs Ashlee. 

Wednesday, 24 April 2024

hello....

Hey there Tea-timers...

DT Ashlee here with some clean and simple inspiration for you this week.  

I used these Time for Tea designs products :

- Hey, Hello, Hi dies

- Flirty flowers cover die


To create this card I started with a white card base. I then die cut the cover plate from white card stock also and adhered that to the card base. I then die cut the two sentiments Hi and Hello before adhering those to the card base with foam tape giving the card some dimension. 


The card was completed with a touch of pretty sequins adhered with glue dots (these are so good for adhering sequins). 

That's all for my card today, a nice easy one to mass produce for lots of hello cards!

Until next post, happy crafting. Hugs Ashlee.

Wednesday, 13 March 2024

Hi, hello

Hello Tea-timers...

DT Ashlee here with you today sharing some new Time for Tea designs inspiration to get your crafty mojo rolling! 

This card uses one die set along with one sentiment stamp. An easy but nice CAS card. The die I used is the Hey, Hello, Hi set and the sentiment is from the Simple sentiments clear stamp set.

I started by cutting a pink card base for my card which I then placed and die cut the shadows to both of the hi, hello sentiment. I then backed this with a black piece of card where I went on to die cutting the wording 4 times per word. These were all glued together to create a raised sentiment effect on the card!


Using the sentiment stamp I stamped that directly onto the card base with black ink before completing the card with a touchy of pretty sequins adhered with micro glue dots. An easy but sweet card to send to someone with a little note inside.


That's my card for today, I hope you like it. Until next post happy crafting, hugs Ashlee.

Wednesday, 17 January 2024

I wish I could make it better....

 Hey there tea-timer friends...

DT Ashlee here with a clean and simple card design for this week which is perfect when you only have a small amount of time to get a card made!


I used these Time for Tea designs products for this card....

- Hey, Hello, Hi dies

- Simple sentiments clear stamp set


To create this card I started with a peach coloured card stock cut to my card base size. I then used the shadow of the hello die to die cut the space for the sentiment. Once the sentiment shadow was die cut I adhered a white card base in place with liquid glue. 

I stamped the sentiment "I wish I could make it better" directly onto the card with Memento tuxedo black ink beneath the shadow cut. 

Using black card I die cut the hello word piece four times so I could glue them all together making the sentiment pop up from the card base giving it some dimension. To complete the card a tiny touch of sequins and it was all done!

I'm really happy with how this easy design turned out, I think I will definitely be re-creating it with different sentiment. 

Until next post happy crafting, hugs Ashlee. 


Wednesday, 27 December 2023

Hello, hello....

 Hello there Tea-timers...

Today I'm sharing a hello card that I made using die's from Time for Tea designs with a touch of pretty sequins!


T4T products used :

To create this card I started by die cutting the flirty flowers cover die from a teal blue cardstock. I then backed the die cut piece with black card stock to fill in the open portions. 

Using the hello die I die cut it three times from yellow card and three times from black card before adhering together with liquid glue and adhering to the card base with foam tape to add dimension.


To complete the card I added a touch of pretty yellow sequins adhered with micro glue dots (I love these things, they are perfect for sequins!).

I hope you enjoyed my die cut card, I love just using dies on my creations sometimes when I might not be feeling like colouring. 

Happy crafting friends, hugs Ashlee.

Wednesday, 22 November 2023

Hello, hey star

Hello there Tea-timers...

It's DT Ashlee here with my weekly Time for Tea designs inspiration and this one is set for a STAR!


I used theses T4T products for this one :


To create this card I started with a glitter card base. I then die cut the stitched stars cover from yellow card stock, added a bit of yellow ink blending with Wild Honey distress oxide ink around the edges and gave it a slight splatter with black paint. This was then adhered onto the glitter card base using foam tape to pop it up. 

I die cut the sentiments hello and hey from black and blue card stock before adhering to the card base also with foam tape and completing the card with a touch of pretty yellow sequins!!

This card is ready to sparkle and shine just like the recipient...

Happy crafting, till next post hugs Ashlee.

Friday, 3 November 2023

Let's Do Coffee


Happy Friday, Annalisa here today. The days are getting shorter, and the temperatures are becoming chilly and as such, I thought it would be fitting to share a warm coffee-themed card. The Pumpkin Spice stamp set from Time For Tea Designs is perfect for this time of year.

I placed the Coffee Stains 6 x 6" stencil onto my glass matt and sprayed it with Tea dye Oxide Spray. I then took watercolour paper and pressed it on the inked stencil with a paper towel for a few moments to ensure the ink sunk in. I then carefully lifted off the stencil and set the panel aside to dry.

Once the panel was dry, I die-cut it with a stitched rectangle from my stash and ink-blended walnut stain and ground espresso Distress Inks with my Beautiful Blender Brush. I stuck this panel to an A2 card base of cream cardstock.

I die-cut vellum with the Landscape Edge Standalone Die to form a wavy shape that I ink-blended with peacock feathers Distress Oxide. I then glued this to the card base. 

I stamped and coloured (with Copics) images from the Pumpkin Spice and Happy New Year Critters stamp sets and cut them out with their coordinating dies. I added white gel pen accents with a Gelly Roll Pen. Next, I used liquid glue to adhere the stamped images to the card base. 

I ink-blended prize ribbon Distress Oxide onto watercolour cardstock and die cut it with the Hey, Hello, Hi Dies. I die-cut the frame into vellum and used it to back the 'hey' sentiment. I stuck the sentiment and frame backer to the card with liquid glue. 

I stamped 'let's do coffee' from The Perfect Blend stamp set to the card base with Versafine Onyx Black. I sprinkled on Alabaster Ultra Fine Embossing Powder and heat set it to complete the card.

Thank you so much for reading my blog post. Remember to use my discount code T4TANNALISA10 when you visit the Time For Tea Designs shop to get 10% off your order.

Friday, 22 September 2023

Hey, Congrats


 Happy Friday, DT Annalisa here! The first day of Fall, or autumnal equinox, arrives tomorrow, so I am sharing a card with a fall feel. It features the Birthday Fox clear stamp set from Time For Tea Designs.

For the background, I ink-blended tumbled glass and salty ocean Distress Oxides with my Beautiful Blender Brush onto Distress White Heavy cardstock by Ranger. Using a paintbrush, I added splatters of water and uncharted mariner Distress Oxide. For the grass, I ink-blended twisted citron, mowed lawn Distress Oxides and added water splatters. 

I die-cut the grass with the Slimline Hillside Scene Dies and stuck this to the sky panel with liquid glue. I then added this panel to an A2 card base.

I stamped and coloured (with Copics) the foxes from the Birthday Fox clear stamp set and cut them out with my Brother Scan N Cut SDX125e. I added white gel pen accents with a Gelly Roll Pen. I did the same process with the leaves from Jumping With Joy and Bee and Butterfly from I Really Dig You.

I used liquid glue to stick the leaves to the card and double-sided foam tape for the rest of the critters. 

The hey letters were die cut from black cardstock using the Hey, Hello, Hi Dies. I die cut vellum using the word shadow die in this set. I used liquid glue to adhere the letters to the shadow area and then behind the letters and stuck this to the sky area on the card. 

I stamped congrats from the You’re Engaged stamp set with VersaMark ink and heat embossed using white Ultra Fine Embossing Powder by Brutus Monroe. I die-cut the sentiment using the coordinating die set. I used liquid glue to stick the congrats to the bottom of the card. 

Thank you so much for reading my blog post. Remember to use my discount code T4TANNALISA10 when you visit the Time For Tea Designs shop to get 10% off your order.

Wednesday, 21 June 2023

I'm here for you

 Hey there Tea-timer friends...

It's DT Ashlee here and today I've got some simple easy to re create inspiration for you that would be perfect if you need to mass produce some cards!


I used these Time for Tea designs products :

- Pawsome dies

 - Hey, Hello, Hi dies

- Simple sentiments stamp set

- T4T Enamel dots clear bubbles


To create this card I started with a teal blue card stock base that I die cut the largest pawsome die paw from and then in laid the pieces back in. (The in lay pieces were die cut from a light grey card stock). 

I stamped a sentiment directly onto the card stock base from the simple sentiments set. This was a sub sentiment for the large hi die cut that I added just above the stamped sentiment and then completed it all with two clear bubble enamel dots!

A simple but sweet card that's easy to re-create. May be you might want to case this one and create a batch of cards too...


Thanks for stopping by T4T today, I hope you feel inspired by my card. Happy crafting, hugs Ashlee.

Wednesday, 7 June 2023

Hey, I'm sorry!

Hey there Tea-timer friends...

DT Ashlee here with some new Time for Tea designs inspiration for you and this one is a sorry card for someone that needs a little paper hug!


To create this card I started with a light grey card stock base that I die cut two Pawsome paws from. I then backed the card base with a darker grey card stock so that it peeked through the die cut paws....

I added a die cut hey sentiment from the Hey, Hello, Hi set and a sub sentiment at the top then I put one little sequin touch!


I coloured up a kitty from the Oops a daisy stamp set, cut it out and then adhered to the card using foam tape. This completed the card!


I really hope you like this sorry themed card, thanks for stopping by today. Until next post, happy crafting. Hugs Ashlee. 


(You can use my discount code T4TASHLEE10 for discount off your order at the T4T store)

Wednesday, 15 March 2023

There's a bear in the wood's

Hey there Tea-timer friends...

It's DT Ashlee here today and I've got a card to share featuring the Happy trails set from Time for tea designs!!


I wanted to create a scene of a bear lost in the woods so I used a couple dies from T4T to set the scene...
- Hey, Hello, Hi (for the large focal sentiment)


I started with a blue cardstock base that I added some slight blue inking to for depth to the sky. I then used green cardstock and added ink blending and splatters to it so that I could die cut the tree top (I used one of the ocean wave dies) and then a strip for the grass. Using a piece of brown cardstock I added brown ink blending and splatters and then die cut a bunch of trees trunks...

I adhered all the trunks to the sky base using liquid glue and then adhered the tree top and grass with foam tape. The hey sentiment was adhered into the tree top and to add a sub sentiment I stamped the I'd be lost without you on light brown card and added it to the grass. 


I stamped, coloured and die cut all the images before arranging my little woods scene before completing the card with a touch of sequins!!

(All images were coloured using Spectrum noir tri-blend markers)


I hope you enjoyed today's card, I certainly had lots of fun making it...
Happy crafting, hugs Ashlee. 

Wednesday, 28 December 2022

Hey, Hello, Hi it's a rainbow!

 Hey there Tea-timer friends...

I hope you have all been having a fantastic Christmas time. I have been absolutely loving it, its definitely one of my most favourite times of the year! 

I thought I would change things up from Christmas cards for today and share a Hello greeting card...


This card uses these Time for Tea designs products :


To create this card I started bu selecting a piece of rainbow paper and die cutting it from the hooray cover plate. I then die cut all the shadows for the sentiments from black cardstock before die cutting the tops of the sentiments from different coloured card. The sentiment and the shadow were adhered together using liquid glue and then popped onto the card base with foam tape adding dimension. To complete the card I added clear bubbles enamel dots. 

I love how bright and cheerful this card is, perfect for a happy hello to a friend!!

Thanks for checking out today's card, I hope it inspired you to use a rainbow of colour on your next creation.

Happy holidays everyone, hugs Ashlee. 

Friday, 25 November 2022

Floating By to say Hey


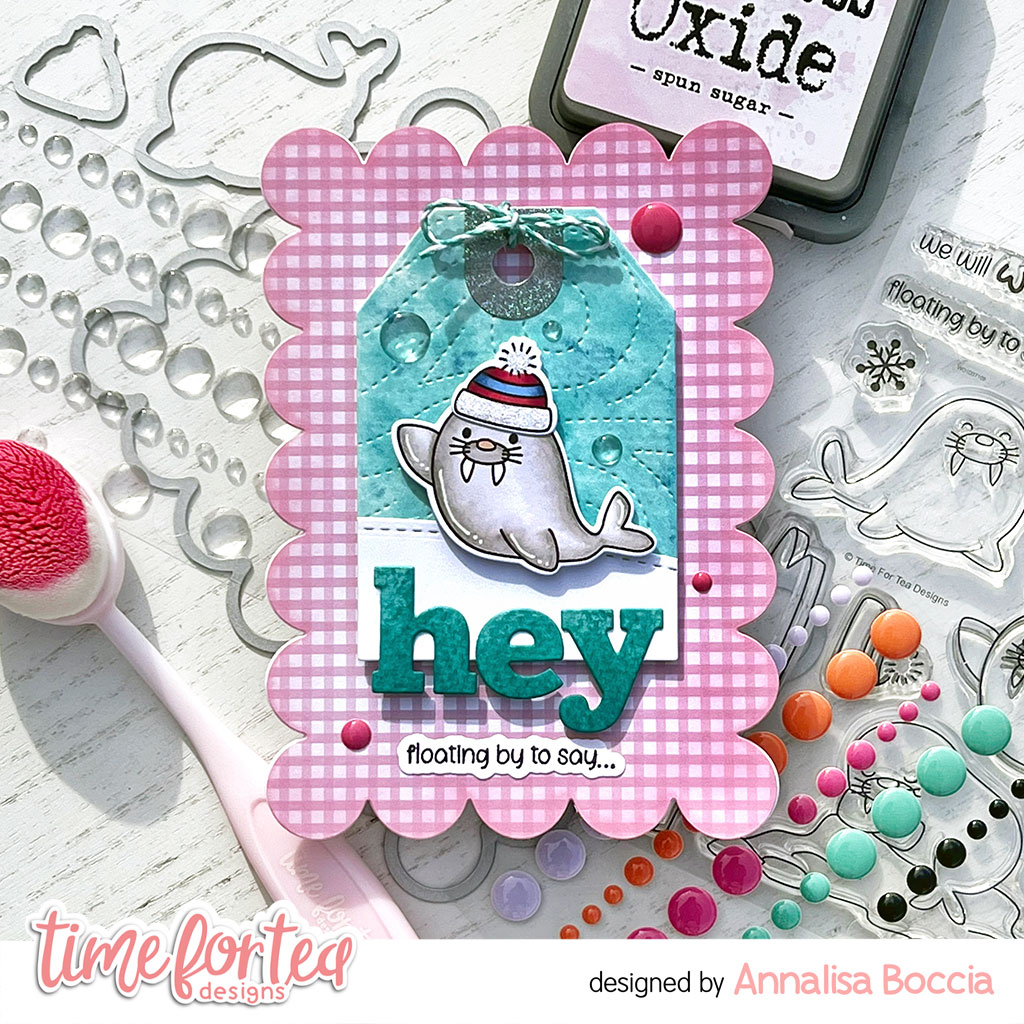
Hello and happy Friday. DT Annalisa here sharing a fun scalloped card featuring the new Walrus Be Friends stamp set by Time For Tea Designs. I love how the Walrus is waving hello.

To start, I die-cut a piece of Gorgeous Gingham 6x6' Paper Pad with the Large Scallop Celebrate Frame Dies. I ink-blended Spun Sugar Distress Oxide ink to the sides of the paper with my Beautiful Blender Brush. I then adhered this to a card base that I created using the same die. 


I sprayed Distress Mica Stain in Shiny Bauble onto watercolour paper. I love the shine mica stain has. Once it was dry, I die-cut it first with the Snow Flurry Cover Die and then with the tag die found in the Memory Keeping Essential Dies. I also used some of this paper to die-cut the hey sentiment from the Hey, Hello, Hi Dies. I ink blended on Peacock Feathers Distress Ink to the letters to darken them up. 

I cut some white card stock with the Slimline Hillside Scene Dies to create a snowy hill for the Walrus to sit on. I cut it again with the tag die and then glued it on top of the tag. I glued the 'hey' to the base of the tag with liquid glue. I tied a bow onto the tag with some Lawn Fawn teal Lawn Trimmings. 


I stamped the seal and hat from the Walrus Be Friends and coloured them with my Copic markers. I die-cut them with the coordinating dies and added some white gel pen accents. I used liquid glue to adhere the hat to the Walrus and then used double-sided foam tape to stick them to the tag. I then added double-sided foam tape to the back of the tag and placed it on the scalloped card base. 

I stamped and die-cut the sentiment and glued it to the bottom of the card base below the tag. To complete the card, I added "Summer Haze" and "Clear Bubbles" Designer Enamel Dots.


Thank you so much for reading my blog post, you can use my discount code T4TANNALISA10 when you visit the Time For Tea Designs shop to get 10% off your order.


Thursday, 27 October 2022

Sending You Virtual Hugs!

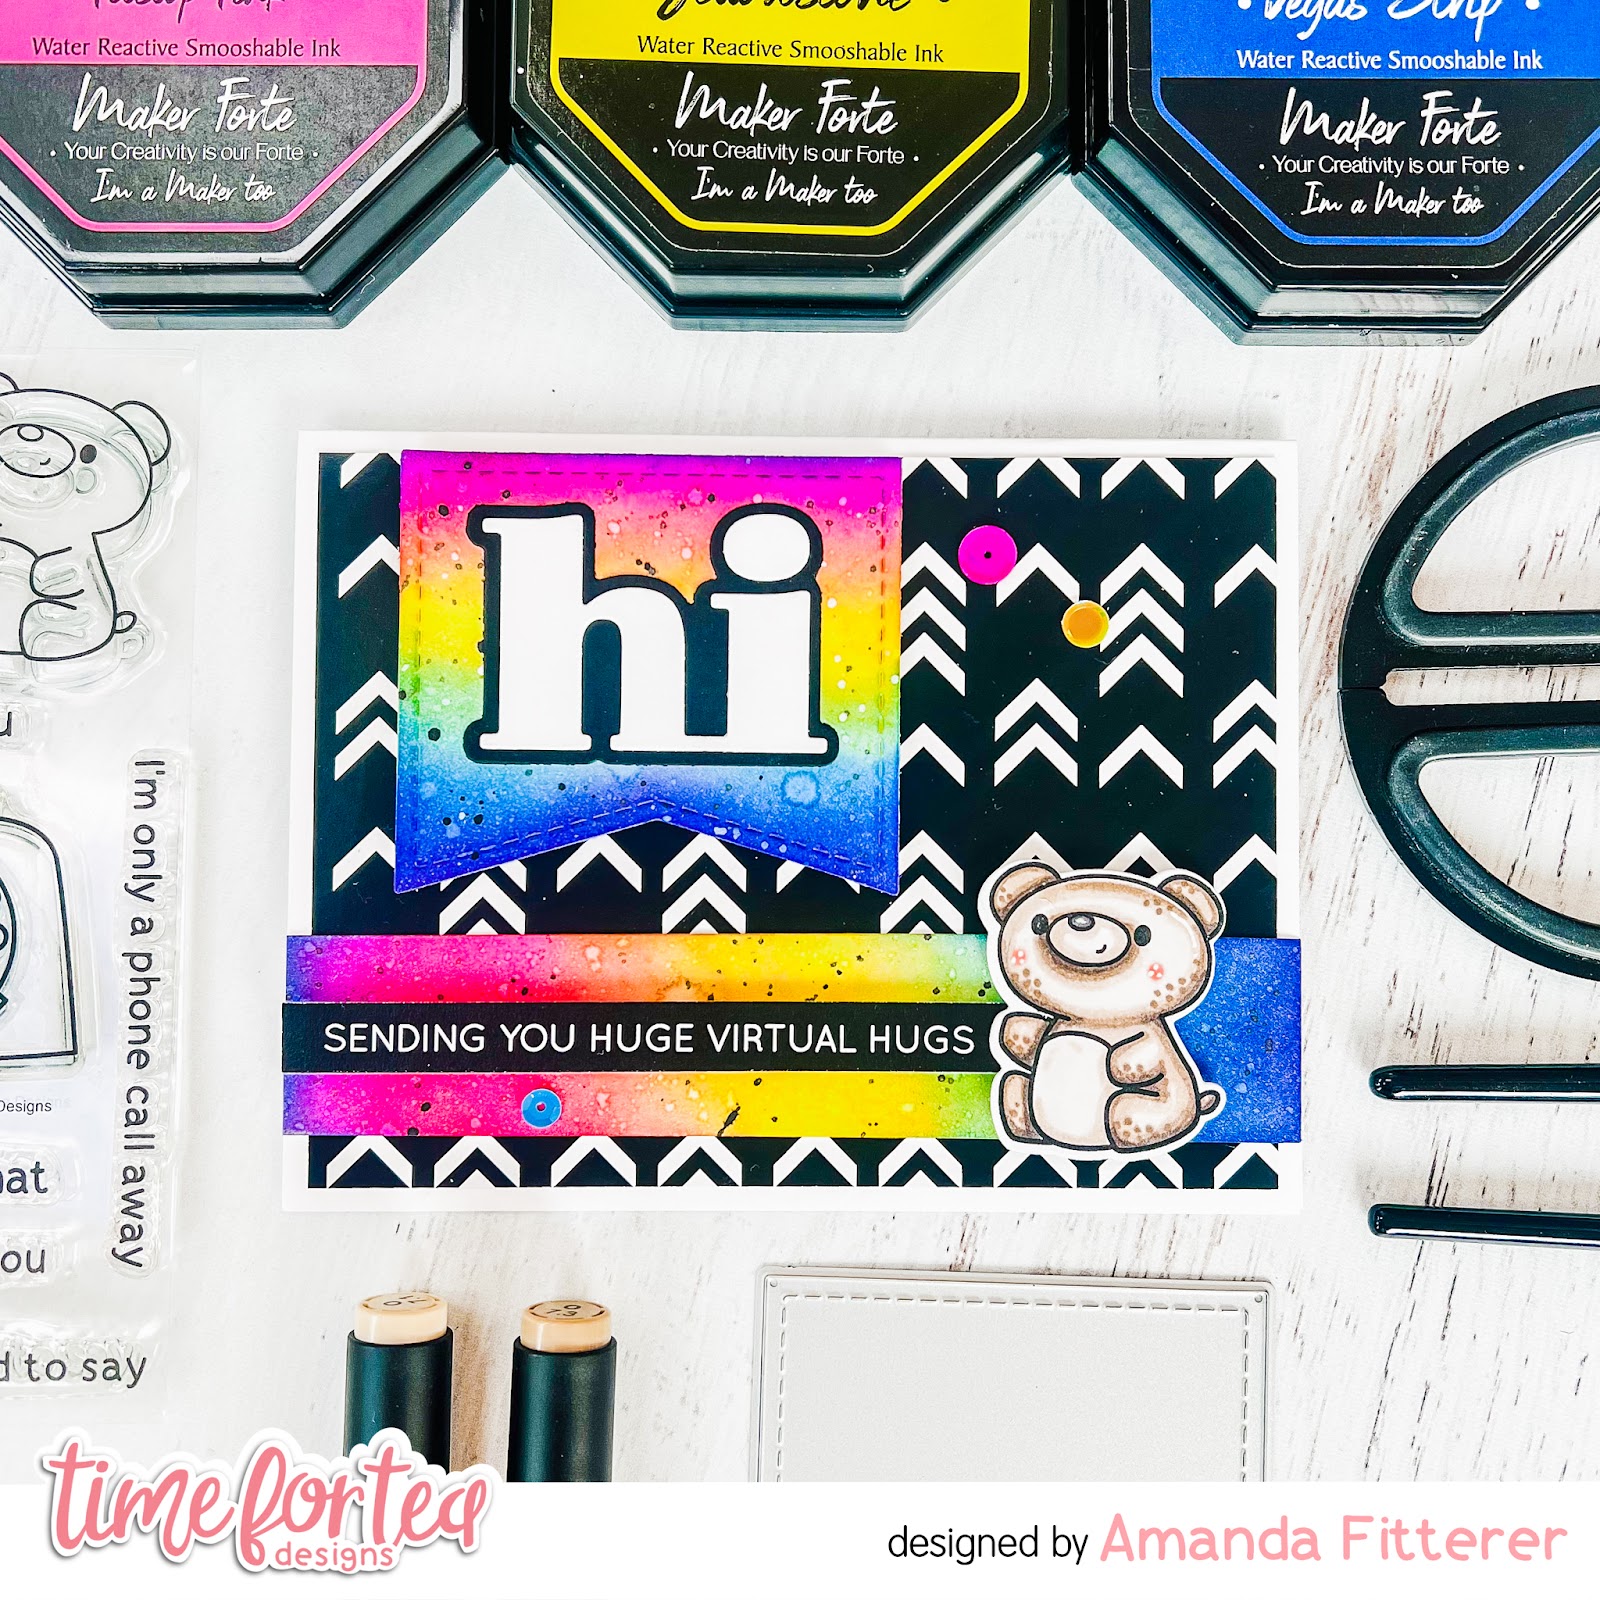
Happy Thursday, Tea Timers!  It's Amanda here!  I'm sharing this very happy card today!  I love creating cards that have bright contrast and bright colors - especially when they're rainbow!


To create this card, I stamped my cutie from the Let's Chat Stamp Set and then colored him with OLO markers.
 For my "hi", I used the Hey, Hello, Hi Dies.  The rainbow flag behind it is from the It's Your Day Sentiment Dies.  The other sentiment strip if from the Brighter Days Sentiment Cards.

One of my favorite rainbow ink blends is the one I created on this card!  It's a blend of Pitstop Pink, Yellowstone, and Vegas Strip Color Hive Inks.  I also spritzed my ink blend with water and created some black splatters with black paint.

Thank you so much for stopping by the blog today!  I hope you're feeling inspired by this post!  Come back next week for another happy card!
Xx, Amanda


Other Posts You Might Like