Pages

Showing posts with label The Perfect Blend Stamp Set. Show all posts

Friday, 10 November 2023

I Love Brew Bookmark


Happy Friday, it is Annalisa here with my Friday project! Fall is a great time to stay in with a cup of tea and a good book, isn't it?! Today, I am sharing a tea-themed bookmark I created using several stamp sets and a stencil from Time For Tea Designs.


Now is a great time to grab the Tearrific Pals stamp set as it is on sale! Check out the 'Retiring Collection' section of the website for some great deals.

I added colour to the 3 1/8 inch by 6 1/4 inch tag (Dina Wakley Media White Tags-#8) by spraying tea-dye Distress Oxide Spray over the Coffee Stains 6 x 6" Stencil. I removed the stencil, sprayed on water (using a Distress Sprayer) and more tea-dye colour, and heat set this using the Tim Holtz Heat It Craft Tool. I find it essential to dry each time you apply colour/spray so you can build up the layers.


Next, I did some ink-smooshing onto the tag with ground espresso Distress Ink and a piece of acetate. For added detail and contrast, I added some splatter with a paintbrush and ink blended extra ink on the edges of the tag.  

I stamped 'I love brew' from The Perfect Blend stamp set with Vintage Sepia VersaFine ink. I then applied Icicle ultra fine embossing powder by Brutus Monroe (clear) and heat set it.

I stamped and coloured (with Copics) several images from Tearrific Pals, and the cup from Coffee Lover and cut them out with their coordinating dies. I added white gel pen accents with a Gelly Roll Pen. I used liquid glue to stick all of the elements to the tag. I tied some twine from Lawn Fawn through the opening in the bookmark to complete this project.

Thank you so much for reading my blog post, be sure to use my discount code T4TANNALISA10 when you visit the Time For Tea Designs shop to get 10% off your order.


Friday, 3 November 2023

Let's Do Coffee


Happy Friday, Annalisa here today. The days are getting shorter, and the temperatures are becoming chilly and as such, I thought it would be fitting to share a warm coffee-themed card. The Pumpkin Spice stamp set from Time For Tea Designs is perfect for this time of year.

I placed the Coffee Stains 6 x 6" stencil onto my glass matt and sprayed it with Tea dye Oxide Spray. I then took watercolour paper and pressed it on the inked stencil with a paper towel for a few moments to ensure the ink sunk in. I then carefully lifted off the stencil and set the panel aside to dry.

Once the panel was dry, I die-cut it with a stitched rectangle from my stash and ink-blended walnut stain and ground espresso Distress Inks with my Beautiful Blender Brush. I stuck this panel to an A2 card base of cream cardstock.

I die-cut vellum with the Landscape Edge Standalone Die to form a wavy shape that I ink-blended with peacock feathers Distress Oxide. I then glued this to the card base. 

I stamped and coloured (with Copics) images from the Pumpkin Spice and Happy New Year Critters stamp sets and cut them out with their coordinating dies. I added white gel pen accents with a Gelly Roll Pen. Next, I used liquid glue to adhere the stamped images to the card base. 

I ink-blended prize ribbon Distress Oxide onto watercolour cardstock and die cut it with the Hey, Hello, Hi Dies. I die-cut the frame into vellum and used it to back the 'hey' sentiment. I stuck the sentiment and frame backer to the card with liquid glue. 

I stamped 'let's do coffee' from The Perfect Blend stamp set to the card base with Versafine Onyx Black. I sprinkled on Alabaster Ultra Fine Embossing Powder and heat set it to complete the card.

Thank you so much for reading my blog post. Remember to use my discount code T4TANNALISA10 when you visit the Time For Tea Designs shop to get 10% off your order.

Thursday, 9 March 2023

You, Me and a Cup of Tea


Hello, Tea Timers!  It's Amanda here!  Today, I am sharing this card I made using the Pumpkin Spice Stamp Set with a sentiment from the Perfect Blend Stamp Set!

This card is a perfect BLEND of simplicity and elegance!  I love how versatile the layout is and how you could use it for a masculine or feminine card!

I used an acrylic block to first stamp out the tea cups.  I always start in the middle and then work my way to the outside.  Next, I swapped out the tea with the beans and stamped those in between the mugs.  I colored them in with OLO alcohol markers.

For the sentiment, I stamped it on black cardstock with glue ink.  Then, I sprinkled some white embossing powder on it and melted it with my heat tool.

I hope you make some time to get crafty today, friends!!  'Til next week!!  Xx, Amanda


Thursday, 2 March 2023

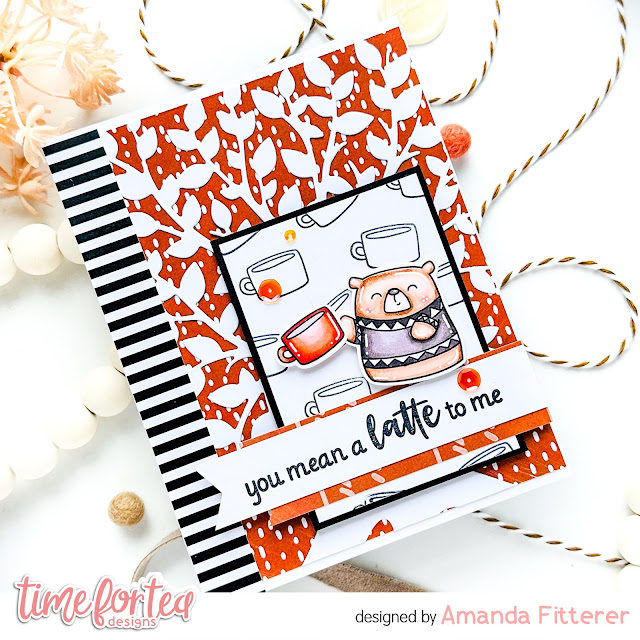
You Mean a LATTE to Me


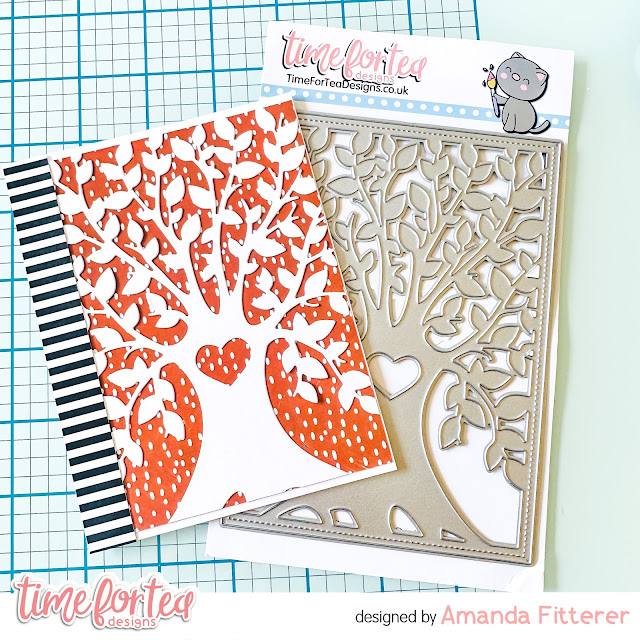
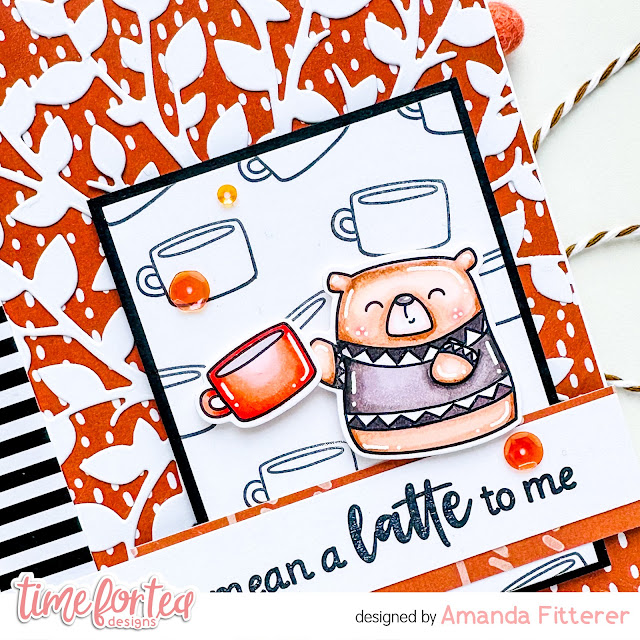
Hello, Tea Timers!  I'm excited to be here today to share this gorgeous card with you!  I created this card by cutting out the Tree of Love Cover Die in white cardstock.  I adhered some patterned paper directly onto my A2 card base using liquid glue.  Then, I used my Bearly Arts precision glue to adhere my tree.

Next,  I stamped my images from the Happy Trails Stamp Set.  Once colored with alcohol markers, I cut them out using the coordinating die set.  I also trimmed a small white panel down and stamped the mugs directly onto it, evenly spacing them out, using a small acrylic block.


I trimmed down a piece of black cardstock that was just .25" bigger than my white panel.  I glued my white panel to the black panel.  I propped that up onto my card base using strips of 3D foam tape.


I trimmed down another piece of patterned paper and glued that to my white panel.  I grabbed my sentiment from the Perfect Blend Stamp Set and stamped that onto a piece of white cardstock in black ink.  I trimmed that down with my scissors and created a little flag/banner at the end.  I glued that onto my patterned strip.

The last thing to do is add on my stamped images with 3D foam squares and glue a few sequins down!


I hope you enjoyed this card and are feeling inspired by my post!  Have fun getting crafty today or whenever you can!  Xx, Amanda


Friday, 10 February 2023

I Love Brew Kitty


Happy Friday, since February 14th is only a few days away, I am sharing a clean and simple Valentine's Day card that would be purr-fect for a tea lover. 

I used the following Time For Tea Designs products to create this card:


I started with an A2 card base, the Large Square masking stencil and the Scattered Hearts Stencil. I placed the Square masking stencil down and then put the Scattered Hearts Stencil on top of this. I used the strong magnets of the Wendy Vecchi 7-inch Make Art Station to ensure the stencils didn't move while I was inking up my card. I used Peacock Feathers, Picked Rasberry and Squeezed Lemonade Distress Inks and my Beautiful Rainbow Blender Brushes to apply ink. 

I stamped the kitty in the tea mug (Tearrific Pals) and the butterfly (Be Slothy), coloured them with my Copics and cut them out with their coordinating dies. I added some white gel pen accents.

I used liquid glue to adhere the butterfly and double-sided tape for the kitty in a cup. I stamped the 'i love BREW' sentiment from The Perfect Blend onto the card base. 


When you die-cut the Flirty Flowers cover die, a lot of tiny hearts remain that could be considered waste but I keep them in a small container for projects just like this! I coloured three of the tiny hearts Copics and used liquid glue to adhere them to the card.

Thank you so much for reading my blog post, you can use my discount code T4TANNALISA10 when you visit the Time For Tea Designs shop to get 10% off your order.

Friday, 27 January 2023

Love You Lots Penguins


Happy Friday, everyone! Have you enjoyed Time For Tea Designs' Valentine's Week so far? There has been so much inspiration from the DT and a great sale (20% off the Valentine's collection). Don't forget, there is a Valentine Themed Facebook/YouTube Live this afternoon at 4 PM, followed by the Stinkin' Cute Virtual/Live Class at 3 PM on Saturday. I hope you can join in and create with us. 
 
I am sharing a card with a vibrant and bold sentiment; the Love You Lots Large Sentiment Die is perfect for your Valentine's Day cards. Create a pretty ink-blended background and pair it with some cute critters, and there you go!

I ink-blended white cardstock with Picked Raspberry, Abandoned Coral and Wild Honey Distress Oxide Inks using my Beautiful Rainbow Blender Brushes. I added white splatter with a paintbrush and Copic opaque white.

I die-cut the ink-blended panel with A2 Stitched Hearts Cover Dies and used double-sided tape to adhere it to an A2 card base.


I sprayed Distress Mica Stain in Shiny Bauble to Distress Watercolor Cardstock by Ranger and added water colour metallic silver splatter once it was dry. I cut this panel with the Love You Lots Large Sentiment Die once, cut out three more of this large sentiment from white card stock and glued them together for added dimension. I also used the large heart die from Slimline Postage Stamp Frame Dies on the sprayed cardstock. I cut the heart three more times and glued them all together. 

For the sub sentiment, I stamped the 'you mocha me crazy' from The Perfect Blend stamp set with Versafine Onyx Black for a crisp impression. I used liquid glue to adhere the large sentiment and the heart to the card base. 


 The cute penguins are from the Mistletoe Kisses Digital Stamp Collection. I coloured them with my Copics, fussy cut them out and used a utility knife to cut around the arm of the penguin with the hat on so I could slip in the small coffee cup. It is from Bearing Gifts and fits perfectly in the arm of the penguin! I used foam tape to adhere the penguins to the card. 

I added Designer Enamel Dots, the pink ones are from Sweet Summer, and the pink ones are from Festive Fun.

Thank you so much for reading my blog post, you can use my discount code T4TANNALISA10 when you visit the Time For Tea Designs shop to get 10% off your order.


Wednesday, 11 January 2023

Coffee?!

 Hey there tea-timers...

It's DT Ashlee here today, now I don't know about you but I myself can't go without my coffee...

And what's better than just coffee? Coffee with a friend!!

Today's inspiration is a card to send to a friend to organise a coffee catchup and its got some adorable little cups with cute faces centre show...


I used these Time for Tea designs products :


This card is a very CAS one so it was super simple to create. I started with a white card base and stamped both my sentiments directly onto the base with black ink leaving a gap in between for the images. I then stamped, coloured and die cut three cute cups from the pumpkin spice stamp set. These were coloured with OLO and Spectrum noir tri-blend markers. 

Once the images were ready I added them to the card base with different levels of foam tape creating a happy little bunch of coffee cups. To complete the card a touch of sequins adhered using micro glue dots. 

Do you want coffee now?! I would but it's nearly bed time here so maybe tea for me, coffee come at me in the morning hehe. 


Thanks for stopping by the blog today, I hope you enjoyed my latest card. Happy crafting, hugs Ashlee.

Friday, 11 November 2022

New Release: Brew Can Do It


DT Annalisa here today! Hello, and welcome to a brand new release! As a huge coffee fan, I had to share a coffee-themed card first! This release has EIGHT new stamp sets and coordinating designs, ranging in type from gingerbread characters to snowmen, penguins, seals and more. 

I stamped all the cups/mugs in the Pumpkin Spice stamp set and coloured them with my Copic markers. I added white gel pen accents and used the coordinating dies to cut them out.

I cut white cardstock with the 4 1/8 x 4 1/8 inch die from the Square Label Dies and ink blended on salvaged patina distress oxide using my teal Beautiful Blender Brush. I used the 5 x 5 inch die in the same set to cut patterned paper from the Brighter Days 6x6' Paper Pad. I also created a card base using the same-sized die.

I used liquid glue to adhere the patterned paper to the card base. I stamped the 'brew can do it' sentiment from The Perfect Blend stamp set to the teal panel and then stuck this panel to the card with double-sided foam tape.  


I added foam tape to the back of each mug and placed them on the card. I adhered three "Clear Bubbles enamel dots" to complete the card. These clear bubbles are absolutely beautiful and my photos don't do them justice!

Thank you so much for reading my blog post, you can use my discount code T4TANNALISA10 when you visit the Time For Tea Designs shop to get 10% off your order.

Other Posts You Might Like