Pages

Friday, 28 June 2024

Thank You Berry Much Sweet Friend


Happy Friday! DT Annalisa here sharing my second card that features the new release. I used the Five Windows Cover Die; a terrific stand-alone die with many possibilities! I also used two of the latest fruit-themed stamp sets.

I made an A6 card base out of heavy white card stock. I blended wild honey Distress Oxide ink onto the card base through the Dancing Dandelions 6 x6″ Stencil, once I removed the stencil, I ink-blended squeezed lemonade Distress Oxide with my Beautiful Blender Brush. I added splatter with a paintbrush, water and squeezed lemonade Distress Ink.

I die-cut the Five Windows Cover Die from white card stock and used double-sided tape to stick it down to the card base.

I stamped and coloured (with Copics) several images from Fruitful Friends and Squeeze the Day and cut them out with their coordinating dies. I added white gel pen accents with a Gelly Roll Pen.


The sentiments are from Fruitful Friends and I die-cut them with their coordinating dies. I used 1mm double-sided foam tape to stick most elements to the card base. I used liquid glue to stick down the cherries and the large strawberry. 


Thank you so much for reading my blog post. Remember to use my discount code T4TANNALISA10 when you visit the Time For Tea Designs shop to get 10% off your order.


Wednesday, 26 June 2024

Book buddies

Hey Tea-timer friends...

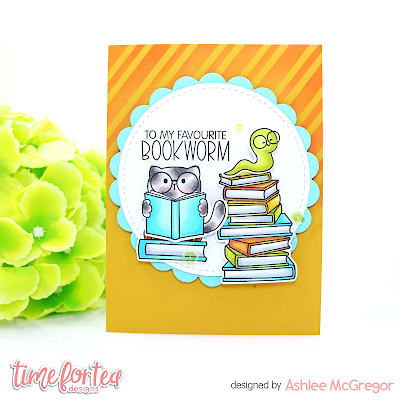
DT Ashlee here with some card making inspiration using a bunch of brand new products from the latest release at Time for tea designs


I used these new release products to make this card : 

Book buddies stamp / co-ordinating die

Diagonal stripes stencil

Scalloped circle die

Stitched circle die


To create this card I started with a yellow card stock base that I added partial stencilling to using the diagonal stripes stencil and distress oxide ink. I then die cut a scalloped circle and a stitched circle from different coloured card stocks before layering them together. These were then adhered to the card base with foam tape. 

I stamped a sentiment into the circle from the book buddies set before moving on to stamp, colour and die cut a bunch of the book buddies images. These were adhered in place also using varying levels of foam tape. 


To complete the card I added a touch of pretty sequins adhered in place using glue dots. 

Thanks for checking out my card today, I hope you enjoy this new card with new products too!! Happy crafting, hugs Ashlee. 

Tuesday, 25 June 2024

Paws here!

Did you get a chance to look at the new goodies?? It's my turn to show off some of the new release, and I am so happy with this particular theme: BOOKS!

I love books. And I am glad to say I have a couple of friends to share this love with. I can't wait to gift them crafted bookmarks! Let me show you the first one I made thusfar...


To create this, I started by die cutting 2 pieces out of white cardstock with the new Bookmark Dies. I used the X Marks the Spot Stencil and distress oxide colors salvaged patina and peacock feathers to create a background.
The bottom part was done with tea dye and aged mahogany.

I stamped on the sentiment from the new Book Buddies A6 Stamp set and adhered it onto the largest piece using double sided tape.

Next up was to color the images from the same lovely stamp set!
I used the bookstack, made a red tabby and ofcourse added the bookworm. You can't have a bookmark without a bookworm! 

As a finishing touch, I used glossy accents by Ranger onto the glasses. it gives a nice shine and smooth texture so the glasses actually look like they were made out of glass! Bonus: this 'glass' can't break 😉


I'm off creating a couple more! Have a great day everybody!

Monday, 24 June 2024

"You're my main squeeze... You're simply the ZEST!"

Hi Tea Timers, welcome back to the blog. The latest release went live last week and I am super excited to share one of the cards I created using some of the new stamps and dies. 

One of my favorite stamp sets from the latest release is the Squeeze the Day set. I love all things citrus and wanted to create a fun citrus filled background for these adorable critters and their clusters of fruits.

Sets used:

Squeeze the Day stamp set
Squeeze the Day coordinating die set
Squeeze the Day stamp and die bundle available here
Diagonal Strip Cover Die set

I first stamped  out my images and used the coordinating dies to die cut them out. I then used Copic Markers to color the images. I decided to turn one of the citrus slices into an orange slice to add a bit more color to the images.

I then die cut out the Diagonal Strip Cover die from white cardstock. I then blended it with Uncharted Mariner, Peacock Feathers and Salvaged Patina Distress Oxides. I splattered it with white watercolor to give it some interest.


I took a piece of gold cardstock and trimmed it down to fit right behind the cover diecut. 

I then decided that I wanted some of the citrus images to look like it was falling around the critters. I stamped them out several times and die cut them out. I then used Copic Markers to color them.

For the sentiments, I heat embossed them onto pink cardstock and then die cut them out using the coordinating dies.


To assemble my card, I adhered the gold cardstock behind the frame with liquid adhesive. I then adhered the two clusters at the bundle using foam tape. 

I added my citrus images to the top of the card using liquid adhesive. I then added my two sentiments using foam tape to complete the card.

Check out the latest release, now in the shop. All sets that I used are linked above. Don't forget to use the code T4TRANDY10 at checkout for extra savings! Happy Crafting!

Friday, 21 June 2024

Lime All Yours - New Release!


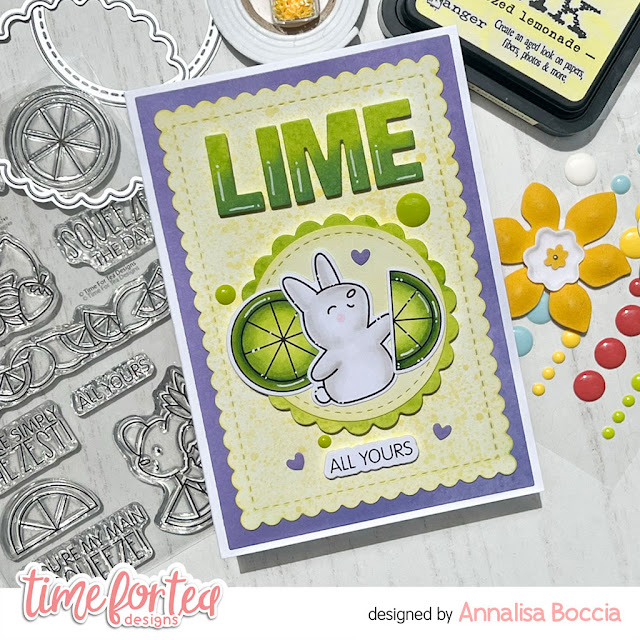
Happy new release day! I am sharing my first card featuring the latest stamp and die sets from Time For Tea Designs! I used two new stamp sets and two new dies for today's card. I LOVE this new release; it is perfect for all your summer cards!

For the background panel, I ink blended squeezed lemonade Distress Ink onto white cardstock that I had die-cut using the Sweet Scalloped Dies. I added mustard seed Distress Oxide splatter with a paintbrush and water.


I used the second-largest die in the  A6 Simple Nesting Dies to die-cut purple patterned paper to 5 and 5/16 inches by 3 and 5/8 inches. I glued this down to an A6 card base with double-sided tape.


I used double-sided tape to stick the scalloped panel to the card base.


I added twisted citron Distress Paint on my glass mat and sprayed it with water. Next, I pressed watercolour cardstock into the paint multiple times to create a background. I die-cut the letters 'lime' from this background with Anthony's Alpha Dies.


I die-cut a small scalloped circle from the same lime green panel using the brand-new Scalloped Circle Dies. I die-cut a small circle using the new Simple Stitched Circle dies and ink blended it with squeezed lemonade Distress Ink. These two nesting die-sets will be a valuable addition to your die collection!


I stamped and coloured (with Copics) the bunny from the new 'Fruitful Friends' stamp set and the limes (lemons or oranges - depending on how you colour them!) from 'Squeeze The Day' and cut them out with their coordinating dies. I added white gel pen accents with a Gelly Roll Pen.


I used liquid glue to stick the stitched circle to the scalloped circle and then double-sided tape to stick them down to the card base. I used liquid glue to stick the stamped elements to the circle.


I used slim double-sided tape to stick the letters to the card base and the 'all yours' sentiment.


I die-cut the purple patterned paper with the Flirty Flowers Cover Die and used three heart cut-outs on the card.  


I added three beautiful lime enamel dots from the Sweet Summer Designer Enamel Dots to complete the card.


Thank you so much for reading my blog post. Remember to use my discount code T4TANNALISA10 when you visit the Time For Tea Designs shop to get 10% off your order.


Wednesday, 19 June 2024

Hello hearts

Hey there Tea-timers...

DT Ashlee here with some new weekly inspiration featuring Time for Tea designs products of course! 


To create this card I started with a pink card stock base and added some cute hearts using the Scattered hearts stencil and pink ink partially over the base....


I then die cut the Hello sentiment from the Hey, hello hi die set from glitter card stock and adhered it to the card base with foam tape so it added some dimension to the card. I then stamped the thank you sentiment from the Simple sentiments stamp set using black ink directly under the focal sentiment and finished off the card with a touch of pretty sequins!

I hope you like this sweet pink card with a touch of sparkle I made for today. Thankyou for stopping by and happy crafting. Hugs Ashlee. 

Tuesday, 18 June 2024

Oh Baby Baby

Hello crafty friends!

Sending actual cards out by post is a gesture that we see less and less over here in Holland. Birthday cards are scarce for instance. The dutch do however still send cards to congratulate somebody with the birth of their child. I felt like making a baby themed card this week, and I'd like to show you the result!

I wanted to make stuffed animals out of some critters by coloring them in unnatural colors and adding a stitched line to the faces. The critters from the Hey There Critters Clear Stamp Set proved to be perfect for this idea. I ended up with a pink rabbit, a blue bear and a grey mouse (ok, this is not unnatural, but perfect for a stuffed animal though 😉)


Colorful stuffed animals should be accompanied by a colorful background in my book, so I took out the Scattered Hearts 6 x6" Stencil and used distress oxides cracked pistachio, scattered straw, dried marigold and kitsch flamingo onto a trimmed square from white cardstock.

To create a little 'cabinet' for the stuffed animals to sit in, I used the Stitched Window Cover Die and trimmed the top to fit onto the square panel.


With the Anthony's Alpha Dies set, I created the word BABY by die cutting each letter twice, once in white and once in black. I adhered the letters and made sure the black pops out of the side a little bit, creating the illusion of shadow. Using this method enhances the contrast thus readability of the word.

I adhered the trimmed frame onto the stenciled panel and trimmed a new panel out of light pink cardstock to put on the back. This went onto a square white cardbase.  Lastly I added the critters, letters and a couple of enamel dots on top and this baby is ready to be sent off! 


I hope you like the outcome as much as I do.

Have a great day everyone!


Monday, 17 June 2024

"I Chews You!"

 Hello Tea Timers, welcome back to the blog. Today, I wanted to create a card around one of my favorite images from the 'Gummy Bears' stamp set, the Gumball Machine!

I kept going back and forth on how I wanted the scene to look and thought it would be fun to have it look like the gumballs were spilling out of the machine, causing sweet chaos throughout the card.

Sets used:

(Coordinating die set available here)

I first stamped out the gumball machine image and used Copic Markers to color the image. I then fussy cut it out.

I took an A2 Panel and stamped the gumball image around the panel with black ink. Once I had the gumballs all stamped out, I used the same Copic Marker combos and the candies in the machine for the background.


I wanted it to look like some of the gumballs were overlapping and add a bit of dimension to the card. I decided to take scrap pieces of cardstock and stamp additional gumballs onto the scrap piece.

Once stamped out, I used the same Copic Marker combos to color these gumballs as well. I fussy cut them out and set them to the side.

I took a purple piece of cardstock and heat embossed the sentiment onto the cardstock with embossing ink and white embossing powder. I then trimmed it down to complete the sentiment.


Before I decided where I wanted the additional gumballs to go, I adhered my gumball machine to the panel with foam tape.

I then added the sentiment strip to the panel using a piece of foam strip.

Once that was completed, I took round foam dots and added them to the back of the gumballs and added them around the panel, layering over the ones already stamped onto the panel. 

I hope you enjoyed this blog post today. All the items I used are linked above. Don't forget to use the code T4TRANDY10 at checkout for extra savings.


Friday, 14 June 2024

Sweet Days with You


Happy Friday! DT Annalisa here today sharing a bright pink card I created with the adorable Sweet Cart Critters. This is such a fun stamp set, I love the little critter heads that pop up inside the cart.

I ink-blended kitsch flamingo and picked raspberry Distress Oxide on Distress Watercolor Cardstock by Ranger. I added splatter with picked raspberry Distress Ink, Copic opaque white, watercolour and a paintbrush. Once the panel was dry, I die-cut it with the A2 Stitched Hearts Cover Die.


I ink-blended tumbled glass (sky), twisted citron and mowed lawn (grass) Distress Ink over the 6x6 Scene Builder stencil onto an A2 card base with my Beautiful Blender Brushes. I added white splatter with a paintbrush, water and Copic opaque white.


I did some creative masking with the Sweet Cart Critters stamp set - stamping the raccoon first, kitty next, candy jars and finally the cart - masking each one as I went along.


I coloured the images with my Copics and added white gel pen accents with a Gelly Roll Pen. I cut the little scene with my Brother Scan N Cut SDX125e.


I stamped the 'days with you are so sweet' and cut it out with the coordinating die set. The butterfly is from the Kitty Capers stamp set.


I used double-sided foam tape to adhere everything to the card (other than the small butterfly).


Thank you so much for reading my blog post. Remember to use my discount code T4TANNALISA10 when you visit the Time For Tea Designs shop to get 10% off your order.


Other Posts You Might Like