
Pages

Showing posts with label Beautiful Rainbow Blender Brushes. Show all posts

Friday, 28 June 2024

Thank You Berry Much Sweet Friend


Happy Friday! DT Annalisa here sharing my second card that features the new release. I used the Five Windows Cover Die; a terrific stand-alone die with many possibilities! I also used two of the latest fruit-themed stamp sets.

I made an A6 card base out of heavy white card stock. I blended wild honey Distress Oxide ink onto the card base through the Dancing Dandelions 6 x6″ Stencil, once I removed the stencil, I ink-blended squeezed lemonade Distress Oxide with my Beautiful Blender Brush. I added splatter with a paintbrush, water and squeezed lemonade Distress Ink.

I die-cut the Five Windows Cover Die from white card stock and used double-sided tape to stick it down to the card base.

I stamped and coloured (with Copics) several images from Fruitful Friends and Squeeze the Day and cut them out with their coordinating dies. I added white gel pen accents with a Gelly Roll Pen.


The sentiments are from Fruitful Friends and I die-cut them with their coordinating dies. I used 1mm double-sided foam tape to stick most elements to the card base. I used liquid glue to stick down the cherries and the large strawberry. 


Thank you so much for reading my blog post. Remember to use my discount code T4TANNALISA10 when you visit the Time For Tea Designs shop to get 10% off your order.


Friday, 27 October 2023

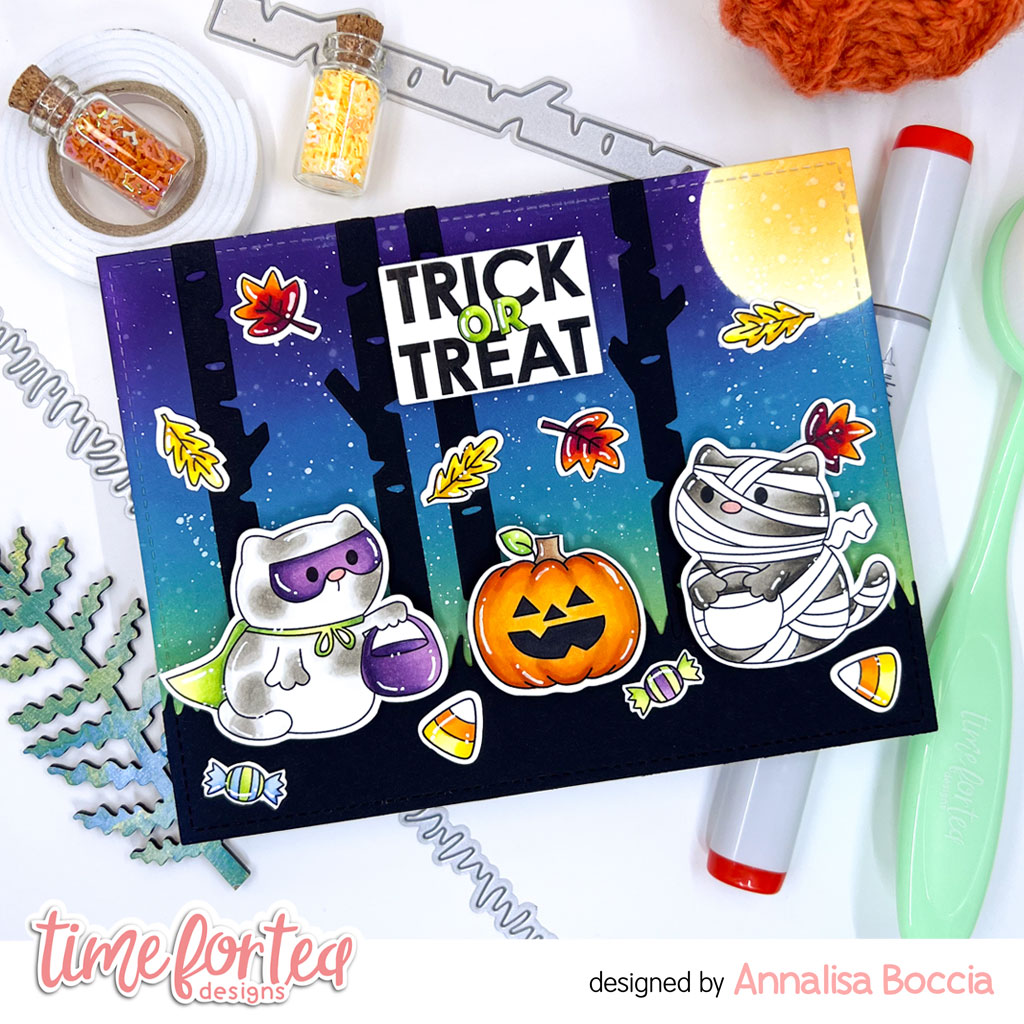
Time to Trick-Or-Treat


DT Annalisa here today! The kids will be trick-or-treating on Halloween in my area in just a few days! I created this nighttime trick-or-treat scene using the Trick or Treaters Digital Stamp Collection with the Haunted House clear stamp set. I love the ability to re-size digi stamps to what I need for my cards.

I ink-blended villainous potion, peacock feathers and twisted citron Distress Oxides onto Distress White Heavy cardstock by Ranger with my Beautiful Rainbow Blender Brushes. I splattered on water and Copic opaque white with a paintbrush. 


To mask the moon area for this scene, I added temporary adhesive to the back of the negative portion of one of the circles in the 
Circle Grid Masking Stencil. To colour the moon area, I used the outer section of the stencil for the mask and ink-blended squeezed lemonade and rusty hinge Distress Inks. 

I used the Winter Trees and Slimline Hillside Scene Dies to die-cut black cardstock. I used liquid glue to stick the trees and the grassy area to the ink-blended panel and glued this panel down to an A2 white card base.


I stamped and coloured (with Copics) several leaves from 
Jumping With Joy. I resized and printed several Trick or Treaters Digital Stamp Collection images and coloured them with my Copics. I added white gel pen accents with a Gelly Roll Pen to the coloured images. I cut out all the stamps with my Brother Scan N Cut SDX125e.

I stamped 'Trick or Treat' and die-cut it with one of the smaller A2 Layering dies. I adhered the images to the card base using liquid glue or double-sided foam tape for dimension. 


Thank you so much for reading my blog post, be sure to use my discount code 
T4TANNALISA10 when you visit the Time For Tea Designs shop to get 10% off your order.

Friday, 1 September 2023

Party Time

Hello, and happy Friday from DT Annalisa! Today, I share a fun party card that would be great to invite someone to a birthday party. It features the brand new Let’s Party stamp set.

Onto an A6 card base, I ink-blended peacock feathers, picked raspberry, spiced marmalade, mustard seed, twisted citron, and squeezed lemonade Distress Oxides through the Confetti 6 x6" Stencil using my Beautiful Rainbow Blender Brushes. I stamped confetti in varying colours of the same ink using stamps from the Let's Party stamp set.


I die-cut the large outer scalloped frame from the Smile Inverted Scallop Frame Dies from white cardstock and used liquid glue to stick it down to the ink-blended card base. 

I stamped and coloured (with Copics) several images from the Let’s Party stamp set and cut them out with my Brother Scan N Cut SDX125e. I added white gel pen accents with a Gelly Roll Pen


I used Anthony's Alpha Dies to die-cut the letters for 'party' and coloured each letter using my Copics to match the colours used on the background and stamps.

I used double-sided foam tape to stick the critters, letters, etc. to the cardbase to complete the card.

Thank you so much for visiting my blog. Remember to use my discount code T4TANNALISA10 when you visit the Time For Tea Designs shop to get 10% off your order.

Friday, 16 June 2023

Sunrise Daffodils


Happy Friday! DT Annalisa is here sharing a spring sunrise card with beautiful daffodils and butterflies from Time For Tea Designs. The Darling Daffodils stamp set also has some great sentiments like miss you, thank you and happy birthday that cut out beautifully with their coordinating dies.

I ink-blended white cardstock with Fired Brick, Abandoned Coral, Spiced Marmalade and Mustard Seed Distress Oxide Inks using my Beautiful Rainbow Blender Brushes. I added white splatter with a paintbrush, water and Copic opaque white. I used double-sided tape to adhere this panel to an A2 card base. 


I stamped and coloured (with Copics) several images from the Darling Daffodils and cut them out with their coordinating dies. I added white gel pen accents with a Gelly Roll Pen. The bee, worm and smaller butterfly are from I Really Dig You.

I used liquid glue to stick the grass and daffodils to the ink-blended panel. I then glued down a stitched frame from the Wide Stitched Frame Dies on top of this.

I used double-sided foam tape to stick the remaining elements and sentiment to the card.


Thank you so much for reading my blog post. Remember to use my discount code T4TANNALISA10 when you visit the Time For Tea Designs shop to get 10% off your order.


Friday, 28 April 2023

Thank Ewe


Happy Friday, everyone! DT Annalisa is here today sharing a thank 'ewe' card featuring the adorable sheep from the Ewe Are The Best clear stamp set from Time For Tea Designs.

A heads up the latest T4T mini release goes on sale Saturday 29th April at 8am BST. If you would like to see all the new goodies before the release goes live then please join Jo today, Friday 28th April, on Facebook or YouTube at 7pm BST.

I used the Simple Slimline Nesting Dies to die-cut a slimline card panel (8.5 by 3.5 inches) from Fabriano Bristol cardstock. I ink blended Prize Ribbon, Wilted Violet, Picked Rasberry and Squeezed Lemonade Distress Oxide using my Beautiful Rainbow Blender Brushes. I added silver splatter with a paintbrush, water and silver watercolour. I used double-sided tape to adhere this to a slimline card base. 


For the grass, I used the Slimline Hillside Scene Dies. I ink-blended Twisted Citron and Mowed Lawn and added Lucky Clover Distress Oxide splatter. I used the Landscape Edge Standalone Die Set to die-cut the clouds and ink blended with Weathered Wood Distress Oxide and added some splatter in the same colour. I added silver splatter to the clouds and grassy sections to match the sky.

I stamped, and coloured (with Copics) several images from Ewe Are The Best and cut them out with their coordinating dies. I added white gel pen accents with a Gelly Roll Pen. The tulip, butterfly and bee are from I Really Dig You, I coloured them and cut them out with their coordinating dies.

To assemble the scene, I used liquid glue on the clouds, hillside and some of the images. I used double-sided foam tape on two of the sheep, the butterfly and the bee to pop them up.

I stamped the 'thank EWE' sentiment and cut it out with its' coordinating die, I die cut two more pieces of paper using the die and glued them all together for added dimension.

Thank you so much for reading my blog post, you can use my discount code T4TANNALISA10 when you visit the Time For Tea Designs shop to get 10% off your order.


Friday, 14 April 2023

Birthday Mole


DT Annalisa here today! Spring has finally sprung in my area, so I am sharing a fun gardening scene I created using the new I Really Dig You stamp set. I paired this with a new die and stencil as well. I love to garden so Spring is one of my favourite seasons (despite my allergies!), I love watching everything come to life. 

I ink-blended an A2 card base using Tea Die and Antique Linen Distress Oxide using my Beautiful Rainbow Blender Brushes over the I Really Dig You Background Stencil. I used the leftover ink on the brush to lightly blend over the white areas left behind. I added Vintage Photo Distress Oxide splatter with water and a watercolour brush. I added white splatter with a paintbrush, water and Copic opaque white.

I used the Wonky Windows Cover Die to cut white cardstock that I ink-blended with Mowed Lawn and Twisted Citron over a grass stencil and added splatter using Rustic Wilderness and Copic opaque white. 

I stamped and die-cut the images from I Really Dig You (coordinating dies), Queen For the Day (coordinating dies), and Eggstra Special Birthday (coordinating dies); I coloured them with my Copics and added white gel pen accents with a Gelly Roll Pen. I also stamped and die-cut the sentiments.


I added double-sided foam tape to the back of the grassy panel and placed it on top of the ink-blended card base. I used liquid glue to adhere all the die-cut elements to the card. I love how it turned out and this garden scene makes me happy.

Thank you so much for reading my blog post, you can use my discount code T4TANNALISA10 when you visit the Time For Tea Designs shop to get 10% off your order.


Other Posts You Might Like