Pages

Showing posts with label Kitty Capers. Show all posts

Friday, 24 April 2026

Punny Cat-astrophe


Happy Friday! DT Annalisa here, sharing a punny cat card featuring the Kitty Capers A4 Printed Cardstock from Time For Tea Designs. I paired it with a stencil and coordinating dies to create a fun little scene.


I began by ink blending Stormy Sky and Salvaged Patina Distress Oxides through the Scene Builder 6x6 Stencil. To add some texture, I splattered the background using a paintbrush and Distress Spray Stains in Picket Fence and Stormy Sky.

Once the panel was dry, I adhered it to a card base using liquid glue.


Next, I die-cut white cardstock with the Stitched Window Cover Die and glued it over the inked background to frame the scene.

I then used the Kitty Capers Coordinating Die set to cut out the images from the Kitty Capers A4 Printed Cardstock. I adhered the images and sentiment to the card using 1mm double-sided foam tape for added dimension.


Thank you so much for reading my blog post! Don’t forget to use my discount code T4TANNALISA10 at Time For Tea Designs to receive 10% off your order.


Sunday, 1 March 2026

A Purrfect Spring Day!

Hello Everyone! 

Michelle from the Design Team here and today I’m sharing a bright and cheerful card that feels like a little slice of springtime - with playful kitties, fluttering butterflies and a garden full of colour! 

Supplies used:

Ginger Cat - Kitty Capers

Grey Cat - Love Is In The Air

Flowers - I Really Dig You

Butterflies - Cacti Critters

Fence and Tree - Ewe Are Marvellous

I built the design in layers to create that sunny outdoor feel. The lower half features a white picket fence and a vibrant flower bed packed with colourful blooms and butterflies. I added lots of bright shades to make everything feel lively and fresh, just like a real spring garden.

Up top, the sweet kitties sit on a wall enjoying the day with soft clouds in the background and a tree adding a touch of balance. The little butterflies floating around them help tie the whole card together and add a sense of movement.

The “Hope your day is purrfect” sentiment heat embossed into green cardstock finishes the card perfectly and adds a fun pun that makes it even more smile-worthy. This would be such a lovely card to send to brighten someone’s day with a bit of springtime happiness.


Thanks so much for stopping by today! 

Michelle


Friday, 21 March 2025

Lucky To Have You as a Friend


Happy Friday, DT Annalisa here! Spring is finally here, and I'm excited to share a bright mini slimline card to celebrate. I created it using the Good Luck Critters and Mini Slimline Scallop Dies.

For the sky background, I sprayed Distress Spritz in Peacock Feathers and Distress Spray Stain in Salvaged Patina onto acetate. I then sprayed water on top and pressed it onto watercolour cardstock.


For the grass, I soaked Crushed Olive and Peeled Paint Distress Watercolor Pencils in water, scribbled them onto acetate, and spritzed the acetate with water. Next, I pressed the acetate onto watercolour paper, heat-setting it and spritzing it with water as needed.

I trimmed the sky and grass sections and used liquid glue to attach them to the back of the Mini Slimline Scallop Dies, which I die-cut from white cardstock.

I added double-sided foam tape to this panel and adhered it to a 6 1/2 by 3 1/2 inch card base.

For the focal points, I stamped and coloured several images from the Good Luck Critters set using Copics, and cut them out with their coordinating dies. I added accents with a white gel pen using a Gelly Roll Pen.


The flowers are from the Ewe Are The Best set, and the butterfly is from the Kitty Capers set. I used foam tape to adhere the stamped elements other than the flowers, which I used liquid glue to adhere.

Thank you so much for reading my blog post! Be sure to use my discount code T4TANNALISA10 when you visit the Time For Tea Designs shop to get 10% off your order.

Friday, 21 February 2025

Hello Kitties


Happy Friday, DT Annalisa here! Today, I'm excited to share a beautiful card featuring a watercolored background that I created using the Wonky Shapes Masking Stencil and Distress Watercolor Pencils.

To start, I soaked the Evergreen Bough and Chipped Sapphire Distress Watercolor Pencils in water. I then scribbled the colours onto the Wonky Shapes Masking Stencil and spritzed it with water. After that, I flipped the stencil over and pressed it onto Ranger Distress Watercolor Cardstock, holding it in place for several minutes.


While the stencil was pressed down, I traced the outline on one side of the stencil openings with a Victorian Velvet Distress Watercolor Pencil. I used a small paintbrush and very little water and brushed over the pigment, activating it, and spreading it out.

I lifted the stencil and heat set the panel with my Ranger Heat It craft tool. I trimmed the panel and used liquid glue to adhere it to an A2 card base.


I love the way the background turned out and will be trying this technique again!

Next, I stamped and coloured several images using Copics from the Kitty Capers, Purrfect Day (books, plants, and a cat lying down), Let's Chat (sentiment), and Home Is Where The Heart Is (telephone) stamp sets. I cut them out with their coordinating dies and added white gel pen accents with a Gelly Roll Pen.


Finally, I adhered the images to the card base using liquid glue or double-sided foam tape for added dimension.

Thank you so much for reading my blog post! Be sure to use my discount code T4TANNALISA10 when you visit the Time For Tea Designs shop to get 10% off your order.


Friday, 14 June 2024

Sweet Days with You


Happy Friday! DT Annalisa here today sharing a bright pink card I created with the adorable Sweet Cart Critters. This is such a fun stamp set, I love the little critter heads that pop up inside the cart.

I ink-blended kitsch flamingo and picked raspberry Distress Oxide on Distress Watercolor Cardstock by Ranger. I added splatter with picked raspberry Distress Ink, Copic opaque white, watercolour and a paintbrush. Once the panel was dry, I die-cut it with the A2 Stitched Hearts Cover Die.


I ink-blended tumbled glass (sky), twisted citron and mowed lawn (grass) Distress Ink over the 6x6 Scene Builder stencil onto an A2 card base with my Beautiful Blender Brushes. I added white splatter with a paintbrush, water and Copic opaque white.


I did some creative masking with the Sweet Cart Critters stamp set - stamping the raccoon first, kitty next, candy jars and finally the cart - masking each one as I went along.


I coloured the images with my Copics and added white gel pen accents with a Gelly Roll Pen. I cut the little scene with my Brother Scan N Cut SDX125e.


I stamped the 'days with you are so sweet' and cut it out with the coordinating die set. The butterfly is from the Kitty Capers stamp set.


I used double-sided foam tape to adhere everything to the card (other than the small butterfly).


Thank you so much for reading my blog post. Remember to use my discount code T4TANNALISA10 when you visit the Time For Tea Designs shop to get 10% off your order.


Friday, 5 April 2024

Have a Moovellous Birthday


Happy Friday! DT Annalisa, today is my birthday so I am sharing a cute birthday slimline card featuring the Ewe Are Moovellous stamp set from Time For Tea Designs. I love how you can mix and match sets from Time For Tea Designs to create detailed scenes like this with several images from different stamp sets. 


I die-cut Distress White Heavy cardstock by Ranger with the Stitched Slimline Slopes Dies and ink-blended the different sloped panels with Distress Oxides using my Beautiful Blender Brushes. I created the sand area, with tea dye, antique linen and vintage photo (splatter); the grass, with twisted citron, mowed lawn and rustic wilderness (splatter); the sky, with tumbled glass, salvaged patina, peacock feathers and mermaid lagoon (splatter).


I used liquid glue to adhere the inked sloped panels and the stitched outline to a slimline card base.  

I stamped and coloured (with Copics) several images from Ewe Are MoovellousHey There CrittersKitty CapersSweet VillageEwe Are The BestJust Married and Love Is In the Air and cut them out with their coordinating dies. I added white gel pen accents with a Gelly Roll Pen


I stuck the images and sentiments to the card base using liquid glue or double-sided foam tape for dimension.

Thank you so much for reading my blog post. Remember to use my discount code T4TANNALISA10 when you visit the Time For Tea Designs shop to get 10% off your order.


Wednesday, 2 August 2023

Meow....!!

 Hey there Tea-timers...

It's DT Ashlee here and today I'm sharing a new card I made using some fun Time for Tea designs goodies to create a kitty cat themed card! 


I used these T4T products :

To create this card I started with a light grey card stock base that I inked the Pawsome prints on to with a grey ink from Catherine Pooler. I then die cut the large focal sentiment from two shades of pink cardstock and glued them together with Bearly arts liquid glue. That was then adhered to the card base using foam tape to pop it up.


 I stamped, coloured and die cut a bunch of images from the Kitty capers set and adhered those in place also with layers of foam tape to add even more dimension. The images were all coloured using Ohuhu brush markers. To finish the card off a touch of pretty pink sequins!


That's all for my card today, I hope you enjoyed this kitty themed card. Till next post happy crafting, hugs Ashlee. 

Saturday, 29 October 2022

Halloween Pumpkin Kitty


Happy Friday! DT Annalisa here, I have a cute slimline Halloween card featuring the Trick or Treaters Digital Stamp Collection and Haunted House Clear Stamp Set from Time For Tea Designs.

I used coloured paper from my stash and die-cut them with the Simple Slimline Nesting Dies. I added Shaded Lilac and Dusty Concord Distress Oxide to the edges of the purple paper using my Beautiful Rainbow Blender Brushesand Villainous Potion Distress Oxide splatter with a paintbrush.

 For the grass, I used the Slimline Hillside Scene Dies and added Cracked Pistachio to the edges and Mowed Lawn Distress Oxide splatter. I used liquid glue to adhere these to an 8.5 by 3.5-inch slimline card base.

I printed the digis and stamped the sentiment from the Haunted House Clear Stamp Set. The other stamps I used were  Kitty Capers (cat pointing) Life's Ups & Downs (hedgehog) Warm Winter Wishes (mouse). I coloured everything with my Copics and then added white gel pen accents. 

To cut out the images, I used the coordinating dies for the ones I had and my Brother Scan N Cut SDX125e for the others. To adhere the images to the card, I used liquid glue or double-sided foam tape.

Thank you so much for reading my blog post, you can use my discount code T4TANNALISA10 when you visit the Time For Tea Designs shop to get 10% off your order.


Friday, 21 October 2022

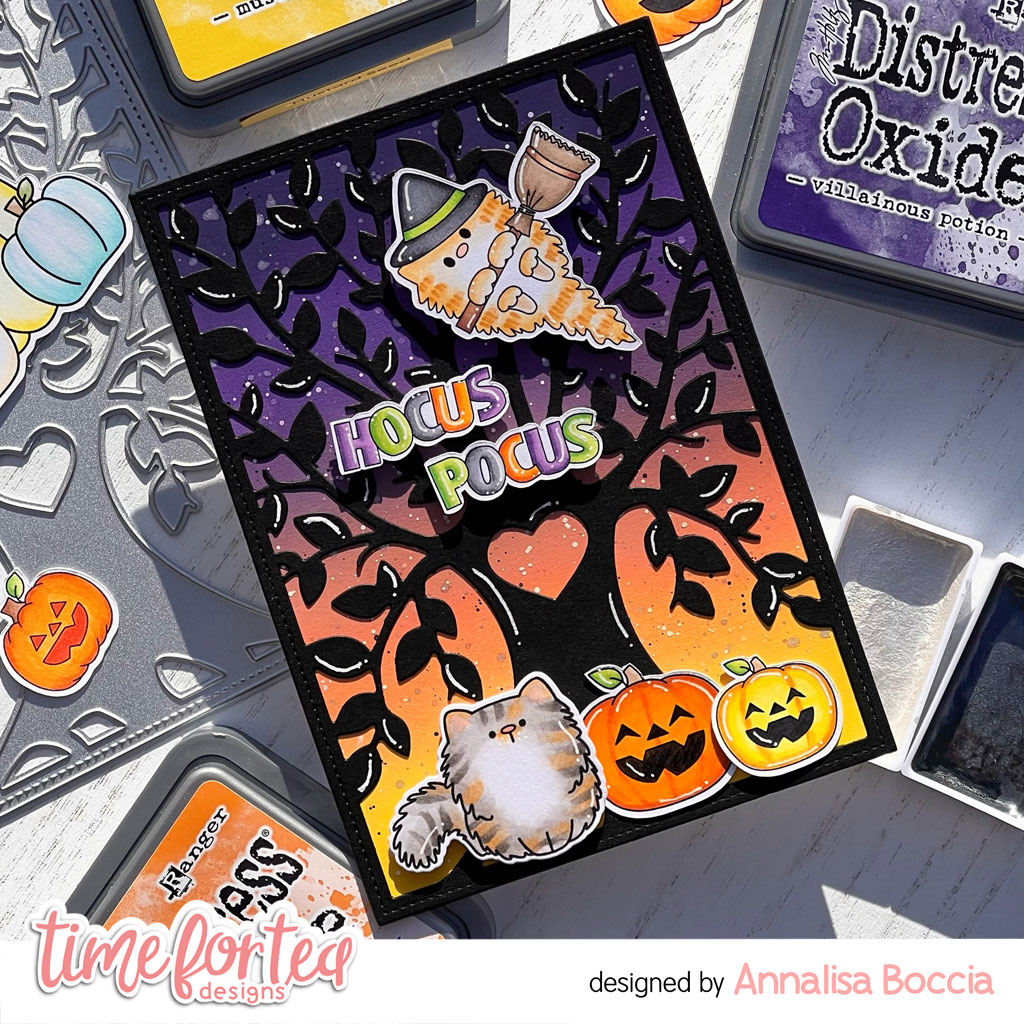
Hocus Pocus Tree


Happy Friday! DT Annalisa here with a Halloween card for you today that I made using the Tree of Love Cover Plate Die and the new Trick or Treaters Digital Stamp Collection.

I ink blended several Distress Oxide Inks (Villainous Potion, Wilted Violet, Seedless Preserves, Spiced Marmalade and Mustard Seed) onto Distress White Heavy cardstock by Ranger using my Beautiful Rainbow Blender Brushes. I added white, silver and black paint splatter with a paintbrush and set it aside to dry.


I used the Tree of Love die on black card stock and glued the cut-out onto the coloured background. I then added some white gel pen accents to the tree.

The kitty on a broom and pumpkins are from the Trick or Treaters Digital Stamp Collection; the sentiment is from Haunted House; the kitty on the ground is from Kitty Capers. I cut the images out and coloured them with my Copic markers. I added White Gelly Roll Pen accents before adhering them down to the card panel with liquid glue (pumpkins) and double-sided foam tape.


I added the panel to a white heavy stock card base to complete the card.

Thank you so much for reading my blog post, you can use my discount code T4TANNALISA10 when you visit the Time For Tea Designs shop to get 10% off your order.

Friday, 16 September 2022

You Had Me At Meow


Happy Friday, DT Annalisa here! My card today features the awesomely large You Had Me At Meow Sentiment Dies. I love how this die takes up a whole A2 card!


I found some adhesive sheets with wood print at my local dollar store and decided to try them in my cardmaking. I used a stitched rectangle die (4 by 5 1/4 inches) to cut out one of the wood patterns. I also ran this through my die-cutting machine with the You Had Me At Meow die. It helped me with the placement of the letters and provided me with wood-looking letters that I could use in another project. I removed the backer sheet of the die-cut wood panel and placed it on a white A2 card base. 


I ink blended Walnut Stain Distress Ink using my Beautiful Blender Brush onto some white card stock through the Pawsome Prints 6 x6" Stencil. I used the You Had Me At Meow sentiment again to cut the stencilled paper. I used the same die to cut out the letters two more times (it got a workout on this card!). I glued all the letters together and then onto the card.  


I used the 
Purrfect DayKitty Capers and CafĂ© Critters stamp sets and their coordinating dies. I coloured the images with Copic markers and added white Gelly Roll pen accents. I used liquid glue to adhere the elements to the card.


Thank you so much for reading my blog post, you can use my discount code
T4TANNALISA10 when you visit the Time For Tea Designs shop to get 10% off your order.


Other Posts You Might Like