
Pages

Showing posts with label Happy Mail. Show all posts

Saturday, 19 February 2022

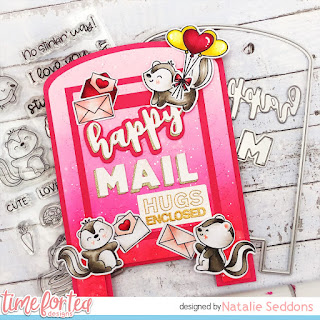
Happy Mail, Hugs Enclosed!


Happy Saturday Teatimer’s, have you had a good week? You might have seen this cute card during the blog hop last week, so I thought I’d share with you all how I made it. 

I finally got to use the Happy Mail Gift Card Holder Die Set. I didn’t use it as a gift cardholder though, I just used it to create a fun shaped card base. I wanted some texture on my card so cut out the Dotty Hearts Cover Plate Die and ink blended Abandoned Coral, Picked Raspberry, Kitsch Flamingo and Spun Sugar Distress Oxides over the top to give and ombré look. Finishing off with a few splatters of water to give some texture and some splatters of gold water colour paint.

 Setting that aside to dry I stamped cut out and coloured up the skunks from the Stinkin’ Cute Stamp Set. I coloured them up with COPIC markers and added some finishing touches with white gelly roll pen. The letters are from the Happy Mail Critters Stamp Set and the Be Kind Be You Stamp Set which also contains the hugs enclosed sentiment (which I stamped and heat embossed in gold) then the balloons are from the Smitten Kitten stamp set. I really do love to mix and match my sets! Once all the colouring was done I could began adhering my card together.

I cut out the biggest of the two mail box dies the larger rectangle and the letter box die out of hot pink card. Then taking the Dotty Hearts panel I cut the smaller mail box out of that and to save my card being bulky and time I cut out the smaller rectangle in the middle. Then layered everything on top of each other as you can see the larger pink rectangle covered the hole.

Before adding my critters I needed to make the rest of my sentiments I used the Happy Mail die from the Happy Mail Gift Card Holder Add on Die Set which cut out in gold and white and layered on top of each other to create a shadow and used the same hot pink for the happy bigger shadow. 

Then I just adhered everything together using foam tape on the critters to give some added depth and dimension. To make the card base I just cut out the bigger of the two mail box dies from white 360gsm card twice and scored one of across the top about 2cm down and added double sided tape above the line and attached my card together. Then all was left to do was adhere the top and that's my card finished up. I hope you like my card for today it's super fun and great for just sending happy mail to a friend. You can find all the products in the Time for Tea Shop and get 10% off any orders using code T4TNATALIE10. Have a great weekend and I will see you all next week. 

Tuesday, 28 September 2021

HAPPY MAIL Noline coloring using distress inks

Hey everyone, Lien here. Today I am sharing this card on the Time For Tea Designs Youtube Channel. I am featuring the Dog Gone Mutts stamp set from Time For Tea Designs. For this card, I did some no-line coloring using distress inks. I hope you like it xxx 


You can click HERE to watch on the Time for Tea Designs Youtube channel.


I started by stamping out the dogs from the Dog Gone Mutts from Time for Tea Designs using antique linen distress ink onto water colour paper. I smooched several distress inks down onto a media mat and used them to do the water coloring of the critters. 


Once I had everything colored in, I cut the paper to an A2 sized panel. I also die cut a frame. After assembling the card onto a card base, I finished it using some heart sprinkles. I hope you like the card!


Thinking of buying some T4TD supplies? With T4TLIEN10 you will get 10% of your order at Time For Tea Designs! Happy shopping xxx 


Supplies:
  • Time For Tea Designs - Dog Gone Mutts
  • Waffle Flower - A2 Layers Die
  • WaterArt: Water Colour Paper 
  • Gina K. Designs Amalgam Ink Obsidian
  • Distress Inks: Antique Linen, Vintage Photo, Ground Espresso, Gathered Twigs, Brushed Corduroy, Frayed Burlap, Pumice Stone
  • White Gelly Roll Pen 
  • Trinity Stamps: Heart Sprinkles - Coffee Bean
  • Darice Thin Foam Strips
  • NUVO Deluxe Adhesive
  • Pritt Adhesive Roller

Wednesday, 25 August 2021

Sweet black monochrome with a pop of red

Hey everyone, Lien here. Today I am sharing this card on the Time For Tea Designs Youtube Channel. I am featuring the Sundae Sweeties stamp set that was previously released. I decided to make a monochrome card with a pop of red, I hope you like it xxx 


You can click HERE to watch on the Time for Tea Designs Youtube channel.


I started with the cute image and sentiment from the Sundae Sweeties stamp set from Time for Tea Designs. I colored the image using copic markers (listed below). Afterwards, I used the matching dies to cut it out. 


For the background, I trimmed down a patterned paper from the Brighter Days Paper Pad from Time for Tea Designs and a piece of white card stock (for the grounding).

  • Cherry: R35, R24, R22 / W7
  • Cream: W3, W1, W0
  • Ice: W8, W6, W5, W3
  • Cone: W4, W3, W1
  • Cat: W7, W5, W4, W2 / W7 
 
With all the elements ready, I assembled the card on a mini slimline card base. I finished it of using some hearts sprinkles and glossy accents. I hope you like it xxx

Thinking of buying some T4TD supplies? With T4TLIEN10 you will get 10% of your order at Time For Tea Designs! Happy shopping xxx 

Supplies:

  • Time for Tea Designs - Sundae Sweeties 
  • Time for Tea Designs - Sundae Sweeties Dies
  • Time for Tea Designs Paper Pad: Brighter Days
  • Transotype: Perfect Colouring Paper
  • Gina K. Designs Amalgam Ink
  • Copic Markers: see above
  • Trinity Stamps: Heart Sprinkles Mix - Sweet-N-Tart
  • Ranger: Glossy Accents
  • Pritt Adhesive Roller
  • NUVO Deluxe Adhesive
  • Thin Foam Squares from Scrapbook Adhesives (black)

Tuesday, 22 June 2021

HAPPY MAIL: Making a one layered card using masks

Hey everyone, Lien here. Today I am sharing this card on the Time For Tea Designs Youtube Channel. I am featuring the Car Critters stamp set that was release at the end of May. I decided to make a one-layer card using several critters from this set. I hope you like the end result. 


You can click HERE to watch on the Time for Tea Designs Youtube channel.


I started by stamping everything out onto an A2 sized panel. Important to take into account is which images are in front of the rest. This way, you can stamp out your image, add a mask, stamp the next image, add mask, ... this process was repeated A LOT to get the complete image I am coloring today. I colored everything in using my Copic Markers (combination below). 

  • Cow: E47, E57 / E13, E11
  • Llama: E33, E53, E51, E13
  • Pig: E13, E11
  • Panda: W1, W0
  • Bunny: E18, E15, E33, E53
  • Car: R89, R59, R37, R35 / W8, W6, W5 / W5, W3, W1 / Y38, Y17 / R37, R35
  • Glass: G0000
  • Shadow: W3, W1

After coloring everything in, I decided to add the sentiment "You're on your way!". Next, I adhered this panel onto a card base. I also added some glossy accents onto several parts of the image. I also used a black glaze pen onto the eyes, noses and panda. I hope you like it xxx


Thinking of buying some T4TD supplies? With T4TLIEN10 you will get 10% of your order at Time For Tea Designs! Happy shopping xxx 


Supplies:
  • Time For Tea Designs - Car Critters
  • Mama Elephant - Basic Rectangles
  • Transotype: Perfect Colouring Paper
  • Gina K. Designs Amalgam Ink
  • Copic Markers: see above
  • Ranger: Glossy Accents
  • Black Glaze Pen
  • Copic Multiliner 0.3
  • Full Stick Post-It Notes 
  • Pritt Adhesive Rollers

Wednesday, 26 May 2021

Happy mail: Featuring the small stamp - Tearrific Pals

Hey everyone, Lien here. Today I am sharing this card where I use a smaller stamp from a stamp set (Tearrific Pals from Time For Tea Designs) and feature it all over the card. I have 2 versions, one just using a colored card stock (imagine using a rainbow of colors) and one where I colored the stamp in several colors.


You can click HERE to watch on the Time for Tea Designs Youtube channel.


Card #1
I white heat embossed the image from the Tearrific Pals stamp set several times onto brown card stock. After die cutting all of them using the matching dies, I did the same for the sentiment. I took an A2 sized white panel and added everything together on top of it. I finished the panel by decorating the tea bags with heart sprinkles stickers.
 

Card #2:
I stamped the image and sentiment from the Tearrific Pals stamp set several times onto an A2 sized panel out of Strathmore Bristol Smooth 100lb. With ZIG Clean Color Real Brush Markers, I colored all of the images.    


Thinking of buying some T4TD supplies? With T4TLIEN10 you will get 10% of your order at Time For Tea Designs! Happy shopping xxx 


Supplies card #1:
Time For Tea Designs - Tearrific Pals
Time For Tea Designs - Tearrific Pals Die
Lawn Fawn Card Stock: Paper Bag
Neenah 110 lb Solar White Card Stock
Versamark Clear Embossing Ink
Doodlebug Design: Shape Sprinkles - Baby Hearts
Ranger Embossing Powder: White (super fine detail)
NUVO Deluxe Adhesive
Thin Foam Squares from Scrapbook Adhesives
Pritt Adhesive Roller

Supplies card #2: 
Time For Tea Designs - Tearrific Pals
Strathmore Bristol Smooth 100lb
Gina K. Designs Amalgam Ink
ZIG Clean Color Real Brush Markers: 049, 041, 050, 021, 042, 022
Doodlebug Design: Shape Sprinkles - Tiny Hearts
Pritt Adhesive Roller
 

Other Posts You Might Like