Pages

Showing posts with label time for tea stamps. Show all posts

Sunday, 22 December 2024

Holly Jolly Christmas

 Hi Friends!
I’m Patricia and today I share you a new Christmas card with new release Santa's Nice list stamp set
For the background I've used Distress Oxide ink (Wilted Violet & Worn Lipstick colors)

I've cutting two circles from Stitched Circle dies for use under the two santas and highlight them from the background
And I've given both of them a few touches with Distress ink so that they were not completely white.

For the sentiment I used one of sentiment of the set and White Velvet Alpha Stickers. To finish I used a few Festive Fun & Clear enamel dots.
Thank you so much for reading my blog post. Remember to use my discount code T4TPATRICIA10 when you visit the Time For Tea Designs shop to get 10% off your order. Happy Crafting!  

Sunday, 15 December 2024

Merry Christmas

  Hi Friends!

I’m Patricia and today I share you a new Christmas card with  Sweet Christmas stamp set.


I've created this card with Scalloped Circle Dies, on of them I've used with Joyful Winter 6x6 Paper Pad and the other I've used Distress Oxide Ink (Spun Sugar) and liquid inks for splash on.


For the sentiment I've used the White Velvet Alpha Stickers


Thank you so much for reading my blog post. Remember to use my discount code T4TPATRICIA10 when you visit the Time For Tea Designs shop to get 10% off your order. Happy Crafting! 

Sunday, 8 December 2024

Sweet Christmas

 Hi Friends!
I’m Patricia and today I share you a new Christmas card with  Sweet Christmas stamp set


I've created a Slim Card with some characters of set, I've colored with Copic Markers.

For the background I've used Distress Oxide ink Spun Sugar color and liquid inks for splash on.


The sentiment in the center of the card, I've created with Joy Stitched Sentiment die and Joyful Winter 6x6 paper pad


Thank you so much for reading my blog post. Remember to use my discount code T4TPATRICIA10 when you visit the Time For Tea Designs shop to get 10% off your order. Happy Crafting! 

Sunday, 1 December 2024

Have a mice & gouda Cheesemas!!

 Hi Friends!
I’m Patricia and today I share you a new Christmas card with new release Merry Cheesemas stamp set.


I've used the Stitched Circle dies to background and center of my card and put all elements of the set over creating a christmas scene with the mouses.


The background circle I've used Distress oxide inks (Fossilized Amber, Wild Honey & Vintage Photo colors) and ink splashes. Also I've decorated with enamel dots and sequins. All stamps are colored with Copic Markers.


Thank you so much for reading my blog post. Remember to use my discount code T4TPATRICIA10 when you visit the Time For Tea Designs shop to get 10% off your order. Happy Crafting! 

Sunday, 24 November 2024

Joy with Seasons Tweetings

 Hi Friends!
I’m Patricia and today I share you a new card with new Christmas Release Seasons Tweetings A6 Stamps


For this card I've combined different papers from Joyful Winter 6x6 Paper Pad. I use from the background and sentiment with de Joy Stitched Sentiment die.


Also, I use the Simple Stitched Circle dies for created a "window" in a middle of the card and place the pair of birds, they were going to be the protagonists of the card but then I decided to put them all 😁


For coloring I use the Copic Markers. 
And finished I decorated with some enamel dots 
Thank you so much for reading my blog post. Remember to use my discount code T4TPATRICIA10 when you visit the Time For Tea Designs shop to get 10% off your order. Happy Crafting! 

Saturday, 26 November 2022

Falalala


Falalala, happy Saturday Teatimer's the weekends keep rolling on fast at the minute don't they! I have another sweet Christmas card for you this week. I had the idea of turning the bears from the Happy Trails stamp set into Polar Bears to create this snowy scene card. 

I used the Falalala Scalloped Slimline Die set to create the base layer cutting it out twice and ink blending on some blue/green distress oxides to create my background. I added some texture with ink splatters and some snow with white acrylic paint splatters. Using the second base I cut out a snow bank using the Slimline Hillside Scene Dies and added some foam tape behind to add some depth. Using foam tape I added a second scallop frame on the top so it matched the height of the snow bank. 
I also cut out some snow flakes and the falalala out of white card adding them to the background then adhering the images on top. 
Their igloo house comes from the It's Penguin-ing to Look a Lot like Christmas Stamp set and the little holly came from the Gingerbread Family Stamp Set
As always I finished up by adding some final touches with a white and black gelly roll pen. I hope you like my card and as always you can get 10% off in the shop using code T4TNATALIE10. 


Saturday, 29 October 2022

Trick or Treat!


Happy Saturday Teatimer's I have another Halloween card for today using the Hello Cupcake Stamp Set by masking out the strawberry and drawing in an eyeball it gives out a whole different feel to my card. 
I coloured in the image using copic markers and then added some dripping blood using a red gelly roll pen. I love how it turned out. Since the eyeball was smaller than the strawberry I could also cut it out using the coordinating die and then  fussy cut around the eyeball. 
For the base of my card I used the Geometric Snowflakes Die and cut out two and layered them over the top of each other to add some depth. I then used this as a template to cut out a rectangle a bit bigger than that one and inked it up with yellow and green distress oxide ink and splattered some purple over the top. 
I let this dry and then adhered them together alongside the cupcake in the middle. Then all that was left was the lettering for which I used Anthony's Alpha Dies and coloured it in using purple distress oxide inks. After adhering these together I felt like it was missing something so used the coordinating dies from the Spooktacular Stamp Set to cut out some bats from black card and just added some little eyes using white gelly roll pen and that was my card finished up. 
I hope you like it and don't forget to keep checking back for more inspiration from the rest of the team. Also if you would like to purchase any of the items in the Time for Tea Shop you can get 10% off your order using code T4TNATALIE10.  


Saturday, 19 February 2022

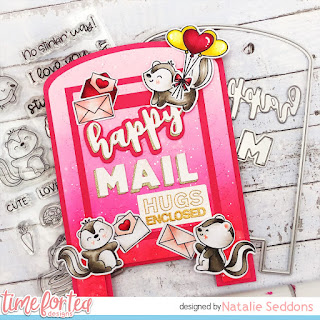
Happy Mail, Hugs Enclosed!


Happy Saturday Teatimer’s, have you had a good week? You might have seen this cute card during the blog hop last week, so I thought I’d share with you all how I made it. 

I finally got to use the Happy Mail Gift Card Holder Die Set. I didn’t use it as a gift cardholder though, I just used it to create a fun shaped card base. I wanted some texture on my card so cut out the Dotty Hearts Cover Plate Die and ink blended Abandoned Coral, Picked Raspberry, Kitsch Flamingo and Spun Sugar Distress Oxides over the top to give and ombré look. Finishing off with a few splatters of water to give some texture and some splatters of gold water colour paint.

 Setting that aside to dry I stamped cut out and coloured up the skunks from the Stinkin’ Cute Stamp Set. I coloured them up with COPIC markers and added some finishing touches with white gelly roll pen. The letters are from the Happy Mail Critters Stamp Set and the Be Kind Be You Stamp Set which also contains the hugs enclosed sentiment (which I stamped and heat embossed in gold) then the balloons are from the Smitten Kitten stamp set. I really do love to mix and match my sets! Once all the colouring was done I could began adhering my card together.

I cut out the biggest of the two mail box dies the larger rectangle and the letter box die out of hot pink card. Then taking the Dotty Hearts panel I cut the smaller mail box out of that and to save my card being bulky and time I cut out the smaller rectangle in the middle. Then layered everything on top of each other as you can see the larger pink rectangle covered the hole.

Before adding my critters I needed to make the rest of my sentiments I used the Happy Mail die from the Happy Mail Gift Card Holder Add on Die Set which cut out in gold and white and layered on top of each other to create a shadow and used the same hot pink for the happy bigger shadow. 

Then I just adhered everything together using foam tape on the critters to give some added depth and dimension. To make the card base I just cut out the bigger of the two mail box dies from white 360gsm card twice and scored one of across the top about 2cm down and added double sided tape above the line and attached my card together. Then all was left to do was adhere the top and that's my card finished up. I hope you like my card for today it's super fun and great for just sending happy mail to a friend. You can find all the products in the Time for Tea Shop and get 10% off any orders using code T4TNATALIE10. Have a great weekend and I will see you all next week. 

Saturday, 5 February 2022

Treat Yourself!


 Happy Saturday Teatimer’s have you had a good week? I have a super sweet card for you today. I was feeling the pink this week can you tell 😂 

I began by cutting out the A2 Stitched Cover Die and ink blending Festive Berries, Picked Raspberry, Kitsch Flamingo and Spun Sugar Distress Oxide ink. Then spritzing it with water and adding splatters of the same colour inks to give it some texture. Also adding some gold glitter paint splatters.

Setting this aside to dry I stamped out the Hello Cupcake Stamp Set and coloured it up with copics and cut them out with the coordinating dies. Once they were cut I added some finishing touches with white gelly roll pen. 

I popped them onto the card base adding some dimension with foam tape and double layering the mice so they stand out more. For the sentiment I used the new Bold Sentiments Stamp Set, which I heat embossed with the neon pink wow embossing powder. I love this colour so much it’s super fun. I cut the sentiment mount with the coordinating dies and used the die to cut out some fun foam to add some dimension. I find the fun foam great for fiddly or intricate shapes you can just cut it out with the die and it fits straight underneath. 

After adhering everything I added it on a black card base and that was my card finished up. I’m really loving this colour scheme at the minute it’s perfect for those Valentine’s cards coming up too! 

Happy crafting and have a great weekend and if you fancy some cheeky shopping you can get 10% off in the Time for Tea shop using code T4TNATALIE10 ❤️

Saturday, 29 January 2022

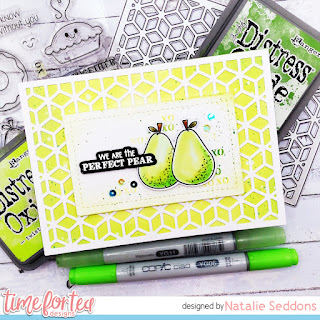
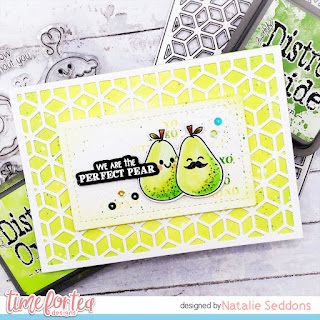
We are the Perfect Pear!


Happy Saturday Teatimer's hope your all well, how fast has this week rolled around! I have a fun Valentines/Anniversary card for you today. I decided to go for non traditional colours as I loved the citrus colours on the pears. I also did two versions to show you how it could be more traditional and then more cute with the addition of sweet faces and a bit of blush.
I just love how it gives a while different look to your card!


It was a really simple and quick card to create I started by cutting out the Geometric Snowflakes Cover Die and then using that as a template to cut out a back panel of the same size. I used white 360gsm card and coloured it up with Twisted Citron and adding some texture by splattering some water on and then dabbing it off. Then finishing it off with some splatters of mowed lawn distress oxide ink. 
Setting this aside to dry I worked on the topper, the panel is cut out using the A2 Stitched Hearts Cover Dies. Again I splattered the panel with Twisted Citron and Mowed Lawn to add some interest. 
The pears are from the We Go Together stamp set I stamped them out onto copic paper and used a range of green copics adding some dimension by adding the darker colours towards the bottom. Then adding some dots to give them a textured look. 
The sentiment is white heat embossed on black card stock and then die cut using the coordinating dies. I added the sentiment and the pears before sticking and realised it looked a bit empty so added some xoxo's using the xo stamp in the same green inks. Then adhered them using some foam tape and adhered everything together and that was my card finished up. I hope you like it and if you want to purchase any of the items or anything else in the Time for Tea shop you can get 10% off using code T4TNATALIE10 . Have a great weekend and I will see you all next week. 


Saturday, 23 October 2021

Happy Winter Birthday!


Happy weekend Teatimer's it's DT member Natalie here with a winter birthday card. I just love the Winter Wreath set it's such a beautiful design and works so well on it's own or combined with the critters. To get started here's a list of materials I used.
 

· Winter wreath stamps and dies

· Salvaged Patina and Evergreen Bough Distress Oxide Inks

· Distress Oxide

· Autumn Scene Cover Plate Die

· White Fun Foam

· White and Red Cardstock

· Copic Paper

· Copic Markers

· Ink - Blending Brushes

· White Wow Embossing Powder and Embossing Ink

· Cosmic Shimmer Glue

How to Create

1) Cut out the Rectangle Die from the Autumn Scene Cover Plate Die from the white cardstock. Blend the Salvaged Patina all over the card stock and add Evergreen Bough Distress Oxides on the edges. Spritz water on top and dab off with tissue paper. Dab some of the oxides onto a paint palette and add water to add some splatters of colour. Leave to dry.

2) Stamp out the Winter Wreath stamp twice, three of the acorn leaves, two acorns, the trio of toadstools, one flower and the leafy branch onto Copic Paper. Colour with the Copics and Die cut out with the coordinating dies. Snip off the top of one of the wreaths halfway up at each side.

3) Using the wreath as a guide stamp and heat emboss the Happy Winter Birthday sentiment onto the ink blended card stock.

4) Stick on the full wreath around the sentiment with the cosmic shimmer glue. Cut out the fun foam using the coordinating die for the wreath and stick to the back of the half wreath using the cosmic shimmer glue and cut off the excess. Then stick this on top of the wreath using the glue. Sticking the trio of toadstools underneath.

5) Adhere the leaves onto the edges and the big acorn and acorn leaf onto the wreath. Then pop up the acorn at the bottom and the flower at the top of the wreath using some of the fun foam.

6) Pop the finished up piece onto the red card stock around 120cm x 150cm and adhere straight onto your card base.

I hope you like my tutorial for today I thought I'd try a different method so let me know which style you prefer. If you want to recreate my card or get anything in the Time for Tea shop you can get 10% off your Time for Tea order using code T4TNATALIE10 . Happy shopping and I'll catch you same time next week!

Other Posts You Might Like