Pages

Showing posts with label Oval Scalloped Nesting Dies. Show all posts

Tuesday, 28 June 2022

Oval shaped card - using paper pads

Hi Tea Timers,

Welcome back to the T4TD blog! As promised last week, I am back with a new design idea for using pattern paper in your cards. 

I started today's card by die cutting the largest oval die in the Oval Scalloped Nesting Die set twice. I then scored one of them close to the top to make a fold and glued it on the back of the other oval. This created my card base. 

Next, I used the oval frame from the same set and die cut the frame twice in white and glued them together for extra dimension. For the background I used one of the designs in the Pawsome Rainbows paper pad and cut it a bit smaller than the outside of my oval frame. I also cut a piece of vellum to the same size and glued them at the back of the frame. By adding the vellum the of the colours on the pattern paper get a bit muted. For the grass I picked a green design from the Gorgeous Gingham paper pad and cut it using the oval frame die. This time I used the negative and cut it with the Landscape Edge Die and glued it on the inside of the frame. 

I chose to use the Hey there critters stamp set for my critters. I stamped the cute animals and some of the accessories and coloured them in with the Spectrum Noir Illustrator markers. I then used the matching dies to cut them out and added some white highlights for details. For the clouds I used the small dies from the Clouds Die set. I lightly ink blended the edges with Tumbled Glass and stamped the hello sentiment on one of them.

I arranged the images on the background and glued them down. Next, I glued the frame on the card front and that's it!

Thanks for tuning in! I hope you like today's card, it was a lot of fun to create. Remember, you can use T4TMIKI10 for 10% off your orders store-wide.

Hugs,

Miki

Monday, 20 December 2021

Using your patterned papers


Hello, Tea Timers!

It is Natalia with you today. How are the preparations for Christmas coming along?

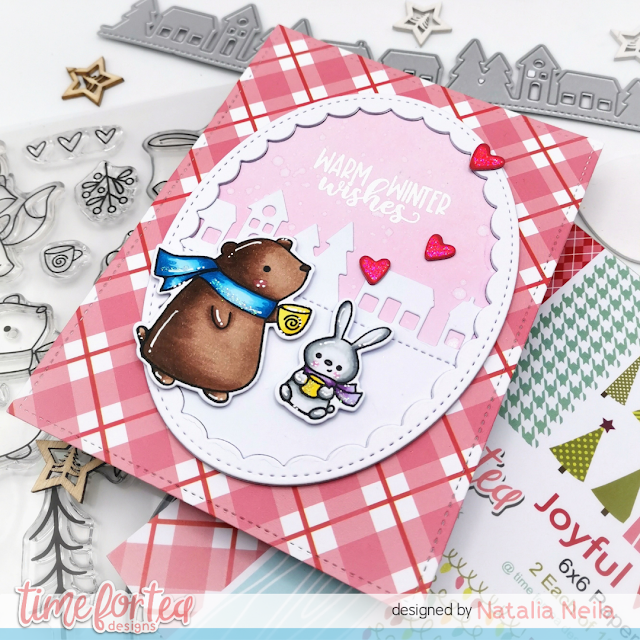
Today's card features these little cuties from the Cosy Winter stamp set. I used the Oval Scalloped Nesting die to create the focal point for my card. 

I created a pink sky - there is something about pink skies, don't you think? - with kitsch flamingo distress oxide and perfect pearls water to create shimmery splatters. I stamped the sentiment with my WOW! embossing pad and used white embossing powder.


I then cut the Slimline Mini Village die from white cardstock to create my background scene. 

The patterned paper is from the Joyful Winter 6x6' paper, which I think is SOOO pretty! and very versatile as there's designs in it that you can use all year around. 

I added some stickles to my die cut hearts, because you can never have too much sparkle! I am sure you agree.

I wish you a lovely Christmas, and I will see you next Monday with a new card!

Whether you are getting a Christmas present for a loved one, or yourself, remember to use the code T4TNEILA10 for a 10% off your shop!

Sending hugs,
Natalia

Wednesday, 4 November 2020

You Warm My Heart

Happy Wednesday!

It's DT Shabneez here with a favourite card of mine as it makes me feel warm and cosy just looking at it!


The card was made using the Life's Ups & Downs Stamp Set.  The critters were all stamped and coloured using my Chameleon pens then die cut using the Co-ordinating Die Set - these really do save time!


To create the background I used the Large Oval Masking Stencil and blended my distress inks through it with the Beautiful Blender Brushes.  I added some gold spatters to finish. 

I used a die from the Oval Scalloped Nesting Dies to cut the oval from gold card which fits the masked image perfectly.  I just love that sentiment - don't you?

Don't forget you can get 10% off anything in store using my code T4TSHABNEEZ10.

Happy Crafting!


Wednesday, 14 October 2020

Life's Ups & Downs

Happy Wednesday!

Did you catch Jo on Create & Craft with the new release yesterday evening?  If not you can watch on catch up.  Here's one of the cards I made that she shared.


I had fun with this creation and in particular making it interactive was just so simple.  Once you die cut the images you just need to push a brad through the see saw and the post!


The images were stamped and coloured using my Chameleon pens and the background was created using the beautiful blender brushes together with distress oxides through the Sunny Side Up again stencil.  

You'll see the use of the new Scalloped Oval die set too which was the perfect size to frame the image.

Don't forget you can get 10% off anything in store using my code T4TSHABNEEZ10.

Happy crafting!
Shabneez

Products Used:


Other Posts You Might Like